Miku Models 1/72
IL-14/Avia 14
|
KIT #: |
72-035 |
|
PRICE: |
$30.00 MSRP
|
|
DECALS: |
One option |
|
REVIEWER: |
Carmel J. Attard. |
|
NOTES: |
Vacuformed kit with resin parts. |

The Il-14 was a progressive development of the Il-12
and first appeared in 1953.The initial commercial model was the Il-14P, an 18
seat version, and in 1956 the Il-14M appeared, this being distinguished by an
increase in fuselage length from 69’10” to 73’2”.
 Passenger capacity being
increased to 24-28. The Il-14 has been built under license in
Czechoslovakia,
East Germany
and Poland.
Passenger capacity being
increased to 24-28. The Il-14 has been built under license in
Czechoslovakia,
East Germany
and Poland.
In the
Soviet Union two production lines existed.
The first was factory GAZ-34 at Tashkent
which produced 350 Il-14 in the period 1954-57. The second factory GAZ-30 at
Khodinka produced around a thousand of Il-14P and Il-14M between 1956-58.
Outside the Soviet Union,
Czechoslovakia
produced 200 Avia-14s at Latnany between 1956-1960. In neighborhood
East Germany, the VEB
factory at Dresden
produced 80 examples of VEB-14 between 1956 and 1958. A total production of
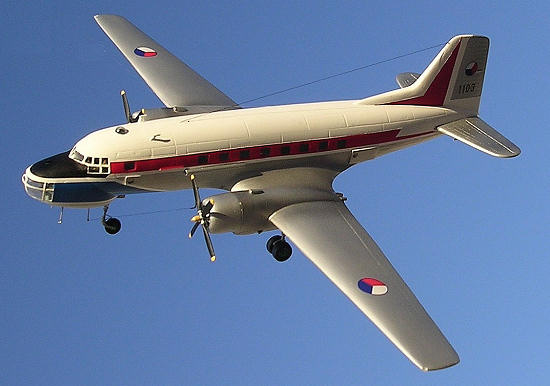
Il-14 was around 1,650 examples of all versions. The Il-14 was more comparable
to the Convair 240/340/440 series and Martin 202/204 airliners in terms of
shape, performance, production and time period. The Il-14 is no doubt a Russian
classic air liner and fortunately many examples have been preserved or deployed
as museum exhibits.
One of the operators of
the Il-14 was TABSO-Bulgarian Air Transport which took delivery of 8 Il-14s in
1956 for international routes from Sofia.
Circa 1969 the company changed its identity to Balkan and adopted a new colour
image. The Bulgarian Air Force operated nine Il-14 as a mixture of VIP, cargo and
general troop transporters. The Il-14G, cargo version worked its life into 1979
and h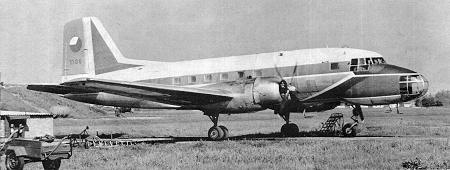 ad a large cargo door. One Il-14S serial No 82 was dispatched at Bozuristte
and displayed in the town after retirement. Most Il-14 passenger airliners had
their main boarding door on the port side while all versions had the door on
starboard side.
ad a large cargo door. One Il-14S serial No 82 was dispatched at Bozuristte
and displayed in the town after retirement. Most Il-14 passenger airliners had
their main boarding door on the port side while all versions had the door on
starboard side.
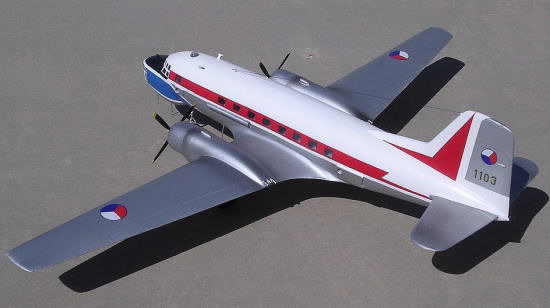
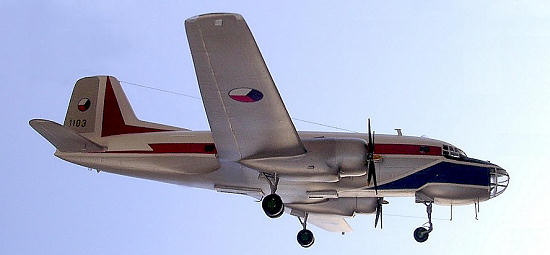
CSA Czech airlines
operated all the Czech built Avia-14 fleet of 34 airliners between 1957-77 and
were used on continental routes until the arrival of the Il-18 and the Tu-104,
following that it became the backbone in domestic routes. At least 57 Avia 14s
were operated by the Czechoslovakian Air Force from late 1957 to late 1970s.
Most of the large fleet was finished in bare metal with registration and an Air
Force roundel. A small number was classified as VIP version; some had wing tip
tanks which very few military examples had. The Avia 14FG, some of which are
know to have operated in the Czech AF were equipped with a modified droop nose
and used for aerial mapping, photography and possibly calibration duties.
Examples of these have been seen at Kbeli, parked in the open air and in need of
restoration of this classic aircraft.
 The scale model of the Avia
14FG is issued by Miku Model to a scale of 1/72. Miku Models of Kutna Hora in
the
Czech
Republic
produces a range of short run models that operated in the Iron Curtain. The
vacform kit No 72035 comes in white vacform plastic and cream resin parts. There
is an 8 page A4 size instruction sheet which is in Czech language. There is
indication that under different packing in Kit No 72034 comes in another
version, the Avia 14 and 14T. It appears that Kit 72035 caters for these
versions too. So one can make an Avia 14T, Avia 14, Avia 14P and or Avia 14FG.
The 9 vacform parts comprise of a cockpit floor, bulkheads, fuselage halves,
main plane parts and a separate nose. The parts made in resin are the wing tip
tanks,, fin and rudder, tail planes, 4-blade props, radial engine detail, engine
cowlings, undercarriage legs and several shapes of antennae to go with the FG
version making a total of 86 parts in resin. The canopy, nose Perspex and
astrodomes are in clear vacform acetate. For anyone interested in other markings
or versions of the IL-14 there is detail information on the instructions for
this also.
The scale model of the Avia
14FG is issued by Miku Model to a scale of 1/72. Miku Models of Kutna Hora in
the
Czech
Republic
produces a range of short run models that operated in the Iron Curtain. The
vacform kit No 72035 comes in white vacform plastic and cream resin parts. There
is an 8 page A4 size instruction sheet which is in Czech language. There is
indication that under different packing in Kit No 72034 comes in another
version, the Avia 14 and 14T. It appears that Kit 72035 caters for these
versions too. So one can make an Avia 14T, Avia 14, Avia 14P and or Avia 14FG.
The 9 vacform parts comprise of a cockpit floor, bulkheads, fuselage halves,
main plane parts and a separate nose. The parts made in resin are the wing tip
tanks,, fin and rudder, tail planes, 4-blade props, radial engine detail, engine
cowlings, undercarriage legs and several shapes of antennae to go with the FG
version making a total of 86 parts in resin. The canopy, nose Perspex and
astrodomes are in clear vacform acetate. For anyone interested in other markings
or versions of the IL-14 there is detail information on the instructions for
this also.
The vacform parts were scored with a sharp modeling
knife and separated from the backing sheet by snapping off each part. These were
then sanded down on medium followed by fine sanding paper adequately stuck to a
flat backing surface. The FG
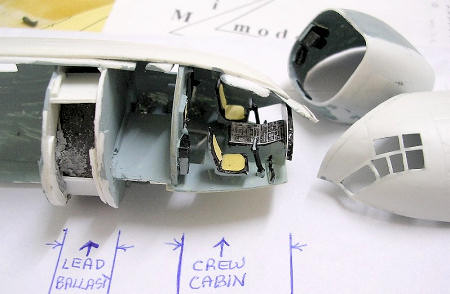 version that I choose to build required surgery to
the nose so that a droop nose version is fitted instead. I first made a scrap
side nose drawing to help me align the new nose correctly when it comes to fix
it to the rest of the fuselage at a later stage. Rectangular windows were cut to
the fuselage sides following the kit light impressions in the plastic using a
sharp pointed blade. Bulkheads were prepared and glued to the interior, crew
office assembled, adding seats, coaming of instrument panels, paint detail and
added also fine instruments decal issued with the kit for the central console
and front instrument panel. I added interior detail to crew office and nose
compartment as best I could with adequate reference to pictures downloaded from
internet. Crew figures to same scale were also added. One must indicate here
that the vacform kit outline was somewhat crudely produced but with careful
cutting particularly at the wing root area, the desired proper shape is
attained.
version that I choose to build required surgery to
the nose so that a droop nose version is fitted instead. I first made a scrap
side nose drawing to help me align the new nose correctly when it comes to fix
it to the rest of the fuselage at a later stage. Rectangular windows were cut to
the fuselage sides following the kit light impressions in the plastic using a
sharp pointed blade. Bulkheads were prepared and glued to the interior, crew
office assembled, adding seats, coaming of instrument panels, paint detail and
added also fine instruments decal issued with the kit for the central console
and front instrument panel. I added interior detail to crew office and nose
compartment as best I could with adequate reference to pictures downloaded from
internet. Crew figures to same scale were also added. One must indicate here
that the vacform kit outline was somewhat crudely produced but with careful
cutting particularly at the wing root area, the desired proper shape is
attained.
Rectangular narrow tabs
were cut from backing plastic and fitted at intermittent locations along the
edge of the prepared fuselage halves so that these will give a good strong joint
and also provide self alignment of parts. Before closing nose weight was added
and encased in a compartment at forward are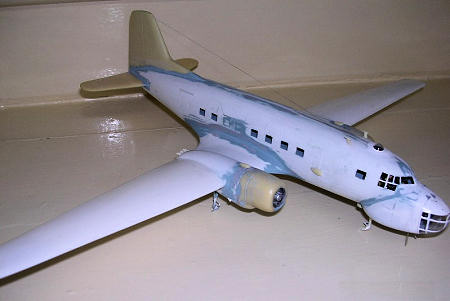 a. The fuselage was allowed to set
for 8 hours and the main planes, 5 parts were by now in one piece. These were
joined to the lower fuselage to form a complete one piece. Filler was added at
joining parts and sanded to produce a smooth continuous streamline wing root.
The rest of assembly practically consisted of adding the resin items one by one
to produce a detailed model. The resin parts were of good quality, no finning,
or presence of air bubbles. Special care was made when aligning and fixing the
undercarriage legs, and the propellers.
a. The fuselage was allowed to set
for 8 hours and the main planes, 5 parts were by now in one piece. These were
joined to the lower fuselage to form a complete one piece. Filler was added at
joining parts and sanded to produce a smooth continuous streamline wing root.
The rest of assembly practically consisted of adding the resin items one by one
to produce a detailed model. The resin parts were of good quality, no finning,
or presence of air bubbles. Special care was made when aligning and fixing the
undercarriage legs, and the propellers.
Some extra work carried
out during construction included adding of aerial antennae made from metal pins;
adding wing tip lights cut from solid Perspex; shortened the main undercarriage
struts; drilled the front and rear end of the tube sensor attached to port
fuselage, drilled six exhaust outlets fitted to rear of engines; added tiny
aerials to forward of cockpit; added detail to oleo; rails to doors; tiny
intakes to side of engines. The resin parts proved to be soft and contained fine
engraved detail.
 The decals that come with
the kit cater for an Avia 14FG. The tail fin serial numbers and Czech AF
roundels were found to be oversize and therefore replaced with a more accurate
set coming from decal spares box. This is pity as the decals were of good
quality judging from those that provide the instruments. Some carried a lion
motif to the nose and I added it at a later stage. The kit was airbrushed in
white upper and the rest being silver. Careful masking was needed when adding
the bright red trim which was also airbrushed while some complex masking was
made for the bright blue nose and under fuselage trimming.
The decals that come with
the kit cater for an Avia 14FG. The tail fin serial numbers and Czech AF
roundels were found to be oversize and therefore replaced with a more accurate
set coming from decal spares box. This is pity as the decals were of good
quality judging from those that provide the instruments. Some carried a lion
motif to the nose and I added it at a later stage. The kit was airbrushed in
white upper and the rest being silver. Careful masking was needed when adding
the bright red trim which was also airbrushed while some complex masking was
made for the bright blue nose and under fuselage trimming.
I am not sure if the kit
is still readily available but it is certainly recommended if one wants to build
a version of the Ilyushin Il-14 and besides the quasi civilian liveries one can
also go for a desert camouflage type flown by the Egyptian AF or a dark brown
and dark earth East German livery. Kit is recommended with those with vacform
and resin experience.
Carmel J Attard
July 2008
Copyright ModelingMadness.com. All rights reserved. No
reproduction in part or in whole without express permission from the editor.
If you would like your product reviewed fairly and fairly quickly, please
contact the editor or see other details in the
Note to
Contributors.
Back to the Main Page
Back to the Review
Index Page 2015