Zvezda 1/72 MiG-21PFM
| KIT #: | 7202 |
| PRICE: | 6 Euros from the bargain bin |
| DECALS: | Two options |
| REVIEWER: | Jeroen Koen |
| NOTES: | Lift Here! Yugoslav MiG decals used. |
| HISTORY |
Well, if you don't know what a MiG-21 is, then you should really be ashamed! But, for the sake of those who don't... The MiG-21 started out as a light-weight small interceptor as a continuation of the MiG-15, 17 and 19. Around that time, many Soviet aircraft designs used the nose intake, either combined with delta or swept-back wings, like the Su-7. The MiG-21 would be the most successful of those. It started out as the Ye-1, quickly reworked when it was realized it was underpowered, the second prototype being the Ye-2. Both of these had swept wings. The classic delta wings did not appear until the Ye-4, making its maiden flight on june 16th, 1955. It was a light-weight interceptor, reaching Mach 2 with a relatively low-powered afterburning turbojet.
 Being an interceptor meant it had a short range. When in clean condition,
only 45 minutes of flying time remained. In spite of the continuous improvements
made through the F, PF, PFM, S/SM, and M/MF versions, this was not fully
remedied until the improved MT and SMT appeared. However, the increased range
meant added weight, and thus decreased performance.
Being an interceptor meant it had a short range. When in clean condition,
only 45 minutes of flying time remained. In spite of the continuous improvements
made through the F, PF, PFM, S/SM, and M/MF versions, this was not fully
remedied until the improved MT and SMT appeared. However, the increased range
meant added weight, and thus decreased performance.
It's delta wing meant it was an excellent fast-climbing interceptor, but also meant that during turns, it would bleed speed rapidly. This was somewhat compensated by its lightness, its maximum climb not being much worse than the newer F-16A. With a skilled pilot and capable missiles, it could more than hold its own against contemporary fighters. It was later replaced by the swing-wing MiG-23 and 27 in Soviet serice, but continues to serve in many other countries, its ruggedness, ease of maintenance and few vices making it a good aircraft for less well trained pilots, too.
One of the MiG-21 operators was former Yugoslavia. From 1962 to 1980, the Yugoslavs bought about 215 MiG-21s of different versions, of which about 100 were PFMs, the subject of this review. The remnants of these, after the disbandment of Yugoslavia, fought in the civil war that followed, most of them were with the Serbs. The PFMs had been retired prior to that, though, so most versions seeing combat were the newer models. The countries formed after the breakup, such as Serbia and Croatia, continue to operate the MiG-21.
| THE KIT |
Kevin Thompson wrote a good review of this kit already, which you'll find here:
http://modelingmadness.com/reviews/viet/russian/thom21pfm.htm
That already has some nice information on the kit itself, but to summarise,
it comes with weapons such as the GP-9 cannon pack, Atoll missiles, rocket pods
and a centerline fuel tank. Separate speedbrakes are also provided. In addition,
there's a pilot (nice!) for the quite nice cockpit, and a clear sprue with a
stand is provided, too. No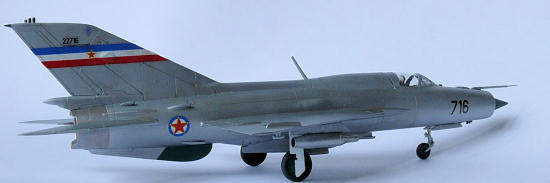 w where do you get that? The kit itself has fine
recessed panel lines.
w where do you get that? The kit itself has fine
recessed panel lines.
The only small addition I'd like to make is that some of the detail parts are a bit thick, such as the gear doors, antennae and air scoops. Either leave them as-is, or make your own. Being used to the soft Roden plastic, the Zvezda plastic is quite hard, yet easy to work with.
Decals are for 2 versions, one Vietnamese, one Soviet, and look to be printed by Begemot, judging by the style, as there's no mention on the decals themself. They're in register and look good, though very matte. Kevin commented on the Vietnamese insignia's proportions. I would be doing a Yugoslav version, so the kit decals went straight into the sparesbox.
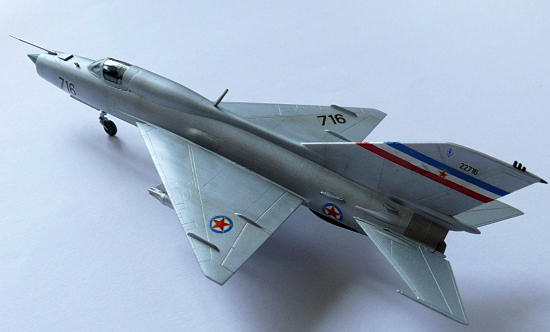
The LiftHere decals are also printed by Begemot. They look good on the sheet, and without much effort you can easily do 3 aircraft of it. You get insignia and tail bands for 2 Yugoslav MiGs, and also a smaller tail band and new-style roundels for a Serbian option. There are a total of 6 options on the sheet, of which 2 are 2-seaters. The Yugoslav aircraft are all in painted aluminium, the Serbian examples are overall light grey.
| CONSTRUCTION |
 This started with the obligatory cockpit. I painted the seat light grey, and
the rest that odd Russian interior colour, which is apparently what later PFMs
had. Earlier models had grey cockpits. I also painted up the pilot, and put him
in his seat. The cockpit fits quite well, as do the separate gear bays and
engine face/afterburner parts. Then I cemented the tailplanes and wings to the
fuselage, and the nose ring. The nose ring is actually too large, so required
quite some sanding to get it to the proper diameter. It does not attach on a
panel line, so quite some effort was expended to eliminate the seam, though it
still shows up under the right lighting -got to love metal finishes...
This started with the obligatory cockpit. I painted the seat light grey, and
the rest that odd Russian interior colour, which is apparently what later PFMs
had. Earlier models had grey cockpits. I also painted up the pilot, and put him
in his seat. The cockpit fits quite well, as do the separate gear bays and
engine face/afterburner parts. Then I cemented the tailplanes and wings to the
fuselage, and the nose ring. The nose ring is actually too large, so required
quite some sanding to get it to the proper diameter. It does not attach on a
panel line, so quite some effort was expended to eliminate the seam, though it
still shows up under the right lighting -got to love metal finishes...
Unlike Kevin I needed filler on the join near the bottom fin, and where the top joins the vertical tail. The fin and tail are attached to one fuselage half and the joins required a bit of filler near the edges. Filler was also needed near the cockpit on the spine, and near the nose where I had a small step. I guess it's either a Monday-morning kit or just my clumsiness... Filler was also needed to smooth in the speed brakes in the closed position. After a bit of rescribing I attached the clear parts, which are the worst fitting part of my kit -I needed to shave off bits of the instrument panel to make the windscreen fit, and the canopy itself isn't flawless either as you can see on the pictures. Kevin's canopies look excellent, so I guess that has to be bad karma, or a bad Monday morning, again. ;-)
The GP-9 cannon pack also required a bit of sanding and fiddling to fit properly. Before attaching that, I drilled out the barrels.
 Finally I shortened the nosecone as per
Kevin's directions, not just to
improve the looks, but also to make it actually fit, as the base diameter is
larger than the intake itself. Shortening took care of that, but I can't help
noticing that the intake diameter itself seems too small to my eye. After
several tedious rounds of sanding, rescribing, and polishing for the metal
finish, I attached some lumps, bumps and air scoops. Surprisingly, I didn't even
break off the three small rod antennae on the tail and under the nose, or the
big spine antenna!
Finally I shortened the nosecone as per
Kevin's directions, not just to
improve the looks, but also to make it actually fit, as the base diameter is
larger than the intake itself. Shortening took care of that, but I can't help
noticing that the intake diameter itself seems too small to my eye. After
several tedious rounds of sanding, rescribing, and polishing for the metal
finish, I attached some lumps, bumps and air scoops. Surprisingly, I didn't even
break off the three small rod antennae on the tail and under the nose, or the
big spine antenna!
A thin, due to the faint panel lines, coat of primer was shot to check for flaws. A few were found and fixed, mostly around the nose ring. After that, I of course discovered I forgot to add a nose weight, so I drilled through the forward bulkhead and slid some lead inside the nose, causing a bit of plastic dust to stick to the inside of the canopy in the process...
| COLORS & MARKINGS |
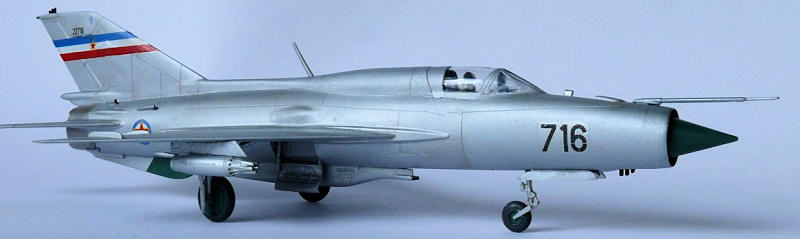
According to the Lift-Here instructions, the Yugoslav MiGs were painted in
aluminium paint. So I used Revell Aqua Aluminium overall, but I first painted
the nose ring and exhaust area steel. I also painted the green dielectric panel
on the belly fin green. Unlike the box art shows, the PFM did not have a green
panel on top of the tail. I then airbrushed small vertical streaks very diluted
browns, reds, and blues to add some discolouration to the exhaust area, not
entirely correct, but it would break up the monotone aluminium a bit. I then
masked off these areas and painted her overall Revell Aqua #99 aluminium. When
dry I added a
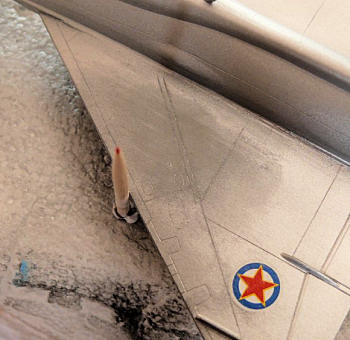 glosscoat and went to decals. I'm not too happy with these; though
they work OK, I added some Daco set to the tail band, as that goes straight over
the diamond shaped bulge on the tail. The decal reacted well there, but wrinkled
elsewhere and while repeated applications of Daco, some prodding with a needle
and knife did help, but it's not great. I should have painted it in the first
place I guess, but masking over the diamond would be a nice challenge, too...
When it had all set, I applied a very thin acrylic varnish to seal the decals
and prepare for a panel line wash.
glosscoat and went to decals. I'm not too happy with these; though
they work OK, I added some Daco set to the tail band, as that goes straight over
the diamond shaped bulge on the tail. The decal reacted well there, but wrinkled
elsewhere and while repeated applications of Daco, some prodding with a needle
and knife did help, but it's not great. I should have painted it in the first
place I guess, but masking over the diamond would be a nice challenge, too...
When it had all set, I applied a very thin acrylic varnish to seal the decals
and prepare for a panel line wash.
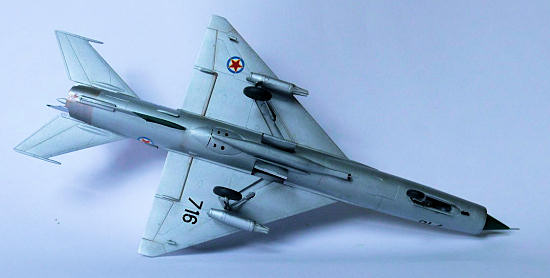
That was when the obligatory disaster struck -the water based paint would not stay in the panel lines which, despite very thin coats of paints, were too shallow. A different approach with fine pigmented oil paints resulted in one wing's paint being damaged... I masked off the insignia with kneadable eraser and hoped for the best. I then resprayed the entire wing and decided this one would end up without a wash, as it would only make things worse. Landing gears, sprayed steel, and the wheels, would receive a wash, though, as did the gear doors and wells, which have nice details. After that, I sprayed 2 thin coats of Humbrol satin varnish to simulate the painted aluminium look of the real thing. I think that came out pretty nice.
| FINAL CONSTRUCTION |
 I then assembled the rocked pods, whose noses are much larger than their
bodies. I robbed these from the Revell MiG21-F-13 kit as they look and fit
better. I then attached the nose cone, gear, wheels, gear doors (all were sanded
thinner before painting) and various small antennae. The retracting mechanism
for the main gear door is incorrectly depicted in the instructions, being on the
rear of the door, where it should be at the front. The boxart is a good guide
for this. I found out only when everything was already in place, obviously...
I then assembled the rocked pods, whose noses are much larger than their
bodies. I robbed these from the Revell MiG21-F-13 kit as they look and fit
better. I then attached the nose cone, gear, wheels, gear doors (all were sanded
thinner before painting) and various small antennae. The retracting mechanism
for the main gear door is incorrectly depicted in the instructions, being on the
rear of the door, where it should be at the front. The boxart is a good guide
for this. I found out only when everything was already in place, obviously...
| CONCLUSIONS |
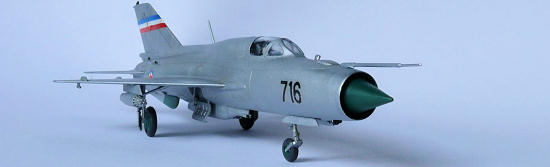
 For the money you get a nice kit with few faults or vices. Fit is generally
good, and despite my fails with the wash and repaints, it still looks nice on my
shelf. The Lift-Here decals haven't convinced me entirely, some of the them
silvered, like the nose number, despite the glosscoat, and the adventures of the
tail band speak for themselves... I have a Revell MiG-21F-13 in my stash, that
one is also on the sheet, so I'll give them a second chance!
For the money you get a nice kit with few faults or vices. Fit is generally
good, and despite my fails with the wash and repaints, it still looks nice on my
shelf. The Lift-Here decals haven't convinced me entirely, some of the them
silvered, like the nose number, despite the glosscoat, and the adventures of the
tail band speak for themselves... I have a Revell MiG-21F-13 in my stash, that
one is also on the sheet, so I'll give them a second chance!
November 2010
If you would like your product reviewed fairly and quickly, please contact me or see other details in the Note to Contributors.