Monogram 1/48 F-105F Thunderchief
|
KIT # |
5806 |
|
PRICE: |
$8.00 (in 1982) |
|
DECALS: |
See Review |
|
REVIEW: |
Blair Stewart |
|
NOTES: |
F-105G kit modified to F-105F |
|
HISTORY |
Thud, Thunderthud, Hog, Lead Sled, Squat Bomber Ù all affectionate
terms given by its pilots to Republic Aviation¿s F-105 Thunderchief. The F-105
evolved from a project begun in 1951 by Republic Aviation to develop a
supersonic tactical fighter-bomber to replace the F-84F. The prototype first
flew on October 22, 1955, but the first production aircraft, an F-105B, was not
delivered to the USAF until 1958. The F-105D all-weather strike fighter and the
two-place F-105F dual-purpose trainer-fighter also were built before F-105
production ended in 1964 at 833 aircraft. No "C" or "E"
series were produced, The 143 F-105Fs were converted from the last F-105Ds that
were produced. The F-105G came from a modification to fifty F-105Fs that
incorporated fuselage-mounted ECM blisters.
Although originally designed as a supersonic nuclear weapon delivery platform,
the F105 distinguished itself in a tactical bombing role during the Vietnam
conflict. First sent to Southeast Asia in early 1965, the Thunderchief became
the USAF workhorse in delivering ordinance to targets in North Vietnam, termed
by many veteran pilots to have even more concentrated air defenses than those
that defended Nazi Germany during World War II. Through 1969, F-105s carried out
about 75% of all the air strikes launched against North Vietnam. At the same
time, the losses were significant: by the end of May 1967 225 F-105s had been
lost over North Vietnam.
 Due to the North Vietnamese¿s use of the Soviet SA-2 surface-to-air missile or
"SAM", the Air Force began looking for ways to counter this new
threat. The result was the Wild Weasel Program, a specially equipped two-seat
fighter that could detect SA-2 acquisition radars and then attack or divert
(suppress) the SAM batteries. The mission of Wild Weasels was to fly ahead of a
strike force into the target area, entice enemy SAMs and antiaircraft radars to
come on the air, and then knock them out with bombs or with missiles that homed
on the radar's emissions. Weasels were often in a high-threat area for a long
time while the strike force attacked its targets and withdrew. The Weasels¿
mission of offering themselves as targets for enemy antiaircraft batteries was
made even more hazardous by the presence of MIG fighters in the target areas.
Due to the North Vietnamese¿s use of the Soviet SA-2 surface-to-air missile or
"SAM", the Air Force began looking for ways to counter this new
threat. The result was the Wild Weasel Program, a specially equipped two-seat
fighter that could detect SA-2 acquisition radars and then attack or divert
(suppress) the SAM batteries. The mission of Wild Weasels was to fly ahead of a
strike force into the target area, entice enemy SAMs and antiaircraft radars to
come on the air, and then knock them out with bombs or with missiles that homed
on the radar's emissions. Weasels were often in a high-threat area for a long
time while the strike force attacked its targets and withdrew. The Weasels¿
mission of offering themselves as targets for enemy antiaircraft batteries was
made even more hazardous by the presence of MIG fighters in the target areas.
The first aircraft used in this role were F-100Fs carrying a variety of
"dumb" ordinance and relatively crude radar detection systems. Later,
these early Weasels were equipped with the Navy-developed AGM-45 Shrike
anti-radiation missile or "ARM." These missiles could be fired from an
aircraft and would home in on an emitting radar signal.
It was soon apparent that a higher performance aircraft than the F-100F was
needed for Weasel missions, so the F-105F was pressed into service. This
represented a great leap in the effectiveness of Wild Weasels. The F-105F could
match the speed of the strike force F-105Ds, thus allowing the force to enter
the combat area at a higher rate of speed. In addition, the F-105F could carry
much more ordinance for neutralizing SAM sites (some 14,000 pounds of ordinance.
To put this in perspective, the WWII B-17 normally carried a bomb load of about
6,000 pounds!). More importantly, pilots who flew the 105 knew that if
they got in trouble, they could head for the weeds, hit the afterburner, and
watch the enemy disappear in the rearview mirror. NOTHING could stay with a Thud
on the deck!
|
THE KIT |
 Since my senior year at the Air Force Academy, I have had an admiring
affection for the Thunderchief. 1968 happened to be the year a flight of four
F-105Ds was performing a low altitude flyby at the Academy to commemorate the
dedication of a Thud as a new static display on the Academy¿s terrazzo. The
dignitaries included the Air Force Chief of Staff, a variety of F105 Wing
Commanders, and the man himself: Republic Aviation¿s Alexander Kartveli, the
Thud¿s chief designer. After a normal four-ship flyby, the aircraft circled
around for another pass. This time, the aircraft were in trail formation
and about as low as you could go without clipping the top of the flagpole. As I
was marching to the noon meal with the rest of the Cadet Wing, I remember
looking up and realizing that I could not hear the lead aircraft. Shortly after
uttering an "oh sugar" or something to that effect, there was a loud
bang, and, you guessed it, tons of damage. We entered the dining hall, and
virtually every window pane on the southside of Mitchell Hall had been blown out
by the sonic boom! The same results happened for part of the dormitory and the
gym, all of which were in the flight path. Fortunately, no one was seriously
hurt by the incident. The flight leader was grounded while the Air Force
investigated the incident (we all said he had to be a USAFA Grad to do that!),
and I believe the official answer from the inquiry was that, given the
atmospheric conditions at the time and the altitude of the Academy, the flight
in its attempt to make a good impression accidentally exceeded the speed of
sound. Needless to say, the event made quite an impression on a bunch of
young guys who couldn¿t wait to start flying airplanes for a living (and even
on those of us who were blind as a bat in both eyes but still loved airplanes!).
Since my senior year at the Air Force Academy, I have had an admiring
affection for the Thunderchief. 1968 happened to be the year a flight of four
F-105Ds was performing a low altitude flyby at the Academy to commemorate the
dedication of a Thud as a new static display on the Academy¿s terrazzo. The
dignitaries included the Air Force Chief of Staff, a variety of F105 Wing
Commanders, and the man himself: Republic Aviation¿s Alexander Kartveli, the
Thud¿s chief designer. After a normal four-ship flyby, the aircraft circled
around for another pass. This time, the aircraft were in trail formation
and about as low as you could go without clipping the top of the flagpole. As I
was marching to the noon meal with the rest of the Cadet Wing, I remember
looking up and realizing that I could not hear the lead aircraft. Shortly after
uttering an "oh sugar" or something to that effect, there was a loud
bang, and, you guessed it, tons of damage. We entered the dining hall, and
virtually every window pane on the southside of Mitchell Hall had been blown out
by the sonic boom! The same results happened for part of the dormitory and the
gym, all of which were in the flight path. Fortunately, no one was seriously
hurt by the incident. The flight leader was grounded while the Air Force
investigated the incident (we all said he had to be a USAFA Grad to do that!),
and I believe the official answer from the inquiry was that, given the
atmospheric conditions at the time and the altitude of the Academy, the flight
in its attempt to make a good impression accidentally exceeded the speed of
sound. Needless to say, the event made quite an impression on a bunch of
young guys who couldn¿t wait to start flying airplanes for a living (and even
on those of us who were blind as a bat in both eyes but still loved airplanes!).
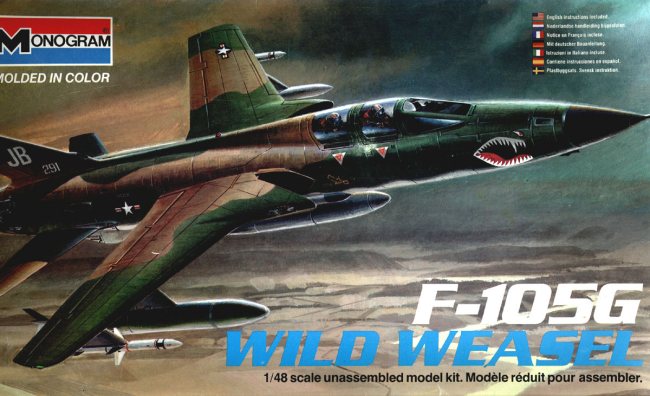
 The Monogram F-105G kit was released in 1982, before the release of their F-105D
kit (No. 5812, released in 1985). Monogram also released an F-105F kit (No.
5808, which was subsequently released as kit No. 5816 as part of the "Call
to Glory" series). I chose the G kit primarily because it provided the Wild
Weasel Shrike missiles and the 600 gallon centerline fuel tank, which are not in
the F kit (that kit provides a multiple ejection rack for the centerline station
and two 600 gallon wing drop tanks). The G kit also comes with one AGM-78
Standard ARM and a 600 gallon wing tank that allows accurate modeling of the
so-called "asymmetrical load" of two Shrikes on the outboard wing
stations, a Standard ARM on one inboard wing station, a 600 gallon fuel tank on
the other inboard station, and a centerline fuel tank, which was typical of G
Weasel missions in the 1968-69 time period. To construct a reasonably accurate
F-105F from the G kit, simply leave off the two long QRC-380 ECM blisters that
mount on the fuselage sides below each wing, and change the ordinance load
around a bit (more on this later).
The Monogram F-105G kit was released in 1982, before the release of their F-105D
kit (No. 5812, released in 1985). Monogram also released an F-105F kit (No.
5808, which was subsequently released as kit No. 5816 as part of the "Call
to Glory" series). I chose the G kit primarily because it provided the Wild
Weasel Shrike missiles and the 600 gallon centerline fuel tank, which are not in
the F kit (that kit provides a multiple ejection rack for the centerline station
and two 600 gallon wing drop tanks). The G kit also comes with one AGM-78
Standard ARM and a 600 gallon wing tank that allows accurate modeling of the
so-called "asymmetrical load" of two Shrikes on the outboard wing
stations, a Standard ARM on one inboard wing station, a 600 gallon fuel tank on
the other inboard station, and a centerline fuel tank, which was typical of G
Weasel missions in the 1968-69 time period. To construct a reasonably accurate
F-105F from the G kit, simply leave off the two long QRC-380 ECM blisters that
mount on the fuselage sides below each wing, and change the ordinance load
around a bit (more on this later).
The kit is typical for its time: raised panel lines, but overall an outstanding
kit. The parts are molded in an olive green styrene on four trees. A single tree
is also included for the clear parts. Also typical for the time, the kit decals
are somewhat sparse.
With the exception of the side-mounted APR-25 OMNI antennas, I think all of the
F-105F and G ECM antennas and fairings are either molded onto the model¿s
fuselage or provided as separate parts. These antennas include the four IR-133
APR-25 (or APR-35 for the F-105G) direction finding and homing antennas on the
nose, the APR 26 blade antennas on the bottom of the fuselage, and the radar
homing and warning (RHAW) fairings and APR-25/26 aft antennas on the vertical
stabilizer. The ALR-31 wing tip antennas are also included, and the modeling
purest will have to remove these for an accurate F-105F (given my lazy nature
and the fact that I don¿t compete in contests, I chose to ignore this
modification Ù things like this happen when you¿re over fifty and realize you
have hundreds of kits to build and not too many fruitful modeling years left to
accomplish that ominous task!).
I have read some reviews of this kit that criticize the lack of interior detail,
but for a guy like me who builds "box-stock" I found it to be a fairly
good representation of the real thing when compared to actual cockpit photos.
Those interested in adding more detail can check out the Black Box F-105G
Thunderchief Cockpit Detail Set (No. 48015). Other detailists might want to
replace the pitot tube with a needle or some other better representation, but
otherwise, the kit is just fine. Hasegawa¿s weapon sets can also be used for
various ordinance loads, although the ordinance and fuel tanks that come with
the kit are adequate in my opinion.
|
CONSTRUCTION |
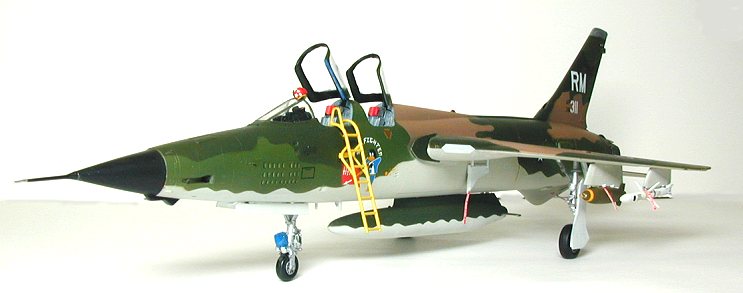
Construction of the kit was relatively straightforward. With the exception of
the radome, I had zero fit problems, and the general outline and shape of the
model accurately portray the prototype.
I chose to assemble, paint and decal this model in subassemblies, which is not a
normal modeling practice for me. Given the complexity of the camouflage scheme,
this worked very well and I intend to try it on future kits.
 I started with the cockpit tub and assembled it per the kit instructions. The
tub was painted overall Model Masters medium gray with black instrument panels
and boxes. Instruments were highlighted by drybrushing the kit¿s raised
instrument panel details with flat white. Various knobs and switches were
highlighted in flat red and yellow paints.
I started with the cockpit tub and assembled it per the kit instructions. The
tub was painted overall Model Masters medium gray with black instrument panels
and boxes. Instruments were highlighted by drybrushing the kit¿s raised
instrument panel details with flat white. Various knobs and switches were
highlighted in flat red and yellow paints.
The cockpit tub fits well in the fuselage. No nose weight is required to make
the model sit on its tricycle gear, as the wing landing gear, just like on the
prototype, are located well behind the middle of the fuselage.
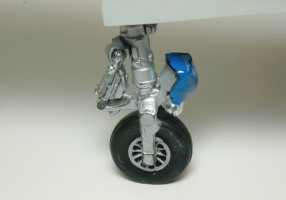
The one area of caution in the entire assembly process is the landing gear: just
like on the real thing, it is quite spindly, and if you are not careful in
aligning the gear during assembly, you are apt to get a bowed look in the gear
(this happened to me on my first F-105D kit when I built it almost 15 years ago,
and it has bothered me greatly ever since (but not enough to take the
time to fix it!). Prior to their installation, I slightly flattened the
tires with an Exacto knife to give them that squashed look.
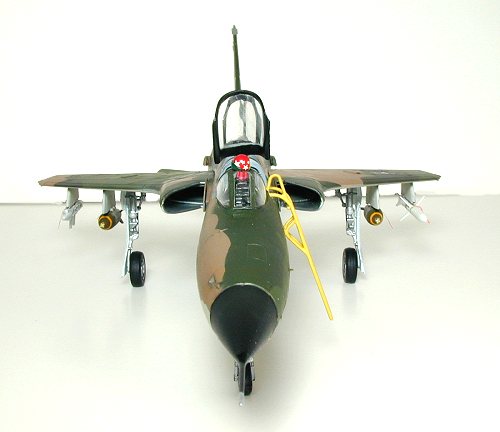
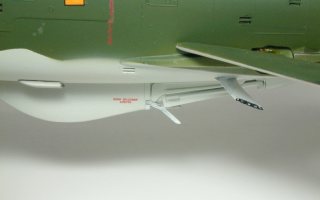
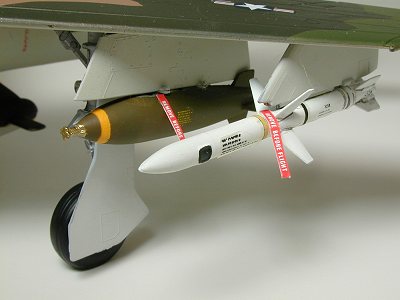 For under wing stores, I decided to model a typical Wild Weasel mission of the
pre-F105G period: one Shrike missile and an ALQ-87 ECM pod on the outboard
pylons, single CBU bombs on the inboard pylons, and a 600 gallon centerline fuel
tank. The CBU bombs came from the Hasegawa Weapons Set A. I scrounged the ECM
pod from an old Monogram F-4C kit (No. 5800) that was in my spare parts
box.
For under wing stores, I decided to model a typical Wild Weasel mission of the
pre-F105G period: one Shrike missile and an ALQ-87 ECM pod on the outboard
pylons, single CBU bombs on the inboard pylons, and a 600 gallon centerline fuel
tank. The CBU bombs came from the Hasegawa Weapons Set A. I scrounged the ECM
pod from an old Monogram F-4C kit (No. 5800) that was in my spare parts
box.
After completing the major subassemblies, I glued the wings and horizontal
stabilizers onto the fuselage. Detail parts such as the underwing stores, the
various blade antennas under the fuselage, the tail hook, and the engine-mounted
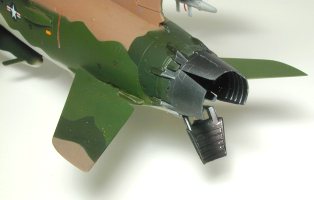
speed brakes were then added. The top three brakes were glued in a slightly open
position with the bottom one fully extended as per the normal configuration for
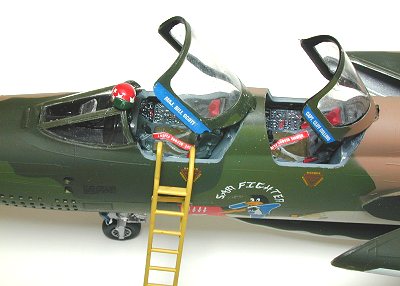
Thuds on the ground. The canopies and front windscreen were then added.
The interiors of the canopy frames were painted flat black.
 |
 |
 |
|
PAINT & DECALS |
The first task was to choose the paint for this model. Here, as far as I am
concerned, there is no choice: Floquil Classic Military colors. Floquil has the
best representation of the Vietnam color scheme I¿ve seen. Unfortunately, they
have been purchased by Testors, and the Floquil military colors are being
discontinued. Testors claims their FSN enamel paints are the same, but the jury
is still out on that one in this modeler¿s household. There was an old
rumor going around that the reason Floquil¿s paint matched the USAF Vietnam
camouflage colors so well is that they supplied the actual paint that was
applied to the real aircraft. After contacting Floquil and asking if this were
true, I was told that the rumor probably got started because Floquil began
as a contract supplier of the US government providing paint and a "paint
like pen;" hence, the term "Flo-quil". The US Navy used Floquil
products to mark deck cargo. After WWII, Floquil continued to provide paint (and
markers) to the US armed forces, though not for final use (at least to the best
of the remaining people at Floquil¿s knowledge) on military equipment.
 Floquil recognized hobbyists might need paint to complete replicas of military
equipment. Floquil did have US government paint specifications as a supplier of
paint to the US Government, so they made model paint conforming to US standards.
And there you have it! (It¿s amazing what you can find out these days using the
Internet).
Floquil recognized hobbyists might need paint to complete replicas of military
equipment. Floquil did have US government paint specifications as a supplier of
paint to the US Government, so they made model paint conforming to US standards.
And there you have it! (It¿s amazing what you can find out these days using the
Internet).
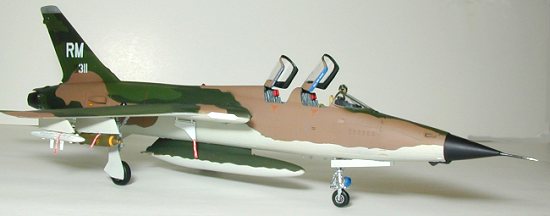
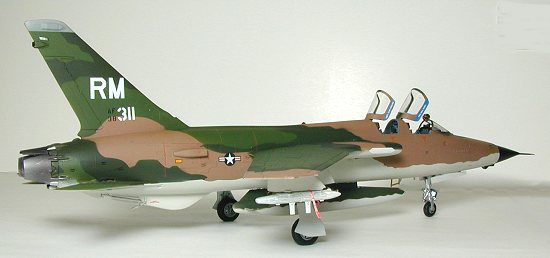
Fortunately, my local hobby shop still had a supply of Floquil FS34079 (Dark
Green), FS34102 (Medium Green), FS30219 (Tan), and FS36622 (Light Gray), so I
grabbed them up. Normally, I freehand airbrush my aircraft and armor camouflage
patterns, but the Thud had a distinctive pattern that was pretty much standard
for all of the 105s used in Southeast Asia, so I decided once again to try
something a little different (See: you CAN teach an old dog new tricks!). After
reading a recent Finescale Modeler article by Darren Roberts on masking
and painting complex camouflage schemes, I decided to give this a go.
After attaching the windscreen and the canopies with white glue, I sprayed the
entire model with FS36622 light gray. Any flaws were cleaned up and resprayed.
Then I attacked the paint scheme on the upper surfaces. First, I took the
kit instruction sheet, which had a pretty good representation of the Thud¿s
camo scheme, and enlarged it to 1/48 scale on a copier. I then cut out patterns
for the tri-color scheme for the wings, fuselage, vertical stabilizer, and
horizontal stabilizers. I began by spraying the first color, dark green,
in the general locations that it appears in the aircraft¿s camo scheme. The
areas that would actually be painted in dark green were then masked using the
cutout patterns, which were attached to the model using Scotch Removable Magic
Tape (this is a low tack tape, that, with some care, can be removed without
ripping up your paint scheme). I then sprayed the next color (medium
green), and proceeded to mask where those areas would be as with the first
color. This process continued until the paint job was finished.
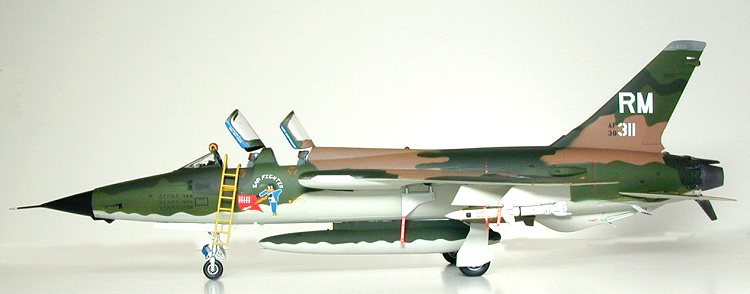
 I applied a coat of Future in preparation for the decals. I decided to use
aftermarket decals, so I chose AeroMaster¿s sheet No. 48-374, "Takhli
Weasels." I selected aircraft no. 63-8311, "Sam Fighter" from
that sheet as the one I wanted to model. The decals went on effortlessly, and
after they dried I coated them and the entire model with Testors Dullcoat.
I applied a coat of Future in preparation for the decals. I decided to use
aftermarket decals, so I chose AeroMaster¿s sheet No. 48-374, "Takhli
Weasels." I selected aircraft no. 63-8311, "Sam Fighter" from
that sheet as the one I wanted to model. The decals went on effortlessly, and
after they dried I coated them and the entire model with Testors Dullcoat.
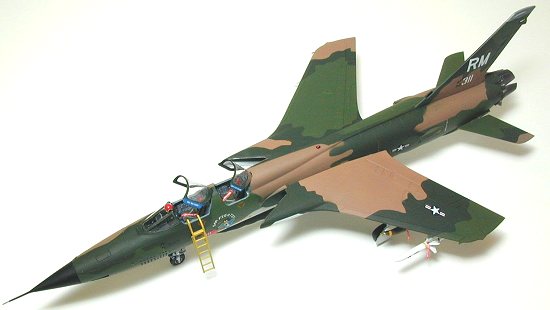
Final touches included red "remove before flight" tags from a P.P.
Aeroparts Acessories Sheet (No. RBF002). These were attached to the
ordinance as well as each seat. I also added a boarding ladder and a pilot¿s
helmet on the front windscreen. The pilot¿s helmet was made by cutting off the
head of the kit¿s pilot figure and drilling out the inside of the helmet using
a Dremel tool, then further reaming it with an Exacto knife. I painted the
helmet red and applied some very small star decals to represent a flight helmet
that was typical of those worn by USAF pilots during the Vietnam War.
|
CONCLUSIONS |
This is my second Monogram Thud, and I intend to build more of them.
Monogram-Revell has re-released their 1/48th scale F-105D as kit No. 5840, so I
picked up another one to add to my collection (perhaps they have plans to
re-issue the G or F). The model builds into a great replica of the prototype and
is worth the minimal effort required to construct it. This kit is highly
recommended to all those that want to recreate one of the most impressive
airplanes to ever serve with the USAF. (A final note: I dedicate this article
with admiration and respect to all former Weasel drivers, and especially those
that didn¿t make it back from Southeast Asia. We thank all of you for your
courage under fire and devotion to duty).
|
REFERENCES |
1. Archer, Robert D., "The Republic F-105
Thunderchief," Aero Publishers, Inc., 1969.
2. Berger, Carl, "The United States Air Force In
Southeast Asia: 1961-1973," Government Printing Office, 1977
3. Davis, Larry, Wild Weasel: The SAM Suppression
Story," Squadron/Signal Publications, 1986.
4. Drendel, Lou, "F-105 Thunderchief in
Action," Squadron/Signal Publications, 1974.
5. Drendel, Lou, "Air War Over Southeast Asia: A
Pictorial Record, Vol. 2, 1967-1970," Squadron/Signal Publications, 1983.
6. Kinzey, Bert, "F-105 Thunderchief in Detail
and Scale," Aero Publishers, Inc., 1982.
7. Nuebeck, Ken, "Walk Around: F-105 Thunderchief,"
Squadron/Signal Publications, 2000.
8. Roberts, Darren, "Camouflage This Adversary
Hornet: Using Layered Masking to Paint a Difficult Scheme," Finescale
Modeler Magazine, March 2001.
Copyright ModelingMadness.com. All rights reserved. No reproduction in part or in whole without express permission. If you would like your product reviewed fairly and quickly, please contact
the editor or see other details in the Note to
Contributors.