Eduard 1/48 Mirage IIICJ
| KIT #: | 8102 |
| PRICE: | $44.95 SRP |
| DECALS: | Five options |
| REVIEWER: | Tom Cleaver |
| NOTES: | Profipak |
| HISTORY |
Seeing jet propulsion as the wave of the future, he got into the most
advanced sectors as rapidly as
 possible
by producing the deHavilland Vampire under license.
In 1950, he mated the British Nene engine with his first original
jet-powered design, to create the Ouragan, which was the first
domestically-designed and produced jet fighter of the Armee de l’Air.
This was further developed into the Mystere series, which was the first
domestic Western European design to equal the F-86 Sabre and MiG-15 in
performance.
The Mystere IV
was utilized by the Israeli Air Force during the Suez War of 1956, where it
demonstrated clear superiority over the Egyptian-flown MiGs.
This led to the development of the Super Mystere, which was the
first European fighter design to be capable of supersonic speed in level flight.
possible
by producing the deHavilland Vampire under license.
In 1950, he mated the British Nene engine with his first original
jet-powered design, to create the Ouragan, which was the first
domestically-designed and produced jet fighter of the Armee de l’Air.
This was further developed into the Mystere series, which was the first
domestic Western European design to equal the F-86 Sabre and MiG-15 in
performance.
The Mystere IV
was utilized by the Israeli Air Force during the Suez War of 1956, where it
demonstrated clear superiority over the Egyptian-flown MiGs.
This led to the development of the Super Mystere, which was the
first European fighter design to be capable of supersonic speed in level flight.
Unlike the development line that began with the Ouragan and is
still operational today with the Super Etendard, the development of
Dassault’s other major line of combat aircraft was entirely fortuitous, the
result of an attempt to capitalize on a popular theory of aircraft development
which - other than the creation of this remarkably successful series of fighters
- was largely a developmental dead-end elsewhere.
By the early 1950s, aircraft designers and some air force planners were
dismayed by the growth in size and complexity of combat aircraft brought about
by the introduction of jet propulsion. Previously, combat aircraft for all their
technological sophistication were simple enough they could be purchased in large
quantity, which was still seen as the way to operate an air force in light of
the lessons of the Second World War; countless arguments were made that soon the
standard combat airplane would be so complex and expensive it would be
unaffordable.
This line of
reasoning was strongly held by designers like Kelly Johnson and Ed Heineman in
the U.S., and Teddy Petter in the UK.
In 1953, the French Air Ministry issued a specification for a lightweight
interceptor capable of supersonic speed.
Dassault replied with what became known as the
Mirage I, a very
small lightweight
 fighter powered by two small jet engines that was capable of
March 1.2.
While it met all
specifications, the resulting aircraft was deemed not really capable of further
operational development, and led to the creation of the Mirage II, which
was some 30 percent larger and introduced the ATAR turbojet.
This was capable of Mach 1.6 and came close to gaining production, but
was outshone by the Mirage III, which had a redesigned delta wing and was
capable of Mach 2.2.
fighter powered by two small jet engines that was capable of
March 1.2.
While it met all
specifications, the resulting aircraft was deemed not really capable of further
operational development, and led to the creation of the Mirage II, which
was some 30 percent larger and introduced the ATAR turbojet.
This was capable of Mach 1.6 and came close to gaining production, but
was outshone by the Mirage III, which had a redesigned delta wing and was
capable of Mach 2.2.
Production Mirage IIICs first appeared in 1960, with 96 on order
for the Armee de l’Air.
The
Israelis, who were then still able to get support from the new DeGaulle
government, ordered 72 known as the Mirage IIICJ, while the South Africans
ordered 16 as the Mirage IIICZ.
At the time of the Six Day War in June 1967, the Mirage IIICJ was
the first-line fighter of Heyl ha’Avir,
the IDF/AF. The performance of
the Mirages in the Israeli air strikes against the Arab air forces on the
first day of the war clearly established the airplane as world-class as the two
30mm DEFA cannons in each cut like a scythe through the Egyptian and Syrian air
forces, on the ground and in the air.
| THE KIT |
 have
been really accurate, leaving much to be desired in detail and in accuracy of
overall shape.
Most recently, Hobby
Boss brought out a 1/48 Mirage IIIC.
To my mind, this kit from Eduard is still the only really accurate Mirage
III.
have
been really accurate, leaving much to be desired in detail and in accuracy of
overall shape.
Most recently, Hobby
Boss brought out a 1/48 Mirage IIIC.
To my mind, this kit from Eduard is still the only really accurate Mirage
III.
With well over 100 cleanly-molded parts in light grey, the kit offers all
the detail a modeler could desire.
The cockpit is simple, but Mirage cockpits are simple, and since they are
almost all painted black the detail that is there will be more than enough for
all but the most far-gone-in-their-addiction resinaholics.
The six part seat makes up into an accurate Martin-Baker seat, with
photo-etch seatbelts provided.
The
kit also provides a molded lead weight to fit inside the radome nose, so
nose-sitting will not be a problem.
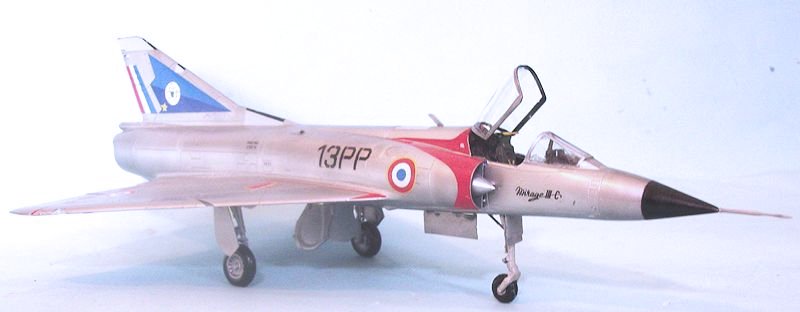
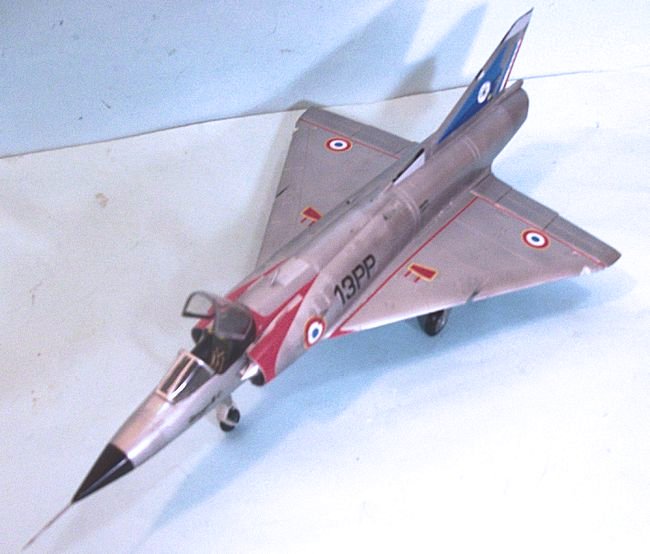
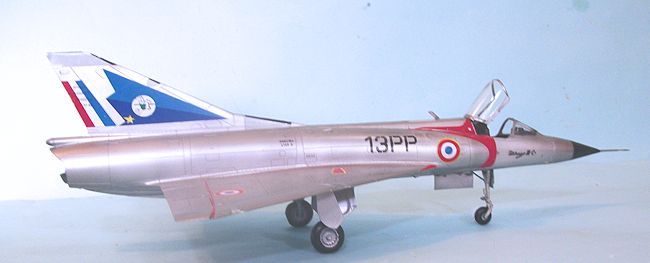
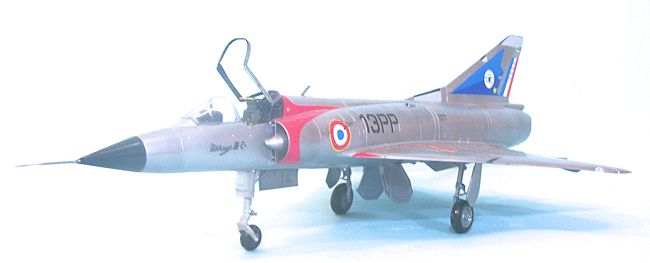
Decals are provided for three French and five Israeli aircraft - four (two French, two Israeli) in overall silver from the 1967 war and five (two French, three Iasraeli) in camouflage. All of the Israeli aircraft are MiG-killers, with one having an impressive score of 13. A separate sheet provides all the stenciling and other markings for the aircraft. There are also express masks for the canopy and for the red markings around the intakes if one opts not to use the decals provided for these. The sheets also provide the identification triangles used on Mirages after they were camouflaged.
| CONSTRUCTION |
That said, one needs to pay close attention to the wing assembly.
The upper wing includes the entire upper and lower leading edge. If you
do not get this joint tight and clean, you stand to loose a lot of the very nice
surface detail on the lower surface of the wing.
I recommend you carefully test-fit the upper and lower parts, and sand
down the interior of the leading edge of the lower wing part, to insure a tight
fit;
doing
that will mean you don’t have to apply any Mr. Surfacer to the seam, and then
have to rescribe detail lost in sanding things smooth.
Also, if one gets the upper wing-to-fu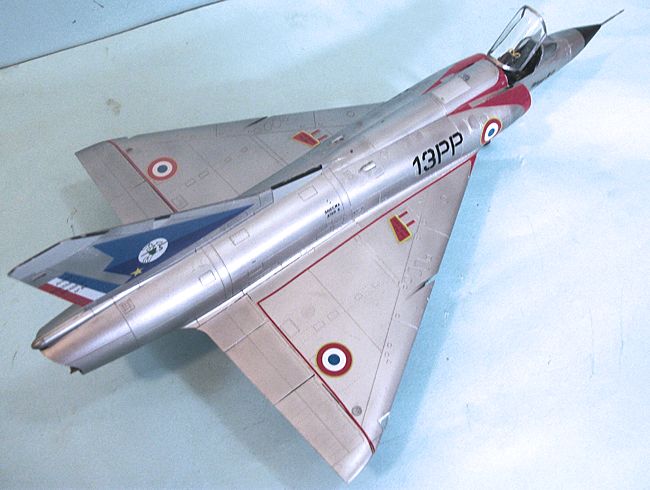 selage joint as clean as possible
to insure good fit, you will not end up using Mr. Surfacer there.
I think if you cut off the alignment pins in the fuselage halves, you can
minimize any centerline seam to clean up.
Unfortunately, due to the single-piece design of the vertical fin, you
aren’t going to escape having to deal with the joint of fin-to-left-fuselage
half; if, however, you have trimmed off the alignment pins and are very careful
in assembling the fuselage halves, you may be able to minimize that.
selage joint as clean as possible
to insure good fit, you will not end up using Mr. Surfacer there.
I think if you cut off the alignment pins in the fuselage halves, you can
minimize any centerline seam to clean up.
Unfortunately, due to the single-piece design of the vertical fin, you
aren’t going to escape having to deal with the joint of fin-to-left-fuselage
half; if, however, you have trimmed off the alignment pins and are very careful
in assembling the fuselage halves, you may be able to minimize that.
As with virtually any Eduard kit, there is one place on this kit where
the parts just really don’t want to fit cleanly, and that is the forward section
of the one piece lower wing part, which includes the nose wheel well.
Aligning that part with the fuselage in that region and the intakes is
going to result in a need for Mr. Surfacer long those seams to a greater or
lesser degree depending on the quality of your assembly, and some rescribing.
Fortunately that is all on lower surfaces, so it won’t be so apparent in
the final result.
All this talk about getting the assembly as clean as possible is of
particular importance if you are thinking of doing one of the natural metal
finish airplanes.
I sanded with
very fine grit and then polished out the model overall, to prepare it for the
natural metal finish I had planned.
There are several small antennas that need to be attached during main
assembly.
To lessen the likelihood
of knocking them off later, I also assembled the landing gear legs, so the model
would be raised off the work table, keeping the antennas away from the tabletop.
I used the Scale Aircraft Conversions metal gear, which was superior to
the kit parts, particularly for the nose gear leg, since it was all one piece
rather than multi-piece as the kit has it.
The Eduard photo-etch seatbelts and ejection handles were used on the ejection seat, resulting in a very good-looking addition to a very plain black cockpit. The decals provided for instrumentation are more than sufficient to provide necessary detail for this area.
| COLORS & MARKINGS |
I am a fan of deltas for their shape.
To me, a disruptive multi-color camouflage detracts from the elegance of
line of the airplane
being modeled, so I like to do my deltas in one main color whenever possible.
 First, I misted on Alclad II “Aluminum” paint.
When this was dry, I masked off the wings and the central area of the
vertical fin, and painted the fuselage with Alclad II “Polished Aluminum.”
I then masked off the rear fuselage around the exhaust, and the fuselage
frames, and painted those areas with Model Master Metalizer “Stainless Steel.”
When that dried, I unmasked the model, and used SNJ polishing powder to
create a different tonal color to the elevons and rudder. The result is very
subtle but noticeable in person, creating a multi-hue natural metal finish.
First, I misted on Alclad II “Aluminum” paint.
When this was dry, I masked off the wings and the central area of the
vertical fin, and painted the fuselage with Alclad II “Polished Aluminum.”
I then masked off the rear fuselage around the exhaust, and the fuselage
frames, and painted those areas with Model Master Metalizer “Stainless Steel.”
When that dried, I unmasked the model, and used SNJ polishing powder to
create a different tonal color to the elevons and rudder. The result is very
subtle but noticeable in person, creating a multi-hue natural metal finish.
The kit decals are excellent. They are thin, and have no excess carrier
film, an important point for doing a NMF model, since I didn’t want to have to
apply a sealer to get rid of the tonal difference that would be created by the
decal film.
The sheets provide all
national and unit markings, and all of the stenciling.
| CONCLUSIONS |
September 2014
Kit courtesy of my wallet when found on a dealer’s table a few years back.