
| KIT #: | 04727 |
| PRICE: | About $32 when new |
| DECALS: | options |
| REVIEWER: | Tom Cleaver |
| NOTES: |
Fisher Conversion: |
| HISTORY |
To my mind, the
Hawker Hunter is aesthetically one of the best-looking jets ever designed.
In that opinion, I am not alone, as many have responded
favorably to the flowing lines of
Hawker Aircraft came late to jet aircraft, and even
later to swept wings. Where the company had achieved a 30 year run of success
with all previous designs, it seemed to lose its footing with the Hunter.
Its immediate predecessor was the straight wing Sea
Hawk, a design that was five years behind its US contemporary - the Grumman
Panther - when it finally entered service with
 the Royal
Navy in 1953. As a design, the Hunter suffered from a too-extended gestation,
which failed to take into account very important discoveries about jet aircraft
that could have led to early modification of the design, most important of which
was that the horizontal stabilizer was not all-flying, and was in the wrong
position aerodynamically for transonic flight.
Failure of the flaps to operate as effective air brakes
led to
extended tests as to the proper location of the ventral dive brake
eventually fitted. There was aileron pitch-up stall which was only cured by the
addition of a sawtooth leading edge to the wing. What would turn out to be the
biggest fault - one shared with all other British post-war designs - was the
extreme lack of range, since the original design called for a point-defense
interceptor.
the Royal
Navy in 1953. As a design, the Hunter suffered from a too-extended gestation,
which failed to take into account very important discoveries about jet aircraft
that could have led to early modification of the design, most important of which
was that the horizontal stabilizer was not all-flying, and was in the wrong
position aerodynamically for transonic flight.
Failure of the flaps to operate as effective air brakes
led to
extended tests as to the proper location of the ventral dive brake
eventually fitted. There was aileron pitch-up stall which was only cured by the
addition of a sawtooth leading edge to the wing. What would turn out to be the
biggest fault - one shared with all other British post-war designs - was the
extreme lack of range, since the original design called for a point-defense
interceptor.
Eventually, the Hunter emerged from all this development
- which included several test flights with extensive criticisms from Chuck
Yeager during 1952-53 - with handling qualities that became the standard against
which other military aircraft would be judged.
The airframe was so strong that no Hunter was ever lost
to midair structural failure.
The firepower of four 30mm cannon was such that any
target that got in a Hunter's sights could be shredded with a 2 second burst.
1,972 Hunters were built, of which 400 were later re-manufactured for service
with second air forces, and it served with no less than 21 different world air
forces, a record only bettered by the MiG-17, which was built in substantially
greater numbers, making the Hunter’s achievement even more remarkable.
The Hunter T.7:
Soon after the Hunter’s introduction to squadron
service, it became apparent that a two seater advanced training version with
weapons capability would be useful, given that the Meteor and Vampire trainers
did not adequately introduce a pilot to the increased performance of the Hunter.
Coincidentally, Hawkers had already been planning a
trainer version for the export market, designated the P.1011, which formed the
basis of the RAF specification issued in 1954.
After much trial and error to get the shape right
aerodynamically and avoid buffeting, new side‑by‑side forward fuselage with a
deep spine aft of the side-by-side cockpit was designed and mated to a Hawker
Hunter Mk4 fighter airframe with an Avon 121 or 122 engine; this whole process
took over 20 different design attempts and took over a year to solve.
The resultant aircraft was designated the Hawker Hunter
T7.
The aircraft carried only a single 30mm
 Ten Hunter T7s were diverted to the Fleet Air Arm as the
T8, with a different electronics set and an airfield arrestor hook under the
tail cone.
These first 10 were followed by 30 other various sub-types, as
trainers for the electronics equipping FAA aircraft like the Sea Harrier.
Ten Hunter T7s were diverted to the Fleet Air Arm as the
T8, with a different electronics set and an airfield arrestor hook under the
tail cone.
These first 10 were followed by 30 other various sub-types, as
trainers for the electronics equipping FAA aircraft like the Sea Harrier.
Hawker also introduced the Avon-200 series engine that
powered the F.6, for the export market.
India was the first customer, for six, with an armament
of two 30mm cannon, which became the standard for the many export trainers built
by converting F.4 and F.6 airframes.
Altogether, Hawker built 65 new-build trainers for the
RAF and FAA, 10 for the
The Hunter T7 entered RAF service in 1958, with one
aircraft assigned to each Hunter fighter squadron, with the remaining aircraft
allocated to 229 OCU (Operational Conversion Unit).
The Hunter T7 remained in RAF service until 2002 when
the last remaining RAF aircraft was retired from operations with the
| THE KIT |
Revell-Germany’s 1/32 Hawker Hunter first appeared in
1998.
It was obvious from the way the kit was designed that there was
considerable “stretch” to create both the earlier Hunter F.6 with its different
tail cone, and the T.7 with its completely different forward fuselage.
Unfortunately, the kit seemed to be just ahead of the
market curve for 1/32 kits. Nice as it was - and is - the Hunter became
something of a “shelf-sitter,”even with several aftermarket decal sheets from
Aeromaster and a resin cockpit from True Details that made a nice model even
nicer.
 In recent years, with the growth in interest for 1/32
kits, the Hunter was rediscovered and re-releases of the kit by Revell-Germany
saw it start to achieve respectable sales figures, culminating in the release of
the F.6 in 2006.
It was always obvious that Revell was considering the two-seat
trainer, given the separate nose design of the fuselage.
This version, however, has yet to appear, which makes
the new Fisher Models conversion very welcome indeed.
In recent years, with the growth in interest for 1/32
kits, the Hunter was rediscovered and re-releases of the kit by Revell-Germany
saw it start to achieve respectable sales figures, culminating in the release of
the F.6 in 2006.
It was always obvious that Revell was considering the two-seat
trainer, given the separate nose design of the fuselage.
This version, however, has yet to appear, which makes
the new Fisher Models conversion very welcome indeed.
Paul Fisher’s Hunter trainer conversion set is very
straightforward.
The forward fuselage is one piece of resin, with the cockpit tub
molded in.
This is joined to the fuselage fairing, the other major piece of
resin. There is also a resin tail cone with the parabrake housing. The cockpit
includes full detail, with a photoetch instrument panel, and two really
excellent Martin-Baker Mk.4 seats by Harold Offield of
| CONSTRUCTION |
So far as construction of the plastic kit is concerned,
I refer you to my earlier review of the Revell Hunter F.6 in the Reviews Section
here.
I will reiterate that I think the best way to assemble the basic kit is
to assemble the wings and then attach them to the separate fuselage halves, with
their intake trunking, in order to get a good fit of the wing-to-fuselage joint.
One also has to cut off the forward part of the spine as
shown in the conversion set instructions, before further assembly.
Once the fuselage is together, attach the tail cone.
With test=fitting, this will require only a little bit
of filler around the joint.
 As regards the conversion set, I urge you to read the
instructions.
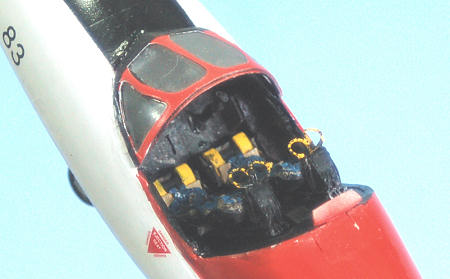
Assembly starts with the cockpit.
Everything here fits, and given that the cockpit is
black, it benefits from a dry-brushing with flat aluminum to “pop out” the
detail.
Once the cockpit is finished and assembled, the two major pieces of
resin are joined.
You will need to reinforce that joint with cyanoacrylate
glue, and then sand it smooth before fitting the nose to the rest of the model.
As regards the conversion set, I urge you to read the
instructions.
Assembly starts with the cockpit.
Everything here fits, and given that the cockpit is
black, it benefits from a dry-brushing with flat aluminum to “pop out” the
detail.
Once the cockpit is finished and assembled, the two major pieces of
resin are joined.
You will need to reinforce that joint with cyanoacrylate
glue, and then sand it smooth before fitting the nose to the rest of the model.
Fit of the nose is easy, and I only needed a little bit
of cyanoacrylate glue along the cockpit fairing to take care of that joint.
The canopy windscreen needs test-fitting and trimming to
fit closely to the fuselage, and then some putty to smooth it to the fuselage.
You should paint it black from the inside before
assembly to avoid seeing any putty, and mask off the clear areas before
proceeding to sand that putty smooth.
I also found that dipping the canopy parts in Future
insured there would be no fogging when attaching these to the model with
cyanoacrylate glue.
I left the seats out of the cockpit and filled the
cockpit with tissue paper when I proceeded to paint the model.
| COLORS & MARKINGS |
Painting:
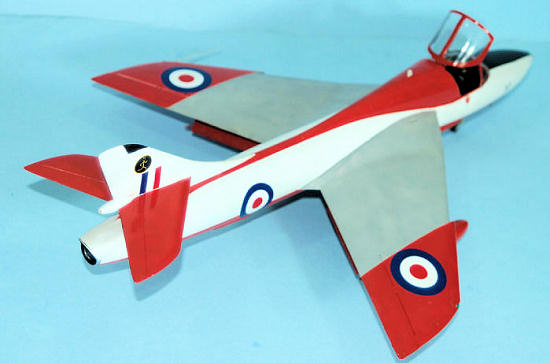
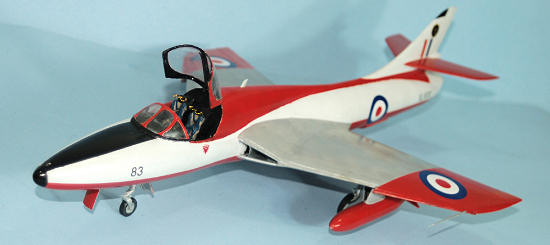
 The coolest-looking scheme is naturally the one that is
most difficult to execute: the red/white/grey trainer scheme.
I began by painting the entire model with Tamiya “Flat
White.” I then masked off and completely covered the white areas, and painted
the red areas with Gunze-Sangyo “Shine Red,” a nice bright scarlet red that is
very close to the British Trainer Red.
I then masked that off and painted the grey area of the
wings with Tamiya “Sky Grey.”
The wheel wells, landing gear and gear door interiors
were painted with Tamiya “flat Aluminum,” while the interior of the flaps was
painted Tamiya “Flat Red.”
The model was given several coats of Xtracrylix Gloss
Varnish to get all the paint surfaces to the same level.
The coolest-looking scheme is naturally the one that is
most difficult to execute: the red/white/grey trainer scheme.
I began by painting the entire model with Tamiya “Flat
White.” I then masked off and completely covered the white areas, and painted
the red areas with Gunze-Sangyo “Shine Red,” a nice bright scarlet red that is
very close to the British Trainer Red.
I then masked that off and painted the grey area of the
wings with Tamiya “Sky Grey.”
The wheel wells, landing gear and gear door interiors
were painted with Tamiya “flat Aluminum,” while the interior of the flaps was
painted Tamiya “Flat Red.”
The model was given several coats of Xtracrylix Gloss
Varnish to get all the paint surfaces to the same level.
Decals:
The kit decals needed some Solvaset to get down
completely, while the Fisher decals went on without problem under a very light
coat of Micro-Sol.
When dry, the model was washed to get rid of solvent
residue and given a final coat of Xtracrylix Gloss Varnish.
| FINAL CONSTRUCTION |
 The landing gear, flaps, and drop tanks were attached,
as were the wingtip navigation lights and the pitot tube.
The seats were installed and the canopy was unmasked and
glued in the open position.
The landing gear, flaps, and drop tanks were attached,
as were the wingtip navigation lights and the pitot tube.
The seats were installed and the canopy was unmasked and
glued in the open position.
As an aside, if you cannot find the Hunter F.6 kit, you
can use the Hunter FGA 9 kit, though you will have to close up the flaps and
fill them to deal with the cutout for the longer drop tanks.
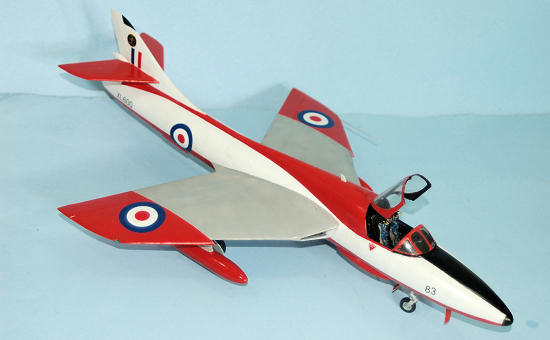
| CONCLUSIONS |
The Hawker Hunter
Trainer doesn’t have the same smooth lines of the single-seater, but it has a
great look all its own.
This conversion set from Fisher Models allows you to use
the most-accurate Hunter kit to make the most-accurate Hunter Trainer model.
Highly recommended for fans of British jets.
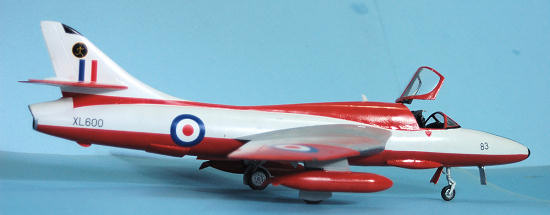
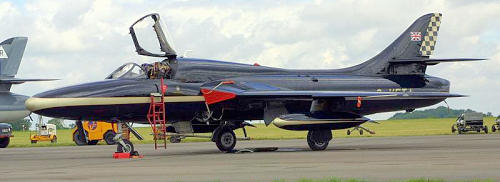 Editor's
Note: In case you are interested, XL600 (the subject of Tom's kit) is still
extant. It retired from the RAF as the famous matte Black T.7 with 208 Sq and
237 OCU, and is now a popular war bird in the UK, registered as G-VETA.
Editor's
Note: In case you are interested, XL600 (the subject of Tom's kit) is still
extant. It retired from the RAF as the famous matte Black T.7 with 208 Sq and
237 OCU, and is now a popular war bird in the UK, registered as G-VETA.
If you would like your product reviewed fairly and quickly, please contact the editor or see other details in the Note to Contributors.
Back to the Review Index Page 2023