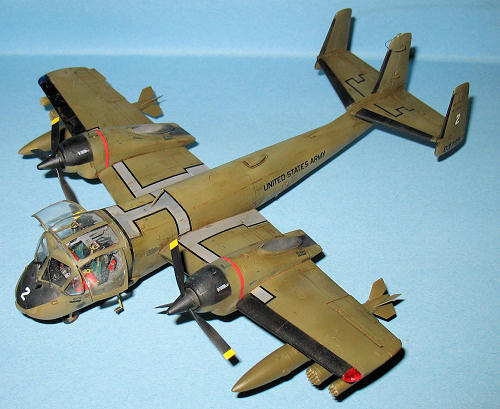
Roden 1/48 OV-1A
Mohawk
| KIT #: | 406 |
| PRICE: | $34.98 MSRP |
| DECALS: | Four options |
| REVIEWER: | Dan Lee |
| NOTES: |
Aftermarket abounds with Eduard Big ED Set, Royale Resin Wheels, and SAC
Metal Landing Gear |
| HISTORY |
Mohawk 1, Mig-17 1
The Grumman OV-1
Mohawk was originally designed to be a joint service observation plane for both
the Army and Navy equipped with two turboprop engines and a variety of sensors.
The Navy dropped out when they got rid of the WW2 era escort carriers
that they were supposed to fly off and left the program up to the Army.
It entered service
in 1961 and was eventually sent to
 The story of Ken
Lee’s Mig kill can be read in Tom Cleaver’s build of the Mig-17
The story of Ken
Lee’s Mig kill can be read in Tom Cleaver’s build of the Mig-17
Unfortunately, the
VNAF evened the score in 1969 when a Mig shot down a Mohawk.
Considering the performance/mission disparity between the two planes, a
tie is as good as a win.
The Mohawk came in
four models:
(J)OV-1A -Daylight
Recon
OV-1B - Side Look
Aperture Radar Recon
OV-1C - IR equipped
Recon
OV-1D - multi
sensor version
The Mohawk served
with the US Army till 1996 when it was replaced with much more sophisticated and
(naturally) expensive systems like satellites and the E-8 JSTAR.
The Mohawk still flies in the air forces of
Today, the Mohawk’s
actual battlefield recon role is now done by unmanned drones such as the
Predator. Use and arming of said
drones has caused another Army/Air Force row as the Army recently formed their
own drone units as they found that Air Force drone support was lacking.
Plus ca change, plus ca la meme chose.
From Wikipedia
Flight Journal Feb 2009 Issue
| THE KIT |
As previewed a few years back.
I picked up this
kit because I was inspired by Tom’s article in Flight Journal about a
 e web.
Over the course of which I did a comparison of the kit to the photos, I
realized that there was a lot of
fine detail missing in the kit. As
I kept reading the on-line resources, I started to grow fond of this ugly
airplane and wanted to do more. Uh
oh. Yeah,
e web.
Over the course of which I did a comparison of the kit to the photos, I
realized that there was a lot of
fine detail missing in the kit. As
I kept reading the on-line resources, I started to grow fond of this ugly
airplane and wanted to do more. Uh
oh. Yeah,
Great Models had a
rather large sale on stuff a while bag and one of those items was their Big Ed
for the Roden OV-1A. I later bought
weighted resin wheels from Royale Resin and white metal landing gear from SAC.
It was my intent to build the best damn Mohawk I could build. This very sentiment has gotten me into trouble before; my many trips to modeling hell (ex: F-14s, D-558, F-117) began with such (dumb) noble intensions. Of course, I took some tiny cold comfort that if things went messy I could blame Tom Cleaver for providing the initial spark (just kidding, Tom.)
| CONSTRUCTION |
I actually began
with the wings due to the fact I wanted to use the Eduard PE gear wells.
The kit wheel wells are fine as long as one ignores all the injection pin
marks or finds a way to deal with it, but I was going to go all
The whole wing gear
wells had to be carefully cut out minus the supports for the landing gear and
the remaining plastic sanded down.
Once that was done, the various PE parts were carefully cut away from the brass
frets and folded into shape. I used
enough CA glue to stick the parts on and then used white glue to fill in the
gaps. At first I thought I did a
good job of aligning everything, but it turned out that I did not and needed to
make readjustments and reglue various parts due to the sanding filling process.
The nose gear well PE was added.
Eduard gives one a choice of using preformed piping or making your own.
I opted for using the preformed piping because I wasn’t that crazy.
Next I glued in the
plastic cockpit parts. I discarded
everything that needed to be replaced by PE and there was a lot.
There was no difficulties adding everything I needed to add (which is
usually not the case with me.) The
various PE bits (including the cockpit console) were held in place with CA glue
or white glue depending on the location and part.
One noticeable difference was that the prepainted Dark Gull Grey was
lighter than the Dark Gull Grey I used.
Once I was done, I pre shaded the interior with flat black and then
sprayed on Gunze Dark Gull Grey.
 The cockpit console
was added first, but that was actually a mistake.
I should have added the throttle column before I did that.
Don’t do it that way as the throttle column is extremely difficult to
slide under the cockpit especially when the fuselage halves are glued in place!!
The cockpit console
was added first, but that was actually a mistake.
I should have added the throttle column before I did that.
Don’t do it that way as the throttle column is extremely difficult to
slide under the cockpit especially when the fuselage halves are glued in place!!
I added 10 1/4 oz
sinkers to the portside fuselage half just behind the cockpit to keep it from
being a tail sitter. It seemed like
enough during the test fitting stage when I added the wings and stabs/rudders
(which weren’t glued in.) When I
glued the fuselage together (fit seemed okay) and I added the wings and
stabs/rudders (did not glue), the Mohawk dipped tail first.
GAAAAAH!
I gently (it was as
gentle as I could considering how frustrated I was at the time) tore apart the
fuselage using wood carving tools as I added more weight to the nose.
The final sinker total was 13 1/4 oz sinkers and a lot of CA glue to hold
them in place. I was very glad that
I didn’t install all the fine PE in the cockpit because several prominent PE
pieces fell off during the “gentle” tear down.
I managed to keep from losing them.
The roughest part
of construction (besides my own stupidity) was the sanding and filling.
With all the re-glued rough seams, PE and lead sinkers jammed into
fuselage, the fit wasn’t perfect. I
used a lot of gap filling glue to deal with with gaps around the c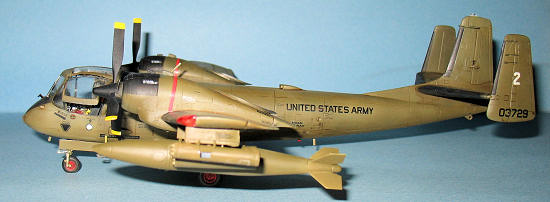 ockpit and
forward wheel well. I also had to
add several layers of CA glue to the area behind the forward wheel well because
it didn’t line up very well and then I sanded it down to match.
It took four hours of work to deal with all the seams on the fuselage,
wings and stabs and to rescribe the panel lines lost in the process.
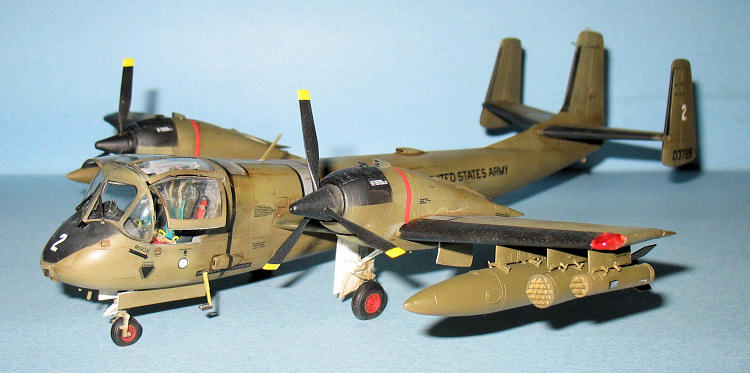
The Mohawk has various antennas that are actually part of the fuselage.
I ended up sanding these away as they would be replaced with PE versions.
ockpit and
forward wheel well. I also had to
add several layers of CA glue to the area behind the forward wheel well because
it didn’t line up very well and then I sanded it down to match.
It took four hours of work to deal with all the seams on the fuselage,
wings and stabs and to rescribe the panel lines lost in the process.
The Mohawk has various antennas that are actually part of the fuselage.
I ended up sanding these away as they would be replaced with PE versions.
Tom’s review stated
that the plastic was very grainy and it certainly was.
I took various grades of micromesh sanding cloths to remove the parts
best I could. I rubbed down the
fuselage, each wing and stab before gluing the wings to the fuse (the
stab/rudder assemblies were left off for painting reasons.
One thing I discovered from this was that the air brakes had some visible
sink mark issues and needed to be dealt with.
More sanding and filling, but nothing bad happened.
The fit of the
wings to the fuselage went together very well.
I used a little bit of white glue to deal with some obvious seams.
I glued in the speed brakes without too much problem.
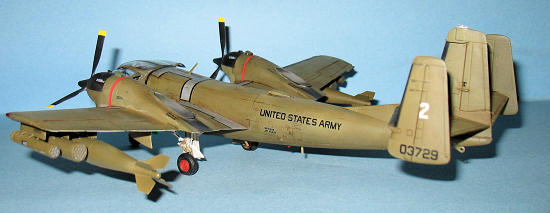
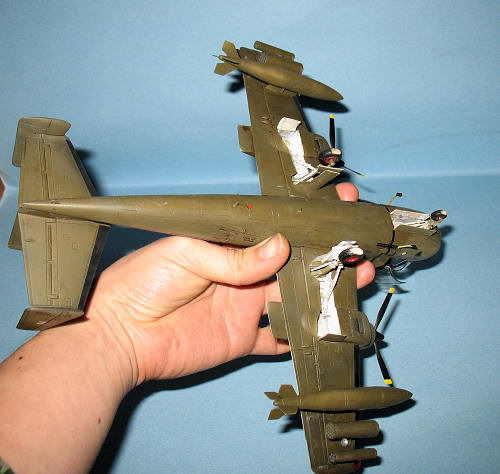
The weapons were
done next. This actually took a bit
of work as the seams needed to be sanded down and details redone.
For the most part, I did not have problems added the PE bits to the
rocket launchers. The bit of
scratchbuilding I did was to cut off the blast tubes for the .50 caliber gun
pods and replace them with (oversized) metal tubing.
Both the metal tubing and PE were glued on using PE glue.
Although I have to admit that it was a bit of a waste as I didn’t use the
.50 caliber gun pods.
I bought some white
metal landing gear from SAC earlier.
The way the Mohawk was supposed to be assembled, the landing gear was
supposed to go in before you put in the fuselage.
I did not do that due to the fact that I was still waiting for the parts
to arrive from Squadron and I have a habit of breaking landing gear during the
sanding/filling process.
I am thankful for
the bendy properties of white metal or I might have had a miserable time adding
the nose gear. One of my main
landing gear supports was slightly deformed so I had to add a piece of 30 thou
plastic card underneath to provide support or it
At this time I
added PE for the gear doors and cut away the thicker plastic doors and replaced
them with thiner PE doors.
Normally, I wouldn’t do that, but I was curious as to see how they worked which
is why I did. I actually replaced
the nose gear doors with cut 20 thou plastic card because it was easier than
sanding down the detail. I
took the time to add the PE details including hinges.
I normally don’t do that, but I decided that this model would be a test
bed for dealing with more advanced PE.
I opted not to use
the very visible kit exhausts and replaced them with PE versions that were
rolled into shape using a paint brush handle.
Instead of two seams to deal with, I only had one and this could not be
seen without a dental mirror so I was fine with it.
Also I removed the detail from the engine facings and replaced them with
PE.
It was at this
point when I decided to go with a Mohawk scheme based on the browner OD than the
glossy ones. Unfortunately, I
discovered that the markings I wanted to use
(for a JOV-1A) meant that I needed to replace the blunt nose with the
After, I sprayed
the interiors of the gear wells white then stuffed them with wet tissue paper in
preparation for painting.
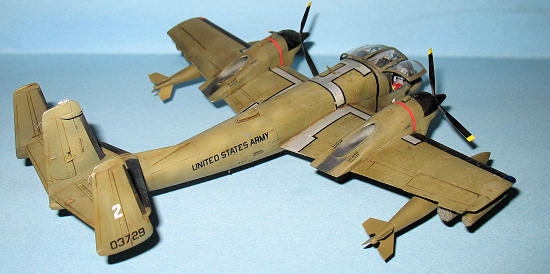
| COLORS & MARKINGS |
Painting/Construction
I first masked off
the canopy parts with the Eduard tape masks and glued them on with white glue.
Next I sprayed the plane flat black, especially on the leading edges of
the wings, stabs, tail and rudders.
Once dry, I masked off the various areas that needed to remain flat black using
Tamiya Tape. Despite the fact that
this plane is basically a single color, this planed required a lot of masking
and wasn’t the easiest to paint.
I sprayed on a
first coat of Tamiya OD. This did
not turn out so hot as Tamiya OD is not really OD as it is too green and too
dark (FS34079 I think.) I had to
use my remaining bottle of Gunze OD which is more brown.
Next I sprayed on two very light coats of
 OD to allow the preshading to
appear. Next I sprayed on a 50/50
mix of OD and dark yellow in random
places topside to give the paint a slightly worn and faded appearance.
OD to allow the preshading to
appear. Next I sprayed on a 50/50
mix of OD and dark yellow in random
places topside to give the paint a slightly worn and faded appearance.
It was at this
point when I realized that several areas needed to be sanding again as my
sand/fill work wasn’t the best. I
ended up replacing one fairing using plastic cards as I sanded it away while
dealing with those seams.
Once dry, I
attached the props and hubs to the plane.
Make sure that the props are in the feathered position.
Next I masked off the areas that weren’t supposed to be flat black and
then painted the props and engines.
Next I had to spray
the walkway markings dark grey.
This took a lot of masking and preparation to get right.
The resin wheels
were painted flat red as per instructions.
When they were dry they were masked using the Eduard tape masks and
painted NATO black. The main gear
wells were painted OD via air brush as well as the exteriors of the gear doors
while the insides were done flat white.
 It wasn’t till when
the plane was almost done that I realized that I had forgotten to paint the tips
of the propellers. Careful masking
and spraying prevented overspray.
It wasn’t till when
the plane was almost done that I realized that I had forgotten to paint the tips
of the propellers. Careful masking
and spraying prevented overspray.
I sprayed two light
coats of Tamiya gloss in preparation for the decals.
Decals
I am not happy with
Roden decals. I’m told they are
much better now, but I think my model definitely had the earlier decals as they
refused to settle down and silvered.
Even with my own gaffes in construction and dealing with PE, I have to
admit that this was the most frustrating part of the build.
I had to slice many decals and pour on the MicroSol and/or Solvaset to
get them to snuggle down. I do
recommend using aftermarket if they are available.
Weathering
I used a water
color wash made up of raw umber and burnt sienna with a drop of dish soap.
I kept the plane rather dirty, but tried to make it not too dirty.
Once the excess was
wiped away, I sealed it all in with a couple of coats of
| FINAL CONSTRUCTION |
The landing gear
proved to very complicated with all the various retractor arms.
I had to
readjust the landing gear several times to get everything to fit.
Eduard provides a lot of PE for this, but I didn’t use most of it as this
build was already a very long painful one so I decided not to do every last
detail. The roughest part was
positioning the main gear doors.
 The resin wheels
were drilled out and glued in with CA glue.
The fuel tanks and rocket pods were added at the same time using CA glue.
The resin wheels
were drilled out and glued in with CA glue.
The fuel tanks and rocket pods were added at the same time using CA glue.
The PE antennas
were added and re-added when they fell off again and again.
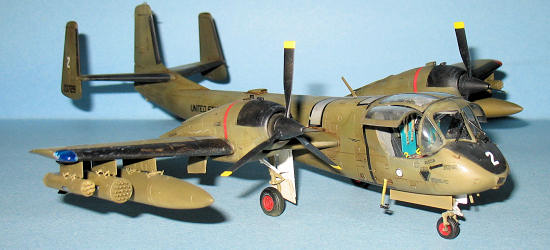
The ejections seat
plastic was assembled, painted and then modified with pre painted PE (it wasn’t
so bad, for PE.) Once the
seats were done and glued in place I added the tiny details to the cockpit such
as various levers. I’m actually
happy how it turned out as the PE details do show up in such a wide open
cockpit.
Finally, I had to
stick the canopy bits on. I first
glued on the overhead instrument panel on and it was very fiddly due to the PE.
Next I added the main windscreen.
I secured this with Tamiya Clear and filled in the gaps between with
white glue. The biggest problem was
the top piece. The reason why it
didn’t fit so well was due to the PE which I had trim (and not very cleanly
either.) Eventually after much
sanding, cutting, swearing and yelling, I managed to secure the top canopy on
with white glue. The doors proved
to be another difficult issue as they didn’t hinge at the top as I was reminded
by Tom and others. I almost
preferred to do that instead of shoving them in without much to grab onto.
I solved that problem by gluing them on with white glue to the shoulder
of the ejection seats. I can live
with this.
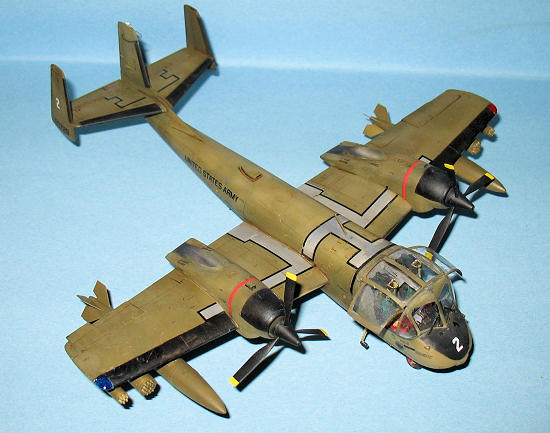
| CONCLUSIONS |
The Roden Mohawk is
the only game in town of this unique bug eyed plane in 1/48 scale.
Despite all that happened, I enjoyed
 working on this one and glad that I
have one on my shelves. Don’t
expect it to be an easy build and be prepared to put in a lot of work as even
without the PE I think this kit is a handful.
working on this one and glad that I
have one on my shelves. Don’t
expect it to be an easy build and be prepared to put in a lot of work as even
without the PE I think this kit is a handful.
If I ever build
another I think I’d rather get aftermarket decals.
As for the Eduard PE, I had no problems with it aside from the usual headaches with PE such as bending, tiny parts flying from tweezers and the fragile delicate nature of PE. I would recommend using at least a cockpit upgrade due to the rather open cockpit. The rest is probably overkill to the regular modeler. FYI Cobra Company has a similar type update set using resin and True Details has a resin cockpit.
March 2010
Thanks to If you would like your product reviewed fairly and quickly, please contact me or see other details in the Note to Contributors.