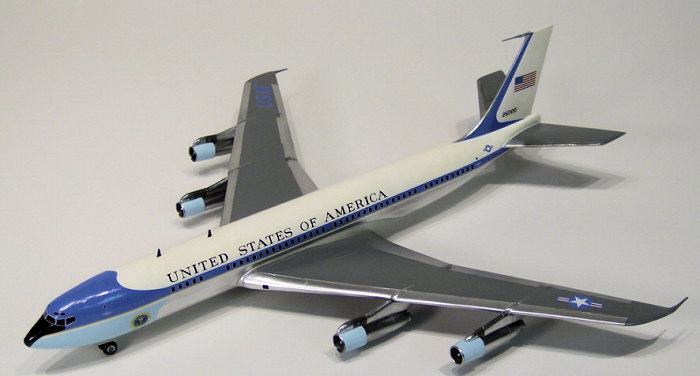
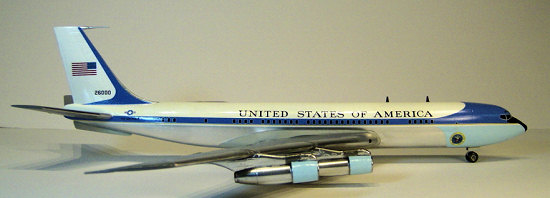
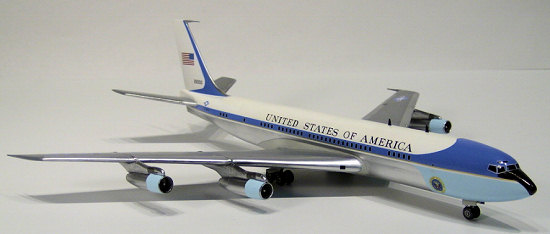
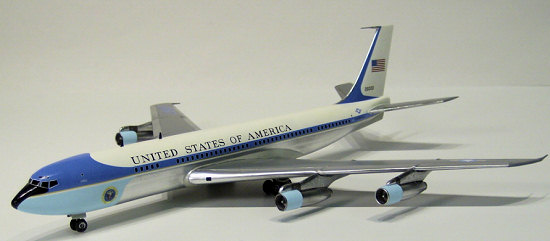
Minicraft 1/144 VC-137C
| KIT #: | 14457 |
| PRICE: | $15.99 MSRP |
| DECALS: | Two options |
| REVIEWER: | John Kauck |
| NOTES: |
| HISTORY |
The VC-137C is a modified version of the Boeing 707 Stratoliner commercial intercontinental airliner and served as the presidential aircraft for Presidents Kennedy, Johnson, and Nixon, in Tail No. 26000, and for Presidents Ford, Carter, Reagan and Bush, Sr. in Tail No. 27000, which is now permanently on display at the Ronald Reagan Library in California.
The
first jet aircraft to be specifically purchased for use as "Air Force One," tail
number 26000 entered service in October 1962. The distinctive design, which has
since become the standard for presidential aircraft, was suggested by Jacqueline
Kennedy and created by Raymond Loewy, a famous American industrial designer.
This aircraft is perhaps most widely known as the aircraft
 that carried
President John F. Kennedy to Dallas on November 22, 1963, and in which his body
was returned to Washington, D.C., following his assassination. Lyndon B.
Johnson was sworn in as the 36th president on board at Love Field in Dallas just
before that departure. This is the version I built.
that carried
President John F. Kennedy to Dallas on November 22, 1963, and in which his body
was returned to Washington, D.C., following his assassination. Lyndon B.
Johnson was sworn in as the 36th president on board at Love Field in Dallas just
before that departure. This is the version I built.
26000 also returned President Johnson's body to Texas following his state funeral in January 1973. In 1972, President Richard M. Nixon made his historic visits to the People's Republic of China in February and to the Soviet Union in May aboard 26000.
Tail number 27000, which replaced 26000, notched its place in history when it carried former Presidents Nixon, Ford and Carter to Cairo, Egypt in October of 1981 to represent the United States at slain Egyptian President Anwar Sadat’s funeral. An attempt was made to dub 27000 the “Spirit of ‘76” in honor of the U.S. Bicentennial, but the moniker never stuck, over-shadowed by the more familiar “Air Force One.” The kit provides two “Spirit of ‘76” decals, which appeared on each side of the nose of 27000.
Specifications:
Length: 152 feet, 11 inches (46.33 meters)
Wingspan: 145 feet, 9 inches (44.17 meters)
Tail Height: 42 feet, 5 inches (12.91 meters)
Engines: Four Pratt and Whitney JT3D-3B turbofan engines
Maximum Takeoff Weight: 322,000 pounds (144,900 kilograms)
Maximum Range: 6,000 miles (9,600 kilometers)
Ceiling: 42,000 feet (12,727 meters)
Speed: 530 miles per hour (Mach 0.81)
| THE KIT |
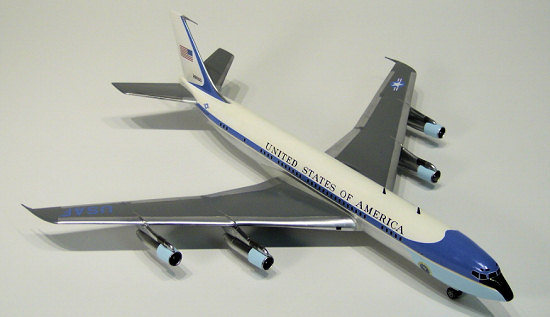
This Minicraft kit is a model of the presidential 707s. It contains the decals for both Tail No. 26000 and Tail No. 27000. Markings include the presidential seal and “The Spirit of ‘76” which was a brief moniker for 27000.
Overall, I like Minicraft kits. The parts have minimal flash and usually fit well together. The kits are generally good, albeit simple, renditions of their subject aircraft, with no interiors.
Best of all, Minicraft has excellent decals. The subjects are well rendered. The decals are thick, unquestionably opaque, and hold up very well under Micro Sol solution making it easy to get them to nestle down into and around complex curves- a big plus on this kit.
I also like the fact that Minicraft
1/144 cabin windows are usually represented with black decals rather than molded
in. It’s just 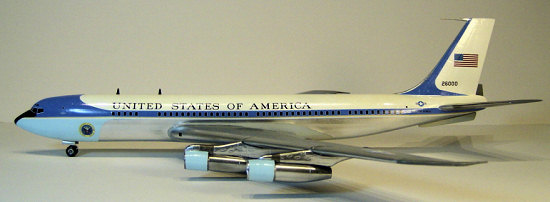 easier sliding decals rather than dealing with all those clear
parts and masking, etc. But I find it curious that the cockpit windows on Minicraft kits are usually clear, as they are on this kit. However, this kit
actually provides a black cockpit window decal which I used to give the finished
plane a more consistent appearance.
easier sliding decals rather than dealing with all those clear
parts and masking, etc. But I find it curious that the cockpit windows on Minicraft kits are usually clear, as they are on this kit. However, this kit
actually provides a black cockpit window decal which I used to give the finished
plane a more consistent appearance.
The instructions are simple, yet thorough, noting when and when not to glue, and indicating right next to the drawing what colors small parts or assemblies should be painted. A pretty good painting/decal diagram for the top and sides of the aircraft is provided on the back page, with the diagram for the bottom of the aircraft on the front page. It’s best to always check references for proper markings as painting/decal diagrams may have minor inaccuracies, as does this one (e.g., the entire leading edges of the rear wings are bare metal, and the “U.S. Air Force” decal does not go on the nose, but rather behind the rear doors on the fuselage of 26000.) Be careful to reference the right tail number as there are slight differences between the two, and even over the years on the same tail number.
The kit has three parts sprues and a single clear part, the cockpit windshield/roof. One sprue contains the right fuselage half and upper wing halves. Another contains the opposite parts. And the third contains all the other smaller parts to construct the engines, landing gear, and gear doors, etc. Again, some had minor flash to be lightly sanded, but nothing out of the ordinary.
| CONSTRUCTION |
After first gluing a few good size fishing weights into the nose cavity so the plane will sit properly on its landing gear after completion, the two fuselage halves fit together very well and were clamped then bonded with a few touches of Zap CA super thin glue, letting capillary action draw it into the seams.
Next, the clear cockpit window/roof section was attached with thick super glue, and then sanded after first covering the windshield frame lines with masking tape to preserve the scribed surface detail.
 I use the Flex.i.File system to
sand my models. I work thru the sticks down to the #3210 Polisher/Finisher file
to get a nearly glass smooth finish. This is especially important if your model
will have silver and/or metal finishes (which this one does) because
silver/metal finishes reveal every imperfection. This is also why I check all
my seams with a Metallic Silver Sharpie - it shows any little imperfections to
be corrected.
I use the Flex.i.File system to
sand my models. I work thru the sticks down to the #3210 Polisher/Finisher file
to get a nearly glass smooth finish. This is especially important if your model
will have silver and/or metal finishes (which this one does) because
silver/metal finishes reveal every imperfection. This is also why I check all
my seams with a Metallic Silver Sharpie - it shows any little imperfections to
be corrected.
After cleaning up all the seams, I re-scribed any sanded down panel lines across the top and bottom of the fuselage with my #11 blade. Checking for any remaining gaps with my silver Sharpie pen along the seams, I spot filled any imperfections with thick or thin super glue as necessary and final sanded.
The front wing halves also fit well together, and were also tacked with thin Zap. After sanding/smoothing each separately, I attached the front wings to the fuselage. They each have slats that intertwine with each other from the opposite sides inside the fuselage. I dry fit them to make sure every thing lined up properly and that the seams at the wing roots would align. I had to increase the opening in the fuselage for the slat on the left side further back toward the tail to get the proper alignment on that side. Then I used generous portions of thick super glue on the opposing slat surfaces, carefully slid the two wings into the fuselage making sure the slats intertwined correctly, then while holding each in proper alignment one at a time, used thin super glue at each wing root seam via capillary action to “lock” them in place.
The rear wings were molded as single pieces and required only very light sanding around the edges. I left them off, after carefully dry fitting and sanding so it would be just a matter of tacking them in place with a tiny drop of CA in each receiving hole as the last step after applying decals, to make that task easier.
The engines required some special attention. Like most kit jet engines, these are molded in two halves with the fan blades as a third piece to be set inside the two joined halves. On each engine, I went through a few iterations of dry fitting and sanding the fan blade piece them finally glued it to one of the engine halves, and then glued the two halves together. Next I filled the gaps where the two halves meet at the top and bottom, both outside and inside as well to get the interior smooth.
 Making sure to get those inside
seams round and smooth is crucial to a good-looking final product because the
engines are so prominent on this aircraft. The inside sanding was done with
progressively finer grit small rolled sandpaper sheets which I twisted back and
forth inside the opening to get the interior of the engines smooth and make the
seams disappear. I then left the engines off the wings for painting separately.
Making sure to get those inside
seams round and smooth is crucial to a good-looking final product because the
engines are so prominent on this aircraft. The inside sanding was done with
progressively finer grit small rolled sandpaper sheets which I twisted back and
forth inside the opening to get the interior of the engines smooth and make the
seams disappear. I then left the engines off the wings for painting separately.
On this kit, the engine mounts are specific to each side of the plane and to their inner or outer positions on the wing. I kept track of which was which by marking them with the part number to ensure correct placement later.
Next, I cut and cleaned all the landing gear pieces, i.e., the tire/hubs, struts and gear doors. Then I dry fit them to each other and to the aircraft and left these pieces off the aircraft and wings for painting separately and attachment later.
| COLORS & MARKINGS |
This kit requires both metallics and colors. For the metallics, I used the Alclad ll metal painting system. For those not familiar, the Alclad system consists of a black primer coat, which dries as smooth as glass, over which the metallic carrier coats are sprayed. You can also spray the metallic carrier over high gloss paint finishes as well, which I did on this kit for the leading edge of the tail fin over the white gloss paint. While the primer requires at least 24 hours to cure, the subsequent metallic carrier coat(s) dries within a half hour and then may be masked and painted over if needed.
For the colors, I used enamels. The instructions only indicate basic general colors, e.g. Light Gray, Dark Gray, Polished Aluminum, etc. I used Testors #1145 Gloss White on the fuselage top. I also used Model Master FS#36492 Light Gray and FS#36231 Dark Gull Gray. And of course flat black for the tires.
I almost always make actual size
copies of the decal sheet. In this case, they particularly came in handy as
templates to determine 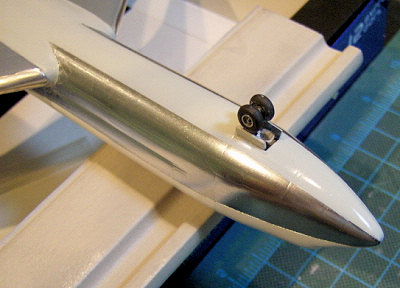 where to mask along the separation line between the white
top and natural metal bottom of the fuselage. I cut out each entire decal copy
and trimmed it right on the bottom edge of the stripe lines. I found that
lining up the decal door portholes/handles over the scribed door detail on the
model gave me the required alignment, and I taped them in place. I then
slightly folded back the decal template and masked under the stripes. Afterward,
I spot checked by holding my thumbnail at the bottom of the windows and folding
back the template. I should always see masking tape to know I didn’t mask too
high and that the decal will cover the line between white and metal when I put
them on.
where to mask along the separation line between the white
top and natural metal bottom of the fuselage. I cut out each entire decal copy
and trimmed it right on the bottom edge of the stripe lines. I found that
lining up the decal door portholes/handles over the scribed door detail on the
model gave me the required alignment, and I taped them in place. I then
slightly folded back the decal template and masked under the stripes. Afterward,
I spot checked by holding my thumbnail at the bottom of the windows and folding
back the template. I should always see masking tape to know I didn’t mask too
high and that the decal will cover the line between white and metal when I put
them on.
The following is the order in which I primed, masked and painted the aircraft:
1. White Primer, then Gloss White Paint:
· Mask wings
·
Spray entire fuselage and tail
2. Alclad Primer:
· Mask upper fuselage as described above
· Spray bottom of fuselage
· Front wings; top & bottom
·
Rear Wings Top and bottom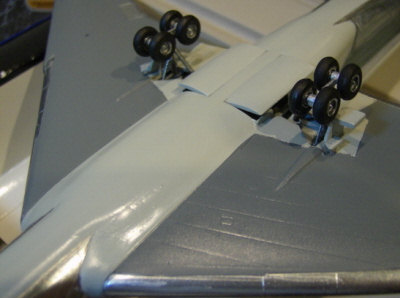
· Engines
· Landing gear
· Tire hubs
·
Tail fin antennae
3. Alclad Polished Aluminum:
· Spray bottom of fuselage
· Front wings; leading edges and rear flaps; top & bottom
· Rear wings: leading edges top and bottom
· Masked then sprayed the tail fin leading edge (the carrier will work fine on the smooth gloss white surface)
· Engines
· Landing gear
· Tire hubs
· Front and rear gear door interiors
·
Tail fin antennae
4. Dark Gray:
· Mask front wings; leading edges and rear flaps top and bottom
· Mask rear wings: leading edges top and bottom
· Spray front wings
·
Spray rear wings
 5.
Light Gray:
5.
Light Gray:
· Mask around the fuselage wing mount area and around the front wings, around the center of the bottom of the fuselage, and around gear door openings on bottom of front wings as instructions indicate.
· Mask the rest of the wings, and the rest of the fuselage and tail.
· Spray the fuselage mount area around the front wings, the center of the bottom of the fuselage, and around gear door openings on bottom of front wings.
·
Spray gear doors.
6. Flat Black:
· Carefully brush the tires around the aluminum hubs
| FINAL CONSTRUCTION |
After everything was allowed to dry for at least 48 hours, I attached all the remaining parts and assemblies to the plane, except for the engines and rear wings, which I left off until after decaling to make that task easier.
Attaching the landing gear, struts, and gear doors, etc., with just a tiny drop of super glue is an extremely delicate task. Precise placement of these often tiny parts without unsightly gobs of glue is always difficult at the 1/144 and smaller scales. I find the use of a “third hand” indispensable. Available at most hobby shops and on-line, it is a small stand with a heavy iron base and one or more ball joint mounted arms with alligator-type spring clamps to hold a part in any angle required. I use them in combination with plastic hemostats (i.e., scissor clamps,) so as not to scratch the part, to position and then hold these small parts in place while the super glue dries, as using super glue accelerant will mare the finish and maybe even dissolve surrounding paint.
 Again, to make it easier to put on
the decals, I attached the engines and the rear wings after decals. They went
on with tiny drops of super glue in each of the receiving holes, placed with a
toothpick, and then holding the part in place a few moments. Remember to place
the engine/mounts in the correct position on the plane and wings.
Again, to make it easier to put on
the decals, I attached the engines and the rear wings after decals. They went
on with tiny drops of super glue in each of the receiving holes, placed with a
toothpick, and then holding the part in place a few moments. Remember to place
the engine/mounts in the correct position on the plane and wings.
Minor Detailing: My references revealed various antennae on top of the fuselage and from the wing tips. While the kit didn’t provide them, I felt they were prominent enough to warrant scratch building them. I made the wing tip antennae from stretched sprue. I made the fuselage antennae from flat thin plastic stock and trimmed and sanded to fit the bill, then painted them black. I also place these antennae on after decals, using the decals as guides for the attachment points as compared to my references. (Note: check your references carefully as the number of, size, shape, and placement of antennae changed over the years and from 26000 to 27000.)
Markings/Decals:
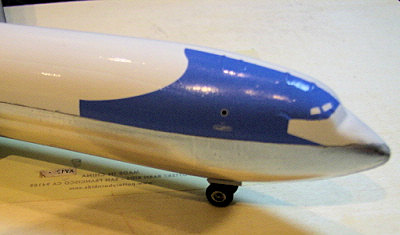
Decal placement is challenging. The key to getting the proper alignment of the decals is to start with the front decals over the cockpit. Getting them placed properly is crucial as the rest of the decals going back down the fuselage align to these front decals. I took my time and used plenty of the red Micro Sol “for highly irregular surfaces” as these decals must conform completely around the cockpit. They flattened out beautifully.
Again, this kit provides black cockpit window decals to cover the clear cockpit windows (which I had previously painted over with the white gloss paint.) to match the black cabin windows. I first carefully trimmed away the clear carrier film connecting them before floating, and then placed them one by one inside the scribed cockpit window lines. I then trimmed and placed the blue window framing decals between the black window decals, leaving just a sliver of white painted surface below to show through around the black windows to give the effect of window frames.
 The fuselage decals are delivered
in 4 sections, 2 for each side, one long with the “United States of America”
above the windows/blue, gold & white trim line, and one short decal to fit
below/around the rear tail wing root areas. (Another reason I left the rear
wings off until after decals.)
The fuselage decals are delivered
in 4 sections, 2 for each side, one long with the “United States of America”
above the windows/blue, gold & white trim line, and one short decal to fit
below/around the rear tail wing root areas. (Another reason I left the rear
wings off until after decals.)
I used the cockpit decals and rear door scribings to properly align the decals as I laid them down working from front to back down the plane. I lined up the decal door portholes/handles right over the scribed door lines in the model.
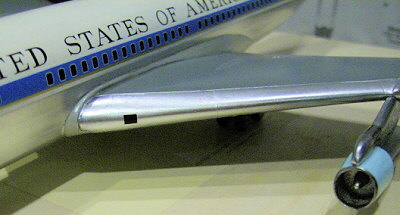
I placed the tail blue section decals, flag decals, and tail number decals on each side of the tail fin. My references showed the flags right in the middle of the tail fin. Using my dividers, I ensured the space between the top of the tail fin and the top of the flags was an equal to the space between the base of the tail fin and the bottom of the flags and that both were in the same spot on each side. Then I used my dividers to make sure the tail numbers were the same height from the base of the tail fin on each side. I also used black decal stock to make two black rectangles to represent lights each of the main wings near the fuselage as per my references.
Finally, my references showed that on the earliest 26000, which is what I modeled, the “U.S. Air Force” decal goes behind the rear fuselage doors just in front of the rear wing, on the blue stripe just below the insignia – NOT on the nose as the instruction sheet shows. (In fact, my research revealed that it was never on the nose, but the “Spirit of ‘76” was on the nose of 27000 briefly in 1976 and 1977.)
After letting the decals dry over night I attached the engines, the rear wings, and the antennae. I then gave the entire model a coat of Future to give it a gloss finish.
| REFERENCES |
· Planes of the Presidents: An Illustrated History of Air Force One; Bill Holder; Schiffer Military History Books, Atglen, PA, 2000
· Various/numerous web sites for reference photos, generated by search engine entries on each plane’s military designation, callsign, and/or nick name, i.e., “VC-137C” and/or “Air Force One” into Google Images and scroll through the results and you’ll get at plenty of good photos from many angles. Remember to reference the correct tail number as there are some differences between them and even within each over the years. Save the photos (right click on them and click “save photo as”) to your hard drive, then just zoom in on the area you want.
| CONCLUSIONS |
FYI, this was the sixth kit in a little theme build I’ve done of the history of presidential aircraft, of a total of eight planes and one helicopter. (See my other reviews of Presidential/VIP Aircraft.)
I enjoyed the kit. It’s a fairy easy kit to build, but with some slightly tricky masking, painting, and decal placement. It should be a good challenge/practice for a beginner (especially the decals around the cockpit) and a fun build for the intermediate (me) to expert modeler.
Happy Modeling!
December 2007
If you would like your product reviewed fairly and fairly quickly, please contact the editor or see other details in the Note to Contributors.