Airmodel
1/72 Helio U-10B "Psy-War Version"
| KIT #: | AM7006 |
| PRICE: |
|
| DECALS: | Three options |
| REVIEWER: | William Alcott |
| NOTES: | Limited run kit, long out of production |
| HISTORY |
The Helio
Courier was the best-known (if that can be said about a fairly obscure aircraft)
product of the Helio Aircraft Corporation, founded in 1948 to develop a STOL
(Short Take-off and Landing) utility aircraft.
If Wikipedia can be trusted, 60% of the Helio Couriers built were
delivered to the
The
Courier's outstanding short-take off and low-speed performance was due to the
large trailing edge flaps and nearly full-span leading edge slats.
These features enabled the Courier to operate out of very short
unprepared airstrips, such as the numerous
Helio developed a turboprop version of the Courier as the Helio Stallion. This was evaluated by the USAF as the AU-24A mini-gunship, and a small number were supplied to the Royal Khmer (Cambodian) Air Force.
| THE KIT |
Long before the current heyday of
limited run injection moulded kits, Airmodel of 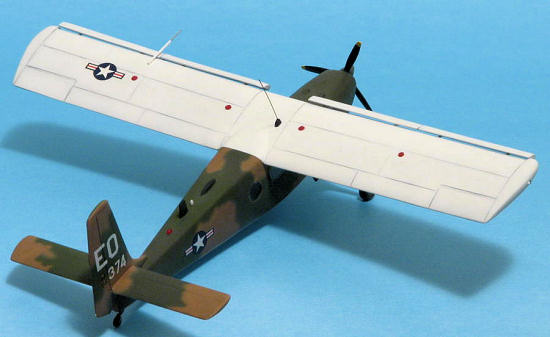 nts
- were these ever released?). The
copyright date on the instructions of my kit is 1989.
I should note that I have never seen this kit for sale - I picked mine up
second hand (thanks Haydn). The kit
is presented in a surprisingly professional full colour box (reminiscent of
Italeri), and comes complete with decals.
nts
- were these ever released?). The
copyright date on the instructions of my kit is 1989.
I should note that I have never seen this kit for sale - I picked mine up
second hand (thanks Haydn). The kit
is presented in a surprisingly professional full colour box (reminiscent of
Italeri), and comes complete with decals.
Given the
Courier's extensive fuselage windows, Airmodel decided to mould the entire
fuselage, along with the tailplanes, landing gear fairings and many small parts
in clear plastic. The wing, prop,
wheels and interior parts are provided on a second sprue of white plastic.
The moulding quality is variable - the major parts are decent, but the
surfaces of many parts are pitted.
The trailing edge of the wing is very thick.
Many small parts, such as the tailwheel and control wheels, are not fully
moulded, while others, such as the prop, are marred by sink marks, or embedded
in flash.
The
mediocre quality of the parts is somewhat made up for by the instructions -
three double-sided photocopied A4 sheets, with a history in German and English,
a numbered parts map with a list of the parts (no part numbers are given on the
sprues), a three-view copy of the U-10 camouflage scheme from Technical Order
1-1-4 with modelling paint references, an exploded view drawing of the parts, a
sketch of the interior structural framework, and finally two pages showing the
decal options, with 1/72 scale profile and elevation drawings.
This last item came in very handy, as the drawings are very detailed and
accurate.
Finally, the kit includes a small decal sheet, offering stars and bars, tail codes, and serial numbers for three aircraft - two U-10Bs and a U-10D.
| CONSTRUCTION |
I started
by cleaning up the major parts. I
sanded and polished the clear fuselage halves inside and out.
The kit interior provides seats, a floor, an instrument panel, and two
control wheels. The control wheels
were poorly moulded, so I scratchbuilt replacements.
I also detailed the control panel based on photos from the web.
I used the kit seats, with added masking tape belts.
The instructions provide a scrap view showing the tubular fuselage
framework. I painstakingly
reproduced this with Evergreen rod, before realising that there typically is an
interior skin covering this structure!
When painting the interior, I masked the insides of the windows.
I traced the window outlines on a piece of Scotch tape, then cut the
masks out and applied them to the inside surface.
 next
step was to fit the windscreen. The
kit part was thick and uneven.
Nothing a little polishing couldn't fix, or so I thought!
After an intensive polishing session, I split the windscreen in two,
right down the centre-line.
Basically, at this point, I gave up on this model for about five years.
next
step was to fit the windscreen. The
kit part was thick and uneven.
Nothing a little polishing couldn't fix, or so I thought!
After an intensive polishing session, I split the windscreen in two,
right down the centre-line.
Basically, at this point, I gave up on this model for about five years.
Determined to get this kit off the workbench, I tried several times to replace
the kit windscreen with a thermoformed part.
This involved a lot of trial and error, and I eventually determined that
the kit part was pretty poorly shaped.
In the end, I had to extend the upper surface of the engine cowl back
over the instrument panel coaming by several millimetres, using scrap plastic
and lots of gap filling superglue.
I thermoformed my new windscreen over a carved balsa mould.
With lots more superglue, sanding, filling and polishing, I managed to
get this faired in, and looking half decent.
Moving to
the tailplanes, the kit parts were cleaned up, and drilled to accept wire
mounting pins. There are no
alignment pins or mounting tabs on any of the kit parts.
I used a razor saw to open the gap between the top of the vertical tail
and the rudder mass balance, as this gap is evident in photos.
I also added a small rudder trim tab and a white position light at the
base of the rudder.
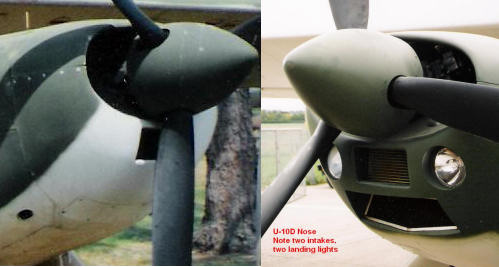 At the
front end, Airmodel provide a separate nose cap, and a cooling flap for the
underside. Carefully examining
photos showed there are differences in the cowl between U-10A/B and U-10D
aircraft. The kit reflects the
U-10A configuration, with a single intake below the prop, and no landing lights.
I wanted to build a U-10D, so I cut away the chin, and rebuilt the second
intake. I also drilled out holes to
later fit landing lights. I've
included two photos to show the difference in the intake configuration.
I replaced the cooling flap with thin sheet, and added twin exhaust pipes
from Evergreen rod.
At the
front end, Airmodel provide a separate nose cap, and a cooling flap for the
underside. Carefully examining
photos showed there are differences in the cowl between U-10A/B and U-10D
aircraft. The kit reflects the
U-10A configuration, with a single intake below the prop, and no landing lights.
I wanted to build a U-10D, so I cut away the chin, and rebuilt the second
intake. I also drilled out holes to
later fit landing lights. I've
included two photos to show the difference in the intake configuration.
I replaced the cooling flap with thin sheet, and added twin exhaust pipes
from Evergreen rod.
The kit
prop was marred by a huge sink mark in the hub.
I couldn't find anything in the spares box that was could be used as a
direct replacement, so I sanded down a Matchbox Twin Otter hub, and fitted the
kit blades to it.
The wing
required two major improvements.
First, I scraped and sanded the trailing edge down to somewhere approaching
scale thickness, while trying to remove many of the pits and scars in the kit
parts. The U-10 featured four
segmented leading edge slats, which retracted under air pressure, and deployed
under gravity. Thus, a U-10 on the
ground should have the slats deployed.
To show this, I
 first
removed the slats from the wing. I
carved the removed leading edges to create the slats.
I then glued some Evergreen rectangular section stock to the leading
edge, and rebuilt the section under the slats.
I glued two short lengths of wire into the leading edge of the wing to
support each section of slat.
first
removed the slats from the wing. I
carved the removed leading edges to create the slats.
I then glued some Evergreen rectangular section stock to the leading
edge, and rebuilt the section under the slats.
I glued two short lengths of wire into the leading edge of the wing to
support each section of slat.
The kit
offers a choice of faired or exposed main landing gear struts.
The unfaired struts are pretty crudely moulded, and are best replaced
with metal wire. The aircraft I was
modelling had the faired struts, so I simply added some wire pins to the kit
parts to strengthen the mounting points.
The end of the strut simply rests on a moulded ledge on the back of each
wheel. I was lazy and didn't
reinforce the joint, using plenty of superglue instead.
The tailwheel was incompletely moulded, so I build a replacement with
Evergreen rod, tube, wire, and lead foil.
As part
of its Psy-ops role, the U-10 was fitted with a loudspeaker on the port side,
and a leaflet chute. I rebuilt
parts of the kit speaker to improve the detail, though I lacked specific
references on this particular style of loud speaker.
The kit includes a square cut-out in the starboard rear door, which
removed as I could find no supporting reference.
I added a belly mounted leaflet dispenser chute, as seen on the USAF
museum example.
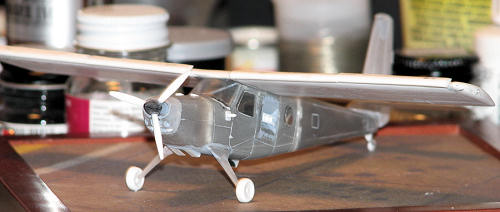
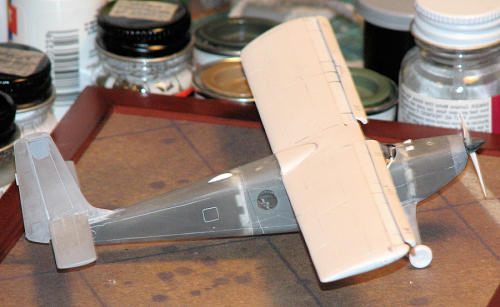 With all
the major parts together, I started priming.
It was at this point that I started to see some of the disadvantages of
the use of clear plastic for the fuselage.
All panel lines are recessed, and once they are under a coat of paint,
they become rather Matchbox trench-like in appearance.
I planned to fill them with gap filling superglue, and then rescribe
them. However, I found that the kit
plastic did not take well to scribing or superglue!
Any attempt to rescribe simply removed the previously applied filler.
In the end,
With all
the major parts together, I started priming.
It was at this point that I started to see some of the disadvantages of
the use of clear plastic for the fuselage.
All panel lines are recessed, and once they are under a coat of paint,
they become rather Matchbox trench-like in appearance.
I planned to fill them with gap filling superglue, and then rescribe
them. However, I found that the kit
plastic did not take well to scribing or superglue!
Any attempt to rescribe simply removed the previously applied filler.
In the end,
I filled
almost all the fuselage panel lines, as I couldn't find a way to give them a
consistent appearance.
At the last minute, I found another flaw in the kit. The fuselage halves are moulded with a front door on the port side, and both a front and rear door on the starboard side. The correct configuration, as shown in the scale drawings in the instructions, is a front door to port, and only a rear door to starboard. This necessitated another round of filling and sanding to address. I'd recommend trying to fix this before the fuselage halves are assembled, and definitely before the wing is added!
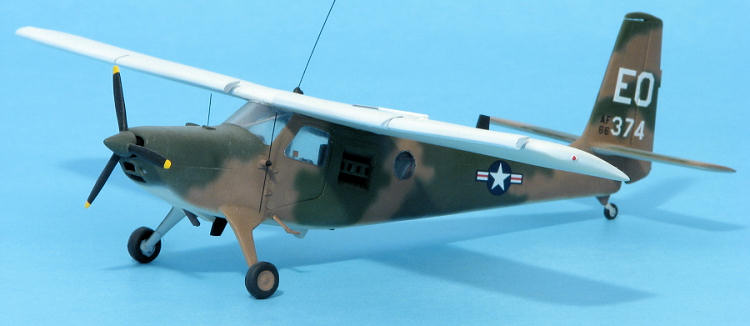
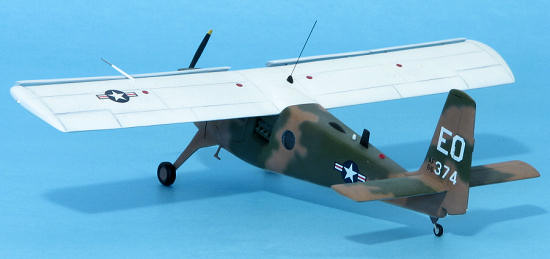
| COLORS & MARKINGS |
The kit offers decals for three aircraft
- two U-10Bs in the standard
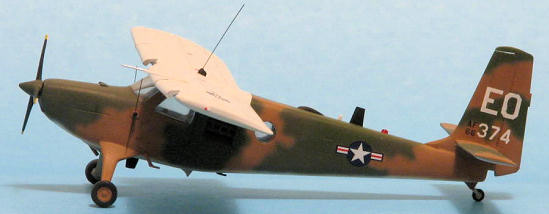 After
priming, I painted the white wing using Model Master flat white enamel.
When dry, I masked this, then painted each of the four colours of the
After
priming, I painted the white wing using Model Master flat white enamel.
When dry, I masked this, then painted each of the four colours of the
After the
main colours were dry I sprayed a coat of Micro Gloss in preparation for decals.
I find this gloss does not yellow significantly, important with the white
upper wing.
I was
pleasantly surprised with the (then) 17 year old kit decals.
After trimming excess carried film, they went on without a problem.
The stars and bars were in perfect register, and the white tail codes and
serials were opaque.
After the
decals had dried overnight, I applied a coat of Polly Scale clear flat.
I found this frosted slightly, a problem I have had occasionally with
water-based clear flat coats. I
buffed the model slightly with an old shirt to give it a slight sheen, as
evident in some photos.
| FINAL CONSTRUCTION |
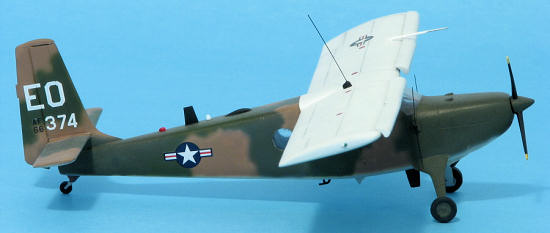 Final
construction involved installing the slats and prop, and adding the aerials,
which were mostly made from stretched sprue and scrap sheet.
I also added a red beacon on the spine, carved from a piece of clear red
sprue. The wing tip lights were
touched in using Tamiya and Gunze clear colours.
The nose mounted landing lights were added from polished pieces of clear
sprue, glued in place with Krystal Klear.
I couldn't find a definitive picture as to how the pitot tube was
mounted, so I took an educated guess and attached it to the top of the port
wing, so it would clear the retracted slats.
Finally, the pilot's boarding step was added.
Final
construction involved installing the slats and prop, and adding the aerials,
which were mostly made from stretched sprue and scrap sheet.
I also added a red beacon on the spine, carved from a piece of clear red
sprue. The wing tip lights were
touched in using Tamiya and Gunze clear colours.
The nose mounted landing lights were added from polished pieces of clear
sprue, glued in place with Krystal Klear.
I couldn't find a definitive picture as to how the pitot tube was
mounted, so I took an educated guess and attached it to the top of the port
wing, so it would clear the retracted slats.
Finally, the pilot's boarding step was added.
| CONCLUSIONS |
While I
think the U-10 is a great looking aircraft, and I'm very glad to have a model of
one, I would think twice about building another.
I would recommend this kit only to those dedicated to having a U-10 in
their collection. It would be great
to have an AU-24 in the collection to park it next to!
| REFERENCES |
L'avion anonyme de guerres secrètes,
Fana de l'aviation,
November 2000
Vietnam Warbirds in Action, Dana Bell
July 2010
Copyright ModelingMadness.com. All rights reserved. No reproduction in any form without express permission from the editor.
If you would like your product reviewed fairly and quickly, please contact the editor or see other details in the Note to Contributors.