Airmodel 1/72 C-117D
| KIT #: | ? |
| PRICE: | 12.25 euros |
| DECALS: | None provided |
| REVIEWER: | Carmel J. Attard |
| NOTES: | A vac form conversion kit, no decals and require parts from Airfix/ Italeri C-47/DC-3 kit. |
| HISTORY |
At
the end of WWII, all aircraft manufacturers were stimulated to intense civil
activity in an attempt to produce the most efficient and economical aircraft in
a given class, a task, which was not so easy as it first sounded. A legend soon
sprang up that the only replacement for a DC-3/C-47 was another DC-3, and
surprisingly though many tried to produce a better design than the then 12 year
old DC-3 it was going to be many years before such a situation did come about.
 Such was
the long life of the DC-3 airframe that
Such was
the long life of the DC-3 airframe that
The airliners were
unimpressed. Though seeking interim equipment before the arrival of the jets
they found the cost of converting a war surplus C-47 almost as much as buying a
new twin-engined, tricycle-undercarriage, Convair 240, and thus the DC-3s idea
almost died.
The USAF was equally
unimpressed and took the airliners view that the Convair C-131 was much to be
preferred, so it was left to the USN and USMC to eventually decide that a large
proportion of their weary R4D-5 fleet could be usefully revived by receiving the
DC-3s treatment, and a hundred or so machines were phased through Douglas, to
emerge as R4D-8s. During the revision of July 1962 when all service airframe
designations were rationalised, the R4D-8 became known as the C-117.
The conversion to C-117 standards consisted by the
installation of more powerful engines, the fitting of new wings, a new tail
unit, and modification of the undercarriage. The result of this conversion is
virtually a new aeroplane, but proposals for similar commercial conversions did
not meet with success.
 The new
medium-range military transport was powered by two 1,535 h.p. Wright R-1820-80
radials giving a maximum speed 270mph at 5,900 ft; and cruising 251mph at 15,400
ft. The C-117 had a wingspan of 90ft and a length of 67ft 8.5 in.
The new
medium-range military transport was powered by two 1,535 h.p. Wright R-1820-80
radials giving a maximum speed 270mph at 5,900 ft; and cruising 251mph at 15,400
ft. The C-117 had a wingspan of 90ft and a length of 67ft 8.5 in.
Between 1964 and 1969 I
have recorded over 8 different US Navy C-117Ds landing at Hal-Luqa airfield,
| THE KIT |
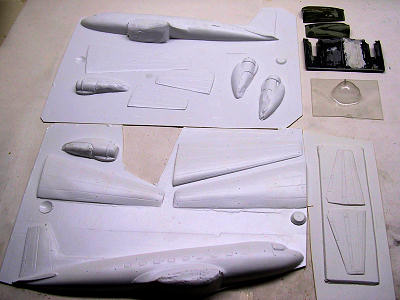 This is a
vac form model in white Styrene, somewhat basic but a good model to build a
C-117 containing all the different parts which when merged with other DC-3 items
makes a very satisfactory model. The parts that should be added consist of a
pair of propellers, undercarriage assembly, wing central section and possibly
the port cargo doors. All parts are otherwise there to complete the model of the
C-117D. This of course requires a certain amount of detail work as well as
correction of some of the parts. Good scale plans are provided. These not only
show side and plan view elevations but also detail scrap views of the interior
so that the cargo compartment with basic seating arrangement as well as cockpit
office is provided. Drawings include those for rear and aft bulkheads as well as
cargo deck, all of which are cut and shaped from backing sheet of plastic.
This is a
vac form model in white Styrene, somewhat basic but a good model to build a
C-117 containing all the different parts which when merged with other DC-3 items
makes a very satisfactory model. The parts that should be added consist of a
pair of propellers, undercarriage assembly, wing central section and possibly
the port cargo doors. All parts are otherwise there to complete the model of the
C-117D. This of course requires a certain amount of detail work as well as
correction of some of the parts. Good scale plans are provided. These not only
show side and plan view elevations but also detail scrap views of the interior
so that the cargo compartment with basic seating arrangement as well as cockpit
office is provided. Drawings include those for rear and aft bulkheads as well as
cargo deck, all of which are cut and shaped from backing sheet of plastic.
| CONSTRUCTION |
The
kit was released over 25 years ago and was the first of the type to appear in
1/72 scale. A welcome addition at the time however certain parts need to be
improved to make a good representation and these include the cowling area, tail
end, and shape of fin and rudder and nose area. Whereas the panel lines appear
well represented particularly those on wing surfaces these needed refresh
scoring.
Construction starts by
marking around the edges with a soft pencil before scoring with a sharp pointed
blade and gently snapping them away from the backing sheet.. This is followed by
wet and dry sanding on an abrasive sheet taped to a flat
 surface.
This is much easier than using a sanding block, as it is a fairly large kit. In
doing so it allows more control of pressure, which is evenly spread on the whole
surface of parts. After preparing the two fuselage, two wing halves, two tail
plane halves and engine cowling pieces these are sanded and care is taken not to
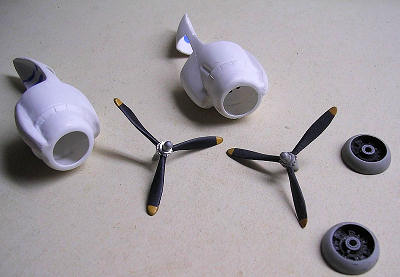
reduce these excessively due to the soft plastic. Engine cowlings are checked
with drawings and a mild defect is corrected with a small amount of filler and
shaping with needle files. The Airfix radial engines are carefully inserted
inside the cowling, which is now assembled to form a complete cowling less wheel
well doors that were carefully cut and left to a later stage. The doors were
further detailed by adding an inner surface with cut round areas. The lower air
intake is somewhat crudely represented but with care and reference to drawing
provided and photos will have the intake cut open and a gauze added inside. The
outer sides of the cowlings are further shaped with needle files, a deflector
plate added to each side and also a long exhaust pipe made from sprue is added.
This had the outlet drilled open.
surface.
This is much easier than using a sanding block, as it is a fairly large kit. In
doing so it allows more control of pressure, which is evenly spread on the whole
surface of parts. After preparing the two fuselage, two wing halves, two tail
plane halves and engine cowling pieces these are sanded and care is taken not to
reduce these excessively due to the soft plastic. Engine cowlings are checked
with drawings and a mild defect is corrected with a small amount of filler and
shaping with needle files. The Airfix radial engines are carefully inserted
inside the cowling, which is now assembled to form a complete cowling less wheel
well doors that were carefully cut and left to a later stage. The doors were
further detailed by adding an inner surface with cut round areas. The lower air
intake is somewhat crudely represented but with care and reference to drawing
provided and photos will have the intake cut open and a gauze added inside. The
outer sides of the cowlings are further shaped with needle files, a deflector
plate added to each side and also a long exhaust pipe made from sprue is added.
This had the outlet drilled open.
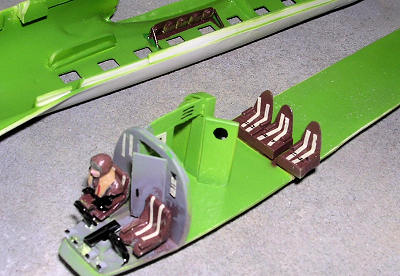 The
interior compartments are now built up from the extra plastic that comes with
the kit. Using tracing paper these were drawn on the flat sheet sections and
cut, built up and seats added where appropriate. Fuselage is also cut, sanded
brought to correct width and all rectangular portholes cut and shaped
accordingly. An extra smaller window is also added to the starboard forward
fuselage and two small portholes are drilled at forward fuselage. Intermittent
plastic stabs are added on the inside to join the fuselage halves together once
the interior is assembled and painted. The central wing section from an old
Airfix kit was prepared so that it securely fits the centre of fuselage. Wing
sections are sanded from both the inside and also the outside otherwise they
will show being on the thick side. Careful scraping along the length of the
wings brought the required airfoil section thickness. A slot was cut to insert a
piece of clear plastic to form the leading edge light to port wing.
Tail planes were also corrected at the rear root area.
Fai
The
interior compartments are now built up from the extra plastic that comes with
the kit. Using tracing paper these were drawn on the flat sheet sections and
cut, built up and seats added where appropriate. Fuselage is also cut, sanded
brought to correct width and all rectangular portholes cut and shaped
accordingly. An extra smaller window is also added to the starboard forward
fuselage and two small portholes are drilled at forward fuselage. Intermittent
plastic stabs are added on the inside to join the fuselage halves together once
the interior is assembled and painted. The central wing section from an old
Airfix kit was prepared so that it securely fits the centre of fuselage. Wing
sections are sanded from both the inside and also the outside otherwise they
will show being on the thick side. Careful scraping along the length of the
wings brought the required airfoil section thickness. A slot was cut to insert a
piece of clear plastic to form the leading edge light to port wing.
Tail planes were also corrected at the rear root area.
Fai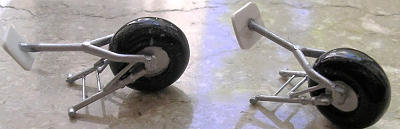 ring
with Plasto filler was essential. Panel lines were redrawn and tail planes were
inserted inside a slot cut at the rear fuselage. Cockpit area was prepared to
receive the clear acetate canopy. A cardboard jig was drawn, cut and assembled
so that when the wings are joined to the fuselage they rest on this jig and have
the correct dihedral while they are setting. A tail wheel was added from spares.
This had the leg built up from plastic card as it differed from the C-47 wheel
that comes in the Airfix kit. The main wheels also had a 1mm insert added at the
centre to broaden their track. Detail also added to the oleo legs as per
drawing.
ring
with Plasto filler was essential. Panel lines were redrawn and tail planes were
inserted inside a slot cut at the rear fuselage. Cockpit area was prepared to
receive the clear acetate canopy. A cardboard jig was drawn, cut and assembled
so that when the wings are joined to the fuselage they rest on this jig and have
the correct dihedral while they are setting. A tail wheel was added from spares.
This had the leg built up from plastic card as it differed from the C-47 wheel
that comes in the Airfix kit. The main wheels also had a 1mm insert added at the
centre to broaden their track. Detail also added to the oleo legs as per
drawing.
| COLORS & MARKINGS |
The kit took exactly 4
weeks to complete. The C-117 in Naval and Marines service carried a variety of
liveries. The first rebuilt aircraft were phased into operation during the
latter part of 1951, and the work proceeded steadily over the next two years.
The 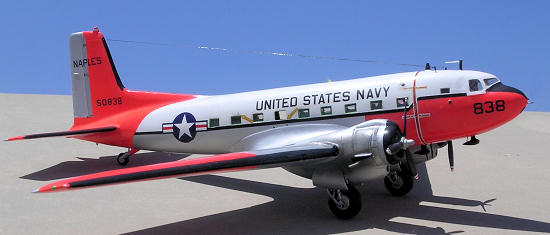 early
machines were finished only in anodised metal, but soon an overall finish of
light grey was standard.
early
machines were finished only in anodised metal, but soon an overall finish of
light grey was standard.
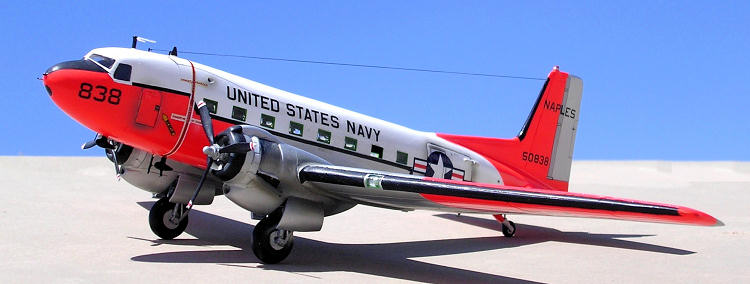
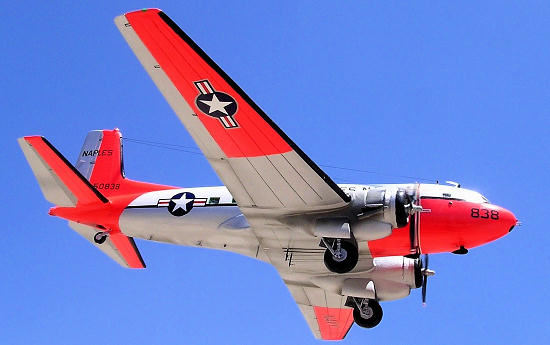
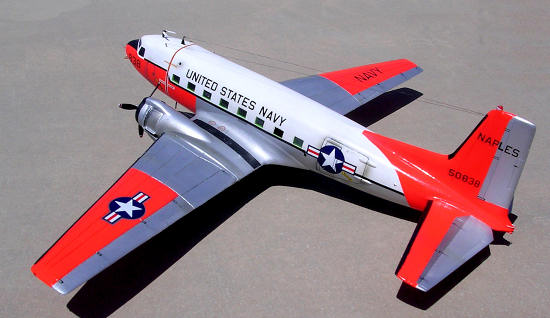
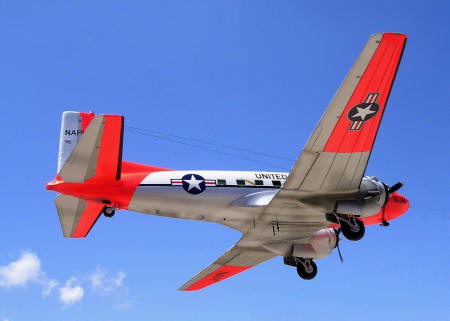
By the mid 50s a smarter paint scheme existed, having a white top to the cabin and upper surfaces, but still with light grey to rest of the aircraft. Some retained the silver fuselage and wings, particularly the ones that came during the Day-glow orange colours era. Cockpit interior was dark grey and greys and blue greys were used on some in the passenger cabin area while earlier had chrome green finish., depending on the role in use. Interior of wheel wells and other areas were in chrome yellow and some in silver finish. Undercarriage parts were originally in plated metal finish, but later these were painted, much according to the preference of the unit user. Several were finished in white. Paint scheme and markings varied greatly during service life so individual details were carefully studied.
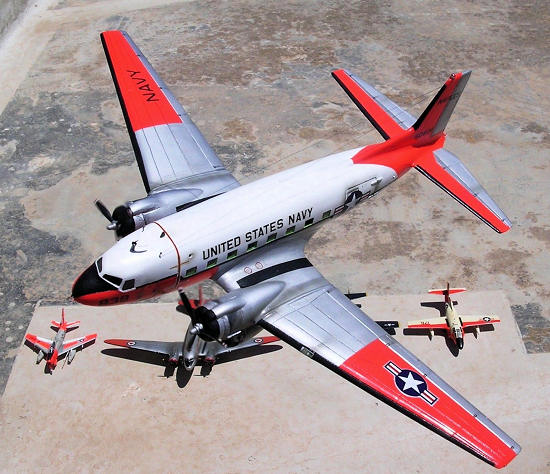 Black
non-slip walkways were provided on the upper centre-section skins. A black decal
film was used for walkways. The leading edge de-icing boots were painted acrylic
paint and matted at the end. I used Model Master day glow to various areas on
the C-117. The national insignia placed on the upper and lower outer wing had a
silver periphery. The star and bar insignia came from Italeri R4D kit N127.
These were stuck on a silver decal sheet and allowing 1mm of silver at the
periphery were cut with scissors. Due to additional
windows on the starboard side, the national marking on
this side was two feet further aft than that on the port side. Blue/black cheat
line was cut from a solid color decal sheet as I ran out of long stripes and
Black
non-slip walkways were provided on the upper centre-section skins. A black decal
film was used for walkways. The leading edge de-icing boots were painted acrylic
paint and matted at the end. I used Model Master day glow to various areas on
the C-117. The national insignia placed on the upper and lower outer wing had a
silver periphery. The star and bar insignia came from Italeri R4D kit N127.
These were stuck on a silver decal sheet and allowing 1mm of silver at the
periphery were cut with scissors. Due to additional
windows on the starboard side, the national marking on
this side was two feet further aft than that on the port side. Blue/black cheat
line was cut from a solid color decal sheet as I ran out of long stripes and
| CONCLUSIONS |
| REFERENCES |
Carmel J. Attard
May 2011 If you would like your product reviewed fairly and quickly, please
contact
me or see other details in the
Note to
Contributors.