Hasegawa 1/48 TA-4J Skyhawk
|
KIT #: |
07243 |
|
PRICE: |
$56.50 MSRP |
|
DECALS: |
Two options |
|
REVIEWER: |
Jeff
Brundt |
|
NOTES: |
Built OOB |
The two-seat TA-4J was the longest serving
member of the Douglas (and McDonnell Douglas) Skyhawk family as the US Navy's
standard advanced jet trainer. It served from June 1969 until its replacement in
the early 1990's with the McDonnell Douglas (now Boeing) T-45A Goshawk.
The TA-4J replaced the TF-9J Cougar as the Navy’s advanced jet trainer. The
TA-4J descended from the single-seat A-4 light attack aircraft which was the
Navy's and Marines' standard light-attack fighter for nearly 20 years.
 The primary role of the TA-4J was to train
carrier pilots. TA-4J Skyhawks were assigned to Instrument Training RAGs
(Replacement Air Group) at all the Navy "master jet bases" under RCVW-12 and
RCVW-4. The Instrument RAGs initially provided jet transition training for Naval
Aviators during the time period when Naval Aviation still had a great number of
propeller-driven aircraft and also provided annual instrument training and check
rides for Naval Aviators. These assigned TA-4Js were installed with collapsible
hoods in the rear cockpit so the aviator under training could demonstrate
instrument flying skills without any outside reference. A total of 226 TA-4Js
were built. Many of the earlier TA-4F airframes were converted to TA-4J
configuration by removal of their offensive weapons systems. TA-4Js were also
used in support roles, including that of adversary aircraft in the Navy’s TOPGUN
fighter school.
The primary role of the TA-4J was to train
carrier pilots. TA-4J Skyhawks were assigned to Instrument Training RAGs
(Replacement Air Group) at all the Navy "master jet bases" under RCVW-12 and
RCVW-4. The Instrument RAGs initially provided jet transition training for Naval
Aviators during the time period when Naval Aviation still had a great number of
propeller-driven aircraft and also provided annual instrument training and check
rides for Naval Aviators. These assigned TA-4Js were installed with collapsible
hoods in the rear cockpit so the aviator under training could demonstrate
instrument flying skills without any outside reference. A total of 226 TA-4Js
were built. Many of the earlier TA-4F airframes were converted to TA-4J
configuration by removal of their offensive weapons systems. TA-4Js were also
used in support roles, including that of adversary aircraft in the Navy’s TOPGUN
fighter school.
In 2002, the last TA-4Js were retired from
US
military service, however, there are still an unknown number flying with air
forces in
Brazil,
Israel
and
Argentina. The
Collings Foundation currently has a flying TA-4J as part of their
Viet
Nam
Memorial flights.
Armament consisted of two 20mm cannon in the
wing roots, and three external racks carried either a weapons load of 5,000
pounds or droppable tanks for a fuel supply of 800 gallons.
For a preview of the kit see Scott’s review
here:
http://modelingmadness.com/scotts/mod/previews/hasegawa/07243.htm
Construction is pretty straight forward and
follows the build sequence of Hasegawa’s single seat scooter. You have to pay
attention to which version you’ll be building and open the various holes in the
fuselage and wings as needed. Pay close attention as well to which parts you’ll
need as well since Hasegawa gives you parts for various other single seat
versions because they use commons sprues form those kits.
 Over all the fit is very good and very little
putty is needed. The only real trouble spot I had was the insert on the lower,
aft fuselage. You end up with a bit of a step and some putty was needed to get a
smooth finish. Also take your time with the large fuse intake (the one with the
compressor face molded in. I had to add some strip styrene to the outer edges to
get a good fit with the fuse sides. This seems to be the weakest part of the
kit.
Over all the fit is very good and very little
putty is needed. The only real trouble spot I had was the insert on the lower,
aft fuselage. You end up with a bit of a step and some putty was needed to get a
smooth finish. Also take your time with the large fuse intake (the one with the
compressor face molded in. I had to add some strip styrene to the outer edges to
get a good fit with the fuse sides. This seems to be the weakest part of the
kit.
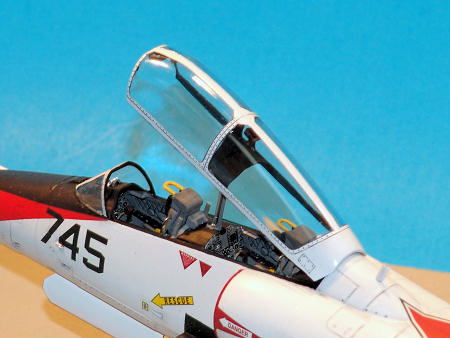
I built my Scooter stock OOB. I had thought
about using some resin seats but I decided to add some details to the kit seats
to make them look a bit better. You can certainly tell the difference between
the older seat for the front pit and the newer tooled seat for the aft crew
member. But after some paint and a wash they looked good. I painted the cockpit
with Tamiya acrylics and added an oil wash and dry brushing to ‘pop’ some of the
details. I used the kit decals for the instrument panels because I always seem
to have good luck in getting them to match the molded detail. I painted the side
consoles because there’s more raised detail (throttles) and it would have been
harder to get the decals to snuggle down.
You’ll need to add weight (it’s called out in
the instructions) to the nose to make sure it’s not a tail sitter. I used BB’s
CA’d in place. Once the weight was in place, the cockpits, intake and jet pipe
glued in the fuse side it was time to bring the two halves together. Once dry
all I needed was to do some light seam scraping.
The wing fits very well to the fuse and no
putty was needed at all. There’s a new insert where the spent ammo chutes are
located just forward of the wing. Make sure you use the correct one…it’s
different than the standard single seater insert that’s also in the kit. I left
off the horizontals and engine exhaust until later to make painting easier. I
also left off the IFR probe until after painting was done (and to prevent
inadvertent breakage).
The model was given a coat of Mr Surfacer 1000
to see where any problems were. A wooden dowel up the tail pipe makes a great
way to hold the model during paint. Once I was satisfied with my surface prep I
painted the entire model white using Tamiya rattle
 can paint. This stuff really
is nice when dry. It’s also quite a durable finish. Once the white was done the
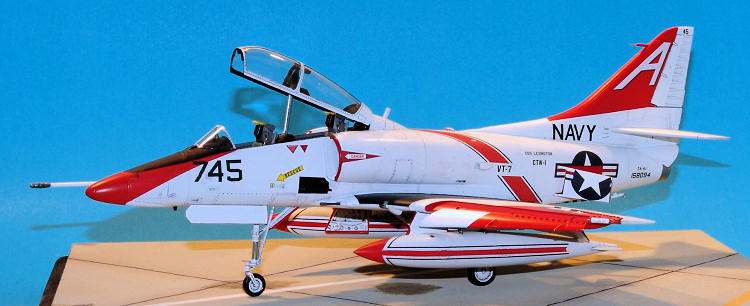
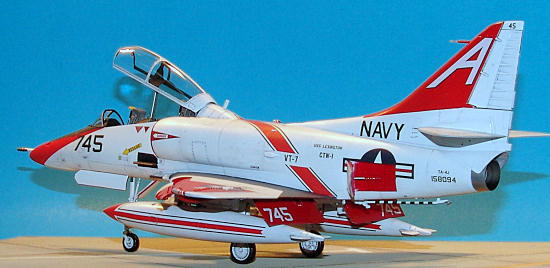
fun part started….masking for all those other colors. I chose the scheme for the
VT-7 bird. First up was the ‘day-glo orange’. Hasegawa would have you mix it up
but I chose instead to use Testor’s Chevy engine red in their lacquer line. To
me it looks the closest in color. I masked the nose, wings and tail off and
sprayed on the color. This paint gives excellent coverage and finish. You could
use the kit decals for the tail flash but since they give you the marking
options of the ‘A’ code separate as well as on an orange field I chose to paint
the fin instead for a more consistent color.
can paint. This stuff really
is nice when dry. It’s also quite a durable finish. Once the white was done the
fun part started….masking for all those other colors. I chose the scheme for the
VT-7 bird. First up was the ‘day-glo orange’. Hasegawa would have you mix it up
but I chose instead to use Testor’s Chevy engine red in their lacquer line. To
me it looks the closest in color. I masked the nose, wings and tail off and
sprayed on the color. This paint gives excellent coverage and finish. You could
use the kit decals for the tail flash but since they give you the marking
options of the ‘A’ code separate as well as on an orange field I chose to paint
the fin instead for a more consistent color.
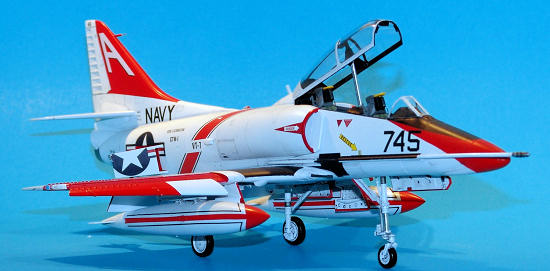
The drop tanks were masked as well for the
orange and painted. I chose not to use the kit decals because they are a
multi-piece affair that has to try and conform around a compound curve. There’s
no way it would look good. Next I masked for the red areas of the speed brakes,
flap wells and leading edge slats. This was done in Tamiya’s X-7 red. Lastly I
painted the black areas on the wings and fuselage for the gun blast areas. This
was the most tedious and time consuming.
Once the paint was completed it was time to
decal. I went with the kit decals which went on OK. I managed to booger up one
of the stars and bars on the wing by touching it before the Solvaset was dry. I
had to rob one of my Superscale sets for another Stars-n-bars. Decaling takes
some time and I was done in a few evenings. Once the decals were done and had
time I applied an oil wash to bring out the panel lines. I let the wash dry
first overnight then removed the excess with a Q-tip (several actually). After
 this the model was clear coated with Polly-Scale acrylic satin finish.
Now it was time to add all the “fiddly bits”
(which I worked on in between); the landing gear, arresting hook, pylons, drop
tanks, canopy, wheels, flaps, slats, boarding ladder, horizontal stabs, etc. One
thing of note is that Hasegawa does a very poor job on depicting how the parts
of the nose landing gear go together. I had to check several references to find
pictures that show the proper arrangement. I did apply bare metal foil to the
NLG hydraulic cylinder prior to attaching all the parts.
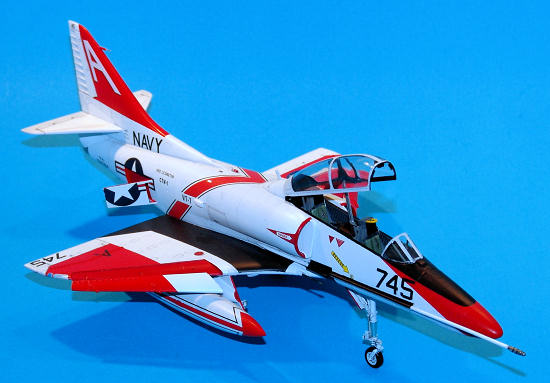
By now it’s starting to look like a Skyhawk.
The canopy was posed in the open position and I used Mighty-Tacky to glue it in
place. The slat actuator tabs all managed to not get knocked off during the
entire build and paint process so I was happy about that. The speed brakes were
glued in place in the open position. Unfortunately that’s the only option as
trying to put them in a closed/stowed condition requires a bit more
work/filling/sanding. You don’t see many Skyhawks on the ramp with their speed
brakes open but for some reason Hasegawa has chosen to model them this way.
And there you have it. Finally a quarter scale
TA-4J from Hasegawa. It’s a very nice kit and there are loads of colorful
schemes to do. If you don’t like a trainer bird then you have a plentitude of
Aggressor schemes to choose from. Go out and get one…or two…or three.
Jeff
Brundt
July 2010
If you would like your product reviewed fairly and quickly, please
contact
me or see other details in the
Note to
Contributors.
Back to the Main Page
Back to the Review
Index Page