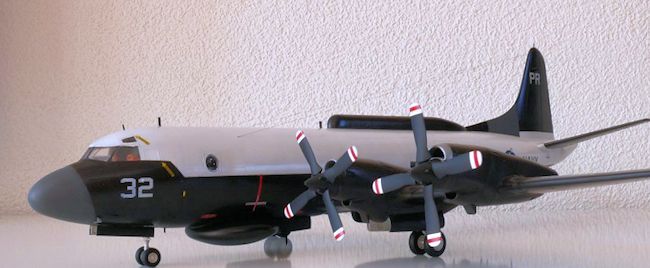
Hasegawa 1/72 EP-3B Orion
| KIT #: | K-15 |
| PRICE: |
€25,= (second hand) |
| DECALS: | Three options |
| REVIEWER: | Jeroen Koen |
| NOTES: | Lone Star conversion, Wolfpak 72-025 decals |
| HISTORY |
Getting a proper history here that does the huge number over versions,
operators, modifications and technical details right is probably far too much,
so I'll focus on the EP-3B version here.
The EP-3B was flown by the US Navy as an electronic surveillance aircraft from
the late 1960s for well over 20 years -which is pretty amazing, given that the
two original EP-3Bs were based on
early P-3A's (old designation: P3V-1). Their story starts with 3 P-3As being
being used by the CIA for clandestine missions first. After conversion for that
use -shorter propeller tips, exhaust shrouds, double cargo entry doors to
 get
all equipment inside, radar, and a whole lot of infra-red equipment, as well as
a few humps and antennae not present on normal Orion, they were flown mainly for
observing Communist China. For that were they not only painted completely black,
but also carried AIM-9 Sidewinders for self defence -the story goes that one
even shot a MiG down! Later
they were flown by the Taiwanese crews, in Taiwanese markings, but by 1967 all
three aircraft were returned to the US Navy.
get
all equipment inside, radar, and a whole lot of infra-red equipment, as well as
a few humps and antennae not present on normal Orion, they were flown mainly for
observing Communist China. For that were they not only painted completely black,
but also carried AIM-9 Sidewinders for self defence -the story goes that one
even shot a MiG down! Later
they were flown by the Taiwanese crews, in Taiwanese markings, but by 1967 all
three aircraft were returned to the US Navy.
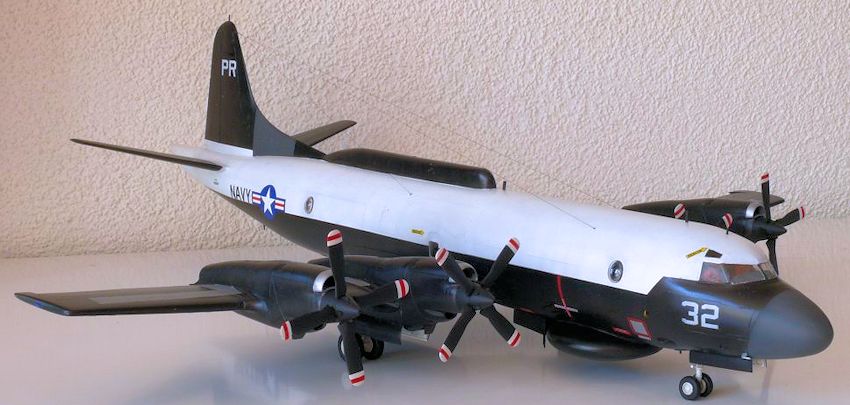
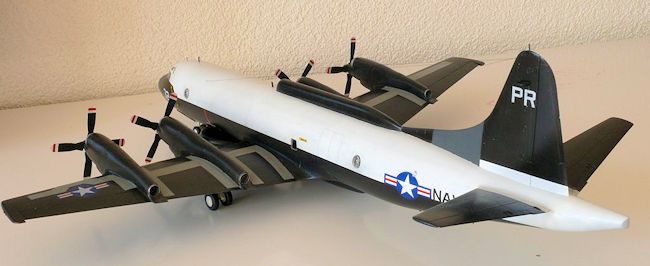
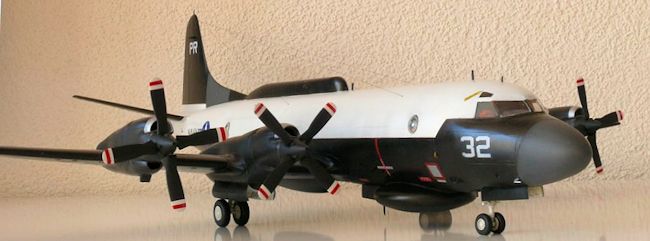
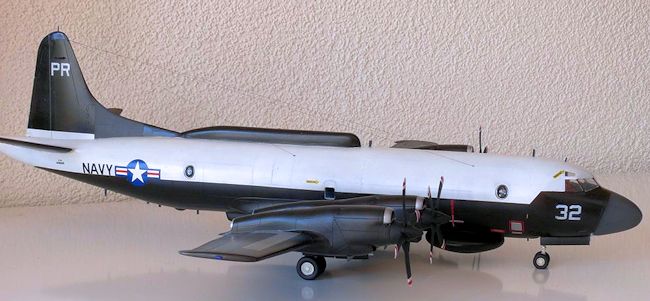
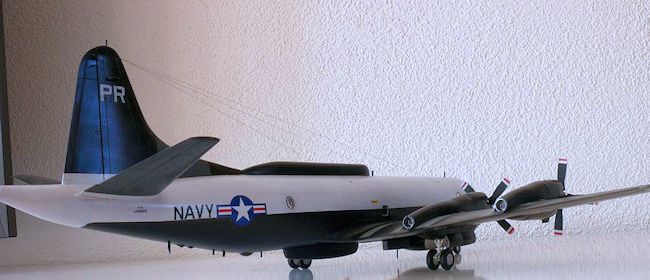
The Navy in turn modified 2 of them again for electronic surveillance. These modifications were visually different, since the APS-20 radar had a big radome underneath the fuselage, and it sprouted big canoe-shaped bulges on the top and bottom of the fuselage. To prevent the insides from getting too warm, the fuselage top was painted white, resulting in it's unique (for P-3s) paint scheme. These aircraft were heavily employed in Vietnam. The experience with the EP-3Bs helped development en improvements for the EP-3E -so in essence, the EP-3Bs were the informal operational prototypes for the EP-3E. Both aircraft were modified to EP-3E standard in the 1970s and painted in the standard grey/white scheme. (When your editor arrived at VQ-1 in late 1974, they were in white/grey. Ed) Eventually, after a long career, both were retired because they had run out of flight hours. The EP-3E eventually became the EP-3E Aries II.
| THE KIT |
The Hasegawa Orion has been around for a while and has been
previewed
already here by Scott.
Mine was an earlier boxing, which came in a large white box with decals for 3
versions; VP-50 with blue trim and a large dragon, VP-5 “Mad Foxes”, and an
Australian version.
 As is mostly the case with those old style Hasegawa boxes, the decals have
overly bright reds, the blue trim for the VP-50 option is nearly turquoise, and
they are very thick. Unlike Scott’s boxing, the walkways will have to be painted
by the builder.
As is mostly the case with those old style Hasegawa boxes, the decals have
overly bright reds, the blue trim for the VP-50 option is nearly turquoise, and
they are very thick. Unlike Scott’s boxing, the walkways will have to be painted
by the builder.
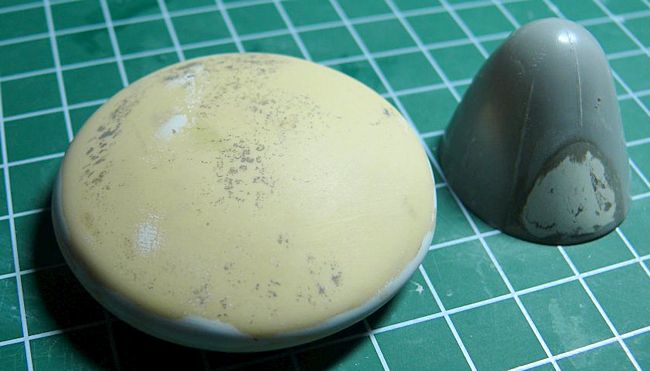
As for the rest, I already had the Wolfpak decals (bought for the Intruder option) but became intrigued by the EP-3B, so I wanted to build that one first. As the Hasegawa boxing of the EP-3E with resin domes and bumps is rather rare and expensive, two alternatives are indicated in the Wolfpak instructions: Falcon triple conversion, and Lone Star resin. Unable to find the Falcon conversion, I went for the Lone Star resin, which is very basic, and quite a lot of work went into getting it onto the model. The parts have rough, balsa-like surfaces and quite a few humps and dents, particularly the nose and APS-20 radome. With these sets in hand, a Hasegawa kit was found through a forum and construction went underway.
| CONSTRUCTION |
In this case, construction did not start where normal modellers building normal
kits start, the cockpit. Instead I snipped all big parts from the sprues and
tested the fit. Not too bad... so I taped the fuselage halves together and
proceeded to saw the resin from the rather thick casting blocks. The casting
blocks are attached to the mating surfaces, requiring the builder to sand the
fuselage top curve into the resin undersides for the canoe-shaped fairings. This
was achieved by taping a piece of thin sandpaper to the fuselage and simply
sanding the fairing over that for ages until it had the proper curve inside.
This job is both boring and messy, but it had to be done, so better do it first
lest I lose interest! After it roughly fit I found out that one needs to cut a
bit off the tail to fit the upper canoe into its proper place, which is not
indicated in the instructions. I also had to de-warp it (did not succeed
entirely) with hot water and polished it it to get rid of the rough texture.
 I then turned to the nose piece, compared it to the kit part and decided it was
not worth the effort to free it from it's casting block, fix the dents and
damages and re-add the raised lines on it, while all that needs to be done to
the kit part is fill the lower cut-out where Hasegawa would have you add some
camera windows or something. So I stuffed that with Milliput and sanded it into
shape.
I then turned to the nose piece, compared it to the kit part and decided it was
not worth the effort to free it from it's casting block, fix the dents and
damages and re-add the raised lines on it, while all that needs to be done to
the kit part is fill the lower cut-out where Hasegawa would have you add some
camera windows or something. So I stuffed that with Milliput and sanded it into
shape.
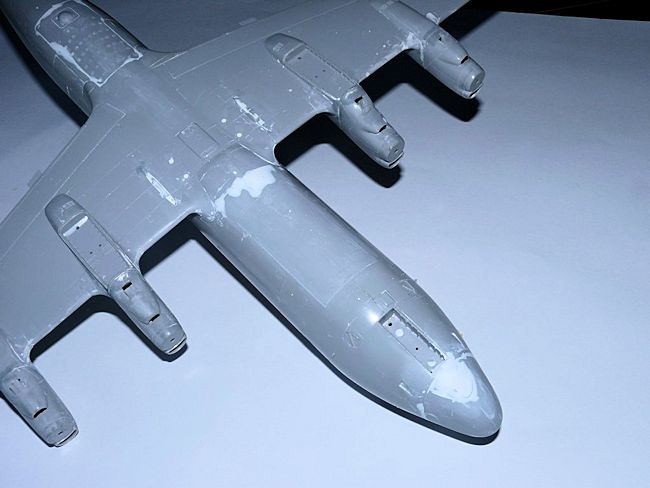
With that done, I turned my attention to the APS-20 radome, which turned out to
have a prominent ridge where apparently 2 mould halves mate, and also had to
sand away remains of the casting block. The curve of the mating surface does not
match the fuselage, and has some damages/protrusions that need removal. More
sanding ensued, and after a test-coat of paint I noticed there are many pinholes
in this part I had to fill. I used Milliput for all this, and though time
consuming, it worked pretty well. 3 Parts down, 2 to go!
However, the lower parts can't be installed until the wing is in place, so
feeling like a normal modeller building a normal Hasegawa kit, I filled a
million pinholes in the cockpit interior and airbrushed it dark gull grey. The
seats were painted orange, and after that came the test of decals. Actually, in
spite of being something like 30 years old, they worked very well and settled
down pretty good using Mr Mark Softer. The cockpit was glossed and given a dark
grey wash and a light grey dry-brush. I also made some tape seatbelts, and glued
a massive amount of lead to the cockpit floor, especially since the resin
fairings add quite a lot of weight after the main gear, not quite compensated
for by the forward radome!
A final matt coat finished off the cockpit.
Again feeling like a normal modeller, I assembled the top and bottom wing halves
and glued the left hand engine nacelles in their intended spots, as a dry-fit
indicated they did not quite meet Tamiya-standards fit wise. The next morning
the other halves were glued and clamped in place, resulting in a tiny height
difference on the bottom and near their mou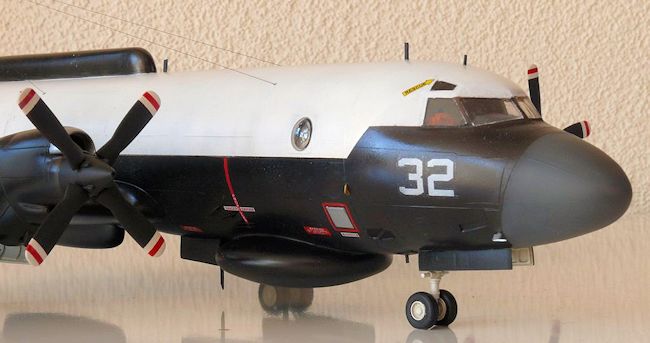 nting point on the wing, that was
duly sanded away and levelled using Milliput. After a primer check and some more
filler I was satisfied and using thin strips of Dymo tape with small triangles
cut out to improve their ability to go around curves, all four nacelles had
their panel lines re-scribed.
nting point on the wing, that was
duly sanded away and levelled using Milliput. After a primer check and some more
filler I was satisfied and using thin strips of Dymo tape with small triangles
cut out to improve their ability to go around curves, all four nacelles had
their panel lines re-scribed.
Turning the wing over, I noticed that Mr Hasegawa had used Lego blocks for
pylons and thus the lower wing has some huge slots to accept those -again filled
with strips of Evergreen and levelled off with Milliput, then sanded. They
needed a bit of Mr Surfacer 500 and more sanding until I was satisfied. The
sono-bouy launchers were stuffed with stretched sprue and filled in the same way
-the joys of sanding and filling. I think my wife can still hear the sound of
sandpaper on Hasegawa plastic...
By now I felt the need to glue plastic together, so I glued the interior into
the left fuselage half and taped the wing and fuselage together. Then I put
cocktail sticks in the gear openings to check the balance, with the resin stuff
taped to the model. Since that was good, I glued some stiffening strips into the
fuselage halves and section by section I closed the fuselage. After that was
thoroughly dry, I added the rear sonobouy insert -a poor fit and requiring some
strips to be glued in to prevent it from sinking too deep. Even with that it
isn't a well fitting part, so break out the Milliput, sandpaper and Mr Surfacer
again. Starting to get repetitive? Sorry about that, so I won't bother you with
how I sanded the lower canoe-shaped fairing in shape and added the small
triangular radome, also sanded in shape.
By this time I ran out of sandpaper and had to get more to sand and fill all the
pin-marks on the wheels, gear parts, propellers, and gear doors. Again, a boring
and time consuming job... but one that needs to be done.
So, are we done by now? Of course not! The fuselage halves needed sanding (not a
lot of filler, save for the inserts and nose), and I added the forward wheel bay
insert and entry door. Obviously all this needs more sanding and re-scribing
done... so again, it was done...
 By this time I again felt the need to glue parts, so after making sure the
balance was OK for the last time, I glued the lower wing in place. After letting
this harden, it was obviously in need of more sanding and filling, and since I
had the stuff out anyway, I also filled the panel lines for the bomb doors.
After making sure it looked pretty good, I broke out the 5 minute Epoxy and,
after drilling holes and adding pins to the resin parts, glued the resin pieces
in place for good. I chose Epoxy over super-glue, as it is much thicker and
helps fill the largest gaps. Do I need to tell what happened next...? again, it
was tedious, but done! I think this model ate up half a stick of Milliput!
By this time I again felt the need to glue parts, so after making sure the
balance was OK for the last time, I glued the lower wing in place. After letting
this harden, it was obviously in need of more sanding and filling, and since I
had the stuff out anyway, I also filled the panel lines for the bomb doors.
After making sure it looked pretty good, I broke out the 5 minute Epoxy and,
after drilling holes and adding pins to the resin parts, glued the resin pieces
in place for good. I chose Epoxy over super-glue, as it is much thicker and
helps fill the largest gaps. Do I need to tell what happened next...? again, it
was tedious, but done! I think this model ate up half a stick of Milliput!
The only place where I did not use Milliput, was with the APS-20 radome. I used
Vallejo putty to fill the gaps, smoothed out with a small q-tip. Worked quite
well, but the gaps on the rest were simply too large for this method.
By this time, the end was in sight, and the not-quite-horizontal tails were
added, with a tiny strip of 0,25mm Evergreen added to help fill a small gap, as
well as the cockpit glazing. All other windows were to be added last. Obviously
these parts needed more sanding and filling, as well! At this time, the hole
left for the MAD boom was rebuilt with a V-shaped plug from Evergreen as per
pictures. It actually amazed me there were so many pictures of an aircraft of
which only two were built.
So, by this time, you, as was I at that time, must be thinking it would now
finally be time for primer and paint? Wrong! By this time, actually very
fortunate and extremely timely, Marco P.J. Borst from
www.p3orion.nl showed up on the Dutch forum where I keep my build
log. He was very helpful with my questions and had some great pointers on what
else to modify.
So, to summarize a bit, by this time I had done:
-fill bomb doors
-fill nose opening
-fill sonobouy launchers
-add V-shaped plug where MAD boom normally goes.
In conjunction with Marco, the following extra modifications were done:
 -original entry door filled, and new double doors unique to both EP-3Bs (and
kept until phased out as EP-3Es) scribed and hinges and latch added (see:
http://www.p3orion.nl/p-3%20cargo%20door%20mods.pdf.
)
-original entry door filled, and new double doors unique to both EP-3Bs (and
kept until phased out as EP-3Es) scribed and hinges and latch added (see:
http://www.p3orion.nl/p-3%20cargo%20door%20mods.pdf.
)
-2 small windows filled on the right rear aft fuselage
-another small window filled halfway above the wing in the right fuselage half
(these small windows were only present on P-3C and the EP-3Bs were based on the
P-3A)
-we also determined it was very likely the EP-3Bs had the small vanes above the
APS-20 radome, but they proved very elusive to confirm on a black aircraft,
(until a much later Google search found me some previously unfound pictures that
confirmed their presence so the estimate was good!) I made these from slightly
bent strips of 0,25mm Evergreen.
And, since I felt I had nothing to do, I also opened up the engine intakes,
which are about 2mm deep on this model, and quite prominent. Since I thought
about that rather late, I could not add some ducting or so, but still, it looks
better, even if there is nothing in there.
At this stage I also drilled the 3 holes for the antenna wires -unlike the later
EP-3Es, the EP-3B had much less antenna wires, and blade antennas for that
matter. I'd have to re-do all of those as well, since all that sanding had
obliterated the moulded on antennae.
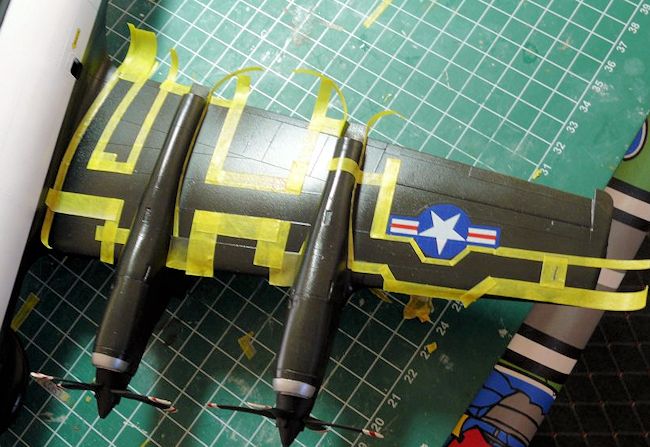
By then it was finally time to mask the cockpit windows and go for primer, which was duly shot and the ever present rework of joints, filler and panel line re-scribing was carried out until I was either satisfied or fed up! ;-)
| COLORS & MARKINGS |
Obviously, painting being my weak spot, I was not helped with a sputtering
airbrush ruining the white. I polished it as best as I could and proceeded with
the metal parts and the black. I had issues with leaking tape, overspray, and
more overspray, and again leaking tape, and, finally, some not-quite-niceley
done seamwork. In the end there was so much paint and ugliness I felt I could
only strip it and start again, so,
 using my trusty oven cleaner, I went ahead
and stripped it all off. Re-addressing the seams with Mr Surfacer 500 and
sanding and scribing again, I went ahead and tried to make this my first
all-acrylic project.
using my trusty oven cleaner, I went ahead
and stripped it all off. Re-addressing the seams with Mr Surfacer 500 and
sanding and scribing again, I went ahead and tried to make this my first
all-acrylic project.
So after making triple sure all seams were properly treated, I shot the whole
thing with Vallejo Urethane primer. This stuff airbrushes well, unthinned with a
larger nozzle, or slightly thinned with Tamiya X-20A through a smaller nozzle.
It does not withstand sanding very well, as it comes of in large flakes, but if
the seamwork is done, it does serve well as a holding coat for acrylics, most of
which don't adhere well to bare plastic. It is simply not as durable as Mr
Surfacer or enamel, but does not smell that bad either!
Eventually, after losing interest and doing other things in life (like becoming
a dad!) I washed the model to get rid of a year's worth of dust, and thought
about putting paint on it.
As I did not want too much preshading or postshading, I used a technique I saw
somewhere on a forum. I first pre-shaded the panel lines (but not all of them)
on the white with dark grey, and used medium grey, blue-grey and pure white in
blotches and spots. I then misted over it all with Revell Aqua flat white, and
had to cover up the pre-shading of the panel lines a bit more, as I used a
too-dark grey. Then, filling spots,
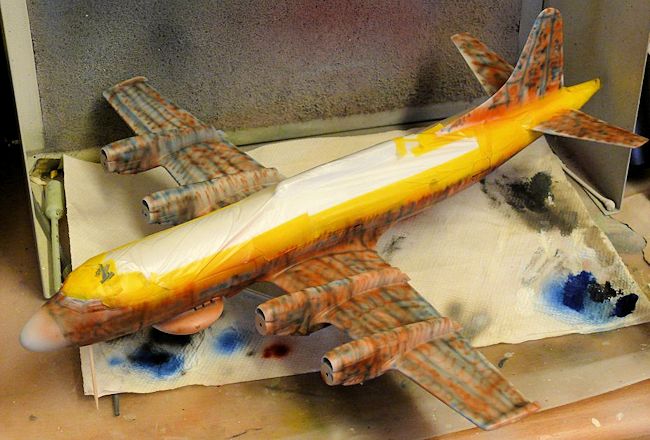 spotting, dotting and dashing with Revell
Aqua Gloss white (which does not cover that well, but is more pure white than
the flat version) for an hour or 3 until my fingers started hurting! I was very
happy with how this came out, so I used it on the black as well, but this time
using red and blue for the spots and dashes, and pure black for the panel lines.
I used Revell Aqua Tar Black with a bit of white in it for the filling in and
misting over. It looked even better on the black, subtle, yet with colour
variation. One of the things that turned me off on the original paint job was
the big expanse of dull black. (even though I used a “scale” black). Another
turn-off was the colour of the nose and panel on the tail, which I found
difficult to match when painting them first, and then the fuselage. I also made
a cut-out on the location of the rear fuselage insignia, predicting colour shift
when putting a white star half on white, half on black. This turned out to be
wise move!
spotting, dotting and dashing with Revell
Aqua Gloss white (which does not cover that well, but is more pure white than
the flat version) for an hour or 3 until my fingers started hurting! I was very
happy with how this came out, so I used it on the black as well, but this time
using red and blue for the spots and dashes, and pure black for the panel lines.
I used Revell Aqua Tar Black with a bit of white in it for the filling in and
misting over. It looked even better on the black, subtle, yet with colour
variation. One of the things that turned me off on the original paint job was
the big expanse of dull black. (even though I used a “scale” black). Another
turn-off was the colour of the nose and panel on the tail, which I found
difficult to match when painting them first, and then the fuselage. I also made
a cut-out on the location of the rear fuselage insignia, predicting colour shift
when putting a white star half on white, half on black. This turned out to be
wise move!
The downside of doing the reverse, is more masking, but I would be able to match
the colours better, so I did it this way. After all the black was done (needing
some touch-ups or some extra misting here and there) I masked off the radomes
and fairing, and airbrushed those with pure Tar Black; my reasoning being that
they are newer than the black paint job on the aircraft. The curved APS-20
radome was particularly fun to mask! The nose and panel on the tail were done
with 50% RLM66 and 50% Tar Black, and since the airframe was already in colour,
it was a lot easier to adjust the colours.
Then, real life and a loss of interest intervened... again, the model sat for a
year or so, while I finished my Polish Albatros and even older Fokker D.VII
first -I
had to move about a lot of
kits for our second expected kid's room, and decided I could live without some
of them and sold them off, and really, really needed to finish off some of those
old hangar queens.
So, with the Fokker and Albatros done, I turned again to my EP-3. The paint job
still looked good, but I wasn't done yet. After washing another year's worth of
dust off, I masked and painted the engine intakes with Revell Aqua Steel, made
the wheel bays and gear parts white, and the panel on the belly grey. The APU
exhaust was also painted Steel. For acrylic metallics, these are actually very
good -not Alclad good,
 but much better than most other acrylic metallics I've
tried. I wonder why Revell does not make more ready-made colours and market them
more aggressively -they are really the best water based acrylics around in my
opinion, not counting the alcohol based Tamiya and Gunze, but I digress.
Painting being done, it was time for a clear gloss of Tamiya X-22 which ended up
nice and glossy, which is most unusual in my case, as I usually end up with
half-dull coarse coats that need a lot of polishing and rework...
but much better than most other acrylic metallics I've
tried. I wonder why Revell does not make more ready-made colours and market them
more aggressively -they are really the best water based acrylics around in my
opinion, not counting the alcohol based Tamiya and Gunze, but I digress.
Painting being done, it was time for a clear gloss of Tamiya X-22 which ended up
nice and glossy, which is most unusual in my case, as I usually end up with
half-dull coarse coats that need a lot of polishing and rework...
So, happily, I went to work on the decals.
I was, honestly, a bit disappointed by those. Despite the gloss and smooth
surface, I had issues with silvering of the rather large carrier film.
Unfortunately this did not show up until the next morning, or I could have glued
the rest on using Future, as I tend to do with Roden decals. On a black aircraft
one would expect properly covering decals, but unfortunately this is not the
case, they are quite transparent. This was somewhat unexpected, as my AD-4
Skyraider in almost equally dark Gloss Sea Blue was done with Euro Decals -also
printed by Fantasy Printshop, which did not show a hint of transparency. On the
other hand, the silvering could have something to do with for example floating
the decals too long on the water, which dissolves too much of the glue -a next
model from this sheet will be the final proof!
So, what's wrong then? First of all, the blue of the insignia is really too
light, which is unfortunate, as it also affects the other options on the sheet.
 The “32” on the nose appears a bit small, but I can live with those little
niggles.
The “32” on the nose appears a bit small, but I can live with those little
niggles.
The silvering was taken care of with a sharp knife blade to try and cut the film
and use tiny bits of tape to pull it off, and on other spots 000 brush and some
Tar Black paint. Not the prettiest, but it was all I could do to turn a 70cm
model into a 30cm viewable one.
There are few other issues as well. While the historical background is
excellent, the actual placement guide is less than stellar. Fortunately a lot of
pictures can be found on the internet, most curious, since there were only 2
Batracks in the first place! The NAVY text on the rear fuselage is missing, and
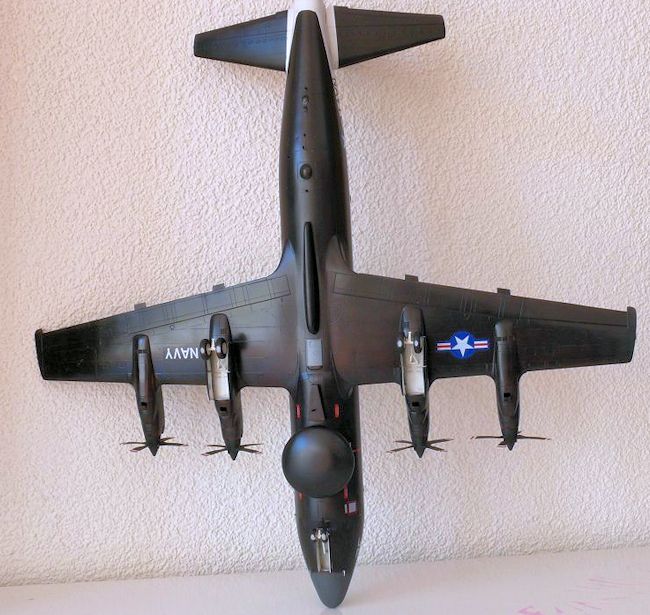
the fuselage insignia is not in the correct position. Also, the bottom insignia
placement is incorrect, both the white NAVY text and insignia should go between
the engines, as per Hasegawa instructions.
Finally the metal parts were masked off again and a coat of Revell Aqua Gloss
varnish airbrushed, which is not quite glossy, but gives a nice satin sheen.
Then the nose and lighter panel on the fin were masked and airbrushed with Aqua
Flat varnish.
 Other than small details, the last thing to do was the walkways. Since these
were also to be matt, they were saved for last. They also turned out to be small
disaster, since after laboriously masking them off and then painting them with a
brush and several grey colours, removing the tape revealed paint creeping
underneath the tape onto the black -not much to do, except remove some with a
cloth damp with Humbrol thinner and letting it dry, then touch-up again with
Aqua black paint. The colours of the walkways also looked ugly, so I bit my
tongue again and airbrushed Revell Aqua Gloss mixed with some black over it all
to tone the colours down and help blend in the touch-ups.
Other than small details, the last thing to do was the walkways. Since these
were also to be matt, they were saved for last. They also turned out to be small
disaster, since after laboriously masking them off and then painting them with a
brush and several grey colours, removing the tape revealed paint creeping
underneath the tape onto the black -not much to do, except remove some with a
cloth damp with Humbrol thinner and letting it dry, then touch-up again with
Aqua black paint. The colours of the walkways also looked ugly, so I bit my
tongue again and airbrushed Revell Aqua Gloss mixed with some black over it all
to tone the colours down and help blend in the touch-ups.
Finally, I painted them with Aqua Matt varnish -negating any advantage by doing
them last!
Also, I'm not sure if this aircraft actually had walkways in the first place, I
could not find a picture showing the upper surfaces, so it's a guess. The main
reason I added them is that they help break up the “blackness”.
However, while far from perfect, it was at least close to completion. After,
again, laboriously masking the propellers these were painted white and red, then
the tips masked completely and then painted them black -there are many pictures
showing this aircraft with both black and standard Orion propellers. The black
with red-white tips is somewhat conjectural as well. (as a side note, there was
a lot of swapping parts, as I even found a picture of a black EP-3B with a
standard light gull grey engine nacelle).
By now you'd probably be thinking, hey, this Jeroen guy is actually going to
complete it without fuss, but, you'd be wrong! As I painted the small detail
bits like navigation lights and mooring points, those yellow moorings made a
slip and I got yellow on the black fuselage. Thinking about how much paint and
varnish there was on it, and how long it had been on it (some of the paint was
by now 1,5 year old!), I took a moist Q-tip with alcohol, which promptly ate
through all the layers of paint to reveal a nice plastic grey spot. Sigh. By now
my tolerance limit had been well past, so I all I can say it is thanks to my
wife that this model and review are now done, instead of the model flying
straight out of the window!
 Dutifully I again masked the white and metal, took my airbrush with 0,15mm
needle, and painted some blue and red spots, then black again, which looked
pretty neat -until I removed the tape and pulled the prop warning stripe off
-sigh again! Fortunately there are extras for the EC-47s so I patched it up
using those, then re-glossed again...
Dutifully I again masked the white and metal, took my airbrush with 0,15mm
needle, and painted some blue and red spots, then black again, which looked
pretty neat -until I removed the tape and pulled the prop warning stripe off
-sigh again! Fortunately there are extras for the EC-47s so I patched it up
using those, then re-glossed again...
Unfortunately, again, when all was dry and set, I apparently did not clean my airbrush properly before spraying the gloss, as I now had darkish tinted glaze on some of the white. Sigh... Again, grabbing my remaining courage and motivation to finally get rid of the thing from my workbench, I used polishing paper and toothpaste and cloth to polish out the edges and the most of it off. This actually worked quite well, due to the raised panel details I polished out only the panel centres, making it look a bit like added post-shade. If I hadn't written my confession here, you'd never have guessed!
| FINAL CONSTRUCTION |
Unlike my previous WWI builds, actually there was not a lot remaining by now.
Smelling the finish line by now, I grabbed a new can of patience and started
working on the antennae. I used 2 or 3 pictures taken from the side for this,
and made the antennae by first slicing
bit of 1,5mm Evergreen off a plate of 0,25mm thickness, and then rounding
off the edges with sandpaper and some scraping with a scalpel. Only then do I
cut them into small pieces and attach them to the model with a tiny drop of
super-glue. Amazingly I managed to do all this without losing a single one,
without CA glue smears a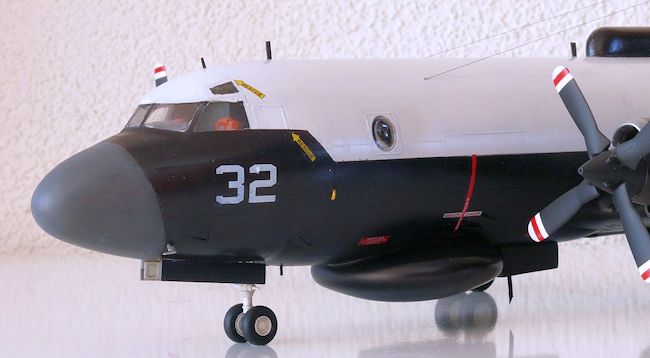 l over the model, and without paint runs when painting
them black on the white upper surface. Amazed, I added the wheels (legs were
added earlier already) and gear doors, and some small antennae and pitots from
the kit, as well as the pre-painted exhausts. The tape was removed from the
windshield, some tiny touch-ups there done and tape glue residue removed (it had
been in place for nearly 2 years, so no surprise there) and finally the side
windows were simply pressed in place. Finally, the three wire antennae were
added from 0,08mm fishing wire pulled through a black marker and attached with a
tiny drop of CA.
l over the model, and without paint runs when painting
them black on the white upper surface. Amazed, I added the wheels (legs were
added earlier already) and gear doors, and some small antennae and pitots from
the kit, as well as the pre-painted exhausts. The tape was removed from the
windshield, some tiny touch-ups there done and tape glue residue removed (it had
been in place for nearly 2 years, so no surprise there) and finally the side
windows were simply pressed in place. Finally, the three wire antennae were
added from 0,08mm fishing wire pulled through a black marker and attached with a
tiny drop of CA.
Motivation was simply not present any more to do the windscreen wipers or static
dischargers.
I took multiple beers this time, tried to jam it into my display case (doesn't
fit) so I put it on the top shelf above the TV to gather a lot of dust...
| CONCLUSIONS |
So, what can I say? It's been quite a learning experience, and some journey! I
would rate this model as my most demanding and difficult model. It's a
combination of an old (but not bad) base kit, not too stellar resin updates, and
uncooperative decals.
Did I enjoy it? Well, as you've read before, not all of it.... the part I did
enjoy the most was actually painting this model. I was also happy with my
previous nemesis, the gloss-coat, which up till using Tamiya X-22, I always
managed to screw up somehow.
Overall, it's a very fetching scheme that you don't see often modelled, and I
learned a lot about both these aircraft and electronic intelligence gathering.
As a final word... I suppose when you read all my latest reviews you'd think I'm
only in agony over setbacks and horrors, but I promised my wife to get rid of
all the half baked hangar-queens, which were abandoned or stalled for a reason
in the first place! They're not all done yet, so stay tuned for more
horror-stories! ;-)
| REFERENCES |
Marco Borst of
www.p3orion.nl helped my out with my questions and gave
suggestions
Scott van Aken via the MM forums was also always helpful and ready with pictures
and tips
Google turned up an amazing amount of pictures and information.
May 2015
If you would like your product reviewed fairly and fairly quickly, please contact the editor or see other details in the Note to Contributors.