Trumpeter 1/32 F-8C (conversion)
| KIT #: | 02272 |
| PRICE: | $159.95 MSRP |
| DECALS: | Two options |
| REVIEWER: | Lee Kolosna |
| NOTES: |
Zotz Decals ZTZ32029,
Fisher A3211 |
| HISTORY |
 The Vought
F-8 Crusader finally provided the US Navy with the outstanding supersonic
performance that it had sought so hard -- but elusively -- with the numerous
fleet defense fighters that had preceded it in the 1950s. With the
Crusader, the Navy had a fighter aircraft that could match the Air Force’s F-100
in pure speed but was able to operate safely from the confines of an angled deck
aircraft carrier. The F-8C Crusader (known as the F8U-2 prior to 1962)
improved on the performance of the first F8U-1 production variants with a more
powerful J57 engine, upgraded radar, a refined fire control system, and the
addition of fins on the ventral side of the rear fuselage for better high-speed
stability. It was delivered to VF-84 in 1959.
The Vought
F-8 Crusader finally provided the US Navy with the outstanding supersonic
performance that it had sought so hard -- but elusively -- with the numerous
fleet defense fighters that had preceded it in the 1950s. With the
Crusader, the Navy had a fighter aircraft that could match the Air Force’s F-100
in pure speed but was able to operate safely from the confines of an angled deck
aircraft carrier. The F-8C Crusader (known as the F8U-2 prior to 1962)
improved on the performance of the first F8U-1 production variants with a more
powerful J57 engine, upgraded radar, a refined fire control system, and the
addition of fins on the ventral side of the rear fuselage for better high-speed
stability. It was delivered to VF-84 in 1959.
The F-8C deployed to the conflict in
| THE KIT |
Tom Cleaver has taken readers of Modeling Madness
through the strengths and weaknesses of Trumpeter’s 1/32 F-8E kit in his review
here. Overall, the kit is one of
Trumpeter’s better efforts. Fit is
quite good. Accuracy, always a question mark with this manufacturer, is good as
well with a couple of exceptions. The windscreen framing is not quite right,
resulting in a front panel that is too narrow and small.
The model also has an inaccurate raised panel for the radar cooling
vents on either side of the nose. The
shape of the radome is off, too. On the
plus side, Trumpeter’s “Mad Riveter” seems to have thankfully taken a holiday on
this effort. There are still recessed
divots to represent the real aircraft’s flush rivets, but they are restrained
and not nearly as
 numerous as
those seen on the F-105 and F-100 kits.
The modeler is provided with a complete J-57 engine which of course can’t be
seen when buried inside the model. This
isn’t such a bad idea since the intake portion of the engine has shape problems
anyway. The refueling probe, RAM air
turbine, cannon bays, speed brake, and variable incidence wing bays are all
detailed and are designed to be displayed in the open position.
All control surfaces except the rudder are provided as separate
pieces.
numerous as
those seen on the F-105 and F-100 kits.
The modeler is provided with a complete J-57 engine which of course can’t be
seen when buried inside the model. This
isn’t such a bad idea since the intake portion of the engine has shape problems
anyway. The refueling probe, RAM air
turbine, cannon bays, speed brake, and variable incidence wing bays are all
detailed and are designed to be displayed in the open position.
All control surfaces except the rudder are provided as separate
pieces.
The Fisher Model & Pattern F-8C conversion set goes the
distance by giving the modeler a seamless intake, metal landing gear struts,
resin wheels, an early Vought ejection seat (mastered by Harold Offield of AMS
Resin), a large wing spine plug, a new control stick, pitot tube, a new nose
that also fixes the raised radar panel and radome shape issues, and a clear
resin windscreen that relieves the other Trumpeter goof.
While not inexpensive, you get a lot of quality stuff your money with
excellent instructions. The resin was
cast well with almost no air bubbles and the ejection seat is particularly well
done.
Of course, new decals will be needed if you go this route and Zotz Decals F-8C sheet is the only game in town. This sheet is also on the expensive side, but it is beautifully printed with excellent color and registration and the decals fit quite well. Markings for two aircraft, a CAG bird from VF-84 and a MiG killer from VF-111 are included.
| CONSTRUCTION |
The first order of business is to hack up the fuselage and wing and install the
Fisher resin parts. I cut the wing top piece and removed the bulge that is
appropriate for the F-8E and later variants of the Crusader, but not the F-8C.
I glued the wings back onto the center piece and filled the gaps with CA glue.
I assembled all of the flaps and slats and inserted clear colored resin in the
tips to replicate the navigation and position lights. The holes for the
underwing pylons were filled as these were not present on the F-8C.
 Fisher provides detailed instructions on how to carefully cut the fuselage
pieces to allow for the new nose and seamless intake, so I followed them exactly
and no drama ensued. I personally don’t care for models with all the
insides showing, so I closed up the cannon, RAM air turbine, and refueling probe
bays. Like most model kits the fit of these pieces is just fair, so I
filled the resulting gaps and rescribed the panel lines.
Fisher provides detailed instructions on how to carefully cut the fuselage
pieces to allow for the new nose and seamless intake, so I followed them exactly
and no drama ensued. I personally don’t care for models with all the
insides showing, so I closed up the cannon, RAM air turbine, and refueling probe
bays. Like most model kits the fit of these pieces is just fair, so I
filled the resulting gaps and rescribed the panel lines.
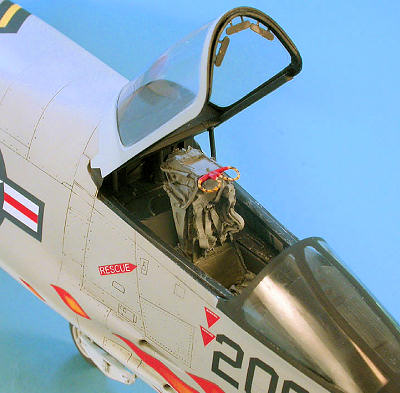
Other than the new ejection seat and control stick, I used the kit pieces for
the rest of the cockpit. The instrument panel is just a bunch of round
blank dials that could use some aftermarket decals to detail, but I didn’t have
any so a careful drybrushing was done to bring out the raised surrounds.
The cockpit was painted FS36231 Dark Gull Gray overall with flat black coaming
and sills. The ejection seat got an Olive Drab cushion with light gray
harness and the requisite black and yellow grab handles.
I assembled the J-57 engine with an eye towards what would and wouldn’t be
visible, which means a number of pieces were left off the front of the engine.
There are some nasty ejector pin marks on the interior of the exhaust that are
very hard to fill. I decided to cover the whole area with a thin piece of
sheet styrene cut in a rectangular shape and rolled up into a tube. The
single seam was positioned at the top so the casual observer of the model
wouldn’t see it. I used Mr. Surfacer to fill the seam which left the
inside of the exhaust nice and smooth, albeit without any internal detail.
I assembled the wheel wells, speed brake, and variable wing incident bays as per
the kit instructions. The kit provides adequate detail and it looks quite
busy enough on its own. I’m sure hyper-detailers will want to add bits of
wire and other small parts to make these areas completely accurate, but I
thought it looked good enough. The inside of the main wheel well doors
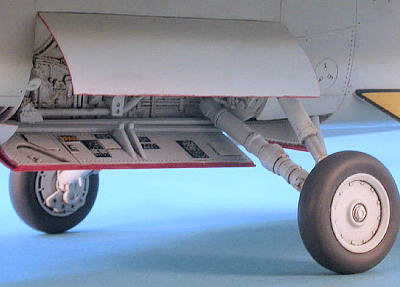 have more
ejector pin marks that are hard to eliminate, so I cut little squares of sheet
styrene and glued them over the holes, which blended them into the surrounding
detail enough to look like they really belonged there. The two fuselage
halves were glued together, trapping the large resin intake and nose inside.
Fit here was pretty good, which is a testament to Fisher’s quality level.
I still had gaps to be filled where the resin and styrene pieces met, which I
expected and filled with CA glue and sanded smooth. I always use Mr.
Surfacer 1000 as a way to further fill the seams after the initial filling.
This lets me check my work and to fill the tiny holes introduced in the CA glue
by using an accelerator.
have more
ejector pin marks that are hard to eliminate, so I cut little squares of sheet
styrene and glued them over the holes, which blended them into the surrounding
detail enough to look like they really belonged there. The two fuselage
halves were glued together, trapping the large resin intake and nose inside.
Fit here was pretty good, which is a testament to Fisher’s quality level.
I still had gaps to be filled where the resin and styrene pieces met, which I
expected and filled with CA glue and sanded smooth. I always use Mr.
Surfacer 1000 as a way to further fill the seams after the initial filling.
This lets me check my work and to fill the tiny holes introduced in the CA glue
by using an accelerator.
The F-8C had single missile launch rails on either side of the fuselage, so I
fashioned these from the kit’s Y-shaped dual launch rails by cutting off the
appropriate parts and reassembling them. Clear photos of this detail are
difficult to find, so I probably fudged the shape a little bit.
After filling all the fuselage seams and rescribing lost panel lines, I painted
the instrument panel coaming and surrounding decking flat black and drybrushed
it with light gray. Trumpeter doesn’t provide a gun sight, so that was
fabricated from a piece of clear sheet and scrap plastic. The biggest
challenge of the kit was to properly attach and fair in the clear resin Fisher
windscreen. First though, I tried to improve the transparency of the piece
by dipping it in Future, which helped a bit. This is my only (minor)
criticism of the Fisher conversion set: the clear resin windscreen is slightly
foggy, but not enough to make it unusable. Masking off the clear panes, I
glued the windscreen on and filled the gaps with more CA glue. Quite a bit
of sanding and contouring was required to get the piece to blend evenly with the
surrounding fuselage profile.
With that piece of work out the way, the model was prepared for painting with a thorough cleaning with soap and water and inspecting all the filled seams one last time.
| COLORS & MARKINGS |
The windscreen was masked off with drafting tape and sprayed
flat black. The unpainted exhaust area on the rear fuselage was painted
with Floquil Old Silver and masked off after a week of curing time. All
control surfaces, wheel wells, landing gear, interior of the variable incidence
wing, and the speed brake well were painted with Testor Acryl flat white.
The top surfaces were painted with Testor Acryl Light Gull Gray FS36440 with an
irregular soft demarcation line down the side of the fuselage. Period
photographs of VF-84 aircraft indicate that they weren’t too dirty, but did
suffer from sunlight and sea spray exposure, so I diffused the topside with
various random sprayings of lighter and darker grays in order to break up the
monotony of the base color. The leading edges of the slats were painted
Old Silver, and the antiskid walkways on the elevons were painted with Gunship
Gray FS36118. Future floor polish was used as a gloss coat overall to
prepare for additional weathering and decals.
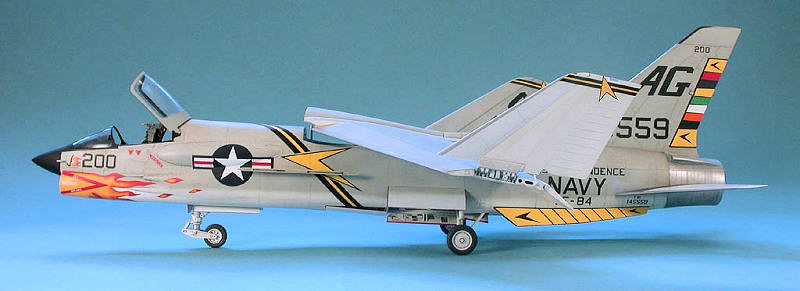
I chose the flamboyant CAG aircraft from VF-84 as deployed on
the USS Independence in the early 1960s from the Zotz decal sheet. Being
wary of very large decals and the trouble they can inflict, I chose to apply the
hot rod flames under the air intake first. That way, if I messed it up, I
could switch to the alternate MiG killer aircraft from VF-111. I was
pleased that the big
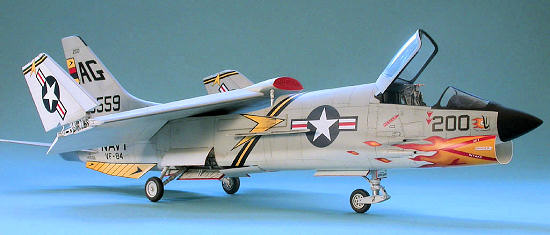 flame
marking fit well and adhered to the model with just a moderate amount of
coaxing. Kudos go to Zotz Decals for making decals of such high quality.
The remaining markings went on without incident, although the ventral fin and
rudder markings are slightly oversized. I let them dry completely and
gently sanded around the outside edge with 320 grit paper to trim the excess
decal. A few minor paint touchups were needed and the decals were good to
go.
flame
marking fit well and adhered to the model with just a moderate amount of
coaxing. Kudos go to Zotz Decals for making decals of such high quality.
The remaining markings went on without incident, although the ventral fin and
rudder markings are slightly oversized. I let them dry completely and
gently sanded around the outside edge with 320 grit paper to trim the excess
decal. A few minor paint touchups were needed and the decals were good to
go.
Looking at photos once again, I could not discern any visible
stenciling, so this aircraft probably went through a repaint which mercifully
saved me from tediously applying all those little decals and their silvering
opportunities. Likewise, this aircraft did not have the yellowish
fiberglass reinforcing tape around the outlines of the windscreen and canopy
panes, which saved me from another miserable task. As with any large clear
area of decal over a model, no matter how well gloss-coated, some silvering was
present over panel lines and rivets, so I attacked those areas with repeated
applications of Micro Sol and even a little Solvaset with stabs from a sharp X-acto
knife blade. This pretty much eliminated any trace of clear carrier film
on the model.
Weathering was achieved in a couple of ways. A wash
consisting of Winsor & Newton artists oils (a mix of 80% Payne’s Gary and 20%
Burnt Umber) was created with odorless Turpenoid and applied to all panel lines
and more heavily in the wheel well bays, wheels, and landing struts. Chalk
pastels were dabbed all under the bottom side of the fuselage in a random
pattern to mimic the greasy handprints of the maintenance crews and leaking
fluids. A 2B pencil drew in missing rivets and panel lines where needed,
and more chalk pastels dirtied up the metallic exhaust area. A silver
Berol pencil was used to replicate scuff marks on the canopy sills and in
high-wear locations in the cockpit. Testor Acryl Insignia Red was used for
the inside surface of the speed brake as well as to outline the landing gear bay
doors and the front of the raised wing.
A final coat of Future was applied over the model to seal everything, and Polly Scale clear flat was sprayed over the Gull Gray and black areas only, leaving the white in its proper semi-gloss state.
| FINAL CONSTRUCTION |
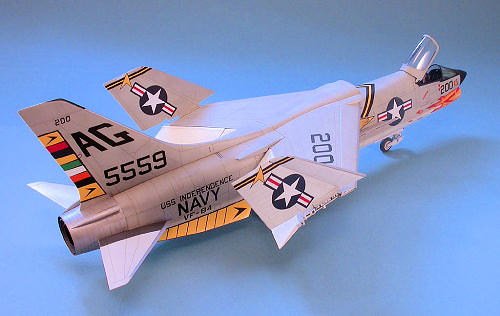
One thing I debated was how to position the wing and flaps. Hundreds of
photographs of F-8s were studied and to the best of my ability I determined that
a Crusader at rest has the variable incidence wing down, outer wings folded up,
flaps and slats slightly down from the loss of hydraulic pressure, and the speed
brake slightly open for the same reason. This presents a couple of
problems for the modeler. One, the kit is really designed to have the
wings folded and incident wing in the up position. To unfold the outer
wing panels, some cutting of pieces and filling of an ugly gap is required. Two,
the flaps and slats, as mentioned in Tom’s review, don’t fit too well in any
other position than neutral. I really wanted to have my model in a
dramatic pose so I chose a compromise with the variable incidence wing up, the
slats and flaps down, the speed brake slightly open, and t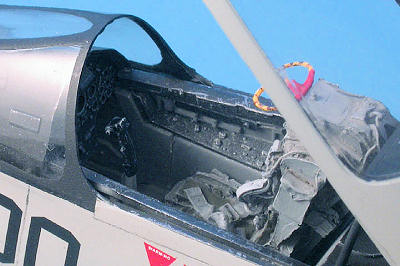 he
wings folded. I did find a tiny few number of photographs of F-8s in this
condition so this did occur, albeit rarely.
he
wings folded. I did find a tiny few number of photographs of F-8s in this
condition so this did occur, albeit rarely.
I used five minute epoxy to securely glue the slats to the wing. They
don’t fit over the fuselage sides sufficiently unless you sand the inner
surfaces of flaps and slats down enough to make proper clearance. At Tom
mentioned in his review, mounting the control surfaces this way results in a
ridge at the junction of the flap or slat and the top of the wing that isn’t
present on the real aircraft. It’s not too prominent, fortunately, so I
didn’t bother with the laborious filing and sanding that would be required to
correct this. The outer wing panels have some nice detail provided by the
kit and fit pretty well in the folded position. The complex landing gear
were glued in with CA glue and the doors carefully attached in the same manner,
making sure that everything was properly aligned and square.
The kit contains AIM-9D Sidewinder missiles, even though they refer to them in
the instructions as AIM-9Bs. The D model has a less blunt shape and is not
appropriate for an F-8C in this time period, so I wasn’t able to use them.
I had some AIM-9Bs from the Tamiya F-4C kit, but their fins are inaccurate by
being way too large. Yes, even Tamiya makes mistakes now and then, so I
decided to leave them off.
Final assembly tasks are always nerve-wracking for me. First, the
photoetched rear-view mirrors have to be attached to the inside portion of the
canopy. There is no secure way to do this, so I glued a strip of .020
sheet plastic on first and drilled tiny little holes for the two mirror mounting
stalks to have something to attach to, which I did with tiny drops of CA glue.
Secondly, the canopy itself has no secure mounting apparatus to pose it in the
open position, so I epoxied a short piece of cut paper clip to the underside of
the rear edge, painted it flat black, and drilled a corresponding hole in the
fuselage spine at the proper angle to hold the canopy open with some support.
The ejection seat and control stick went in, the pitot tube was glued on,
thereby finishing up this dreaded stage with no more that usual amount of salty
language. A final search and destroy mission of Polly Scale clear flat
eliminated all the shiny glue and epoxy marks and my 70 hour project was done.
It took me nine months from start to finish.
| CONCLUSIONS |
Trumpeter did a pretty good job overall with this kit. Like all their big 1/32 scale models, it’s expensive, but you get a lot of plastic and quite a bit of detail. The Fisher Model & Pattern resin set is definitely worth the investment. This set, in conjunction with Zotz Decals, transforms the kit into an outstanding model. It’s quite large at 20 inches (51 cm) long, has nicely restrained surface detail, and builds up to an impressive, showy piece that will garner attention from everyone who sees it. Fisher corrects the major accuracy issues and makes a unique variant of the Crusader that will stand out with Zotz’s wildly colorful markings as one of the finest examples of an aircraft operating during the US Navy’s high-visibility period. The Crusader is a big brute of an airplane and Trumpeter captures its powerful lines quite well.
| REFERENCES |
Kinzey, Bert: “F-8 Crusader
in Detail & Scale, volume 31”
Thomason, Tommy: “US Naval Air Superiority, Development of Shipborne Jet Fighters, Phantom – Phantom II, 1943 – 1962”
September 2010
If you would like your product reviewed fairly and quickly, please contact me or see other details in the Note to Contributors.