| KIT #: | 7206 |
| PRICE: | $45.00 SRP |
| DECALS: | Four Options |
| REVIEWER: | Dan Lee |
| NOTES: | Black Box Cockpit for F-4J, Fox One Decal Sheet 48-023, Quickboost F-101 pitot tubes and F-4 air scoops, True Details F-4 Wheels, Eduard F-4 Placcards, Aires F-4J Exhausts and Cutting Edge Seamless Intakes used. |
| HISTORY |
The F-4 Phantom II
aka "Rhino", "Double Ugly", “the "Flying Anvil", "Flying Footlocker", "Flying
Brick", "Lead Sled", the "Big Iron Sled" and the "St. Louis Slugger” was the
primary fighter bomber of the US Navy and USAF during the Vietnam War and to the
early part of the 80s.
It was originally
conceived as an “attack” fighter armed with four 20mm cannons.
Later, the cannons were deleted (which was later regretted) and the
mission changed to a Mach 2 fighter intercepter armed with radar guided
missiles. It soon was designated
the F4H-1 and named the Phantom II instead of Satan or Mithras.
 The first
Phantoms reached the Fleet in 1961 when VF-74 “The Be-Devilers” flew them.
By 1964 less than half of the
The first
Phantoms reached the Fleet in 1961 when VF-74 “The Be-Devilers” flew them.
By 1964 less than half of the
The Phantom
developed a reputation as an adaptable and dangerous opponent.
It could not outmaneuver the Mig-17, 19 or 21 but it was a fearsome
energy fighter that used its thrust advantage from the twin J-79 turbojets to
zoom out of any bad situation or for “zoom and boom” high speed attacks if the
pilots had Air Combat Maneuvering Experience.
Its combat record was hampered by the lack of an internal gun and
reliable missiles (the radar guided Sparrow being the least favorite missile
behind the IR guided Sidewinder) and many crews lacked dogfighting
experience/training so Phantom crews were in tough against their Vietnamese,
Soviet and Chinese opposition.
Things changed when
Top Gun was started by the
By the 1970s, the
Phantom was slowly replaced in the USN by the Tomcat and Hornet while the Eagle
and Falcon were replacing them in USAF squadrons.
5195 Phantoms were
built around the world and some are still flying today.
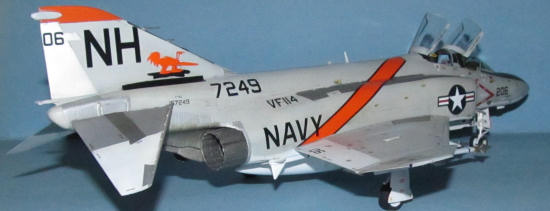
 VF-114
Aardvarks or Executioners
VF-114
Aardvarks or Executioners
Originally
designated as the VBF-19 in 1945.
They were deployed to North Island and did not see action in WW2.
They were redesignated several times till they were designated VF-114
“The Executioners.”
The Executioners
fought in Korea, flying Corsairs.
After Korea they transitioned to jet aircraft, first the Panther then the
Banshee and finally the Demon. In
1961, they transitioned to the F-4 Phantom.
Around this time, the Executioners were renamed to the Aardvarks.
According to wiki, they were renamed because the Phantom had a passing
resemblance to the BC Comics character “Zott” the Aardvark.
From other sources I have read, they were actually renamed because
someone was offended by the squadron nickname of “Executioners.”
The Aardvarks
quickly adapted to their new name.
Some flight crews wore bright day glo orange flight suits while various aircraft
had the leading edge of their pylons and fuel tank tips painted international
orange.
In 1975 they would
transition to the F-14 Tomcat and were disestablished in 1993 during the post
Cold War Drawdown.
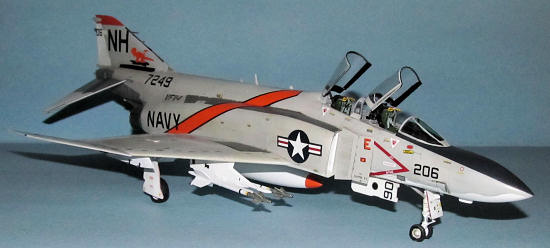
Linfield 206
On May 6, 1972,
aircraft from the Coral Sea had bombed Bai Thunong airfield when CVW-11 from the
USS Kitty Hawk was called upon to deliver a follow-on Alpha Strike on short
notice. Lt Bob Hughes (pilot) with
Lt jg Joe Cruz (
Information from Wiki and the Fox One Decals Sheet 48-023
| THE KIT |
The closest
reference is
Julian
Dixon’s preview of the F-4J (UK) kit which is almost the same as the F-4J
Showtime 100 kit.
As I happen to be a
Phan of this plane, I had acquired a number of goodies over the years to be used
in the construction of this model including an old Black Box F-4J cockpit,
Cutting Edge Seamless intakes, Aires exhausts, True Details resin wheels, Eduard
F-4 Placcards, Quickboost F-101 pitot tubes, Quickboost air scoops and the Fox
One Decal Sheet.
| CONSTRUCTION |
One of the first
things I did was remove all the little antennas and tubes molded along the seam
as well as the bump along the nose cone as I would replace these later with 10
thou plastic card cut to shape.
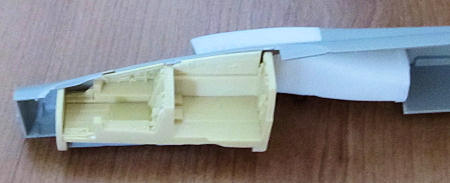 Next I had
to sand away all the detail from the cockpit so that the Black Box ‘pit would
fit in. I sanded the walls down a
bit too having had some rough experiences jamming resin cockpits into model
aircraft. For the most part, there
weren’t too many issues that were caused by the Black Box Pit.
Next I had
to sand away all the detail from the cockpit so that the Black Box ‘pit would
fit in. I sanded the walls down a
bit too having had some rough experiences jamming resin cockpits into model
aircraft. For the most part, there
weren’t too many issues that were caused by the Black Box Pit.
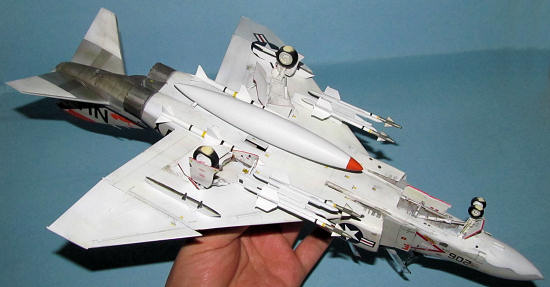
The Cutting Edge
seamless intakes needed to be added next. The engine faces
were painted and then the resin part moved in place.
The intakes were sprayed a thin coat of flat white (even though there are
made of white resin.) I followed
the CE instructions, but for whatever reason these were not easy drop in
replacements. I ended up having to
cut, trim and sometimes pound these things into place.
There were some gaps and steps that needed to be addressed.
I then noticed that one intake was off from the other... I ended up
having to do major surgery removing the intake then replacing it not once but
twice as it took me two tries to figure out why the intake was out of alignment.
I hacked off most of one corner of the intake (till I could almost see
through it) as well as much of the interior plastic of the fuselage mating lip
till it sat at the correct angle.
 The cockpit
interior was painted with Dark Gull Grey, some lead weights (5-8g) were added to
the nose to ensure it would sit nose down and then the fuselage was closed up.
The cockpit
interior was painted with Dark Gull Grey, some lead weights (5-8g) were added to
the nose to ensure it would sit nose down and then the fuselage was closed up.
I hacked out the
plastic where the resin control panel would sit.
Next I fitted the wings to the fuselage.
At that point, I stopped modeling.
When I returned 8
months later, I filled in all the gaps with Milliput around the intakes instead
of CA glue mostly because CA glue would have been so messy --much of the excess
Milliput was removed with wet Q-tips and only a little sanding was needed.
I used CA glue elsewhere.
There was a lot of sanding and filling done.
Repeat several times as the seams had pinholes and phantom seams to be
dealt with. Also the slime light
were removed which lead to more sanding and filling.
Once everything
seemed to be done and cleaned up, the Phantom was sprayed with Tamiya White Fine
Primer which revealed several areas that needed some extra work.
A final coat of primer revealed nothing so it was off to the paint shop.
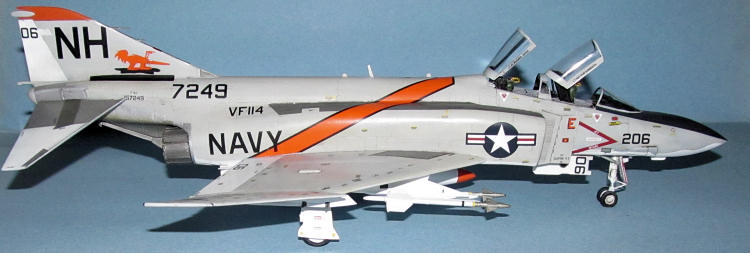
| COLORS & MARKINGS |
First
I sprayed Tamiya TS-30 Old Silver around the bare metal areas of the tail and
tailplanes. After it was dry, I
masked off those areas in preparation for the main paint job.
The Phantom was preshaded with dark grey along the panel lines and random
squiggles in the panels themselves.
After that the
white undersides were painted with a thin coat of flat white and a thin coat of
gloss white. When it was dry,
various areas were masked off and several thin coats of Gunze H325 Light Gull
Grey were sprayed on.
Unfortunately, a couple of areas
 needed
touch up as the masking either lifted or I did not spray enough paint.
needed
touch up as the masking either lifted or I did not spray enough paint.
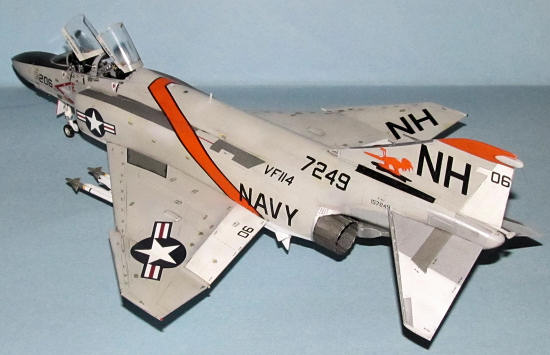
The international
orange tail fin was masked off and painted while similar actions were done for
the area for the black anti-glare panel.
Once dry, two thin coats of Tamiya Gloss were sprayed on in preparation
for the decals.
Many of the small
parts were painted including missiles were done at this time.
The landing gear doors proved to be a bit of a pain as they usually are
with US Navy aircraft due to the red borders.
I used a red sharpie to color them in.
It worked okay aside from a couple of small glitches that needed to be
cleaned off and repainted.
The Corrogard areas
were done differently. I hand
painted the fine edge around the intakes while I added tinfoil using Microfoil
adhesive along the leading edge of the tail because I had already added the
decals at that point and masking/painting it would be difficult.
I unmasked the bare
metal areas around the tail and sprayed them with a combination of Tamiya XF-56
Metallic Grey and a thin coat of Titanium Gold to show grime and heat damage to
the metal to the areas near the exhausts.
 Normally I
paint the canopies at the same time as the rest of the plane so that they would
have a similar color. Unfortunately
I did not do that and had to mask, paint, decal, wash and final coat them after
the fact. One thing that makes the
canopies of the F-4J a bit tricky
is that it uses the windscreen as a HUD instead of using a separate HUD so the
windscreen center panel needed to be painted a light clear green.
I carefully masked off the center panel and sprayed 3 parts clear gloss
and 1 part clear green to give it a hint of clear green but not make it too
dark.
Normally I
paint the canopies at the same time as the rest of the plane so that they would
have a similar color. Unfortunately
I did not do that and had to mask, paint, decal, wash and final coat them after
the fact. One thing that makes the
canopies of the F-4J a bit tricky
is that it uses the windscreen as a HUD instead of using a separate HUD so the
windscreen center panel needed to be painted a light clear green.
I carefully masked off the center panel and sprayed 3 parts clear gloss
and 1 part clear green to give it a hint of clear green but not make it too
dark.
I selected the Fox
One Decals 48-023 sheet because of the VF-114 markings.
Only one glitch I noticed is that the orange for the decals is a touch
brighter than the international orange paint I used.
The decals went on
without any issues except that there were a lot of stencils to be added.
It took several days to fully decal the Phantom and missiles.
A week later, the
Phantom was wiped down with a damp cloth to remove the excess decal solution.
A wash was not done
till the rest of the plane was assembled.
A watercolor wash of Raw Umber and Burnt Sienna was used.
Just enough to darken the paint and fill in some of the panel lines.
The excess was removed with a lot of damp Q-Tips.
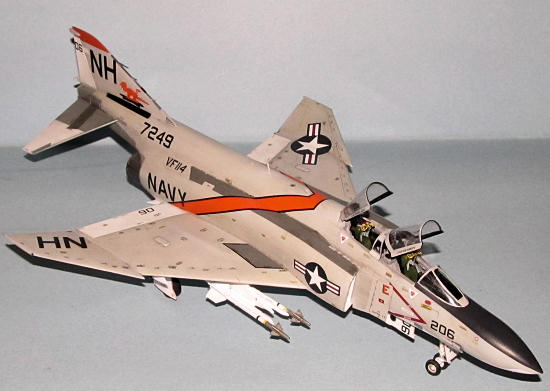
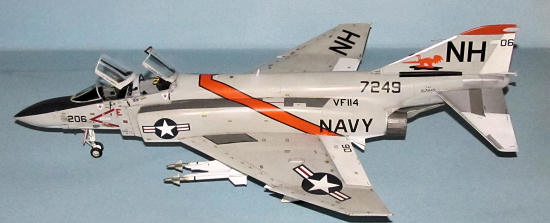
Two thin coats of Xtracylix Satin were sprayed on for the final coat while the landing lights were painted various colors of clear as per instructions.
| CONSTRUCTION CONTINUES |
The numerous tiny
parts were added on including the missiles (only two Sparrows and four
Sidewinders), centerline fuel tank and pylons and replacement antennas made from
10 thou plastic card (attached using CA glue.)
For some reason, Hasegawa does not supply sway braces for the pylons and
I had to scrounge them from a couple of their weapons sets that I own.
I had bought an
extra set of F-101 pitot tubes to replace the Phantom’s pitot tubes I had cut
off previously. These were trimmed
to  size,
the attachment points were cut to the correct angle and the centers were carved
out so that they fit a little better than a mere butt join, painted steel and
attached using a small dot of CA glue.
size,
the attachment points were cut to the correct angle and the centers were carved
out so that they fit a little better than a mere butt join, painted steel and
attached using a small dot of CA glue.
I finished up
adding the last of the cockpit pieces (the instrument panels were dry brushed
and hand painted using various colors) including the ejection seats.
Normally I would have done all this when I sealed up the fuselage, but I
left it off till later due to the modifications I had to do to the fuselage.
Next the painted
and previously assembled Aires exhausts were glued into the Phantom using small
dabs of CA glue without much trouble.
The Eduard
placcards were added to the more visible areas of the Phantom using a small dab
of CA glue applied with a toothpick.
Lastly, I glued the
painted canopies in place using Tamiya clear and I was finished my F-4J.
| CONCLUSIONS |
 The Hasegawa
F-4J is a relatively simple kit in terms of parts, but it needs some careful
work to assemble into a decent model out of the box.
Like most kits, some areas could use some improvement like the cockpit,
wheels, intakes (which are prominent in the Phantom), and exhausts.
In this case, I feel a better looking replacement is a good idea,
especially if you are a contest modeler, but not mandatory.
The Hasegawa
F-4J is a relatively simple kit in terms of parts, but it needs some careful
work to assemble into a decent model out of the box.
Like most kits, some areas could use some improvement like the cockpit,
wheels, intakes (which are prominent in the Phantom), and exhausts.
In this case, I feel a better looking replacement is a good idea,
especially if you are a contest modeler, but not mandatory.
I’ve always been a Phantom Phan and like the brutal look of the plane. This is the first one in 1/48 scale I have built and I am quite happy how it turned out. It is much better than the 1/72 MPC version I built 30 years ago where I used the F-4E nose and exhausts with US Navy decals.
September 2012
If you would like your product reviewed fairly and fairly quickly, please contact the editor or see other details in the Note to Contributors.