1/72
Phoenix Type A
|
KIT #: |
|
|
PRICE: |
|
|
DECALS: |
Home printed for the most part |
|
REVIEWER: |
Stephen Foster |
|
NOTES: |
Some scratch building experience advisable |
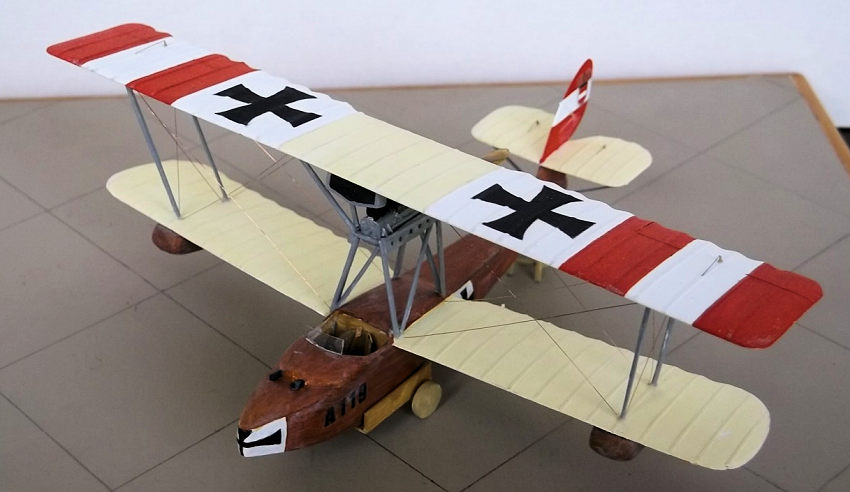
The Phoenix Type A was a Hansa Brandenburg design (the W18) which was
manufactured under licence for the Austro-Hungarian navy: one was supplied
to the German navy but as German pilots preferred floatplanes rather than
flying boats the type was not used by them. By contrast the Austro-H ungarian
navy used flying boats in considerable numbers for the defence of port and
other coastal installations, and for offensive operations and
reconnaissance. The Phoenix Type A entered service in the summer of 1917 for
the defence of Trieste, Pola, Kumbor and Parenzo (Porec) - all on the
Adriatic Sea, where it was capable of holding its own against the Nieuport
11 being used by their Italian opponents. Machines were powered by either a
200hp or 230hp Heiro engine (the German machine was powered by a Benz III),
and there were variations in the tail structures and radiators mounted on
the top wing. In 1918 these machines were generally withdrawn from front
line service as their relatively limited range and lack of manoeuvrability
meant that they were outclassed by the newer aircraft being employed by the
Italians.
ungarian
navy used flying boats in considerable numbers for the defence of port and
other coastal installations, and for offensive operations and
reconnaissance. The Phoenix Type A entered service in the summer of 1917 for
the defence of Trieste, Pola, Kumbor and Parenzo (Porec) - all on the
Adriatic Sea, where it was capable of holding its own against the Nieuport
11 being used by their Italian opponents. Machines were powered by either a
200hp or 230hp Heiro engine (the German machine was powered by a Benz III),
and there were variations in the tail structures and radiators mounted on
the top wing. In 1918 these machines were generally withdrawn from front
line service as their relatively limited range and lack of manoeuvrability
meant that they were outclassed by the newer aircraft being employed by the
Italians.
There is a vacuform kit of this aircraft by Formaplane which can be found
sometimes on e-bay and at model sales, but regular readers will know that I
have an aversion to vacuforms so I decided to assemble some plastic card and
rod, a set of plans which were kindly sent to me by Dan Smith, (who gave me
the inspiration to build this model by showing his Formaplane model on
another website), and make one of my own. This is the result.
 I
started with the hull which was push moulded from 30 thou plastic card using
a male mould from balsa wood and a female from plywood. This was one of the
larger moulds which I had made to date so I had to make three hulls before I
achieved an acceptable unit. The underside of the front end of the hull is
curved upwards so I moulded that as a separate piece. I glued the hull
halves together and then removed the bottom so that I could attach the
curved underside at the front end. The rear underside was made from 15 thou
card which had been scored with a sharp point and then bent gently to give
the correct cross section behind the hull step. The cockpit opening was cut
out as per normal and cleaned with a file: the cockpit details were vague
because I had little information so I made a standard instrument panel, seat
and controls from card and rod.
I
started with the hull which was push moulded from 30 thou plastic card using
a male mould from balsa wood and a female from plywood. This was one of the
larger moulds which I had made to date so I had to make three hulls before I
achieved an acceptable unit. The underside of the front end of the hull is
curved upwards so I moulded that as a separate piece. I glued the hull
halves together and then removed the bottom so that I could attach the
curved underside at the front end. The rear underside was made from 15 thou
card which had been scored with a sharp point and then bent gently to give
the correct cross section behind the hull step. The cockpit opening was cut
out as per normal and cleaned with a file: the cockpit details were vague
because I had little information so I made a standard instrument panel, seat
and controls from card and rod.
 The
wings were cut as blanks from 30 thou card bent in a piece of plastic waste
pipe which had been sealed at one end and filled with boiling water. After
10 seconds the water was drained off and the sheet of newly curved plastic
taken out. The wing blanks were sanded to aerofoil section before the ribs
were glued into place. Ribs were made from 10 x 20 thou Evergreen strip
which was gently sanded when the glue had dried. The horizontal tail
surfaces and the fin and rudder were likewise made from 30 thou card and
strip ribs. The lower wings were attached one at a time: care must be taken
with these as they are butt joints and therefore not very strong. I then
added the tail unit with the support struts made from 20 x 30 thou Evergreen
strip shaped to aerofoil section. The engine frame was made from 30 thou
card with holes drilled in the sides, and was supported on sections of more
20 x 30 thou strip also shaped to aerofoil section. The engine was made in
the usual way with laminated card for the block and rod for the cylinders. I
added small pieces of 60 thou card to the tops of the cylinders to help
represent the valve gear, and various inlet pipes, pumps carburettor and
exhausts were made from scrap, thin rod and stretched sprue. The engine
mounts on the sides of the block were from 15 thou card. The engine was
painted before it was glued into place.
The
wings were cut as blanks from 30 thou card bent in a piece of plastic waste
pipe which had been sealed at one end and filled with boiling water. After
10 seconds the water was drained off and the sheet of newly curved plastic
taken out. The wing blanks were sanded to aerofoil section before the ribs
were glued into place. Ribs were made from 10 x 20 thou Evergreen strip
which was gently sanded when the glue had dried. The horizontal tail
surfaces and the fin and rudder were likewise made from 30 thou card and
strip ribs. The lower wings were attached one at a time: care must be taken
with these as they are butt joints and therefore not very strong. I then
added the tail unit with the support struts made from 20 x 30 thou Evergreen
strip shaped to aerofoil section. The engine frame was made from 30 thou
card with holes drilled in the sides, and was supported on sections of more
20 x 30 thou strip also shaped to aerofoil section. The engine was made in
the usual way with laminated card for the block and rod for the cylinders. I
added small pieces of 60 thou card to the tops of the cylinders to help
represent the valve gear, and various inlet pipes, pumps carburettor and
exhausts were made from scrap, thin rod and stretched sprue. The engine
mounts on the sides of the block were from 15 thou card. The engine was
painted before it was glued into place.
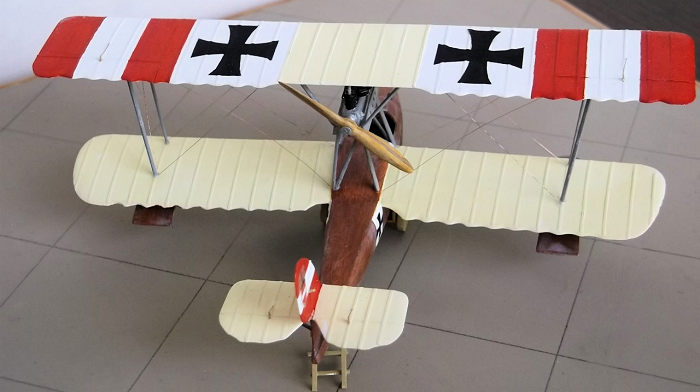
 PaintingI
normally paint my biplanes before I add the top wing because it is easier to
get to all of the surfaces. In this case it was even more important because
the engine is on a platform above the fuselage and below the top wing.
Austro-Hungarian flying boats at this time were often left with natural wood
hulls, so I primed the hull with Revell acrylic Ocker (88) before applying a
mix of burnt sienna and raw sienna oil paints. These can take a long time to
dry so to speed things up I placed the model in my airing cupboard for three
days, after which I was able to apply several very thin coats of Revell
acrylic clear orange varnish (730). I had already painted the white areas on
the fuselage where the crosses were to go - these had been masked when I
painted the remainder of the hull. The engine mount was Humbrol matt light
grey (64) and the linen surfaces on the wings and tail were mixed from
Humbrol clear doped linen (103) mixed with white and a touch of light grey.
The red was Humbrol matt red (60). The wing and fuselage crosses and serial
number were printed on my home computer and the nose cross was hand painted.
The badges on the rudder were from a Pegasus set and were kindly given to me
by fellow modeller Ian Brand.
PaintingI
normally paint my biplanes before I add the top wing because it is easier to
get to all of the surfaces. In this case it was even more important because
the engine is on a platform above the fuselage and below the top wing.
Austro-Hungarian flying boats at this time were often left with natural wood
hulls, so I primed the hull with Revell acrylic Ocker (88) before applying a
mix of burnt sienna and raw sienna oil paints. These can take a long time to
dry so to speed things up I placed the model in my airing cupboard for three
days, after which I was able to apply several very thin coats of Revell
acrylic clear orange varnish (730). I had already painted the white areas on
the fuselage where the crosses were to go - these had been masked when I
painted the remainder of the hull. The engine mount was Humbrol matt light
grey (64) and the linen surfaces on the wings and tail were mixed from
Humbrol clear doped linen (103) mixed with white and a touch of light grey.
The red was Humbrol matt red (60). The wing and fuselage crosses and serial
number were printed on my home computer and the nose cross was hand painted.
The badges on the rudder were from a Pegasus set and were kindly given to me
by fellow modeller Ian Brand.
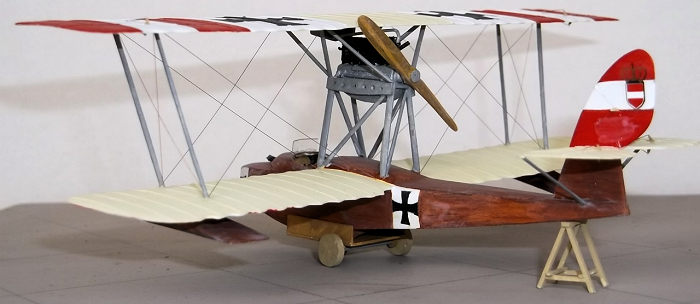
 The top
wing could now be fitted. The struts were from 20 x 30 thou evergreen strip:
the outer struts were fixed first. This was a slightly tricky operation
because the struts are angled slightly outwards and forwards, so the top
wing must be supported on jigs while the glue sets. I made a pair of simple
jigs from thin cardboard and supported the top wing with these. When the
wing struts were dry I could measure and cut the struts from the engine
platform to the wing. The struts were painted when in place. Finally I made
the wing floats from laminated card which was filed to shape, and struts
from thin rod and glued these under the wings. The propeller was carved from
wood. The model was completed by rigging it with 40 SWG rolled copper wire.
The top
wing could now be fitted. The struts were from 20 x 30 thou evergreen strip:
the outer struts were fixed first. This was a slightly tricky operation
because the struts are angled slightly outwards and forwards, so the top
wing must be supported on jigs while the glue sets. I made a pair of simple
jigs from thin cardboard and supported the top wing with these. When the
wing struts were dry I could measure and cut the struts from the engine
platform to the wing. The struts were painted when in place. Finally I made
the wing floats from laminated card which was filed to shape, and struts
from thin rod and glued these under the wings. The propeller was carved from
wood. The model was completed by rigging it with 40 SWG rolled copper wire.
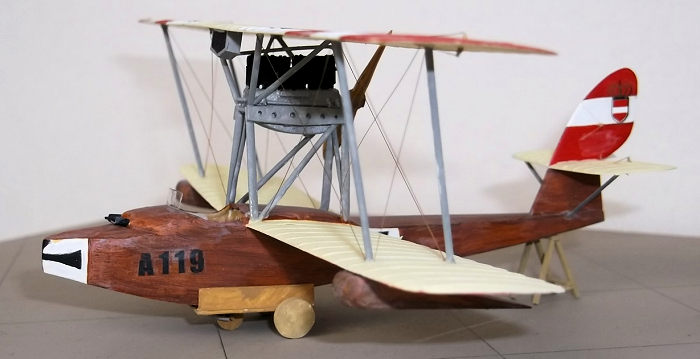
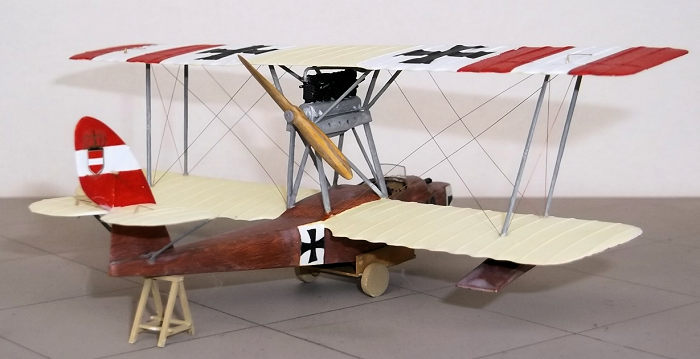
This is a flying boat and it will not sit properly on the
ground unless supported. I am not a diorama builder so I made a simple trolley
and stand for the rear from card and strip: the wheels were shaped from card.
This provides the model with stability and its own little stand and saved me
having to try to make a base with simulated water.
This is not one of the better known WW1 types but it is interesting because
it is a small flying boat which is not often seen in collections. Making it
would not be difficult for a modeller who has some experience with biplanes,
but I would not advise it as a first project.
Stephen Foster
4 May 2017
Copyright ModelingMadness.comIf you would like your product reviewed fairly and fairly quickly, please
contact
the editor or see other details in the
Note to
Contributors.
Back to the Main Page
Back to the Review
Index Page
Back to the Previews Index Page