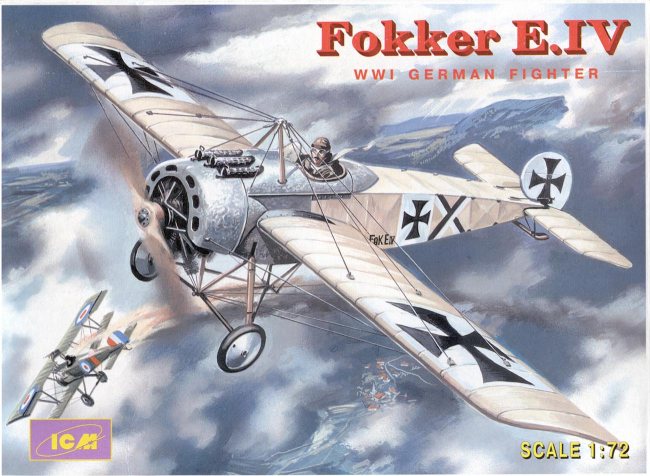
ICM 1/72 Fokker E.IV
|
KIT # |
72111 |
|
PRICE: |
$7.98 |
|
DECALS: |
See Review |
|
REVIEW : |
Kyle Bodily |
|
NOTES: |
|
|
HISTORY |
It is not certain why the Fokker Company built the E.IV, because the German Air service snatched up every E.III that they could make. My favorite story is that since Anthony Fokker was about the same age as most of the pilots that flew his Aircraft and had a very good rapport with them he just produced what they told him they wanted. As a fighter pilot you always want more; more firepower, more maneuverability and to fly higher and faster than your enemy does. The E.III was a proven airframe, so what could be better than souping it up, right? So we take two 100hp Oberursel engines, slap them together and viola you have a 160 hp engine. Now, we put two or three 7.92mm MGs on and you have the Fokker E.IV.
Unfortunately the E.IV didn’t do what it was supposed to. It was less maneuverable and lost power in service, also it could not climb as well as the E.III. At this time biplanes were becoming more and more popular. After the famed Oswald Boelcke wrote a scathing report on its shortcomings the E series Fokkers were doomed. The only thing left was what to do with all the Eindeckers. Most finished their lives as trainers and transition aircraft. Only one original E series Fokker still exists and can be seen at the Science Museum in London England.
|
THE KIT |
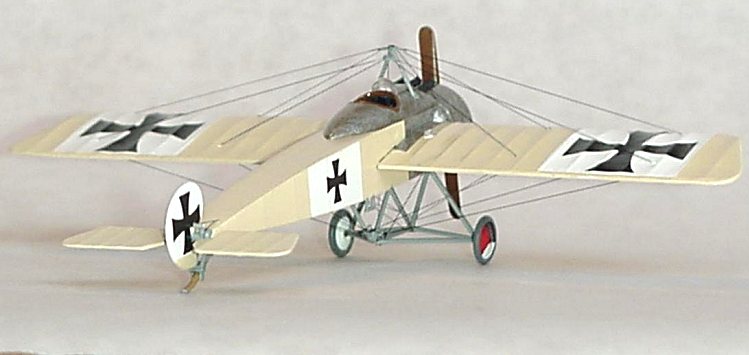
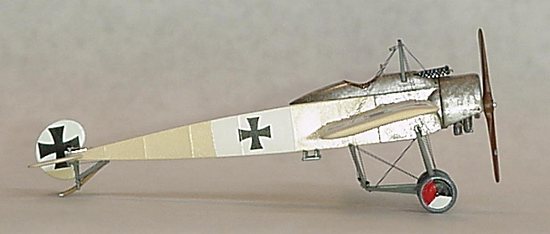
First, like the Pfalz E.IV, the box is much too big for the parts it contains, however the large three view drawings on the back of the box do come in handy. You’ll find in the box, four trees of injection molded pieces. Three dark green trees with 46 parts and one tree of 2 clear parts. The majority of the parts are interchangeable with the Pfalz E.IV (kit # 72121 that they also make). In fact the differences between the two kits are one parts tree that contains parts unique to the kit and the decals.
The molding is quite good, nice detail the only drawback is the exaggerated wing rib detail, all in all a good-looking kit.
 The instructions are good and easy to read with nice
illustrations showing part placement. The painting table is for Humbrol colors.
But they do list the colors by name so you can easily work around that. They
include painting information for the smaller parts. Make sure that you save the
box because the instructions don’t have a rigging diagram or pictures showing
placement of decals and overall painting.
The instructions are good and easy to read with nice
illustrations showing part placement. The painting table is for Humbrol colors.
But they do list the colors by name so you can easily work around that. They
include painting information for the smaller parts. Make sure that you save the
box because the instructions don’t have a rigging diagram or pictures showing
placement of decals and overall painting.
The clear parts are not that clear, but aren’t a real problem. You may want to replace these parts with some made out of film.
The decals are nice and very thin, so they do adhere quite well with little or no decal solvent. The problem here is that they are not printed with white backgrounds, you’ll have to paint them. The kit comes with decal options for two Aircraft, the first flown by Oblt. Max Immelmann June 1916 and Oblt. Oswald Boelcka February 1916. The latter penned his famous report entitled "Air Fighting Tactics" and is considered the father of modern air combat. In fact if you go inside the Fighter Weapons School at Nellis AFB you will see a brass plaque with the Boelcka Dicta (Boelcka’s Dictations). These Eight Commandments of Air combat are still studied and obediently followed by Combat Aviators the world over to this very day. Is there any questions as to which one I built, hint, Boelckas Aircraft.
|
CONSTRUCTION |
I always start out by washing the parts in warm water and mild dish soap to get the mold release oils off. Some of the ICM kits have a very thick mold release oil on them and may take alcohol to remove. If you don’t do this every once in awhile you get a spot that the paint dose not adhere to. Most paints require a nice clean surface to go on well with any kind of consistency.
 After letting the parts dry overnight, I started by painting
the internal parts and assembled the fuselage. The walls of the cockpit were
linen with a tube steel frame. So I painted these surfaces with Testors Model
Master Radome Tan to simulate the linen used to cover the airplane. The cockpit
sides have simulated tube steel detail that was painted gray. I painted the seat
and fuel tank then placed the instrument panel decal on the instrument panel and
was ready to assemble the fuselage. The fuselage is in four parts and takes some
fitting to make it fit together well. Test fitting is very important before you
put any glue on the parts. I filled the seams with putty and tried not to
destroy the very light detail when I sanded the putty smooth.
After letting the parts dry overnight, I started by painting
the internal parts and assembled the fuselage. The walls of the cockpit were
linen with a tube steel frame. So I painted these surfaces with Testors Model
Master Radome Tan to simulate the linen used to cover the airplane. The cockpit
sides have simulated tube steel detail that was painted gray. I painted the seat
and fuel tank then placed the instrument panel decal on the instrument panel and
was ready to assemble the fuselage. The fuselage is in four parts and takes some
fitting to make it fit together well. Test fitting is very important before you
put any glue on the parts. I filled the seams with putty and tried not to
destroy the very light detail when I sanded the putty smooth.
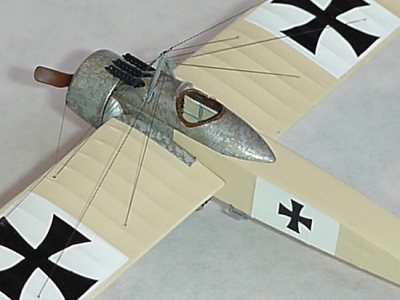
After removing all parts from trees and prepared them for painting. I used a very small drill bit (approximate size 80) to drill all the holes in the wings for the rigging. Squadrons FOKKER EINDECKER in action came handy when determining the hole placement since the kit has no marks to show the position of the rigging. If you don’t want to get the book you can used the three view drawing on the back of the box. As with the Pfalz E.IV I had to find a way to reproduce the pulley attachment that was in front of the pilot and on top of the upper support post (part # C-10). I did this to facilitate rigging since the pulley provided in the kit (part B-6) did not work for me. This part is important because it is the focal point for the rigging and seems to attract your eye. These aircraft did not have ailerons so a process of wing warping was used to change its roll axis, and the pulley was used to allow the wings to warp in opposite directions.
 I heated a piece of sprue, stretched it, then cut a disk to
represent the pulley and drilled a hole in it for a small piece of wire (.008
brass) to attach it to the post and allow the rigging to pass through. On the
top of the upper support post were two turnbuckles, to simulate these, I once
again used brass wire (.008) bent it into two loops flattened them and super
glued it on top of the support. I made a small loop out of the same brass wire
and place it at the bottom of the lower center support (part # C-3). This too
would help facilitate rigging. I painted the rest of the parts and applied the
decals. Then I carefully removed the paint from the areas to be glued on all
remaining parts and put it together. Everything went great.
I heated a piece of sprue, stretched it, then cut a disk to
represent the pulley and drilled a hole in it for a small piece of wire (.008
brass) to attach it to the post and allow the rigging to pass through. On the
top of the upper support post were two turnbuckles, to simulate these, I once
again used brass wire (.008) bent it into two loops flattened them and super
glued it on top of the support. I made a small loop out of the same brass wire
and place it at the bottom of the lower center support (part # C-3). This too
would help facilitate rigging. I painted the rest of the parts and applied the
decals. Then I carefully removed the paint from the areas to be glued on all
remaining parts and put it together. Everything went great.
|
PAINT & MARKINGS |
Painting went well. Most of the plane was painted Radome Tan
(to simulate the CDL or clear doped linen). Most of the framework and supports
were painted gray and the engine cowl and upper fuselage cockpit cowling was
painted silver. On the original it had a natural metal finish with a swirl
pattern on it. This was made by brushing the metal with a spinning brush in a
random pattern. To simulate this I painted these parts steel, used a ½ inch
flat brush to make the pattern. Just dip the brush in silver and let the
bristles start to stick together then remove the excess and just tap the tips on
the part. Take your time and you will get a convincing pattern. You may want to
practice a little first, but you can do it. You will have to paint the white
fields that the Maltese crosses are imposed on because the decals are devoid of
them, the only drawback with them. I
 painted the tires my own shade of gray
mixed with a touch if purple to simulate the color of the early tires. The
tailskid was painted dark brown with steel hardware (most wood tailskids had a
steel plate on the bottom to lengthen service life of the skid). Now a final
coat of clear semi-gloss paint to prepare the surface for decals.
painted the tires my own shade of gray
mixed with a touch if purple to simulate the color of the early tires. The
tailskid was painted dark brown with steel hardware (most wood tailskids had a
steel plate on the bottom to lengthen service life of the skid). Now a final
coat of clear semi-gloss paint to prepare the surface for decals.
The decals went on great, no problem. One last coat of semi-gloss clear and I let the plane sit for a day or two. This time I use to let the glue harden and to let my rigging plan solidify in my mind. It can’t be stressed enough "you have to have a plan before you rig the kit". Or if you prefer, the kit would look good without rigging and you may want to quit here. I personally enjoy rigging and try to make it easy on myself by working smart. Work from the inside out, I like to use a threading method, which I have found to work best for me, you may find a method that works better for you. I use 2lbs. fishing line that I color black using a waterproof marker. I thread the rigging through the predrilled holes and pull it tight as I go and superglue being careful not to put glue on a hole that will get another line.
|
CONCLUSIONS |
ICM did a good job with this kit. I don’t know of any other injection molded Fokker E.IV kits on the market at this time that are under $10.00 and I think this kit is better then the MAC E.IV that goes for $14.98. I would not recommend this kit to the beginner but if you have some experience this would be a good kit to learn some basic rigging techniques. Because it’s a monoplane, I think that the rigging is easier than most biplane kits. It looks good and would even look good without rigging. Don’t let the rigging scare you away from World War I kits, just take your time and enjoy.

|
REFERENCES |
Squadron/Signal "Fokker Eindecker in action # 158"
"German Knights of the Air 1914-1918" By Terry C. Treadwell & Alan C. Wood
"Aces High, the war in the air over the western front 1914-1918" By Alan Clark
Copyright ModelingMadness.com. All rights reserved. No reproduction in part or in whole without express permission.
If you would like your product reviewed fairly and fairly quickly, pleasecontact the editor or see other details in the Note to Contributors.
Back to Reviews Page 2022