Pegasus 1/72 Phonix D.I
|
KIT # |
1026 |
|
PRICE: |
£9.99 |
|
DECALS: |
One Aircraft |
|
REVIEWER: |
Kyle Bodily |
|
NOTES: |
Short run with metal parts |
|
HISTORY |
Austria-Hungry started to look for an indigenous built fighter in 1916 since Germany was reluctant to give up its best front line fighters. Austria-Hungry started out with the Phonix built Hansa-Brandenburg D.I(Ph). The Brandenburg was quite tricky to fly and it took the pilots full attention just to keep the aircraft under control. It had a tendency to spin and, like the Sopwith Camel, was almost impossible to recover the spin. The performance of the Brandenburg was discouraging. The improvements that Flars ordered were not totally successful and the remaining fighters were assigned to training units
 Phonix used their experience
building the Brandedburg to build the Phonix D.I. The Phonix D.I was a great
improvement over the Brandenburg, in fact a German Idflieg report stated “it
possesses totally amazing qualities, especially the quickness of maneuver and
stability when throttled down. The pilot can stall the aircraft virtually on
the spot and drop several hundred meters without losing control.”
Phonix used their experience
building the Brandedburg to build the Phonix D.I. The Phonix D.I was a great
improvement over the Brandenburg, in fact a German Idflieg report stated “it
possesses totally amazing qualities, especially the quickness of maneuver and
stability when throttled down. The pilot can stall the aircraft virtually on
the spot and drop several hundred meters without losing control.”
This Aircraft was very stable and many two seater pilots made the transition into the D.I without incidence. After flying the Hansa-Brandenburg D.I pilots favored the Phonix D.I. However not all was of good report. Flik 60/J reported that the Phonix D.I was not favored, as it was said to be slower than the SPAD and could not maneuver with the Nieuport or the Sopwith fighters.
120 Phonix D.Is were produced between September 1917 and March 1918 of these, 72 were still operational on 1August 1918. It was a very well rounded aircraft with no hidden vices and these numbers speak well of its qualities
|
THE KIT |
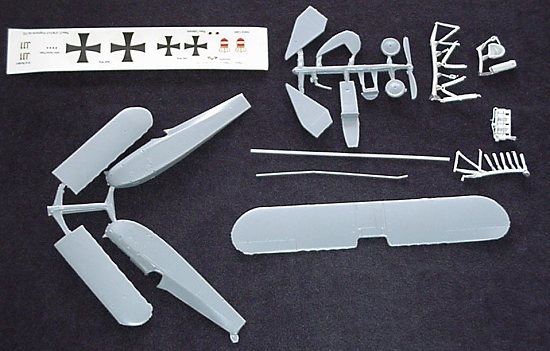
In the box you will find fourteen
light blue injection molded parts, strut and rod stock. Decals are for one navy
aircraft and some sixteen cast metal parts. The plastic is the standard Pegasus
format, gray with a little flash. All in all the parts look nice. The wings
have thin trailing edges and washout. The panel lines and details are nicely
reproduced with either raised or engraved lines where appropriate. The cockpit
is a little light on detail but is adequate. As a rule of thumb Pegasus kits
are light on cockpit detail i.e. if you build many Pegasus kits you will see the
same parts in different kits over and over again.
 They all seem to have some
variation on the same seat, cockpit floor, instrument panel and control column.
This gives the modeler the opportunity to do his or her own detailing if
wanted. However they are quite adequate if you wish to use them.
They all seem to have some
variation on the same seat, cockpit floor, instrument panel and control column.
This gives the modeler the opportunity to do his or her own detailing if
wanted. However they are quite adequate if you wish to use them.
The metal parts are also nicely done with attention to such detail as the little cooling pipes on top of the engine and the nice flat cross section exhaust pipes. They will take the expected cleanup time but nothing more than any other cast metal parts that you’ve worked with in the past.
The instructions are more or less adequate. On one side you have an exploded drawing of the kit and on the other side you get construction notes. Also included are little templates to cut the interplane struts and other items that will need to be fabricated out of the supplied stocks. On the back of the box you will find nice three view drawings. I find that if you have these enlarged to scale you can build the model on them. This allows you to make sure that all the parts are lined and squared up. One more thing to keep in mind is that the molding gates on some of the Pegasus kits at times extend into the parts, so care must be exercised as you clean up the plastic parts.
|
CONSTRUCTION |
The construction was straight forward.
I started by removing all the parts from their trees. I painted all the
metal parts with white primmer because I find that the model paints looks better
and covers more consistently if you prime the metal first. The cockpit
consists of a control column, seat, instrument panel and floor, this is adequate
in 1/72 scale, but you may wish to do some detailing here. I decided to
build this kit with only the parts provided by the manufacturer and painted the
inside of the fuselage halves, floor and instrument panel wood. The seat
and control column were painted black and gray respectively and the engine was
painted black with silver intake manifolds. The cockpit was assembled and
along with the engine was mounted in the right fuselage. Work was needed
to adjust the engine so it stood out of the fuselage correctly
 and I glued the
two halves together. One point here, most of the Pegasus kits don’t have
much in the way of things to help the builder in positioning the parts i.e.
pins, tabs or slots, I guess that is why Pegasus says that there kits are for
the advanced builder/collector.
and I glued the
two halves together. One point here, most of the Pegasus kits don’t have
much in the way of things to help the builder in positioning the parts i.e.
pins, tabs or slots, I guess that is why Pegasus says that there kits are for
the advanced builder/collector.
The bottom wings just butt up against the fuselage, so I drilled some small holes in the fuselage and the wings to accept some pieces of brass rod, this I did to add strength to the joint. I usually build the fuselage and put on the lower wings and stop there until I paint. Sometimes I do more or less, it all depends on the kit and the paint scheme that I will use. You will need to make the interplane struts from the strut stock that is provided. This is really not as hard as it sounds and the experience that is gained from this process is very useful in future projects. This is also the time that I use to drill the holes that I will use for the rigging. Also before I paint I will build other components and test fit everything at least twice. The more you test fit the more fun you will have building the kit and you will at least save money on antacids and aspirin.
|
CAMO & MARKINGS |
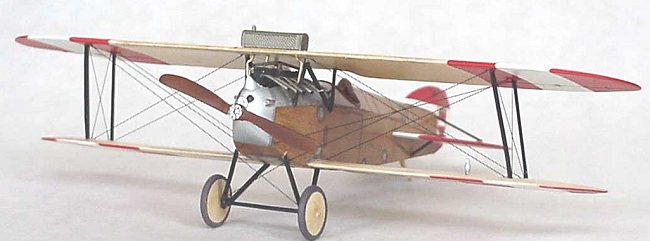
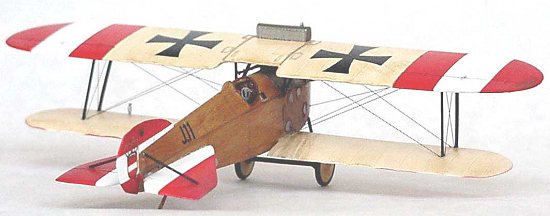
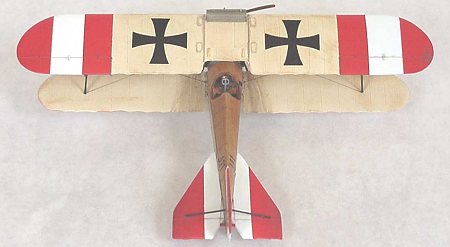
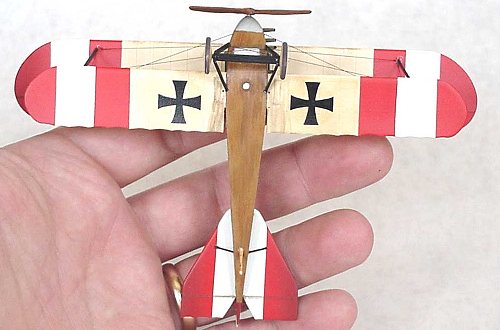
Painting is quite simple. On the aircraft that I am building the fuselage was polished wood paneling with unpainted metal panels, the wings were clear doped linen with the distinctive Red White Red stripes used on Austro-Hungarian Navy aircraft.
Some of the aircraft that I build are weathered and others are built in pristine condition. I decided that this one would have a weathered, just back from a mission appearance. I use standard enamels to paint the kit and I use water wash-up paints for the weathering. I mix up black and shades of brown to get a convincing dirty oil shade. I then dilute this with rubbing alcohol until it looks like murky water. I use a thin brush and let the mixture wick down the panel lines. Don’t worry if you get a paint splotch here all you need to do to fix your mistakes is get a cotton swab with a little alcohol in it and rub the mistake off, because the base paint is enamel it will not be rubbed off.
 The streaming oil stains were made in a
similar way. After looking at pictures of actual aircraft you will get an idea
as to how these aircraft spewed oil. I just blotch the paint mixture on and let
it dry. I will repeat this process several times and this will give you a
convincing mottled/random oil spew and slipstream pattern. Once again if you
mess up just get out the cotton swab and alcohol, clean it and start again. One
thing to keep in mind here is that aircraft having just returned from a flight
were filthy, while those that had been serviced and had a good ground crew to
work on them were quite clean. Remember these aircraft could not be left in the
weather, i.e. snow, rain, or sun, or they would be rendered unserviceable about
as fast as a hot pilot with a good sight picture could. They had to be put
under cover and babied. The ground crews would clean them with petrol soaked
rags (this was before people got upset about those things) and polish them like
furniture. This is true even today. The ground crews take great pride in their
aircraft, and they do belong to the ground crew. Tell a crew chief that the
machine belongs to the pilot and you may just get hit. Also the attrition rate
was so high that few aircraft lasted for more then a year. Records are full of
accounts of aircraft that were lost with less then twenty hours on the airframe,
so some aircraft never got the chance to look old.
The streaming oil stains were made in a
similar way. After looking at pictures of actual aircraft you will get an idea
as to how these aircraft spewed oil. I just blotch the paint mixture on and let
it dry. I will repeat this process several times and this will give you a
convincing mottled/random oil spew and slipstream pattern. Once again if you
mess up just get out the cotton swab and alcohol, clean it and start again. One
thing to keep in mind here is that aircraft having just returned from a flight
were filthy, while those that had been serviced and had a good ground crew to
work on them were quite clean. Remember these aircraft could not be left in the
weather, i.e. snow, rain, or sun, or they would be rendered unserviceable about
as fast as a hot pilot with a good sight picture could. They had to be put
under cover and babied. The ground crews would clean them with petrol soaked
rags (this was before people got upset about those things) and polish them like
furniture. This is true even today. The ground crews take great pride in their
aircraft, and they do belong to the ground crew. Tell a crew chief that the
machine belongs to the pilot and you may just get hit. Also the attrition rate
was so high that few aircraft lasted for more then a year. Records are full of
accounts of aircraft that were lost with less then twenty hours on the airframe,
so some aircraft never got the chance to look old.
The decals that came with the kit had yellowed so I just put then in a zip-lock bag, pushed out the air , zipped it up and put it in the window. It took about three days for them to cleared up and they went on great.
|
CONCLUSIONS |
I like the way this kit looks. It was fun and rewarding. It is a limited run kit and as such has the expected problems. However, I think it would be a good kit to stretch your building skills.
I like Pegasus kits, I’ve built most of their offerings to date and I do like them very much. They are good quality kits, though a bit hard to build until you get the hang of them. Pegasus has always offered interesting aircraft subjects that have not been previously released in an injection-molded kit format. For some aircraft they are the only company that produces them. I think that they should be congratulated for this.
In the end, I think the MAC Phonix D.I is marginally better. However, this is not to say that the Pegasus Phonix D.I kit is lacking in any way.
|
REFERENCES |
Profile #174 (The Phonix Scouts)
Austro-Hungarian Army Aircraft of World War One, by Peter M. Grosz, George Haddow and Peter Schiemer
Air Aces of the Austro-Hungarian Empire 1914-1918 by the late Dr. Martin O’Conner
December 2001
Copyright ModelingMadness.com
If you would like your product reviewed fairly and fairly quickly, please contact the editor or see other details in the Note to Contributors.