Blue Max 1/48 DH.2
|
KIT # |
BM 108 |
|
PRICE: |
$34.95 |
|
DECALS: |
See review |
|
REVIEW : |
|
|
NOTES: |
Short Run |
THE FIRST FIGHTER
|
HISTORY |
Most modelers, if asked "what was the first fighter?" would likely answer, "The Fokker Eindekker." They would be wrong. Some of the more knowledgeable might suggest the Morane-Saulnier, the first airplane to carry a machine gun aimed by aiming the airplane at the target. They would also be wrong. Both of these aircraft began their lives as single-seat unarmed monoplane scouts. That they later carried weapons and engaged in air combat was merely fortuitous.
The first designed-for-the-purpose fighter airplane was Geoffrey deHavilland's D.H.2, design of which first began in March, 1915 - well before any Fokker Eindekker flew anywhere with a machinegun mounted on it. The prototype first flew at Hendon aerodrome June 1, 1915. This airplane was designed to carry a .303 Lewis gun mounted in its nose; at first - since no one knew how air combat would happen - it was a flexible mount, and remained so officially during the aircraft's period of service. Service pilots, however, quickly discovered that the secret was to aim the airplane, not the gun, and most D.H.2s flew with their weapon in a fixed position, albeit a "temporary fitting" should some hidebound air staff officer appear at the aerodrome.
 In an action that demonstrates how litle real
thought was being given to the air war, the sole prototype was sent to France a
month later, on July 6, 1915, to be used by 5 Squadron, RFC, based at the time
at St. Omer. By the middle of the month, the airplane had been lost when Captain
Robert Maxwell-Pike, OC 5 Squadron, was on a mission in the vicinity of Ypres,
Belgium. In a fight with an Albatros 2-searter, he took a mortal wound to the
head, but was able to land just east of Ypres, though the airplane somersaulted
in the rough . Fortunately, the Germans - though they repaired the airplane -
made no attempt at a detailed examination and thereby left it to their flyers
over the next year to discover for themselves what the D.H.2 was capable of.
In an action that demonstrates how litle real
thought was being given to the air war, the sole prototype was sent to France a
month later, on July 6, 1915, to be used by 5 Squadron, RFC, based at the time
at St. Omer. By the middle of the month, the airplane had been lost when Captain
Robert Maxwell-Pike, OC 5 Squadron, was on a mission in the vicinity of Ypres,
Belgium. In a fight with an Albatros 2-searter, he took a mortal wound to the
head, but was able to land just east of Ypres, though the airplane somersaulted
in the rough . Fortunately, the Germans - though they repaired the airplane -
made no attempt at a detailed examination and thereby left it to their flyers
over the next year to discover for themselves what the D.H.2 was capable of.
As development continued, it was discovered that the Gnome Monosoupape rotary would shed its cylinders in flight, which led to the danger of thrown cylinders and engine parts severing the tail booms - a fatal event. The reputation for unrelaibility of the early engines was unmerited, since many had been re-bored in an effort to increase their power, thereby weakening the structure at a crucial point - the joining of cylinder to crankcase. New-build engines were installed in all the D.H.2s flown to France by 24 Squadron R.F.C. - the world-s first fighter squadron - in late 1915.
Once in France, the D.H.2 was unpopular due to their limited speed range and their tendency to spin under the influence of the rotary engine once turned off. Since pilots still did not know the proper procedure for getting out of a spin - pushing the nose down was entirely counterintuitive - this led to numerous losses until that information became common in the summer of 1916.
During the fighting over the Somme battlefield in the summer and early fall of 1916, the D.H.2 played a crucial role in ending the "Fokker scourge." The German fighter was not yet present in organized fighter squadrons, with 3-4 being distributed to each squadron operating two-seat observation aircraft, for the purpose of providing escort to the other airplanes in the unit. The German pilots found themselves outnumbered and outmaneuvered by the "massed" fighter formations (6-8 aircraft) from 24 Squadron and its later stablemate, 32 Squadron. Oswald Boelcke may have "written the book" about fighter tactics, but he learned them watching the operations of the D.H.2 squadrons, and it was the knowledge the British were operating them as squadrons that gave Boelcke the argument he needed to get the German command to authorize the formation of JagdStaffeln.
 Captain,
later Major Lanoe Hawker, the popular commander of 24 Squadron, became the first
British ace during the fighting over the Somme. He had won the DSC for an attack
on a German Zeppelin shed earlier in 1915, and was awarded the V.C. that
September for his actions in a Bristol Scout prior to joining 24 Squadron, in
which he shot down several German aircraft that had attacked him while flying
alone. His standing orders to his pilots were "attack everything." By
November, 1916, his score stood at 7. Unfortunately, 24 Squadron was now opposed
by a far better fighter, the Albatros D.II, flown by Boelcke's Jasta 2.
Captain,
later Major Lanoe Hawker, the popular commander of 24 Squadron, became the first
British ace during the fighting over the Somme. He had won the DSC for an attack
on a German Zeppelin shed earlier in 1915, and was awarded the V.C. that
September for his actions in a Bristol Scout prior to joining 24 Squadron, in
which he shot down several German aircraft that had attacked him while flying
alone. His standing orders to his pilots were "attack everything." By
November, 1916, his score stood at 7. Unfortunately, 24 Squadron was now opposed
by a far better fighter, the Albatros D.II, flown by Boelcke's Jasta 2.
The D.H.2 had a top speed of around 93 mph, and a single .303 Lewis gun, with five 47-round drums of ammunition. The Albatros had a top speed of 106 mph, and carried two Spandau machine guns with 200 rounds each. No matter that the D.H.2 was the more maneuverable, the Albatros pilot could enter or break off combat at will due to superior performance.
On November 23, 1916, Hawker and his wingman engaged a flight of Albatros D.IIs. Hawker engaged one unsuccessfully, then was attacked in turn by an obscure member of Jasta 2, a former Uhlan named Manfred von Richtofen. Had the mounts of each pilot been reversed, there is no doubt of the outcome, as Hawker was by far the more experienced pilot, though von Richtofen had 10 kills to his credit at the time; this fight is a demonstration of the effect of superior technology. The battle eventually wound down to tree-top height as Hawker traded altitude for airspeed, trying desperately to regain his lines. Richtofen later said that of all the fights he entered, the battle with Hawker was the most difficult. The aircraft went round and round, with Hawker pulling tight enough onto von Richtofen's tail to pepper his Albatros several times. Finally, Hawker ran out of ammunition and had to run for it. This gave von Richtofen the opening he needed, and the speedy Albatros quickly caught up with the slower D.H.2. With the last of his ammunition, von Richtofen fired a burst that hit Hawker in the head, killing him outright He was von Richtofen's 11th victory, and marked the beginning of the Baron being considered a leading pilot by his comrades. Von Richtofen paid Hawker the ultimate compliment of making his Lewis gun the centerpiece of his collection of "memorabilia" from his victims, displaying the weapon over the door of his bedroom at home.
|
THE KIT |
 There have been very few kits of the D.H.2 made, with Revell
releasing one in 1/72 in the late 1960s, and Pegasus releasing another in the
1990s. In 1/48, the only release (actually in 1/50) was by Merit in the 1960s, a
kit that has been reproduced over the years by Artiplast in Italy and then by
SMER in the Czech Republic. This is a very ancient kit, which can be made into
an acceptable model, if one is to risk becoming "a candidate for a rubber
room" as my friend on the WW1 List, Steve Perry, managed to accomplish a
few years ago.
There have been very few kits of the D.H.2 made, with Revell
releasing one in 1/72 in the late 1960s, and Pegasus releasing another in the
1990s. In 1/48, the only release (actually in 1/50) was by Merit in the 1960s, a
kit that has been reproduced over the years by Artiplast in Italy and then by
SMER in the Czech Republic. This is a very ancient kit, which can be made into
an acceptable model, if one is to risk becoming "a candidate for a rubber
room" as my friend on the WW1 List, Steve Perry, managed to accomplish a
few years ago.
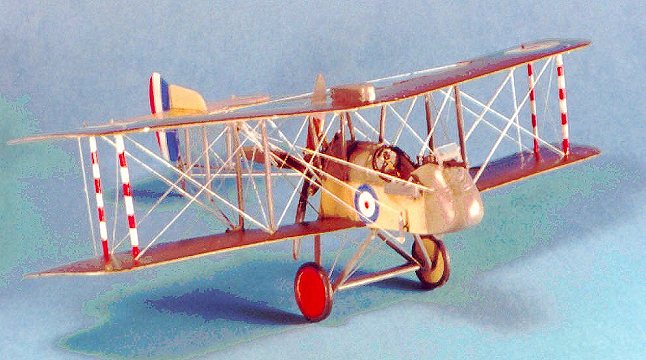
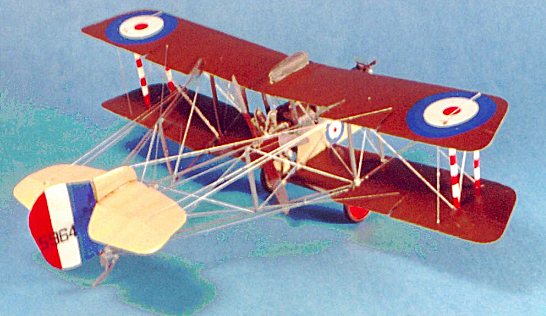
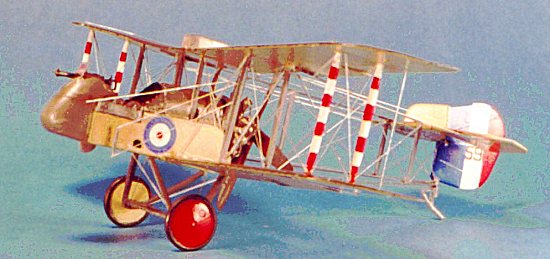
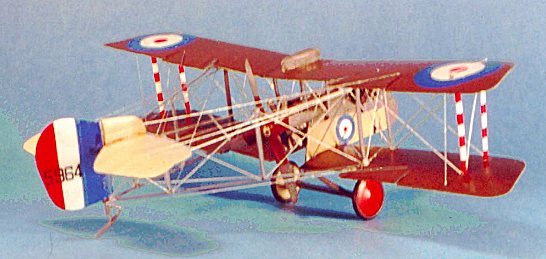
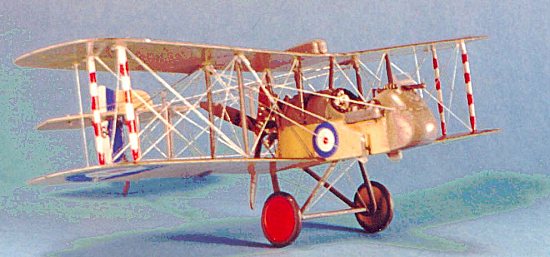
The Blue Max kit, released in a total run of only 1,500 kits, came out in 1998. This is typical "Blue Max": a limited run kit with good plastic parts (for a limited-run kit) and so-so white metal detail parts; if the modeler is fortunate to get a kit without the infamous "wing ripple," the kit can be turned into an acceptable model with a bit of diligence. The decals are nice, as is usual with Blue Max, but the wing roundels are just a bit too big; I went out and spent $5 for a recent SMER D.H.2 kit with new Propagteam decals, which are better sized and - I think - a more accurate color. Overall, just looking at it out of the bag, this is definitely not a WW1 kit for anyone but an advanced modeler.
|
CONSTRUCTION |
Most World War I models are best built in sub-assemblies, painted and decaled, then fully assembled. This is particularly true of this model. The subassemblies were: lower wing and fuselage, upper wing and fuel tank, and tail. First things first, I cut off the control surfaces of the wings and tail and posed them, then set them aside. The cockpit provided in the kit is pretty basic, but then the cockpit of the real thing was pretty basic; here I used an Eduard photo-etch RFC seatbelt set, a p-e throttle, and decals for the three instruments in the small panel: altimeter, tachometer and clock. I fitted the engine mount inside the rear of the fuselage, and then glued the two lower wings into position, then set it aside in its jig to dry. The 3-part upper wing was next and once it was glue together it was set aside in its jig to dry. The rudder and horizontal stabilizer was glued together then set aside to dry. The easy part was now over.
I turned to making the interplane and cabane struts from the airfoil-section plastic strips provided in the kit.
BUILDING THE ENGINE:
After all this was done, I turned to the engine. This is all white metal, with separate cylinders. I managed to get them together using cyanoacrylate and Zip Kicker, then used some Evergreen .010 rod to make the valve lifters. The engine was painted with varying shades of ModelMaster Metallizer colors, then oversprayed with Tamiya "Smoke" to pop out detail and seal the paints. I set this aside where I wasn't likely to handle it and break it (having broken off all the cylinders once attached at least once each).
|
PAINT & DECALS |
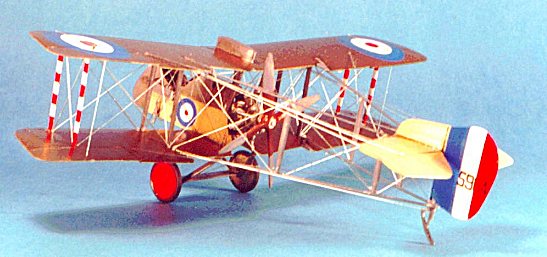 I had decided to do the airplane Hawker flew in his fateful
encounter with von Richtofen. Fortunately, this is the cover art subject of the
Squadron "D.H.2 In Action" book; this is a new Squadron publication,
and is very helpful when building this model, as is the Windsock Datafile with
its thre-view drawings that are very helpful in providing additional information
from the very basic instruction sheet.
I had decided to do the airplane Hawker flew in his fateful
encounter with von Richtofen. Fortunately, this is the cover art subject of the
Squadron "D.H.2 In Action" book; this is a new Squadron publication,
and is very helpful when building this model, as is the Windsock Datafile with
its thre-view drawings that are very helpful in providing additional information
from the very basic instruction sheet.
I first pre-shaded all the sub-assemblies with flat black airbrushed over panel lines and ribs. The metal parts of the fuselage, the inner interplane struts, the cabane struts, the tail section struts , the tail booms and landing gear were painted with Tamiya "Sky Grey," which is a close match for British Battleship Grey; while this was drying, I painted the outer interplane struts flat white, masked them, then painted them Gunze Sanyo "Shine Red," a good match for British scarlet - I also painted the outer sides of the main wheels with this color. I then masked the fuselage and painted the fuselage sides, lower surfaces of the wing, and entire tail section with Gunze "Sail Color," a good match for Clear Doped Linen. When this was dry, I used my special mixture of P.C.10, a combination of Tamiya "Khaki," Tamiya "Olive Drab," and Gunze Sanyo "Dark Earth." This camouflage color came in several differing shades, depending on who manufactured it, so there is no "absolutely correct" color to use. When all was dry, I Futured the subassemblies and put them aside.
I used the national insignia from the SMER kit decal sheet, and then did the serial number, "5964" with number decals from an old Modeldecal sheet from the decal dungeon. Everything went on easily with . a bit of Microscale and set up overnight. Next day I washed the model to get rid of decal solvent, and Futured everything again.
|
CONSTRUCTION |
I glued the interplane struts and cabane struts in position with cyanoacrylate, test-fitting the upper wing frequently to be sure everything was positioned properly. I then glued the upper wing on with cyanoacrylate, using Zip Kicker to hasten the process. I then assembled the landing gear and glued it in position.
I was now ready for the Really Hard Part: the tail booms.
 The kit came with a jig, which I used. Gluing white metal
struts to a metal boom does not create a strong structure, and I would recommend
that any modeler who is going to use what the kit provides solder all this
together for additional strength. I went along in my fool's paradise a while
longer.
The kit came with a jig, which I used. Gluing white metal
struts to a metal boom does not create a strong structure, and I would recommend
that any modeler who is going to use what the kit provides solder all this
together for additional strength. I went along in my fool's paradise a while
longer.
The first attempt to fit the booms in position to the wings started out looking pretty dodgy, since they looked about 1/32" off in dimension with each other. I glued the left side in position, then glued the right side in position, using cyanoacruylate with Zip Kicker. I then proceeded to attach the tail surfaces. They definitely didn't fit exactly, and as I tried to make them do so....
I dropped the model. Not far, only about four inches to my lap. This was enough to send the tail booms flying apart, however (fortunately everything else stayed together. I decided this metal parts business was not going to work.
I cut Evergreen plastic dowel to the same size as the booms, and made struts from plastic. I glued all this together and tried again. The jig was out of rig, and things were not going to fit right anyway. I then disassembled the tail booms, and proceeded to glue to two lower booms together at the proper angle, then attach them to the lower wings at the proper angle, gluing with Tenax and using a bit ot cyanoacrylate with Zip Kicker to hold them in position. I then glued the upper booms to the horizontal stabilizer at the proper angles, the way I had done with the lowers. I glued this assembly to the upper wing, and the bottom of the rudder to the connection point at the tip of the lower booms. Everything was held in position with cyanoacrylate and I was breathing lightly to prevent further trouble. I then fitted the bracing struts into position with the booms, trimming them as necessary to postion them correctly. Finally, everything was together! I then hand-painted the tail boom assembly with Tamiya "Sky Grey" and then Futured it.
Overall, the model was looking good. I just had to keep reminding myself that it was indeed as fragile as it looked.
RIGGING:
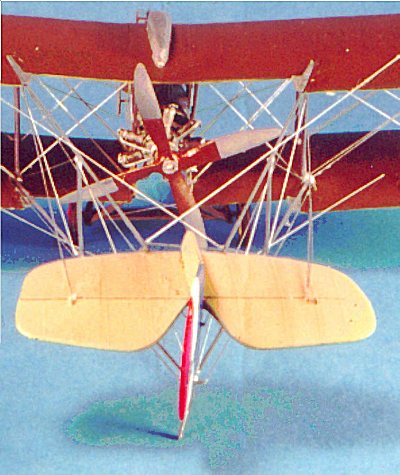 The D.H.2 is the very epitome of the World War I "bird
cage," of which it was said the riggers would test they had done things
right by releasing a small bird between the wings - if the bird managed to
escape, there was a missing wire.
The D.H.2 is the very epitome of the World War I "bird
cage," of which it was said the riggers would test they had done things
right by releasing a small bird between the wings - if the bird managed to
escape, there was a missing wire.
Fortunately, we ended up with a major heat wave: 95 degrees and 90 percent humidity,. under a temperature inversion layer that kept all the crud in the air and limited visibility to less than 2 miles - the kind of heat wave they warn people to stay indoors if they don't have pressing business outdoors, a real LA heatwave to remind us that here we are on the seashore, on the edge of a major desert. I sat down in front of the air conditioner and prepared to go to work - not a lot of motion, not a lot of heavy physical effort, nothing to raise body temperature. Just take it nice and easy... be certain to put only calming, classical music in the CD player...
Over the two and a half days I spent rigging this model, I think it very likely that I lost two pounds of body weight to sweat! There were times that the air over the work bench was tending from deep mauve to dark purple. The good thing was, by attaching all the wires with white glue, I was strengthening all the joints in this fragile model, so that - while the wires themselves were not structural - the end result was a less-fragile model.
When I was done (and I am not entirely certain I got every wire there is on this airplane) I had used nine one-foot sections of .008 wire. Allowing for the little bits of overage in cutting the wires to the proper lengths, I believe there are at least 100 inches of wire in this model, which has a wingpan of 7 1/4" and a length of 5 1/2"!!!
|
CONCLUSIONS |
The Blue Max kit costs seven times as much as the SMER kit. It is at least ten times as good as that kit, and even if built "out of the box" will look better than the final result of the major kit-bashing operation it takes to create something approximating a model of a D.H.2 from the SMER kit. There is good value for the money here. The D.H.2 is a very important airplane in the history of the development of fighter aircraft, fully deserving of a place in any collection that wants to be "definitive" of the subject. The modeler with the ability to take the time and use the patience necessary to construct this model will be rewarded with a great feeling of accomplishment every time they look at it sitting on the model shelf. That said, I doubt I would be able to do another one in the next couple years, and that F.E.2b sitting on the shelf and glaring at me with its naked wings is just going to have to sit there awhile longer while I build my resolve to attempt rigging it (I would estimate there is 160 inches of rigging wire to be done there!).
Bottom line: even the "hard" World War I models can be done by anyone with good hand-eye coordination and a bit of patience.
|
REFERENCE |
DH-2 in Action by Peter Cooksley. Squadron/Signal Publications, 2000
May 2000
Copyright ModelingMadness.com
If you would like your product reviewed fairly and quickly, please contact the editor or see other details in the Note to Contributors.