|
KIT # |
415 |
|
PRICE: |
$19.98 MSRP |
|
DECALS: |
four options |
|
REVIEWER: |
Tom Cleaver |
|
NOTES: |
|
HISTORY |
The Fokker D.VII can fairly be compared to the Me-262 of the Second World War in terms of being the most technologically-advanced fighter to see service during the First World War. With its internally-braced structure that obviated the need for external bracing wires, it in fact was so advanced in terms of aerodynamics that - other than some other fighters build by Fokker during the 1920s - it was not equalled until the introduction of monoplanes in the 1930s. It was fast, maneuverable and easy to fly. It was said of the D.VII that it made the average pilot good and the good pilot great.
The airplane was the final result of a see-saw of technological advances during the Great War that began with the introduction of the armed Fokker monoplane in 1915. This was countered by the French Nieuport 11 and the British deHavilland D.H.2 - the first designed-for-the-purpose fighters to see service - which were trumped by the German introduction of the Albatros series in the fall of 1916, which resulted in approximately a year of German air superiority prior to the widespread introduction of the British Camel and S.E.5A, and the French SPAD series, coupled with the failure of the Albatros D.V due to designed-in faults, and the delayed introduction of the Fokker Dr.I due to poor quality control in production. By the end of the summer of 1917, the German Jastas were not only on the defensive in terms of strategic plan, but on the defensive in terms of day-to-day operations.
 In the face of
this, Idflieg announced a Fighter Competition for early 1918, for the
manufacturers to come up with a fighter that could meet the Allied
fighters on at least a basis of equality if not superiority. Anthony
Fokker was determined to end the reputation he had gained for shoddy
workmanship and designs that did not really meet the needs of the German
Air Service. The result was the V11, a single-bay biplane finally
powered by the Mercedes engine he had campaigned for since 1916, which
incorporated all his ideas regarding advanced aerodynamics. When the
airplane was first flown at the Fighter Competition, it was not up to
winning; Fokker and Reinhold Platz literally redesigned and rebuilt the
prototype during the competition, lengthening the fuselage and adding
other minor items. The result was an airplane that Manfred von Richtofen
himself declared the best fighter he had flown. Not only did Fokker win
the production contract for the fighter now known as the D.VII, but he
had the satisfaction of seeing his competitor, Albatros, ordered to
produce the D.VII under license at both the main Albatros factory and the
OAW factory.
In the face of
this, Idflieg announced a Fighter Competition for early 1918, for the
manufacturers to come up with a fighter that could meet the Allied
fighters on at least a basis of equality if not superiority. Anthony
Fokker was determined to end the reputation he had gained for shoddy
workmanship and designs that did not really meet the needs of the German
Air Service. The result was the V11, a single-bay biplane finally
powered by the Mercedes engine he had campaigned for since 1916, which
incorporated all his ideas regarding advanced aerodynamics. When the
airplane was first flown at the Fighter Competition, it was not up to
winning; Fokker and Reinhold Platz literally redesigned and rebuilt the
prototype during the competition, lengthening the fuselage and adding
other minor items. The result was an airplane that Manfred von Richtofen
himself declared the best fighter he had flown. Not only did Fokker win
the production contract for the fighter now known as the D.VII, but he
had the satisfaction of seeing his competitor, Albatros, ordered to
produce the D.VII under license at both the main Albatros factory and the
OAW factory.
The only problem shown by the fighter was a loss of performance at the high altitudes where aerial combat was increasingly taking place. This was due to the performance restrictions of the 160 h.p. Mercedes engine. Fokker asked for the new 185 h.p. BMW engine, which was designed to maintain power at higher altitudes, but was told it would not be available in time for installation in the production aircraft for six months. As it turned out, the BMW-powered Fokker D.VII did begin to appear on the front in June and July 1918, but it was always in short supply, and the Mercedes-powered D.VIIs saw combat till the end of the war.
The first D.VIIs emerged from the factory in early March. The production level was low enough that no unit could be completely re-equipped with the airplane, though flight leaders and other pilots of demonstrated ability were issued the D.VII initially. Manfred von Richtofen chose not to fly his newly-assigned D.VII on April 21, 1918, and died in his triplane.
 Even with the
inferior Mercedes engine, the D.VII went a long way toward providing the
Germans with technological superiority, even if they were vastly
outnumbered by the Allies in the air. It was said of the D.VII that it
could "hang on its prop" and shoot an Allied fighter from below. This
was due to the excellent stall/spin characteristics of the design.
Even with the
inferior Mercedes engine, the D.VII went a long way toward providing the
Germans with technological superiority, even if they were vastly
outnumbered by the Allies in the air. It was said of the D.VII that it
could "hang on its prop" and shoot an Allied fighter from below. This
was due to the excellent stall/spin characteristics of the design.
By late May, 1918, leading Jastas were able to re-equip completely with the D.VII and establish local air superiority. Unfortunately, this came too late to save the German 1918 Offensive, which had been designed to end the war. The offensive ground to a halt at the moment the D.VII became more available, and was decisively defeated in June 1918. By July, the Fokker D.VII could only try to forestall the inevitable, as Allied squadrons increased with the introduction of the Americans to combat, and the Allied fall offensive which began in late August sealed the fate of Imperial Germany.
Just how good the Fokker D.VII was is indicated by the fact it was the only weapon specifically mentioned as being required to be turned over to the Allies in the Treaty of Versailles.
In the period immediately following the war, the D.VII was able to continue to demonstrate its superiority in the hands of pilots of the German Freikorps and the Polish Air Force in the struggles against the Bolsheviks in the Baltic and eastern Poland. The D.VII also formed the first-line equipment of several smaller European air forces in the post-war period, due to the fact Anthony Fokker had managed to smuggle several hundred airframes out of Germany to Holland in the immediate post-war chaos. Among the 134 D.VIIs sent to the United States as war booty, at least two squadrons of the U.S. Air Service used them in their original lozenge camouflage, and several made it onto the civil list, and first appeared on film in Howard Hughes' "Hells Angels." They continued to appear in diminishing numbers in such films as "Dawn Patrol" during the 1930s. Today, the D.VII is a popular choice for those who want to build their own full-scale D.VII, and several fly. Collector Javier Arango has in his collection of World War I aircraft a Mercedes-powered replica D.VII.
|
THE KIT |
For a look at what's in Roden's box, take a look at the preview.
The D.VII has been well-served in 1/72 scale over the past 40 years, with the early Revell offering being accurate enough to maintain the state of the art for 20 years, with other kits of varying quality showing up, beginning in the late 1970s. In the mid-1990s, Roden released 1/72 kits of each of the major production sub-types of the D.VII, which are probably the best kits in that scale generally available.
 In 1/48, the
D.VII has not been so well-served. Aurora brought out a D.VII in 1956
which was "good enough" for that period, even if it did not accurately
reproduce the wings. SMER released the kit with the original Aurora
molds, including the molded-on markings, beginning in the 1980s. The
molds were resurrected in the late 1970s by Monogram with a general
clean-up involving deletion of the raised markings, and has been released
at different intervals ever since, with the latest release from Revell of
Germany coming this past summer. The kit is so inaccurate that it is
only of value to a modeler if price alone is the criterion. Dragon
Models Limited released a D.VII in 1992 that was the best kit yet of the
D.VII, even if the photo-etch wing struts and undercarriage struts were
too thin. While the kit did get the taper of the wings right, a modeler
of this kit frequently has to de-warp the single-piece upper wing to get
rid of the continuous tip-to-tip curve from poor production.
Additionally, the upper wing sits a bit high. DML dropped production of
the kit in 1995. The kit has also been released by Hasegawa, and any
version of it that can now be found commands collectors prices that start
around $35 and head north quickly.
In 1/48, the
D.VII has not been so well-served. Aurora brought out a D.VII in 1956
which was "good enough" for that period, even if it did not accurately
reproduce the wings. SMER released the kit with the original Aurora
molds, including the molded-on markings, beginning in the 1980s. The
molds were resurrected in the late 1970s by Monogram with a general
clean-up involving deletion of the raised markings, and has been released
at different intervals ever since, with the latest release from Revell of
Germany coming this past summer. The kit is so inaccurate that it is
only of value to a modeler if price alone is the criterion. Dragon
Models Limited released a D.VII in 1992 that was the best kit yet of the
D.VII, even if the photo-etch wing struts and undercarriage struts were
too thin. While the kit did get the taper of the wings right, a modeler
of this kit frequently has to de-warp the single-piece upper wing to get
rid of the continuous tip-to-tip curve from poor production.
Additionally, the upper wing sits a bit high. DML dropped production of
the kit in 1995. The kit has also been released by Hasegawa, and any
version of it that can now be found commands collectors prices that start
around $35 and head north quickly.
As regards
D.VIIs in larger scales, the less said, the better. The Revell 1/28 kit
- which manages to mangle the taper of the upper wing by reversing it,
and misses the fuselage dimensions very badly - can be written off as
only worth the effort if a modeler has advanced skills and the courage to
start cutting the kit to pieces in order to totally rebuild it as an
accurate model. The new Battle-Ax 1/32 kit has all the problems one
associates with any release from this company, and again is a project for
the extremely determined.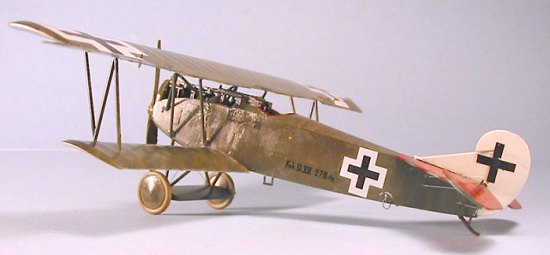
This new kit from Roden, the first of several releases that will ultimately cover all the major production sub-types, is the most accurate D.VII released by any company in 1/48 scale. As released, it is an early-production D.VII, powered by the 160 h.p. Mercedes engine. It has the best detail of any kit of the model released in this scale, and looks good when complete.
However, it is a Roden kit, which means it is "fiddly." Fortunately, it is also cheap enough that a modeler can afford to use the first one as an "instruction" kit to find out what to do with the following kits they will buy (and I am certain most people who buy this kit will buy more) to produce a good looking model.
|
CONSTRUCTION |
Those modelers who want to see what happens when the instructions are followed can check out Scott Van Aken's earlier review. This review is about what to modify in order to get the model you want in the end. The process is pretty simple, and involves no advanced modeling skills other than the ability to "fiddle" with the kit.
Before starting construction, a modeler should decide how they want the final result to look. There are three possible ways to display the model: with the cowling completely closed up, with the engine partially exposed, and with the engine fully exposed. Your decision about this point will dominate how you go about building the model. All of the extra work comes in assembly of the fuselage and engine cowling. Here are the ways to go about achieving the model you want:
Option I - Cowl Completely Closed:
If you want to have a model with the cowling completely closed up, the only thing you want inside that assembly is the engine. If you attempt to build the model closed up, with everything inside, you will have the same problem encountered with the ICM Spitfires - the cowling becomes "too big" as it tries to fit around everything.
 The first
thing to do in this case is to sand down the side parts of the cowling
from the inside, to thin them about 50 percent. Also cut off the
attachment ridge on either side of the lower cowling cover. You also
need to sand down the upper cowling pieces to thin them 50 percent.
The first
thing to do in this case is to sand down the side parts of the cowling
from the inside, to thin them about 50 percent. Also cut off the
attachment ridge on either side of the lower cowling cover. You also
need to sand down the upper cowling pieces to thin them 50 percent.
You should then attach each side part of the cowling to the appropriate unassembled fuselage half, and strengthen the glue joint inside with CA glue. Be sure to open the hole in the right side panel for the exhaust.
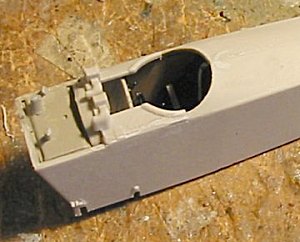
At this point, go ahead and build up the cockpit. The proper color for the welded-steel airframe parts you can see is RLM02 (a color the Germans have used for over 100 years now for things like this). The floor is wood; I used wood decal for that. The foot guides and controls were "japanned" in their finish, as was the aluminum seat, which means paint them gloss black. The rear bulkhead is actually a fabric cover, and should be painted in some linen shade. The gas tank and the ammo tray should be RLM02.
If you are
building a model of an airplane whose fuselage was originally finished in
the factory-applied "streaky" camouflage - which would include both of
the Jasta 15 aircraft catered for in the kit decals - then the interior
of the cockpit should be finished in a linen color. If you are
building a model of an airplane that came out of the factory in the
printed-on lozenge fabric, then you should apply lozenge to the interior
walls of the cockpit. Ideally, this should be a lighter shade than
 it would be seen from
the outside; however, the only lozenge decals I know of that you can
apply with the "inner side out" are the lozenge sheets from Blue Max.
Most people are not going to complain if you use the "outer side in", but
you need those side walls covered in lozenge.
it would be seen from
the outside; however, the only lozenge decals I know of that you can
apply with the "inner side out" are the lozenge sheets from Blue Max.
Most people are not going to complain if you use the "outer side in", but
you need those side walls covered in lozenge.
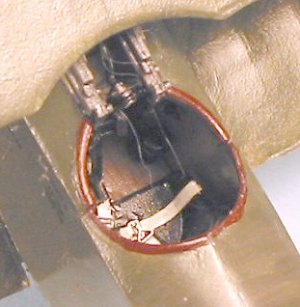
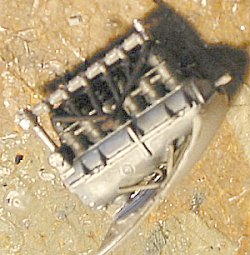
Once you have the cockpit assembled and the fuselage glued together, it's time to proceed with the engine. I painted my Mercedes engine with Model Master Metalizer colors as follows: main body in Gunmetal, piston housings in Magnesium, intake control in Stainless Steel, intake piping in Burnt Iron, the upper part of the pistons in Steel, and the exhaust pipes in Burnt Iron. I did this because I was going to build my model as a D.VII with a partially-open cowl; if you are closing up the cowl, you really only need to worry about painting the pistons, the upper piece, and the exhaust.
Now then, to attach the engine to the fuselage, glue it directly to the firewall; if any part of the engine touches the side panels, glue it there, too. Then test-fit the lower cowling panel, which will be a bit wide - sand it as necessary, then glue it in position. Then attach the upper cowling parts. Finally, attach the radiator. Be sure that the front of the engine is centered through the hole.
Finally, cut off the exhausts immediately outside the right side panel and set that part aside. The reason you must do this is because of the fact that these exhausts are just too far forward to allow you to fit the V-strut of the pyramid struts in position correctly. Once you have assembled these struts later, you can attach the exhausts immediately to the rear of the forward V-strut, and no one will notice the surgery you performed. If you don't do this, the air over your workbench will turn a dark purple as you try to fit the inner struts in position.
Option 2 - Cowl Partially Open:
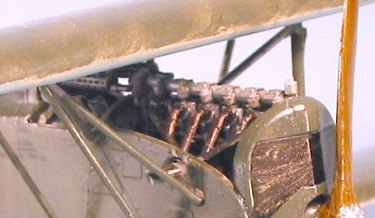
 The early
Fokkers had a nasty habit of the ammunition catching fire and starting a
fire in the gas tank in-flight. This was due to the fact the engine was
not adequately cooled, which resulted in the ammunition being heated to
the point of exploding. The final solution to this problem is seen in
all the louvers on the cowling side panels of later-production Fokkers.
The early solution was to remove the upper cowling, including that part
of the cowling directly in front of the machine guns above the fuel tank,
to provide adequate cooling.
The early
Fokkers had a nasty habit of the ammunition catching fire and starting a
fire in the gas tank in-flight. This was due to the fact the engine was
not adequately cooled, which resulted in the ammunition being heated to
the point of exploding. The final solution to this problem is seen in
all the louvers on the cowling side panels of later-production Fokkers.
The early solution was to remove the upper cowling, including that part
of the cowling directly in front of the machine guns above the fuel tank,
to provide adequate cooling.
The nice thing about doing this option is, you get to show off the fuel tank and the engine, which are not that visible if you build Option 1.
 For this, follow the instructions for Option 1 as regards thinning the
side panels and the lower panel. Paint the engine as above.
Since you really can't see the engine mounts once the model is built, I
suggest you attach the engine as for Option 1, though you can install the
main mounts if there is sufficient clearance inside once the engine is
installed. Then attach the lower cowling panel as described above,
and the radiator. You will have to cut off the forward section of
the cowling ahead of the machine guns, which will mean a bit of fiddling
in assembling the ammunition box, but it is not difficult. You also
need to cut off the exhausts immediately outboard of the right side
panel, for the reason explained above.
For this, follow the instructions for Option 1 as regards thinning the
side panels and the lower panel. Paint the engine as above.
Since you really can't see the engine mounts once the model is built, I
suggest you attach the engine as for Option 1, though you can install the
main mounts if there is sufficient clearance inside once the engine is
installed. Then attach the lower cowling panel as described above,
and the radiator. You will have to cut off the forward section of
the cowling ahead of the machine guns, which will mean a bit of fiddling
in assembling the ammunition box, but it is not difficult. You also
need to cut off the exhausts immediately outboard of the right side
panel, for the reason explained above.
Option 3 - Cowl Completely Open:
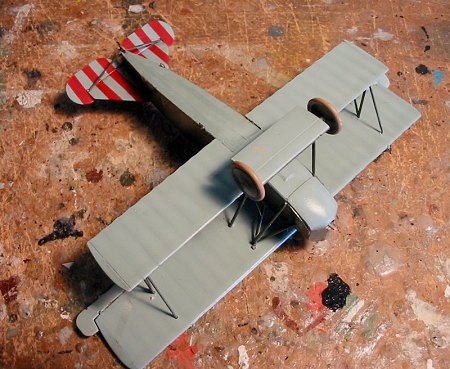
This is actually the easiest construction option, since it involves the least amount of departure from the kit instructions. Paint the engine bearers, the firewall and the interior of the radiator and lower cowl panel in RLM02. Assemble the engine as described above and mount it per the kit instructions. Then put all this engine assembly aside after insuring it will fit to the firewall of the assembled fuselage. You will now proceed with assembly of the rest of the airframe and painting/decaling of the rest of the model before you attach this in position.
Construction Continues:
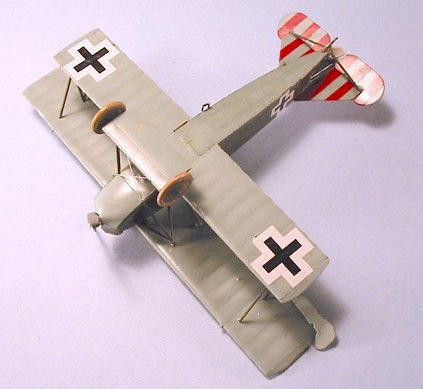
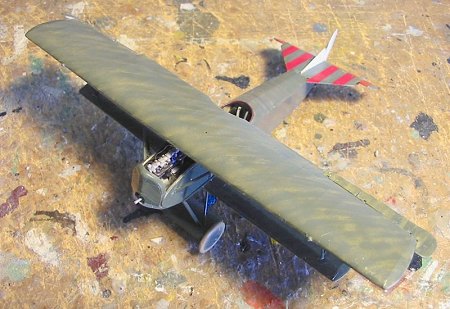
The wings are
easily assembled. If you are really interested in accuracy, the lower
surfaces of the wings should be sanded smooth, inasmuch as fabric
never ever sags as it has been done here (at least it isn't done as
badly as the lower wings of the DML Fokker Triplane). If that degree of
accuracy isn't that important to you, you can leave this alone since it
will not be that apparent if you are going to apply lozenge to the
wings. However, if you are going to paint the wings a non-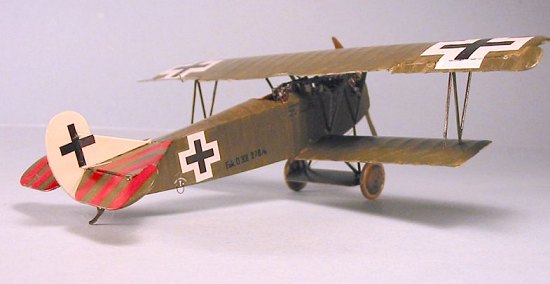 lozenge color,
as I did with this model, be aware that once painted that incorrect
fabric becomes much more apparent. Had I realized this would happen at
the outset, I would have pulled out the sanding sticks early on, and will
do so on all other models I make from this kit.
lozenge color,
as I did with this model, be aware that once painted that incorrect
fabric becomes much more apparent. Had I realized this would happen at
the outset, I would have pulled out the sanding sticks early on, and will
do so on all other models I make from this kit.
When you attach the control surfaces to the wings and horizontal and vertical stabilizers, be aware you must test-fit and will have to do some carving of the opening on the control surface so that it will fit to the hinge in each case.
You need to widen the slots in the fuselage by scraping them a bit in order to get the lower wing to fit easily. Be sure you test-fit this before proceeding with any final finish, since you need to lozenge the wings before you attach them to the fuselage. Depending on the lozenge for the tail surfaces and the fuselage, you may need to do all of this before you go to final assembly. If you haven't fully checked and insured ease of fit of all these parts to the fuselage, you will run a very good chance of ruining the lozenge decals trying to force the parts to fit. Remember if you are doing lozenge that you must apply this to the control surfaces separately before attaching them to the wing and stabilizers.
At the point of having the fuselage and wings assembled, and the various parts trimmed as necessary for ease of fit, it was time to paint the model.
|
CAMOUFLAGE & MARKINGS |
 The very early
Fokker-built D.VIIs were delivered in the factory-applied overall-streaky
camouflage. This was done for perhaps the first 100 machines (expert
opinion varies on this point). Since I build D.VIIs the way Lynn Ritger
builds 109s, I wanted to do this model in markings that didn't look like
all the other D.VIIs it would be sitting next to. Therefore, I decided
to do an overall-streaky camo airplane, even though I did not have any
photos of one. Bob Pearson's World War I profiles CD has an early D.VII
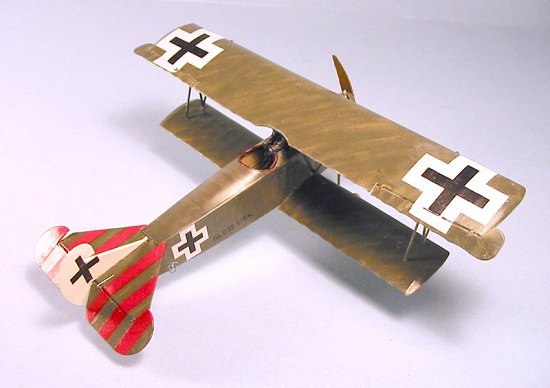
with the Maltese Cross, and I used that for information on painting.
Since I didn't have any Maltese crosses in the right size for the upper
wing, I decided to finish with the "Patee" Cross, which was overpainted
on the Maltese Cross; I had decals from an Eduard Albatros in the right
size for this.
The very early
Fokker-built D.VIIs were delivered in the factory-applied overall-streaky
camouflage. This was done for perhaps the first 100 machines (expert
opinion varies on this point). Since I build D.VIIs the way Lynn Ritger
builds 109s, I wanted to do this model in markings that didn't look like
all the other D.VIIs it would be sitting next to. Therefore, I decided
to do an overall-streaky camo airplane, even though I did not have any
photos of one. Bob Pearson's World War I profiles CD has an early D.VII
with the Maltese Cross, and I used that for information on painting.
Since I didn't have any Maltese crosses in the right size for the upper
wing, I decided to finish with the "Patee" Cross, which was overpainted
on the Maltese Cross; I had decals from an Eduard Albatros in the right
size for this.
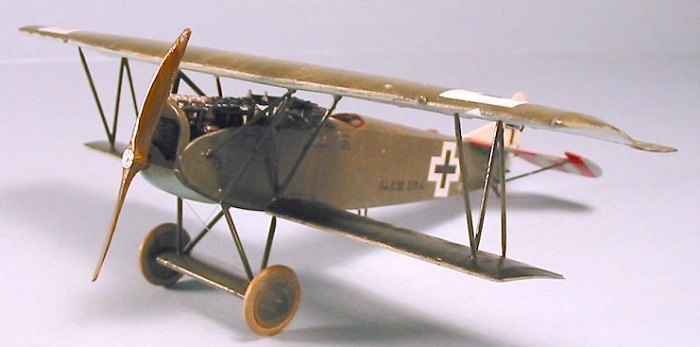
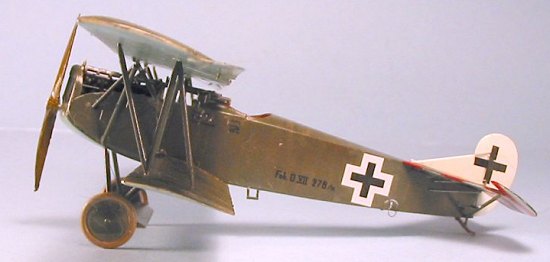
This is not as difficult a paint scheme to apply as it might look. First, paint the lower surfaces. I used RLM65 from Gunze, which I think is the World War I color described as "turquoise." I painted the upper surfaces with Gunze "Sail Color". I then painted the cowling in RLM71 - which I think is likely the "Olive Green" referred to during the First World War. Once these were dry, I applied a solid coat of Model Master Metalizer Sealer, since this is a lacquer-base paint, and would not be affected by what I would do afterwards in creating the "streaky" effect.
 I did the
"streaky" effect by airbrushing Gunze RLM71 - applying it in the proper
directions for the various parts. These are: a 45-degree angle down to
the left for the upper and lower wings; straight up and down for the
fuselage side surfaces and straight across for the upper fuselage
surface; straight fore and aft for the horizontal stabilizer and
elevator, as well as the ailerons. First, apply the paint in a "streaky"
manner. Allow it to dry a bit, then take a paint brush, dip it in
alcohol, and "paint" the streaks by thinning the semi-dry paint - this is
one case where you want the "brush effect" since that is how it was
originally applied and the streaky effect was achieved. If you thin the
paint too much anywhere, re-apply with the airbrush and then repeat till
you get what you want. No two of these finishes were the same; they
varied from a mostly-full application like I did on this model, to a more
"streaky" finish where you see the underlying fabric more. If you're
doing this for the fuselage of your model - which is the most likely way,
since lozenge wings and tail surfaces were used after the first
production batch of airplanes - look at a photo of the airplane you are
doing. You might also want to apply this finish over the entire fuselage
of an airplane that has the fuselage painted differently later, inasmuch
as this dark surface greatly affected the application of lighter colors
like white, red and yellow over it; doing so will result in a more
accurate final look to the model.
I did the
"streaky" effect by airbrushing Gunze RLM71 - applying it in the proper
directions for the various parts. These are: a 45-degree angle down to
the left for the upper and lower wings; straight up and down for the
fuselage side surfaces and straight across for the upper fuselage
surface; straight fore and aft for the horizontal stabilizer and
elevator, as well as the ailerons. First, apply the paint in a "streaky"
manner. Allow it to dry a bit, then take a paint brush, dip it in
alcohol, and "paint" the streaks by thinning the semi-dry paint - this is
one case where you want the "brush effect" since that is how it was
originally applied and the streaky effect was achieved. If you thin the
paint too much anywhere, re-apply with the airbrush and then repeat till
you get what you want. No two of these finishes were the same; they
varied from a mostly-full application like I did on this model, to a more
"streaky" finish where you see the underlying fabric more. If you're
doing this for the fuselage of your model - which is the most likely way,
since lozenge wings and tail surfaces were used after the first
production batch of airplanes - look at a photo of the airplane you are
doing. You might also want to apply this finish over the entire fuselage
of an airplane that has the fuselage painted differently later, inasmuch
as this dark surface greatly affected the application of lighter colors
like white, red and yellow over it; doing so will result in a more
accurate final look to the model.
|
FINAL CONSTRUCTION |
Assembly of the tail surfaces is straightforward and presents no problems. I attached the control surfaces in a "dynamic" look - be sure to set up the controls in the cockpit to match what you're going to do if you pose the controls.
The attachment
of the wings is very "fiddly." You should widen and deepen the holes in
the wing surfaces where the "N" struts go before proceeding. Once the
lower wing is attached, attach the outer "N" struts with CA glue to
insure a strong joint. Then glue the upper wing to the "N" struts with CA
glue. Be sure that the two wings have the correct angle of
 incidence:
looking from the side, the upper wing "tilts" down and forward, just
enough to be slightly noticeable (this is how the D.VII could
"hang on its prop," since the lower wing stalled before the upper wing).
You will then test-fit and attach the inner fuselage struts. The big
problem with these is that the "V" strut of the pyramid assembly is long
enough to fit to the lower fuselage longeron if you are doing a model
with the cowling open; if you are, merely attach the V strut as it goes
naturally. If you are building a model with the cowling side panels on,
you have to cut the longer of the two arms of the V so that the strut
will fit with the long arm just attaching to the lower edge of the hole
in the cowling where it is supposed to go through to attach to the
airframe; due to the thickness of the cowl, it is impossible to stick it
through and get a correct fit. Once you have done this, glue the exhaust
pipes back in position immediately to the rear of the forward strut of
the pyramid.
incidence:
looking from the side, the upper wing "tilts" down and forward, just
enough to be slightly noticeable (this is how the D.VII could
"hang on its prop," since the lower wing stalled before the upper wing).
You will then test-fit and attach the inner fuselage struts. The big
problem with these is that the "V" strut of the pyramid assembly is long
enough to fit to the lower fuselage longeron if you are doing a model
with the cowling open; if you are, merely attach the V strut as it goes
naturally. If you are building a model with the cowling side panels on,
you have to cut the longer of the two arms of the V so that the strut
will fit with the long arm just attaching to the lower edge of the hole
in the cowling where it is supposed to go through to attach to the
airframe; due to the thickness of the cowl, it is impossible to stick it
through and get a correct fit. Once you have done this, glue the exhaust
pipes back in position immediately to the rear of the forward strut of
the pyramid.
Once you have the inner struts attached correctly, attach the landing gear. Choose the correct prop for the airplane you are doing, and construction is complete.
Decals:
I used the Patee Crosses from an old Eduard Sheet, and the serial number from the kit sheet - yes, this is not right for this airplane, but my attempt to use another decal from the dungeon ended in failure when the decal "exploded" on being placed in water. I had also painted the red stripes on the horizontal tail surfaces after painting them in "streaky" camo, to get the painted-over effect. Once the decals were dry and I washed the model to remove setting solution film, I applied a coat of Future, then applied a mixture of Testor's Glosscote and Dullcote, to get a "satin" overall finish.
|
CONCLUSIONS |
Sitting this model next to the DML D.VIIs shows the problem of that warped upper wing on the DML kit than one never gets rid of completely, and also how the upper wing is too high above the fuselage on the DML kit.
This Roden kit "looks right". Finally, after close to 50 years of making D.VII models, I have one in the collection that is accurate in shape and detail. It won't be the last of these early Fokkers, and I am looking forward to the OAW D.VII and D.VIIf to come.
November 2003
Copyright ModelingMadness.com. All rights reserved. No reproduction in part or in whole without express permission.
If you would like your product reviewed fairly and fairly quickly, please contact the editor or see other details in the Note to Contributors.