|
KIT: |
Eduard 1/48 Camel 2F1 |
|
KIT # |
8058 |
|
PRICE: |
$36.98 MSRP |
|
DECALS: |
Three options |
|
REVIEWER: |
Tom Cleaver |
|
NOTES: |
Profipack version |
|
HISTORY |
Operation F7:
Ever since the fall of 1914,Zeppelins had been used by the German Navy for reconnaissance over the strategic North Sea, and had participated in both Dogger Bank and Jutland, the major naval surface actions of the war in that region. Throughout this period, the Royal Naval Air Service made a number of attempts to destroy these Zeppelin bases, mounting the first long‑range bombing mission in history with Avro 504s against the Zeppelin works itself in 1915. The RNAS was forced to operate at maximum range and limited numbers, so that real success always eluded them. In 1917, fighter aircraft first went to sea when Sopwith Pups and Camels were flown off barges towed at high speed behind destroyers, to provide interception capability when Zeppelins were spotted; several of the aerial giants were destroyed this way in 1917‑18.
 Everything
changed in 1918 with the modifications to the navy's first aircraft
carrier, HMS "Furious", providing for a complete flight deck ‑ rather
than the previous landing‑on and taking‑off decks ‑ and an elevator which
allowed the fragile aircraft to be stowed below in the hangar deck. Now
suitable aircraft could be taken to sea and take off armed with a
worthwhile load. The target was to be the Zeppelin sheds at Tønder, which
was the major thorn in the Royal Navy's side.
Everything
changed in 1918 with the modifications to the navy's first aircraft
carrier, HMS "Furious", providing for a complete flight deck ‑ rather
than the previous landing‑on and taking‑off decks ‑ and an elevator which
allowed the fragile aircraft to be stowed below in the hangar deck. Now
suitable aircraft could be taken to sea and take off armed with a
worthwhile load. The target was to be the Zeppelin sheds at Tønder, which
was the major thorn in the Royal Navy's side.
Tønder, the biggest naval Zeppelin base, comprised three hangars. The largest, "TOSKA," was 730ft long, 220 ft. high and 130 ft wide; it could house two of the biggest Zeppelins.
Operation F7, the successful raid on July 19, 1918, was actually the third to have been attempted. Operation F5 in early June was abandoned after "Furious" had left port, due to the possibility of having been spotted by U‑boats. The strike would have to enter coastal waters to give the aircraft sufficient range, and would be highly vulnerable to interception by the High Seas Fleet if sufficient notice were given. Operation F6 in late June was abandoned due to bad weather.
Operation F7 left Rosyth dockyard in Scotland on July 17, 1918. "Furious" was escorted by five cruisers: HMS "Caledon," "Galatea," "Royalist," "Phaeton" and "Inconstant." A squadron of battleships from the Grand Fleet operated in support: HMS "Revenge," "Royal Sovereign," "Ramillies," "Royal Oak" and "Resolution" with four cruisers and other destroyers in case the High Seas Fleet put in an appearance.
 Aboard
"Furious" were seven Sopwith 2F.1 Camels. Capt. Jackson, Capt. Dickson
and Lt. Williams were the first strike, followed by a second strike by
Capt Smart, Capt. Thynne, Lt. Dawson and Lt. Yeulett. This was a
maximum‑performance operation. The Camels would be operating at maximum
range, with each aircraft carrying four 50‑lb bombs. There was not
enough fuel for the planes to join up in formation once launched from the
carrier. The plan was that they would return to the fleet, to ditch near
a destroyer for pickup. Alternatively, if they could not reach the fleet
or the fleet was forced to retire, they were to land in neutral Denmark.
Aboard
"Furious" were seven Sopwith 2F.1 Camels. Capt. Jackson, Capt. Dickson
and Lt. Williams were the first strike, followed by a second strike by
Capt Smart, Capt. Thynne, Lt. Dawson and Lt. Yeulett. This was a
maximum‑performance operation. The Camels would be operating at maximum
range, with each aircraft carrying four 50‑lb bombs. There was not
enough fuel for the planes to join up in formation once launched from the
carrier. The plan was that they would return to the fleet, to ditch near
a destroyer for pickup. Alternatively, if they could not reach the fleet
or the fleet was forced to retire, they were to land in neutral Denmark.
First light came at 0300, July 19, 1918, with "Furious" 90 miles off the North German coast. The first strike climbed to 5,000 ft, heading south down the coast of Denmark until turning east and climbing to 6000 ft to approach Tønder, which was right on the Danish-German border.
Dickson attacked what he thought was the main shed while the other two aircraft actually attacked "TOSKA." Dickson dropped his first bomb from 700ft, hitting what he thought was the target, though it was later determined he actually bombed the nearby town. Jackson and Williams set Zeppelins L‑54 and L‑60 afire in the hangar; flames and smoke rose to over 1,000ft.
Dickson was the only one to make it back to the fleet, locating the inshore destroyer off Lyndvig Lighthouse at 0545; he ditched nearby and was picked up by HMS "Violent." Jackson arrived at the prearranged rendezvous at 0455 but had engine trouble; he managed to restart and climb, but became lost above the clouds. He ran out of fuel and crashed in Denmark, where he burned the airplane and then was taken to the local English Consul by a farmer. Williams force landed near Esjberg, but was unable to destroy his aircraft due to the arrival of the local police.
 The second
strike departed "Furious" at 0322, but only three reached Tønder. Capt.
Thynne suffered engine trouble and was forced to return to the fleet; he
was successfully picked up, though the rescuing destroyer ran over his
aircraft and destroyed it. The last three arrived over the target at
0445, when they were subject to some anti‑aircraft fire. They struck
TONI and TOBIAS, releasing their bombs from 800 ft, though they were not
able to observe the results.
The second
strike departed "Furious" at 0322, but only three reached Tønder. Capt.
Thynne suffered engine trouble and was forced to return to the fleet; he
was successfully picked up, though the rescuing destroyer ran over his
aircraft and destroyed it. The last three arrived over the target at
0445, when they were subject to some anti‑aircraft fire. They struck
TONI and TOBIAS, releasing their bombs from 800 ft, though they were not
able to observe the results.
Capt. Smart successfully rejoined the fleet by 0630. Lt. Dawson was also forced to land in Denmark, where he joined Jackson and Williams in Esjberg. Lt. Yeulett, having departed on his own, was never seen again. His body washed up on a beach in Ringkøbing Fjord on July 30; it is presumed he ran out of fuel, was forced to ditch in the fjord and drowned. He was buried in Havrvig Churchyard.
After some considerable adventures which involved an escape from internment camp in Aarhus, a clandestine trip to Copenhagen, and a voyage across the Skaggerak during which they were nearly intercepted by a German trawler, Dawson, Jackson and Williams got to Sweden and were taken to Norway, where they took a steamer to England, arriving back at Rosyth on August 25, 1918 to rejoin "Furious."
Lt. Yeulett received a posthumous Distinguished Flying Cross. Dickson received a second DSO, while Dawson, Jackson, Thynne and Williams also received DFCs.
The attack on the Tønder Zeppelin base ‑ the first carrier air strike in history ‑ effectively ended use of the base by the Germans for the remainder of the war, a considerable strategic victory for the Royal Navy.
|
THE KIT |
 Eduard's Camel
has already attained accolades for being the best kit of this famous
fighter to be released to date in any scale. This 2.F1 Camel largely
continues that, though the fact it is produced as one of a series of kits
with minimum changes to the molds means that there are details a modeler
will discover there is “some modeling skill required” to create an
accurate model of this variant. While the upper wing is correct, and
provision is made for the differing external control wires for the rudder
and elevators, the propeller in the kit is the standard diameter prop
associated with the land-based Camel, rather than the smaller-diameter
prop used by this type. This will not be difficult to modify, however.
The kit also fails to provide the flotation bags associated with the Sea
Camel, and these will have to be scratch-built.
Eduard's Camel
has already attained accolades for being the best kit of this famous
fighter to be released to date in any scale. This 2.F1 Camel largely
continues that, though the fact it is produced as one of a series of kits
with minimum changes to the molds means that there are details a modeler
will discover there is “some modeling skill required” to create an
accurate model of this variant. While the upper wing is correct, and
provision is made for the differing external control wires for the rudder
and elevators, the propeller in the kit is the standard diameter prop
associated with the land-based Camel, rather than the smaller-diameter
prop used by this type. This will not be difficult to modify, however.
The kit also fails to provide the flotation bags associated with the Sea
Camel, and these will have to be scratch-built.
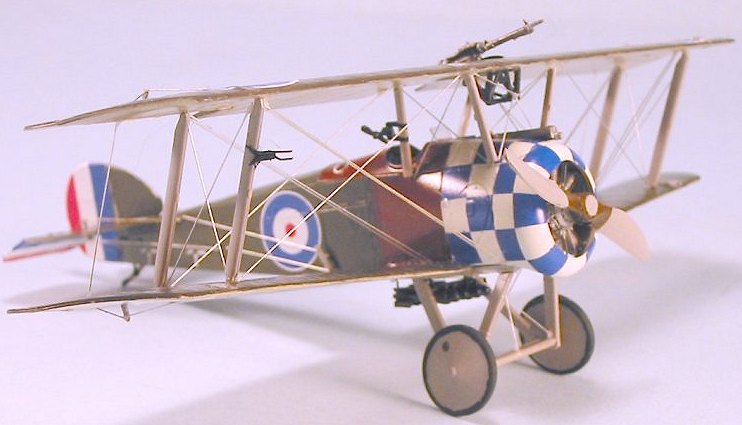
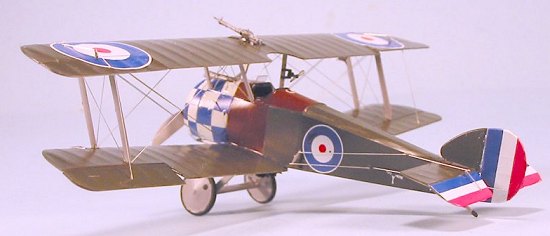
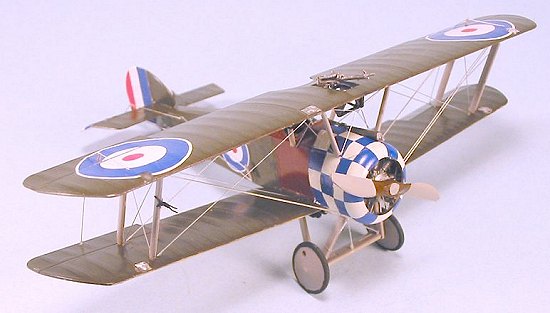
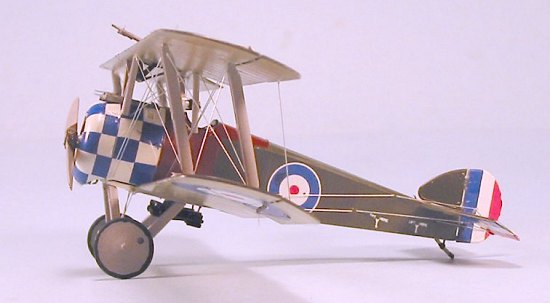
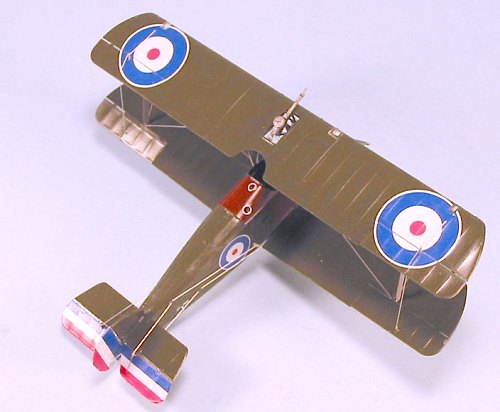
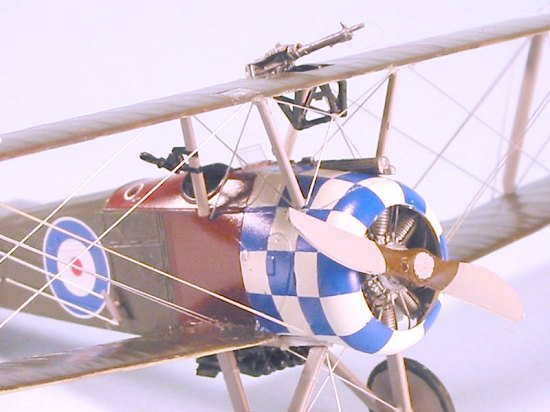
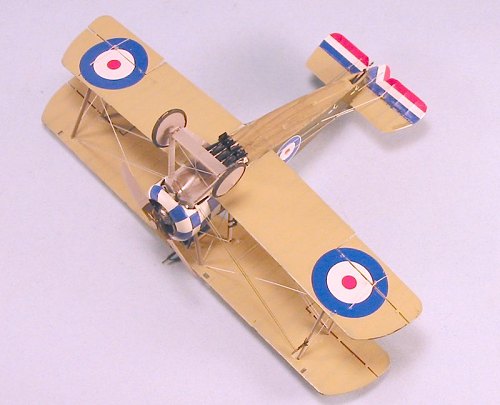
Other than that, the Profipack version provides photo-etch detail for the cockpit and the under-fuselage bomb racks, as well as the wing control wires, and resin bombs. This is good because of the three different markings provided on the excellent decal sheet, the best and most colorful - with its blue-and-white checkerboard nose - is that for the Camel flown by Capt. B.A. Smart, the leader of the second wave of the Tønder Raid. Markings are also provided for a parasite fighter carried by HMA “R.23" from 212 Squadron in 1918, and an otherwise-anonymous airplane based at Great Yarmouth.
|
CONSTRUCTION |
With its excellent production design, the Eduard Camel is a good WW1 project for a modeler with a couple of more simple projects under their belt, inasmuch as the Camel is “fully rigged.” That said, the rigging is probably the most difficult part of this project, making it a good “mid-level” project in terms of overall difficulty.
 The kit has
lots of detail in the cockpit. Unfortunately, in the standard Camel this
is all hard to see in the final product, given the position of the wing
directly over the cockpit, even though it has a fairly-large opening.
The Sea Camel presents the same problem, with the additional difficulty
that the cockpit opening is very tight, so that not much at all can be
seen. In fact, the only thing one can see very well at all is the seat
and seatbelts. The Profipack kit provides a “wicker basket” seat with
photo-etch, but you can't see in there well enough to see it in the end.
I decided to keep that seat in my WW1 spares box, for the next RAF
project that comes along with a cockpit positioned where a observer can
see the cockpit detail, and opted instead for the plastic seat with decal
“wicker” effect. As to painting the rest of the detail inside the
cockpit, the truth is you can’t even see the instrument panel (as you can
with the standard Camel), but I gave it a basic painting nonetheless.
The kit has
lots of detail in the cockpit. Unfortunately, in the standard Camel this
is all hard to see in the final product, given the position of the wing
directly over the cockpit, even though it has a fairly-large opening.
The Sea Camel presents the same problem, with the additional difficulty
that the cockpit opening is very tight, so that not much at all can be
seen. In fact, the only thing one can see very well at all is the seat
and seatbelts. The Profipack kit provides a “wicker basket” seat with
photo-etch, but you can't see in there well enough to see it in the end.
I decided to keep that seat in my WW1 spares box, for the next RAF
project that comes along with a cockpit positioned where a observer can
see the cockpit detail, and opted instead for the plastic seat with decal
“wicker” effect. As to painting the rest of the detail inside the
cockpit, the truth is you can’t even see the instrument panel (as you can
with the standard Camel), but I gave it a basic painting nonetheless.
The separate control surfaces are very nice, and very delicate. I have finally become convinced with this model that one should not attach the tail surfaces until after everything has been painted and decaled, since any handling at all is likely to knock off an elevator, and the fix will end up being just clumsy enough to be noticeable close up. I think one could also avoid attaching the ailerons until the final assembly stage after painting and decaling is completed.
Because I was doing the airplane flown by the leader of the Tønder Raid second wave, with its blue-and-white checkers, I assembled the engine, painted it, then attached the engine and cowling to the fuselage and lower wing subassembly before painting. Once this was done, we were ready for painting.
|
COLORS & MARKINGS |
I first
pre-shaded the model with dark grey, then painted the white area of the
cowling and forward fuselage. I masked this off, then painted the lower
surfaces with Gunze-Sangyo “Sail Color.” The upper surfaces were painted
a green-base “P.C.10" color I mixed up for the purpose. This is a color
that had no set standard anyone has ever been able to determine,
 which
varied from paint lot to paint lot and ran from green to dark brown and
all in between. I decided to do a “green-base” Olive-drab-ish color so
that this Camel would be different from the other two which have a
brown-base khaki upper color. I also painted the wooden area of the upper
fuselage decking and side panels with Chocolate Brown. Due to its
exposure to salt air, the airplane would have had a thicker coat of
varnish on these areas than would its land-based cousins. The landing
gear and other struts were painted Tamiya “Sky Grey” which is a good
approximation of British “Battleship Grey” of the First World War; again,
these areas were overpainted with a thicker paint for protection in the
salt air environment, rather than being left with a natural wood
varnish. When all was dry, the model was unmasked and given a coat of
Future.
which
varied from paint lot to paint lot and ran from green to dark brown and
all in between. I decided to do a “green-base” Olive-drab-ish color so
that this Camel would be different from the other two which have a
brown-base khaki upper color. I also painted the wooden area of the upper
fuselage decking and side panels with Chocolate Brown. Due to its
exposure to salt air, the airplane would have had a thicker coat of
varnish on these areas than would its land-based cousins. The landing
gear and other struts were painted Tamiya “Sky Grey” which is a good
approximation of British “Battleship Grey” of the First World War; again,
these areas were overpainted with a thicker paint for protection in the
salt air environment, rather than being left with a natural wood
varnish. When all was dry, the model was unmasked and given a coat of
Future.
Decals:
The kit decals are correct for color and are very thin. I used a lot of water on the surface of the area I wanted them at, to allow me to move them around into position without sticking, then “mopped up” the water with a tissue and applied a coat of Micro-Sol. Everything went down without problem. Do exercise care with these decals when applying them, because they are very thin and quite fragile, and it is easy to get them to fold under if you are not doing this slowly and with a lot of water on the surface.
When the decals had dried, I washed the dried solvent off the model and applied a coat of Model Master Sealer, to give a slightly less-glossy final finish than I would get with Future.
|
FINAL CONSTRUCTION |
 I attached the
struts in place, made sure the alignment holes in the upper wing were
drilled out a bit to insure a good connection, and attached the upper
wing with cyanoacrylate glue. The landi
I attached the
struts in place, made sure the alignment holes in the upper wing were
drilled out a bit to insure a good connection, and attached the upper
wing with cyanoacrylate glue. The landi ng gear was then attached. I had
attached the Lewis gun and its mount to the upper wing before attaching
the wing to the struts.
ng gear was then attached. I had
attached the Lewis gun and its mount to the upper wing before attaching
the wing to the struts.
Rigging was done with .008 wire, using the rigging diagram in the kit instructions for a guide.
I assembled the photo-etch bomb rack and glued it in position, then glued the four 50-lb Cooper Bombs to it.
At this point, reference to photos of a Camel 2F.1 showed that the prop was shortened, which Eduard had not done, providing the same prop in the kit that is there for the land-based version. I clipped off 1/16" from each prop blade tip, and re-sanded it to the correct shape.
|
CONCLUSIONS |
To me, the release of the Eduard Camel last year was proof the company had entered the ranks of the Big Time Companies like Hasegawa and Tamiya, given the quality of the kit design and the production quality of the kit; the Mirage was just confirmation that the Camel wasn’t a fluke. The Eduard Camel is the best WW1 kit available in terms of buildability for an “advanced” model. If you follow the instructions and take your time, you can produce an excellent kit of one of the true “immortals” of aviation history. Any modeler who specializes in the Fleet Air Arm or carrier aviation in general can’t afford to not have the world’s first carrier strike fighter in their collection.
Review kit courtesy of Eduard.
July 2004
If you would like your product reviewed fairly and quickly by a site that has over 250,000 visitors a month, please contact me or see other details in the Note to Contributors.