
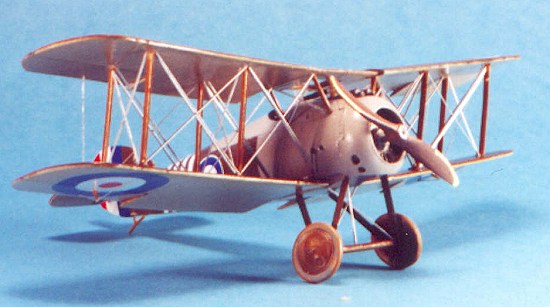
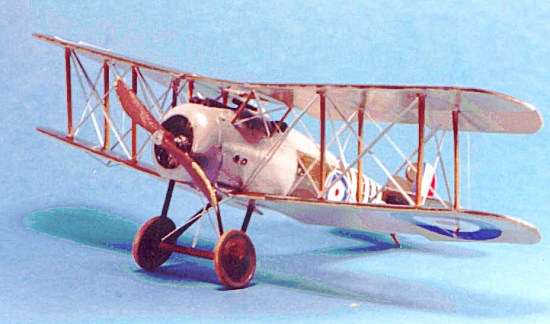
Blue Max 1/48 Sopwith 7.F1 Snipe
|
KIT # |
113 |
|
PRICE: |
$34.95 |
|
DECALS: |
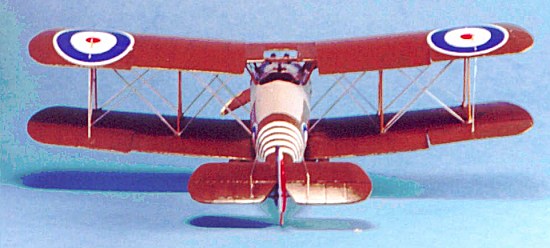
2 Versions, one for Billy Barker's E8102, one for a late-production Snipe of 208 Squadron. |
|
REVIEW : |
|
|
NOTES: |
|
HISTORY |
When one looks at the way the Sopwith Aeroplane Company of Kingston-on-Thames conducted their business during the First World War, it is not surprising that the company became Hawker Aircraft after the war, and continued on to become the leading part of British Aerospace today. Sir Tom Sopwith learned early on that, when the latest design is entering production, its replacement should be on the boards in the design offices. Thus the Pup and the Triplane entered production in late 1916 as the Camel was being designed, and the Camel entered production in the fall of 1917 as the Snipe was taking shape on the drafting table.
As an indication of just how far and fast air combat had driven the development of aircraft in three short years, the Snipe was the first British aircraft to carry both cockpit heating and oxygen, in recognition that combat was now regularly taking place at altitudes over 16,000 feet. At first the Snipe seemed to "go against the grain" of what was expected of a Sopwith-designed fighter with regard to maneuverability. Where the Pup and Triplane were finger-light on the controls and responsive, and the Camel could outfly anything but a Fokker Triplane, pilots said that the Snipe was "like driving a truck after being used to a sports car." While this was true of the early version, the later Snipe with its improved rudder and larger upper ailerons returned the airplane to its roots as a "pilot's airplane." Though the airplane did not enter service until the late summer of 1918, and did not appear in combat until that October, its accomplishments in that limited period clearly demonstrate it would have inherited the Camel's mantle as the leading British air superiority fighter had the war lasted another year.
 The Snipe remained in production after the conclusion of the war, and formed
the main equipment of the postwar RAF along with the Bristol Fighter, with the
last Snipes not leaving service until 1927.
The Snipe remained in production after the conclusion of the war, and formed
the main equipment of the postwar RAF along with the Bristol Fighter, with the
last Snipes not leaving service until 1927.
The wartime reputation of the Snipe rests in large part on the exploits of one Snipe, flown by one particular pilot, Major William G. "Billy" Barker. With 50 victories, "Billy" Barker is the third-ranked ace of Canada in the Great War. If Billy Bishop's alleged "record" was placed where it belongs, Barker would be the second-ranking Canadian ace. As it is, he was awarded the Victoria Cross, Military Cross with 2 bars, and the Distinguished Service Order with bar, making him the most-decorated Canadian soldier.
Barker joined the Canadian Mounted Rifles in December 1914, and spent a year in the trenches before transferring to the Royal Flying Corps in April 1916, where he became a mechanic; he qualified as an observer in August 1916 and shot down his first enemy aircraft from a B.E.2d. - quite an accomplishment. Posted to England in November 1916 for pilot training, he soloed after 55 minutes of dual instruction and received a pilot's certificate in January 1917. In February 1917 he returned to France where he flew the R.E.8 until wounded by anti-aircraft fire on 7 August 1917. When he recovered, he served as a flight instructor before returning to combat duty in France that October as O.C., 139 Squadron, flying the Bristol F.2B.
In November 1917, 139 Squadron was reassigned to Italy where Barker - flying Sopwith Camel B6313 - became the leading British ace on the Italian Front. Logging more than 379 hours of flight time, Barker shot down 46 enemy aircraft before B6313 was retired from service and dismantled on 2 October 1918.
A week later, Barker assumed command of the Air Combat School at Hounslow, England. He decided he needed to brush up on air combat techniques for his new assignment, and joined 201 Squadron for ten days in France. During that time, he saw no action and was about to return to England when he decided to make one more excursion over the front.
On 27 October 1918, alone and flying Sopwith Snipe E8102 at high altitude, he spotted an enemy Rumpler C.VI two-seater and shot it down. During this attack, he sustained a thigh wound, causing him to spin down into a formation of 15 Fokker D.VIIs - the "top cover" of the entire Jagdgeschwader III! Barker shot down one D.VII and was wounded again, which caused him to faint. He came to in the middle of the main formation, where he shot down another D.VII before being wounded again and passing out. Coming to, he found himself in the middle of the lower Jasta. He shot down a third D.VII, then managed to crash land his Snipe behind British lines. For his actions that day, Barker was awarded the Victoria Cross. E8102 was repaired and returned to service.
|
THE KIT |
Before the release of this Blue Max kit of the last Sopwith fighter of the Great War, the only 1/48 kits I am aware of that were available were a vacuform from Lone Star Models and a limited run cast-resin kit from Copperstate Models. I have built the vacuform, and it was a good kit though not a great one; the price of the Copperstate offering deterred me, though I have heard nothing but good comments about it from those who have built it.
 As with most Blue Max kits, one approaches a new release with great
anticipation, and dread. Anticipation that a World War I airplane not previously
available is now out in a limited-run kit, and dread that the particular kit
will fall victim to the up-and-down production quality of Blue Max, particularly
the well-known "wing ripple." This is due to the parts being taken
from the mold prematurely, and can result in a "ripple" in the rear
section of the wing surfaces that can be bad enough to require one to sand off
all the otherwise-excellent surface detail. In the case of my particular kit,
the wing ripple was there, but very lightly; I thought it would disappear under
a coat of paint and - unless one looks at the wing under the light at a
particular angle - I was right. (I still think, however, that at the price of
these kits this should not be an issue - I have sitting next to my computer a VW
"Bug" pen holder which I watched being injection molded from recycled
taillight plastic at a recent auto show by a person who had never operated the
machine before seeing it that day. We are not talking rocket science
here.)
As with most Blue Max kits, one approaches a new release with great
anticipation, and dread. Anticipation that a World War I airplane not previously
available is now out in a limited-run kit, and dread that the particular kit
will fall victim to the up-and-down production quality of Blue Max, particularly
the well-known "wing ripple." This is due to the parts being taken
from the mold prematurely, and can result in a "ripple" in the rear
section of the wing surfaces that can be bad enough to require one to sand off
all the otherwise-excellent surface detail. In the case of my particular kit,
the wing ripple was there, but very lightly; I thought it would disappear under
a coat of paint and - unless one looks at the wing under the light at a
particular angle - I was right. (I still think, however, that at the price of
these kits this should not be an issue - I have sitting next to my computer a VW
"Bug" pen holder which I watched being injection molded from recycled
taillight plastic at a recent auto show by a person who had never operated the
machine before seeing it that day. We are not talking rocket science
here.)
Past this, the kit comes in the standard medium-grey plastic, with good surface detail and acceptably-thin flying surfaces, with both early and late production upper ailerons and rudders. Interior detail is done in white metal. Strut-shaped plastic strips are provided, to be cut to length by the modeler. The multi-part Bentley B.R.2 rotary engine provided is a model in its own right. Decals are provided for the early-version E8102 flown by Billy Barker on his VC flight, and a late-production Snipe of 208 Squadron.
I also used the Photo-etch fret for the Snipe from Copperstate Models, which is available separately from their kit. This fret provides a wealth of small detail parts, most of which you cannot see in the accompanying photos, many of which are in the category of "I know they're there," which definitely help to trick out this nice kit even more so than it would be out of the box. The Copperstate fret costs US$5.95 and is available from Copperstate Models at http://www.amug.org/~copperst/ - I highly recommend it.
|
CONSTRUCTION |
I first cleaned off the flash from the interior framing and then painted it yellow-brown to represent ash. While this was drying, I painted the engine with several shades of ModelMaster Metalizer paints, sealed it with Tamiya "Smoke" to pop out the detail, and then assembled it with cyanoacrylate.
The cockpit interior went together well with test-fitting. The Snipe has a small cockpit opening, so much of what is inside the cockpit will not be that visible, but putting in the Copperstate bits and pieces allow it to look "busy" to anyone from the "Penlight Police" who may take a look at it.
 The fuselage is in multiple parts: fuselage halves, upper cockpit decking,
forward lower section and firewall. I test fitted the fuselage halves, then
glued them together, than test-fit the upper decking and glued it in position
after a bit of trimming, then on to the firewall and lower forward section. I
had to apply a limited amount of putty to all the join lines, which then
required careful filing and sanding once dry to avoid losing the molded detail.
The fuselage is in multiple parts: fuselage halves, upper cockpit decking,
forward lower section and firewall. I test fitted the fuselage halves, then
glued them together, than test-fit the upper decking and glued it in position
after a bit of trimming, then on to the firewall and lower forward section. I
had to apply a limited amount of putty to all the join lines, which then
required careful filing and sanding once dry to avoid losing the molded detail.
While the fuselage was setting up, I turned to the wings and tail surfaces, where I detached the ailerons, elevators and rudder, then glued them back into position as though the stick and rudder bar had been thrown to the left and forward by the pilot as he exited the cockpit.
Once the fuselage was sanded and then the seams filled with Mr. Surfacer 500, I glued the engine in position, followed by the cowling. I finished by gluing the tail surfaces and the lower wing to the fuselage, and gluing the three-part upper wing together. I was careful to get the same degree of dihedral in both upper and lower wings with two sets of jigs. Things were left to set up overnight once that was done.
|
PAINT & DECALS |
Painting:
 After pre-shading the entire model with flat black, I painted the lower
surfaces with Gunze "Sail Color," a good representation of Clear Doped
Linen, and the upper surfaces in P.C.12 - this is a color similar to the
better-known P.C.10, with an orange tint to it, that was used on British
aircraft during the last year of the war. It is impossible to tell from a black
and white photograph whether any particular airplane was done in P.C.10 or
P.C.12, and my choice was purely arbitrary - mostly out of curiosity to see how
it would look; for the record, I use Tamiya Olive Drab and Khaki and Gunze Sanyo
Dark Earth to create P.C.10 - here I added in some Gunze Sanyo Orange to create
P.C.12. I used Tamiya "Sky Grey" to represent British "Battleship
Grey" for the upper decking and cowling areas. Once everything was dry I
shot two coats of Future and let the model set up overnight again. The landing
gear and wheels were painted P.C.12, and all the struts were painted with the
yellow-brown "ash" color. Once that was dry, I then shot the struts
with a light coat of well-thinned Gunze Sanyo "Clear Yellow" for
varnish.
After pre-shading the entire model with flat black, I painted the lower
surfaces with Gunze "Sail Color," a good representation of Clear Doped
Linen, and the upper surfaces in P.C.12 - this is a color similar to the
better-known P.C.10, with an orange tint to it, that was used on British
aircraft during the last year of the war. It is impossible to tell from a black
and white photograph whether any particular airplane was done in P.C.10 or
P.C.12, and my choice was purely arbitrary - mostly out of curiosity to see how
it would look; for the record, I use Tamiya Olive Drab and Khaki and Gunze Sanyo
Dark Earth to create P.C.10 - here I added in some Gunze Sanyo Orange to create
P.C.12. I used Tamiya "Sky Grey" to represent British "Battleship
Grey" for the upper decking and cowling areas. Once everything was dry I
shot two coats of Future and let the model set up overnight again. The landing
gear and wheels were painted P.C.12, and all the struts were painted with the
yellow-brown "ash" color. Once that was dry, I then shot the struts
with a light coat of well-thinned Gunze Sanyo "Clear Yellow" for
varnish.
Decals:
The Blue Max decals went on with no difficulty. I brushed a light coat of Micro-Sol over them and set everything aside to dry overnight again. The next morning I washed the model to get rid of any solvent residue, and shot the model again with Future to seal everything.
|
CONSTRUCTION |
I attached the landing gear and tail skid, then glued the struts in position with cyanoacrylate. The top wing went on with no problem.
Rigging:
By this time, all British airplanes used "raf wires" for rigging. These are stainless steel, with a streamlined airfoil section, and look much different from regular wire rigging. I used Evergreen .101 x .015 strip to create this. Taking my time, the rigging was done in about three hours.
|
CONCLUSIONS |
I have wanted a Snipe in my collection for a long time, and this model from Blue Max fills the bill to perfection. If the Camel looks like a bulked-up Pup, the Snipe looks like a Camel on steroids - very tough and efficient. While the model is more difficult to build than it would be if it came from Eduard, it is nothing a modeler who considers themselves an "intermediate" when it comes to WW1 modeling will have difficulty with. Compared with the D.H.2, which I built just prior to starting in on this Snipe, it was a positive breeze to get through!
Thanks to Eric Hight at Copperstate Models for providing the review copy of the Snipe P-E fret.
If you would like your product reviewed fairly and quickly, pleasecontact the editor or see other details in the Note to Contributors.
Back to Reviews Page 2025