
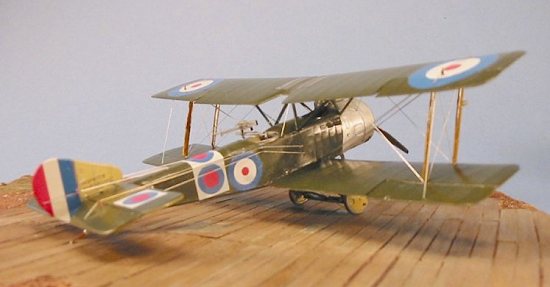
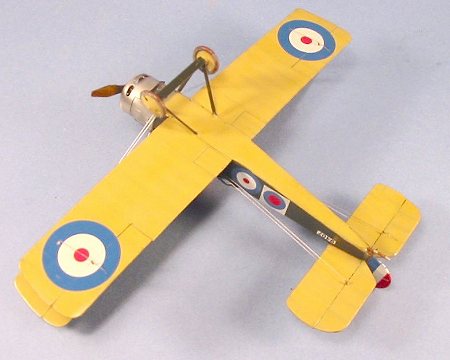
Roden 1/48 Sopwith 1 1/2 Strutter 2 seat fighter
|
KIT # |
402 |
|
PRICE: |
$23.98 ($20.96 at Squadron) |
|
DECALS: |
4 aircraft |
|
REVIEWER: |
|
|
NOTES: |
Forget that is is made of clear plastic |
A GUIDE THROUGH THE MINEFIELD
|
HISTORY |
In 1915, the British Admiralty requested a design for a 2-seat bomber to be used on the Western Front. Designed by Fred Sigrist and Herbert Smith completed the Sopwith Company's prototype was ready for flight in December 1915, officially known as the Sopwith Type 9400 (based on the serial number of the prototype) was the first true two-seat fighter to enter service. Powered by a 110 hp or 130 hp Clerget rotary engine giving it a top speed at 6,500 ft. of 104 mph, the aircraft was armed with a fixed synchronized forward firing Vickers .303 machine gun and a Lewis.303 machine gun in the rear cockpit. The configuration of the attachment of the upper wing to the fuselage was unique in its use of interplane and cabane struts in a trestle-shape. The nickname "1 ½ Strutter" - which related to the trestle-shaped struts - was soon in common usage.
 Other unusual
features of the design were the provision of air-brakes in the trailing-edges of
the lower wing, and a tailplane which was adjustable in flight. It was the first
British aeroplane to go into action with a synchronized Vickers gun for the
pilot. The observer's gun was at first carried on a Scarff pillar mounting, then
on a Nieuport ring and finally on the excellent Scarff No.2 ring. With this
improved armament the Strutter did well as a two-seater fighter during the late
summer and autumn of 1916. The 1 1/2 Strutter served with both the Royal Naval
Air Service and the Royal Flying Corps, with the former flying both two seat
fighters and single-place bomber variants.
Other unusual
features of the design were the provision of air-brakes in the trailing-edges of
the lower wing, and a tailplane which was adjustable in flight. It was the first
British aeroplane to go into action with a synchronized Vickers gun for the
pilot. The observer's gun was at first carried on a Scarff pillar mounting, then
on a Nieuport ring and finally on the excellent Scarff No.2 ring. With this
improved armament the Strutter did well as a two-seater fighter during the late
summer and autumn of 1916. The 1 1/2 Strutter served with both the Royal Naval
Air Service and the Royal Flying Corps, with the former flying both two seat
fighters and single-place bomber variants.
The French aviation authorities were sufficiently impressed with the "1 ½ Strutter" that they began building their own models in 1916 in a number of different variants including two seat fighter-reconnaissance aircraft single seat bomber and two seat bomber. Some 4,200 aircraft were built by Amiot, Bessoneau, Darraq, Lioré et Oliver, Hanriot, Sarazin, S.F.A., and R.E.P., with construction finally ceasing in April, 1918.
With a top speed of 100 m.p.h. and the maneuverability to survive on the Western Front as a 2-seat fighter, it is hard to understand why this airplane was not used in even greater numbers than it was, since it was so clearly superior to such dreadful types as the F.E.2 and B.E.2 series, which were produced in far greater numbers (and shot down in even greater numbers, inasmuch as they were virtually defenseless). Even in the fall of 1917, when the Strutter was removed from service, it was superior in performance to the truly awful R.E.8 for the Corps reconnaissance role.
Deliveries of the "Strutter" began during February of 1916, with the first machines delivered having no fixed forward gun. It is believed that these aircraft were delivered without the forward gun due to a shortage of Vickers.303 machine guns because of Army demands for the weapons. A number of these early production aircraft were delivered in time to participate in the grim fighting of the Battle of the Somme. Although the Strutter gave a good account of itself, by the following year the aircraft had been completely outclassed as a fighter by the more heavily armed and faster German single seat scouts and left British service by the Fall of 1917.
 A small number of
Strutters were used for Home Defense. These aircraft were converted in the field
to be flown from the observer's cockpit, and were armed with twin Lewis guns
firing upwards, and were known as the "Comic." There was nothing comical about
the operational concept of towing these aircraft on a barge behind a destroyer
in the North Sea, to be launched at night for early-warning Zeppelin
interceptions, with the pilot subsequently making his way to land ashore,
hopefully.
A small number of
Strutters were used for Home Defense. These aircraft were converted in the field
to be flown from the observer's cockpit, and were armed with twin Lewis guns
firing upwards, and were known as the "Comic." There was nothing comical about
the operational concept of towing these aircraft on a barge behind a destroyer
in the North Sea, to be launched at night for early-warning Zeppelin
interceptions, with the pilot subsequently making his way to land ashore,
hopefully.
The RNAS operated "Strutters" from ships as reconnaissance and spotter aircraft. The United States Army Air Service also flew 341 French Strutters, assigning nearly 100 of them to the 88th, 90th and 99th Aero Squadrons between May and July of 1918, due to a lack of suitable 2-seaters for corps reconnaissance; fortunately they were replaced by the American D.H.4 by August, 1918. Still others were flown as trainers. The U.S. Navy also flew the 1 ½ Strutter from the battleships "Arizona," "Nevada," "Oklahoma," Pennsylvania" and "Texas."
Besides the British, Americans, and French, the aircraft was also flown by Belgium and Russia, while small numbers were interned and flown by the Dutch. A few were delivered to Romania and Japan, where the aircraft saw action against the Russians during 1918.
Raymond Collishaw:
Raymond Collishaw is Canada's top ace of the First World War, now that the claims of Billy Bishop have been shown to be the lies they were (Bishop may have shot down 10 airplanes, not 65; the Germans had no records after the war of any attack on any German airfield anywhere on the Western Front on July 3, 1916, the action for which Bishop was awarded the Victoria Cross.) Collishaw joined the Royal Naval Air Service in 1915 when the Royal Navy was too slow in processing his application. After undergoing flight training in England in the winter and spring of 1916, in May 1916 he received his wings and was posted to 3 Naval Wing, which flew Sopwith 1½ Strutters as one-seater bombers and two-seater fighters from Luxeuil-les-Bains, France.
3 Wing's aircraft had
been fitted with special fuel tanks giving them an endurance of 7.5 hours, with
which they were to conduct long-distance bombing raids over Germany. Collishaw
was assigned as a fighter pilot in the two-seater Strutters, and participated
in the first strike on the Mauser Arms Works at Oberndorff, Germany. Over 80
aircraft, including 40 1½ Strutters, French Breguet V bombers and Nieuport 11
scouts from the Lafayette Escadrille, participated in the mission.
Unfortunately, the Nieuports did not have the necessary range and had to turn
back before they reached the target, thus exposing the rest of the flight to
attacks by German fighters. Once past the Rhine, they were intercepted by
Albatros D.IIs of the Grasshopper Jasta that included future ace Ernst Udet, who
claimed his first victory that day, a Breguet V bomber.
 Collishaw and his gunner
shot down the future ace, Ludwig Hanstein, with the gunner putting bullets in
Hanstein's engine and Collishaw following him down firing with his forward
Vickers. On the return, his engine acted up and he barely made it the 200 miles
home. The mission was a failure with the loss of 9 aircraft and little damage
done to the rifle works. 3 Wing learned its lessons, and the next week they
destroyed the furnaces at a steel works with a much smaller force that got in
and out of Germany without being spotted. On the next mission, Collishaw was
shot down; fortunately the Strutter was a good glider and he made it into Allied
France near Nancy before crash landing.
Collishaw and his gunner
shot down the future ace, Ludwig Hanstein, with the gunner putting bullets in
Hanstein's engine and Collishaw following him down firing with his forward
Vickers. On the return, his engine acted up and he barely made it the 200 miles
home. The mission was a failure with the loss of 9 aircraft and little damage
done to the rifle works. 3 Wing learned its lessons, and the next week they
destroyed the furnaces at a steel works with a much smaller force that got in
and out of Germany without being spotted. On the next mission, Collishaw was
shot down; fortunately the Strutter was a good glider and he made it into Allied
France near Nancy before crash landing.
Collishaw's most famous fight in the Strutter occurred in January, 1917. Directed to ferry a Strutter to 3 Wing's new base at Ochey without a rear gunner, he accidentally strayed over the front and was jumped by six Albatros D.IIs. The first hint he had of the enemy presence was when bullets slammed into his instrument panel, one hitting his goggles and partially blinding him with glass. In desperation, he dove for the trees hoping to lose them. One Albatros followed and crashed in a steep turn at low altitude, while a second cut in front of him and presented a point-blank target. Collishaw sent him into the ground with an accurate burst. Alone at last, but half-blinded by the shattered goggles, he navigated his way home by the sun and landed at the first field. As men came running to his plane, he saw a line of Fokker D.Vs on the field and suddenly realized he'd landed at a German base! He took off with Fokkers behind him, clipping two trees at the end of the field. The Germans caught him quickly and riddled his plane, but he managed to lose them in clouds. He was several miles past the front before he realized it and landed at a French airfield near Verdun. He stayed several days to have his eyes cared for. The French awarded him the Croix de Guerre for this fight on April 21, 1917, while the RNAS posted him to an all fighter squadron.
Before the year was out, Raymond Collishaw would be one of the leading Commonwealth aces as the leader of the famous Black Flight of "Naval 10" squadron where he immortalized the Sopwith Triplane. By his own count, he shot down 81 aircraft by the end of the war - which would make him the Ace of Aces of the First World War - though the more stringent RNAS scoring rules gave him only a total of 60.
|
THE KIT |
See the earlier preview to see what the kit includes.
While several excellent 1/72 scale kits of this airplane have appeared in recent years, until the advent of this kit from Roden, the only 1/48 scale examples were a vacuform produced by Tom's Modelworks back in the late 1980s, and a fairly expensive resin kit from Copper State Models.
 Unfortunately, Roden
succumbed to an idea that World War I modelers have bandied about for years -
producing the airframe in clear plastic to facilitate the "transparent" look of
clear doped linen when painted. This is one of those ideas that sounds great as
an idea and turns out to be completely worthless when put into practice. I know
of only one modeler who has ever successfully produced a model of a World War I
airplane this way, that being master sctratchbuilder Robert Karr, and even he
has said that he would never do it again due to the difficulty of working with
clear plastic and the difficulty of getting a uniform paint finish that will
look like clear doped linen when completed. Clear plastic is much more brittle
than standard opaque plastic due to its chemistry, and requires molds with more
space in them in order to get parts that are not "short shots." The result is
that the flying surfaces end up thicker than they would be had opaque plastic
been used.
Unfortunately, Roden
succumbed to an idea that World War I modelers have bandied about for years -
producing the airframe in clear plastic to facilitate the "transparent" look of
clear doped linen when painted. This is one of those ideas that sounds great as
an idea and turns out to be completely worthless when put into practice. I know
of only one modeler who has ever successfully produced a model of a World War I
airplane this way, that being master sctratchbuilder Robert Karr, and even he
has said that he would never do it again due to the difficulty of working with
clear plastic and the difficulty of getting a uniform paint finish that will
look like clear doped linen when completed. Clear plastic is much more brittle
than standard opaque plastic due to its chemistry, and requires molds with more
space in them in order to get parts that are not "short shots." The result is
that the flying surfaces end up thicker than they would be had opaque plastic
been used.
Even if the concept worked, the unfortunate fact is that the fit of parts in this kit is not of "Tamiya quality," which means the modeler will end up using putty or Mr. Surfacer to fill gaps and seams in the fuselage. In addition, it is virtually impossible to see the places where this is needed unless the model has been painted to make the parts visible.
Trust me on this, folks. I tried hard with this kit to make the concept work and it completely escaped me. I can tell you that following my little rule at the head of this review to "forget it's made of clear plastic" results in a far easier build as the second and third Strutters I am making came together much easier not worrying about the clear plastic. My construction notes do not include trying to make the clear plastic concept work; if you follow them you will avoid the minefield of this kit and create a very nice model.
Now then, the good news: other than the fact the flying surfaces are a bit thick and the horizontal stabilizer does not have an airfoil shape, the surface detail of the clear plastic parts is excellent, as you can see as soon as you paint them.
|
CONSTRUCTION |
Construction began with airbrushing the interior of the fuselage halves in "clear doped linen," for which I used Gunze-Sanyo "Sail Color". I then hand-painted the airframe with dark brown paint. When that was dry, I assembled the fuselage halves, scraped down the centerline seams, and applied Mr. Surfacer 500 to them for later clean-up.
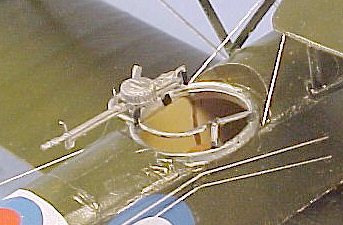
While that was setting up, I painted the cockpit floor a yellowish-brown, as well as the instrument panel. All metal parts were painted with semi-gloss black, since these were "Japanned" on the real thing. I threw away the incorrect pilot's seat and took a more correct white metal Aeroclub WW1 pilot's seat from my spares box. I used a photoetch WW1 Sutton harness from Eduard.
Once all these were dry, I installed the cockpit floor inside the fuselage, working it from inside and out to get it in the correct position and level. I then installed the rudder bar, the instrument panel, the control stick, the pilot's seat (in that order, it makes things easier), and the rear gunner's "piano stool."
I then attached the lower wing. This required quite a bit of scraping of the center section of the lower wing to achieve a good fit of wing and fuselage. Be very careful when doing this, because of the brittleness of the plastic.
 Test-fitting of the
upper section of the fuselage revealed that the mold of the fuselage halves had
a distinct "toe in" to the sides in the cockpit area. I ended up cutting two
braces from sprue, fitting them just behind the pilot's cockpit and just ahead
of the gunner's cockpit, to push out the sides enough that the upper section
would fit right.
Test-fitting of the
upper section of the fuselage revealed that the mold of the fuselage halves had
a distinct "toe in" to the sides in the cockpit area. I ended up cutting two
braces from sprue, fitting them just behind the pilot's cockpit and just ahead
of the gunner's cockpit, to push out the sides enough that the upper section
would fit right.
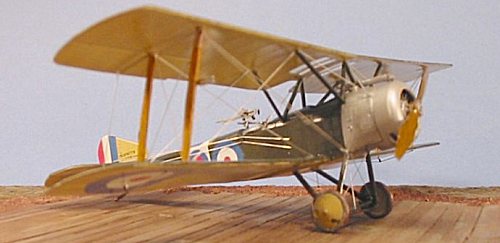
I then attached the horizontal stabilizer, having cut the elevators off and re-shaped the parts so that they could be posed in a drooped position. This was hard to do because of the brittleness of the plastic - so much so that I would advise you not to do this with your model unless you are very good with a razor saw. (Ditto for the ailerons - I cut them and posed them on this model, but not on the next two.) You must attach the tail skid at this point to the fuselage, since it includes the extreme end of the fuselage and the stabilizer will not fit properly otherwise. Again, I had to put effort into re-shaping the area of the fuselage where the stabilizer went, so that they would fit correctly, and it was more difficult than it would have been otherwise due to the nature of the plastic.
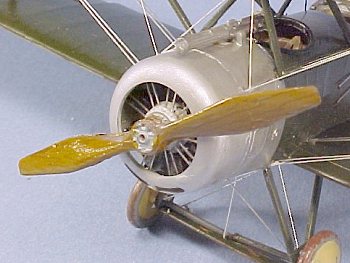 I then assembled the
engine. Do not even try to keep the plastic rods on the crankcase part, just
cut them off. Use the photo-etch rods. Also, cut the part that will attach to
the prop off the front of the engine before attaching the photoetch rods. Then
attach the crankcase, then the hub - do not try to make it fit into the
crankcase, otherwise it will be too short to mount the prop once it is in
position.
I then assembled the
engine. Do not even try to keep the plastic rods on the crankcase part, just
cut them off. Use the photo-etch rods. Also, cut the part that will attach to
the prop off the front of the engine before attaching the photoetch rods. Then
attach the crankcase, then the hub - do not try to make it fit into the
crankcase, otherwise it will be too short to mount the prop once it is in
position.
I painted the engine and attached it in position. I had glued the two-part cowling together previously. When I tried to attach it, I discovered that the diameter of the cowling is smaller than that of the fuselage! I opened the side seams of the lower part of the cowling, attached it, then filled the resulting gaps with C-A glue which I later sanded smooth. As a result of this, I have attached the cowling in its separate pieces to the fuselages of the next two Strutters and then glued them to each other, and this is much easier.
The model was now ready to paint.
|
PAINT & DECALS |
Painting:
 I masked off the
clear areas of the upper wing, and painted the rib area immediately surrounding
them with brown paint - this way, when the model is finished, you will look
through these and "see" a full rib in the middle and to either side of the
glass.
I masked off the
clear areas of the upper wing, and painted the rib area immediately surrounding
them with brown paint - this way, when the model is finished, you will look
through these and "see" a full rib in the middle and to either side of the
glass.
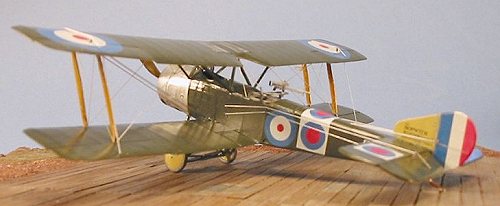
I painted the entire model with Tamiya "Neutral Grey" as a primer. Once I could finally see the model in detail, I found some seams that needed additional filling, which I did with Mr. Surfacer. I was now ready to really paint the model.
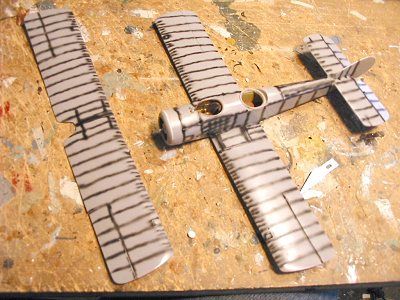
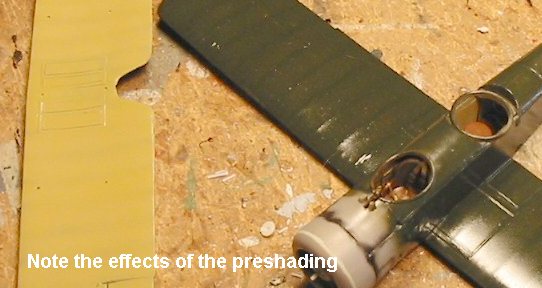
I first "pre-shaded" the model, airbrushing flat black over all the ribs and airframe structure.
When that was dry, I painted the lower surface with Gunze-Sanyo "Sail Color", thinned 50-50 with rubbing alcohol, putting on a final coat that allowed the "shadow" of the wing ribs to definitely show through. I then put a bit of white in the paint and went over the areas between the ribs and airframe structure, to emphasize the underlying structure. When the model is completed, this provides a much more realistic-looking "transparency" to the Clear Doped Linen surfaces than painting the clear plastic would.
 I painted the upper
surface with Gunze-Sanyo "Khaki Green." The real airplane was painted with
P.C.10, a color that changed with each batch that was made, and ranged from a
brownish olive-drab to a dark olive green. I tray to vary my P.C.10 for each
British airplane model I make, so that they do not all look completely similar
sitting next to each other on the display shelf. As with the lower surface, I
allowed the "shadow" of the underlying structure to show through, and emphasized
that by "post-shading" by adding a bit of a lighter green color to the original
and airbrushing the areas between the rib structure.
I painted the upper
surface with Gunze-Sanyo "Khaki Green." The real airplane was painted with
P.C.10, a color that changed with each batch that was made, and ranged from a
brownish olive-drab to a dark olive green. I tray to vary my P.C.10 for each
British airplane model I make, so that they do not all look completely similar
sitting next to each other on the display shelf. As with the lower surface, I
allowed the "shadow" of the underlying structure to show through, and emphasized
that by "post-shading" by adding a bit of a lighter green color to the original
and airbrushing the areas between the rib structure.
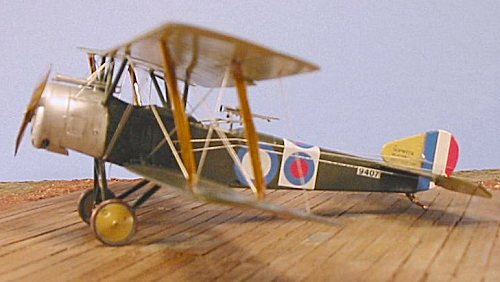
I then Futured the model. When that was dry, I masked off the nose and painted the cowling with SnJ Aluminum.
I also Futured the wing struts, which were then decaled with Aeromaster "light wood." When that was dry I smoothed the edges, then hand-brushed the struts with Gunze-Sanyo "Clear Yellow" to get the final look of varnished ash.
 Decals:
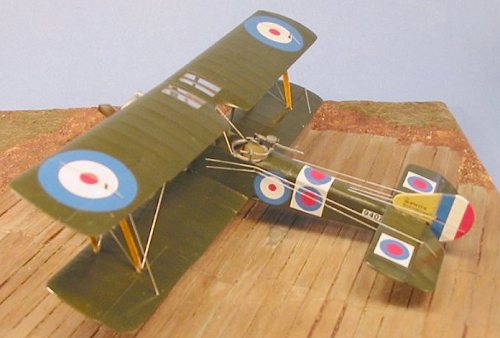
The decals in the kit are excellent and went down with no difficulty. According to the kit instructions, Collishaw's airplane had the vertical fin in P.C.10; other authorities have said it was in the standard clear doped linen with the "Sopwith Aeroplane Co." logo. Since I had the Sopwith logo in the single-seat bomber kit, I used that decal on this model. You can follow the kit instructions and not do this, and have just as many WW1 "markings experts" say that is right as I can find to say what I did is right. I also used the individual aircraft markings for Collishaw's airplane from the second kit, and placed these on the upper surface of the horizontal stabilizer, since photos show that these markings were carried there for identification.
When the decals were finally set, I gave the model another coat of Future. Remember that WW1 airplanes were shiny, not dull, due to the spray of oil from their engines over the surface which means that the longer they served the shinier they got.
|
FINAL ASSEMBLY |
The main landing gear
is incorrect, with the axle shown as a straight-across piece. If you want to do
it right, cut off the axles from the spreader bar. Assemble the gear legs with
the spreader bar between them. Then take some evergreen rod and make the
separate axles for each wheel, which meet in the center atop the spreader bar.
Slip them through the hole in
 the gear leg just above the spreader bar and glue
them together in the center. If you do this, the model will "sit" the way Sopwith airplanes actually did.
the gear leg just above the spreader bar and glue
them together in the center. If you do this, the model will "sit" the way Sopwith airplanes actually did.
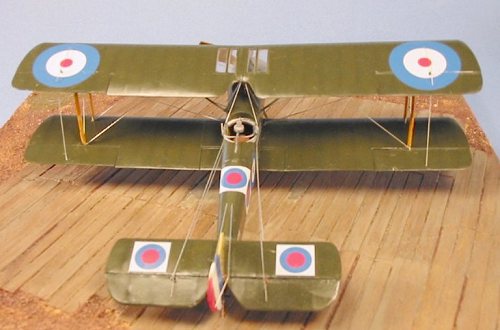
I attached the "W" cabane/interplane struts - be careful to check these, as the front one leans back a bit while the rear one leans forward for the center struts. I then attached the upper wing to the centerline struts, then bent the interplane struts so that they attached to the positioning holes in the wing. I then attached the outer interplane struts to their positioning holes. Be sure to remove the masks from the glass areas before attaching the upper wing in position.
Rigging:
I used .010 stainless steel wire to do the rigging. The hardest part was to bend the wires and fit them properly for the elevator control cables. I liked the inclusion of the photo-etch aileron, elevator and rudder control wires. If you follow the rigging diagram in the instructions, everything is quite simple for anyone who has ever done at least one other WW1 model.
|
CONCLUSIONS |
 There were several
points during the project where I was certain the model was not going to be
completed, mostly having to do with the @#$#%#@!! clear plastic parts and the
impossibility of making the concept work. If you simply ignore the fact that
these parts are in clear plastic and assemble this as you would a normal kit,
you will save yourself a lot of grief.
There were several
points during the project where I was certain the model was not going to be
completed, mostly having to do with the @#$#%#@!! clear plastic parts and the
impossibility of making the concept work. If you simply ignore the fact that
these parts are in clear plastic and assemble this as you would a normal kit,
you will save yourself a lot of grief.
To me, the end result is a very good-looking model of a good-looking and important airplane from WW1. I have wanted a Strutter in my collection for a very long time, and I will soon have three: this two-seat fighter, the single-seat bomber, and a single-seat "Comic" night fighter.
Copyright ModelingMadness.com
If you would like your product reviewed fairly and fairly quickly, pleasecontact the editor or see other details in the Note to
Contributors.