Pegasus 1/72 Breguet XIV B2
| KIT #: | 4004 |
| PRICE: | $Out of Production |
| DECALS: | One option |
| REVIEWER: | Kyle Bodily |
| NOTES: | Short run with metal parts. |
| HISTORY |
After the SPAD and the Nieuport fighters, arguably the next best known French aircraft would have to be the family Breguet 14 bombers and high-speed reconnaissance aircraft. The Br 14 started life as the AV 2 experimental aircraft. The AV 2 was to become the venerable Breguet 14
The Breguet 14 came in many types,
but the most common were the A2 and B2. The French aircraft classification was
as follows; A types were reconnaissance aircraft, B types were bomber aircraft
and C types were fighters and so on. The number that followed the letter stood
for the number of crewmembers the aircraft was designed for. So, a B2 would be
a two-seat bomber, an 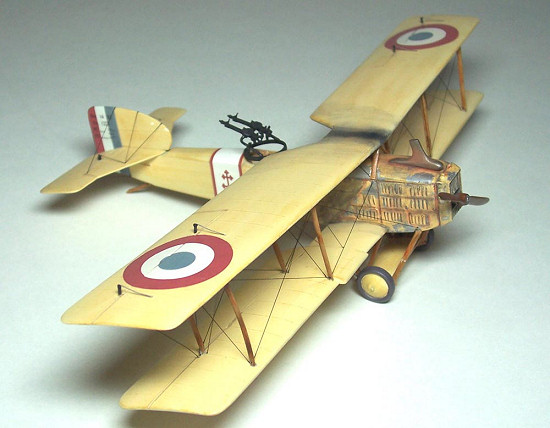 A2 is a
two seat reconnaissance aircraft and a C1 would be a single seat fighter. So a
Breguet 14 B2 tells you that the airplane was built by Breguet, was the 14th
model that they built and is a bomber with a crew of two. So here is a pop
quiz, what is a S.P.A.D. XIII A1. Answer, this was a SPAD 13 that was used as a
single seat photo-reconnaissance aircraft. You can tell this aircraft from the
fighters by the word PHOTO just under the cockpit on the left side of the
fuselage.
A2 is a
two seat reconnaissance aircraft and a C1 would be a single seat fighter. So a
Breguet 14 B2 tells you that the airplane was built by Breguet, was the 14th
model that they built and is a bomber with a crew of two. So here is a pop
quiz, what is a S.P.A.D. XIII A1. Answer, this was a SPAD 13 that was used as a
single seat photo-reconnaissance aircraft. You can tell this aircraft from the
fighters by the word PHOTO just under the cockpit on the left side of the
fuselage.
Of special mention, in this family of aircraft would have to be the Breguet 14 B1. This aircraft was designed to bomb Berlin. It could carry up to 180kg of bombs and stay in the air for seven hours. Even with such endurance, the range was considered too marginal for such a dangerous mission and the raids on Berlin were never carried out.
The Breguet 14 B2, the aircraft that this kit is based on, could fly at 195-203 km/h with 335 kg of bombs for up to four hours, depending on the engine it had. It also had a very interesting automatic bomb release system. The bombardier/observer/gunner would arm the system by turning a crank on the right side of the rear cockpit. The pilot would get steering information from the bombardier at the right moment the bombardier would trip the release and all or a predetermined number of bombs would be dropped. This was a really unique system since the bombardier could determine the number and dispersion of the drop. So you could drop them all in one spot or spread them out.
Pilots liked the Br 14, it was fast and maneuverable, could carry large bomb loads with excellent defensive armament and absorb a lot of damage. The Gorrel Report states that, “no stronger ship has probably ever been subjected to harder active service and given such excellent results.”
American pilots who flew it felt that the Breguet 14 was the best two seater of the First World War. No fewer than 24 countries operated this aircraft including Finland, Turkey, Thailand and Brazil. It also saw further action in Poland in the post war fighting that burned through that country
| THE KIT |
 This kit is now out of
production and very hard to find and commands a steep price among collectors.
However I think that this kit is worth the price I paid for it, $20,00 from a
collector friend of mine. It sure is good to have a friend who collects. .
This kit is now out of
production and very hard to find and commands a steep price among collectors.
However I think that this kit is worth the price I paid for it, $20,00 from a
collector friend of mine. It sure is good to have a friend who collects. .
In the box you will find light colored injection molded parts, strut and rod stock. Decals are for one aircraft. The plastic is the standard Pegasus format, gray with a some flash. All in all really not bad, some of the parts just need to be cleaned up. The wings have thin trailing edges and washout. The panel lines and details are nicely reproduced with either raised or engraved lines where appropriate. The cockpit is a little Spartan on detail side as is common with this company. The good thing is that in 1/72 scale lots of detail here is hard to see. But, if you want to you can just go to town and add scratched detail till your heart’s content.
The metal parts are well done. This is common with British made limited run kits. However like with the other parts you will need to do some light clean up but as a rule of thumb not much.
 The
box states that the kit is for the experienced modeler. This is because you'll
have to do some fabrication. The rod stock will need to be fashioned into things
like wheel axle, control stick, rudder and tail skid struts. The strut stock
will need to be fashioned into interplane and cabane struts. Now don’t fret,
the instructions help here by telling you the lengths and all. I still
recommend a good reference when building Pegasus and Blue Max Kits. If you keep
mistakes to a minimum you should have more then enough material.
The
box states that the kit is for the experienced modeler. This is because you'll
have to do some fabrication. The rod stock will need to be fashioned into things
like wheel axle, control stick, rudder and tail skid struts. The strut stock
will need to be fashioned into interplane and cabane struts. Now don’t fret,
the instructions help here by telling you the lengths and all. I still
recommend a good reference when building Pegasus and Blue Max Kits. If you keep
mistakes to a minimum you should have more then enough material.
The instructions are more or less adequate, some might say basic. On one side you have an exploded drawing of the kit and on the other side you get construction notes. As I said earlier you get some templates to cut the interplane struts and other items to assist in fabrication. On the back of the box you will find nice three view drawings. I find that if you have these enlarged to scale you can build the model on them. This allows you to make sure that all the parts are lined and squared up as you go thus lessening problems and difficulties. One more thing to keep in mind is that the molding gates on most Pegasus are large and sometimes extend into the parts, so care must be exercised as you clean up the plastic parts.
| CONSTRUCTION |
 First let me say, this is an
out of the box build. So I began by removing all the plastic parts from their
trees and I painted all the metal parts with white primmer. As I said the
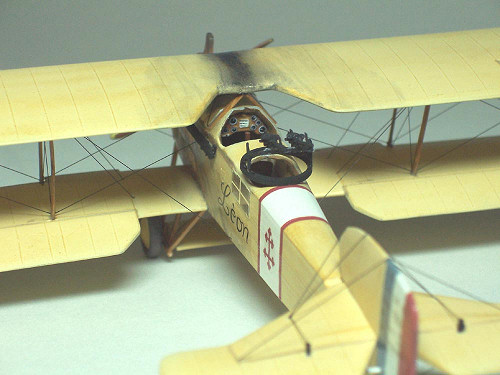
cockpit is a bit Spartan and consists of a control column, seat, instrument
panel, bulkheads and floor, this is adequate but you may wish to do some
detailing. I didn’t add anything since it was an OOB Build. I painted the
inside of the fuselage halves, floor, bulkheads and instrument panel. The seat
and control column were painted black and gray respectively.
First let me say, this is an
out of the box build. So I began by removing all the plastic parts from their
trees and I painted all the metal parts with white primmer. As I said the
cockpit is a bit Spartan and consists of a control column, seat, instrument
panel, bulkheads and floor, this is adequate but you may wish to do some
detailing. I didn’t add anything since it was an OOB Build. I painted the
inside of the fuselage halves, floor, bulkheads and instrument panel. The seat
and control column were painted black and gray respectively.
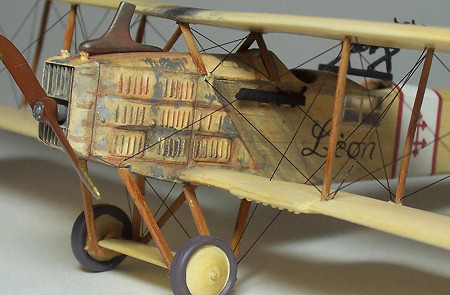
After I assembled the fuselage I painted the engine cowling ModelMaster silver. This is how I gave the cowling that chipped paint look. After you paint the kit and it has dried, I put a small piece of tape on the tip of a paint brush handle and tap the cowling with it. Little tiny pieces of paint come off on the tape and it looks like paint chipping.
Pegasus kits don’t have pins, tabs or slots to help you build. So you will have to take some time getting everything glued and set correctly. I like to build these kits on a set of scale drawings. This lets you set everything and let it dry and if anything goes askew you can see it right away.
The kit is designed so the bottom
wings just butt up against the fuselage, so to make this joint strong, I drilled
some small holes in the fuselage and the wings for a few pieces of brass rod.
This seems to work for me and I’ve not had any problems with this method. I
usually stop after the fuselage is joined to the lower wings a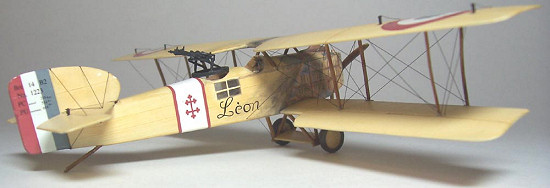 nd
paint. Sometimes I build a little more, it all depends on the kit and the paint
scheme that I want.
nd
paint. Sometimes I build a little more, it all depends on the kit and the paint
scheme that I want.
As I said, you will need to make the interplane struts from the strut stock that is provided. This is really not as hard as it sounds and the experience that is gained from this process is very useful in future projects.
I like to drill the holes that I will use for the rigging before I paint, so I did that. I built the top wing at this point and set the dihedral, this is important to get right since the interplane struts will not fit if this is angle is off by much. I test fit all the parts not all ready glued and then test fit the whole thing at least twice. The secret to building a Pegasus kit and having fun is to take your time and test fit everything before you even think about getting the glue out. Remember this is a limited run kit so it does not fall together.
| COLORS & MARKINGS |
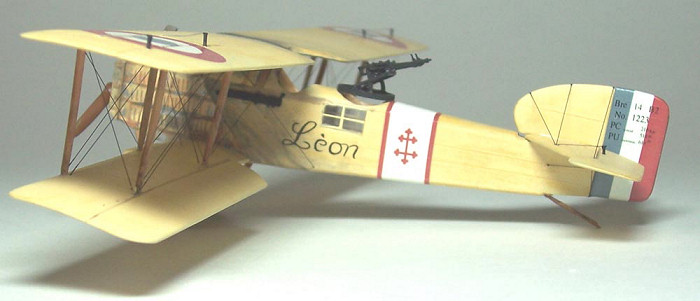
 The easiest part of this kit
is the painting. This kit is just light tan or beige with wood struts. So I
did just that. If you want you could get other markings and do a more colorful
ship with French five color as a base. I just used the decals in the kit and
followed the painting diagram.
The easiest part of this kit
is the painting. This kit is just light tan or beige with wood struts. So I
did just that. If you want you could get other markings and do a more colorful
ship with French five color as a base. I just used the decals in the kit and
followed the painting diagram.
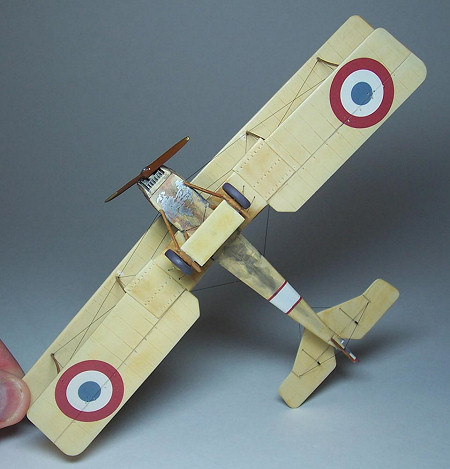
After I put the decals on, and they worked just fine, I weathered. For this kit I wanted the just back from a mission look so a little more weathering would be in order. I started by dry brushing the model with MM wood over the base of MM Radome tan. I then chipped the cowling as previously stated and began the wash process. The washes are basically heavily thinned colors. The secret here is to slowly add layers till you get the shade you want and to use a color that accents the base color to give you the look you want. I usually like washes made from shades of black to gray and brown to tan; once again this just depends on the base color I’m working with. Now I like the colors so thinned that just one coat is almost indiscernible. As you layer it gets darker and darker until it will totally cover the base color. This is why I like very thin colors, because it is difficult to get too heavy of a covering. Take your time and it will turn out just fine.
The decals in this kit are for a Breguet 14 B2 of Escadrille Br 504 stationed in Salonika circa 1918. This color scheme is basic beige but the Breguet 14s were mostly seen in one of the French five color scheme. I know of no after market decals for this kit but with a hand and some decal film I think that you could do just about any B2 you may want.
| CONCLUSIONS |
I sure liked building it and I really
like the way it looks. It was hard enough to challenge but not impossible. If
you want a shake and bake kit you will not find it here. I think that when I
build my next one, I got a couple (s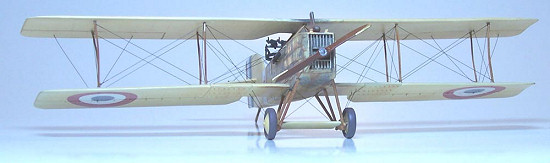 hhhhhhhh
don’t tell my wife), I’ll use some of the more ridged brass strut stock (STRUTZ).
The extruded plastic is just too flimsy for me. This is not a kit for beginners
but would really expand the skills of the determined builder and will definitely
add a 1/72nd scale Breguet 14 to your collection.
hhhhhhhh
don’t tell my wife), I’ll use some of the more ridged brass strut stock (STRUTZ).
The extruded plastic is just too flimsy for me. This is not a kit for beginners
but would really expand the skills of the determined builder and will definitely
add a 1/72nd scale Breguet 14 to your collection.
Like I said this kit is out of production and I know of no other injection molded kits in 1/72nd scale. Hi-Tech of France produces a 1/48th scale Breguet 14 A2 kit and use to offer a B2. Sadly the B2 is now also out of production. I had the opportunity to build both of the Hi-Tech kits and quite liked them. If you are interested in the 1/48th scale kit by HI-Tech, I was able to review the their Breguet 14 A2 and that review can be seen here at Modeling Madness.
| REFERENCES |
French Aircraft of the First World War by Dr. James Davilla and Arthur M. Soltan, Flying Machines Press
This is easily the best publication on French aircraft used or designed during the First World War and well worth the price.
April 2006
Copyright ModelingMadness.com
If you would like your product reviewed fairly and fairly quickly, please contact me or see other details in the Note to Contributors.