| KIT #: | |
| PRICE: | $ |
| DECALS: | Spares box |
| REVIEWER: | Chris Peachment |
| NOTES: | Scratch-built |
| BACKGROUND |
I came across this weird beast while surfing
the internet on a French website. My French is a little rusty, but from what I
managed to glean, it was a proposal in 1917 for an interceptor to counter the
Zeppelin menace. It would have been powered by 48 'fusees a poudre', which I
take to mean powder rockets, or what perhaps were
fireworks. The man behind it, Marcel Riffard became famous 15 years later
as the 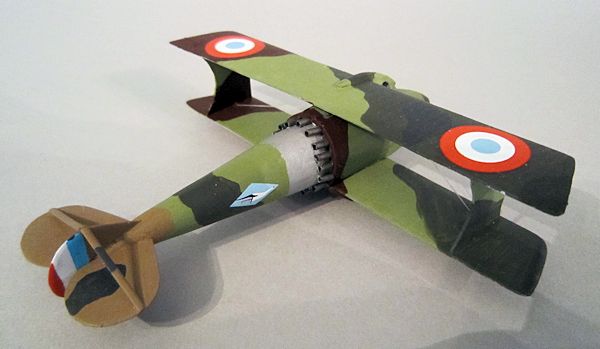 pilot
for Caudron racers. The designer was Gabriel Mollard, a 19 year old with Breguet.
It was named 'Torpilleur' and was armed with a one shot 150mm gun in the nose,
which fired a torpedo, also rocket powered. It strangely prefigures later point
defence fighters such as the Me 163, and the French SNCSO Trident.
pilot
for Caudron racers. The designer was Gabriel Mollard, a 19 year old with Breguet.
It was named 'Torpilleur' and was armed with a one shot 150mm gun in the nose,
which fired a torpedo, also rocket powered. It strangely prefigures later point
defence fighters such as the Me 163, and the French SNCSO Trident.
The website listed below has some scale plans plus a scratch built version in 1/48. I decided to go for 1/72, partly because that is the scale of most of my aircraft, partly it would not need so much detailing in that scale, and, the clincher, I happened to have a fuel tank left over from an old Monogram B-52, which bit the dust about 5 years ago thanks to my cat taking a studied interest in it, and batting it about to see if was a large mouse. The fuel tank just happened to fit the nose on the 1/72 scale plan and so I felt the Gods were nudging me in the right direction.
| CONSTRUCTION |
After cutting the nose off the fuel tank with
a razor saw, I then cast around for something in the spares box which would
replicate the rear fuselage. Alas there was nothing, and so I was faced with the
choice of laminating plastic card, then carving and sanding, or of moulding
something from modelling clay. I chose the latter, some DAS from my local
artists' store, because I had never tried it before. Once I had
 rolled
out a sausage of the stuff, and put it on a piece of greaseproof paper, and
rolled it some more to a cone shape, it set hard overnight. The larger end was
measured to plug into the rear of the fuel tank, leaving a step for the rockets.
rolled
out a sausage of the stuff, and put it on a piece of greaseproof paper, and
rolled it some more to a cone shape, it set hard overnight. The larger end was
measured to plug into the rear of the fuel tank, leaving a step for the rockets.
Alas, I have no vacuum moulding machine, and
the best advice I can give anyone trying this is to use one of those, or else go
for laminated plastic sheet. The clay is all very well, but even after repeated
coats of Klear, it never reached a point where it would accept paint easily,
without it flaking off during handling. Nor can you easily attach the plastic
card tailplane. Stay with plastic. That is why our hobby is called plastic
modelling. Not plastic with a bit of clay thrown in modelling.
The wings came from the spares box, which is
now so full that I am afraid I have no idea of which kit they came from. They
were about the right size and length and only needed some careful trimming and
sanding down here and there. It saves having to scratch build them, and you get
the bonus of some ribs.
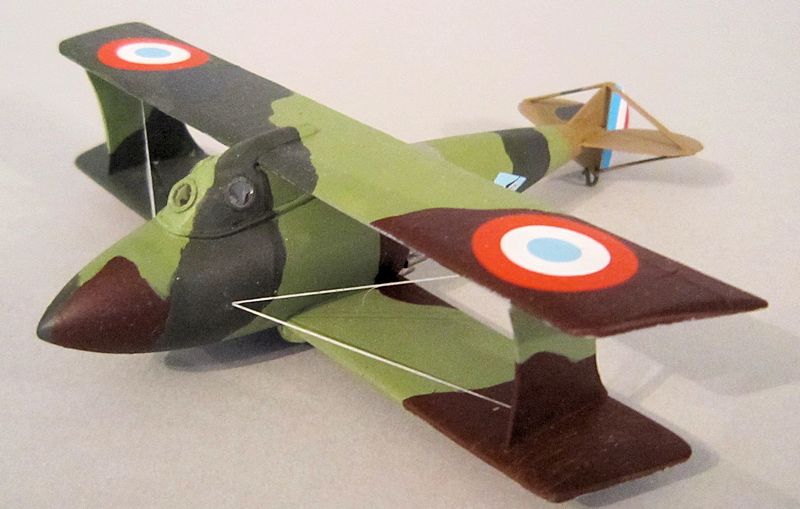
The cockpit looks like something from Jules
Verne's 20,000 Leagues under the Sea. I can only assume that the diver's helmet
look to it was designed with some form of early pressurisation in mind, though I
can't imagine how it might have worked. I made the lower half from an old
under-fuselage slipper fuel tank from a Polish PWS-26, which I will tell you
about some other time. It was about the right shape, although once I had
finished with the many layers of filler and sanding, I might just as well have
scratch built it with card.
It sits o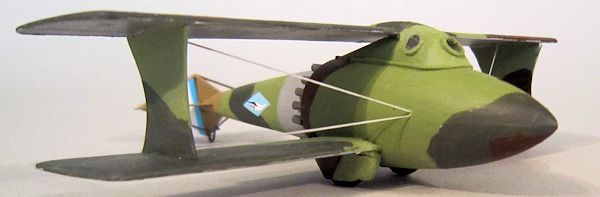 n
what looks like some sort of rubber sealing tube, rather like the padding around
WWI open cockpits. which I replicated from plastic rod.
n
what looks like some sort of rubber sealing tube, rather like the padding around
WWI open cockpits. which I replicated from plastic rod.
The upper wing is attached to the flattened
roof of the cockpit fairing, and then another narrower fairing placed on top,
made from half a small bomb from somewhere.
I tried to punch the portholes from plastic
card, but didn't have a punch of small enough diameter, so settled for hand
carving with a sharp scalpel. The deep cut to my left forefinger is still
healing and makes me wince as I type this.
Once the upper wing has dried, the lower wings
can be offered up, glued in place and a couple of the faired struts made from
card and slid into place. You now have quite a sturdy set-up for the front half.
And I am amazed that more designers didn't follow this kind of layout for other
WWI fighters. It seems stronger and more streamlined than most, though I would
guess would have quite weight penalty.
 I have no
idea about rocket technology in those days. The artist's impression on the
website has a nice piece of artwork depicting it going upstairs like a bat out
of hell, with three rockets on each side lit up. My guess is that this would not
be nearly enough to get it skywards, and anyway, you wouldn't want to risk one
of them not firing up, and the consequent Catherine Wheel effect. Consequently I
decided on a battery of rocket tubes, which would at least have lessened the
effects of any one rocket failure.
I have no
idea about rocket technology in those days. The artist's impression on the
website has a nice piece of artwork depicting it going upstairs like a bat out
of hell, with three rockets on each side lit up. My guess is that this would not
be nearly enough to get it skywards, and anyway, you wouldn't want to risk one
of them not firing up, and the consequent Catherine Wheel effect. Consequently I
decided on a battery of rocket tubes, which would at least have lessened the
effects of any one rocket failure.
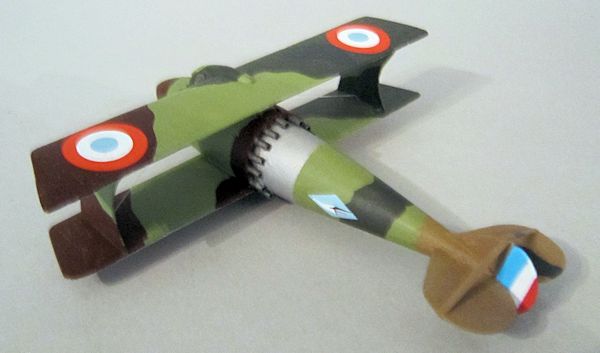
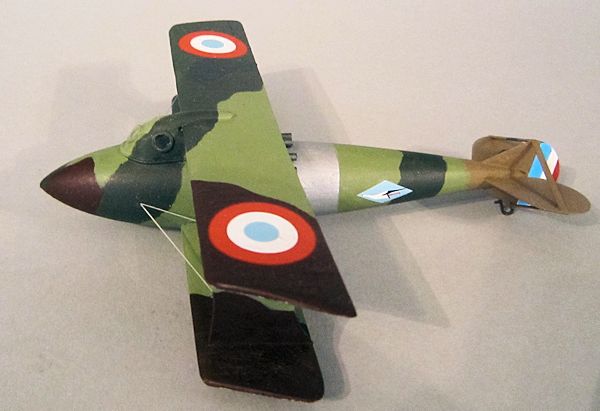
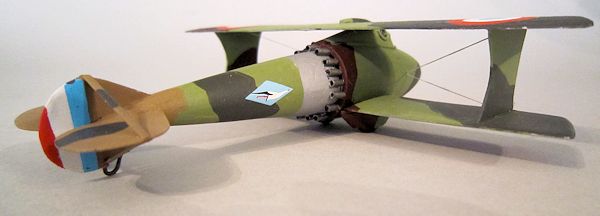
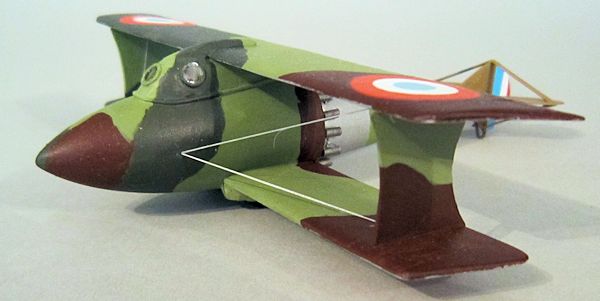
After I had plugged in my clay rear fuselage,
with a band carefully painted in flat silver as a blast area, I cut about 20
short lengths of hollow plastic tube, and attached them around the step in the
fuselage join. Each was painted gunmetal. It doesn't agree with the website's
artwork, but I can find no other reference to suggest that I have got it
hopelessly wrong. The scale plans offer no clue.
I found one spare wheel and cut it in half, as
the undercarriage was buried inside the fuselage, and then faired the two wheel
halves in with spats, which I made from several laminations of plastic card,
glued around the wheel, and carved to shape. They can be attached at the lower
wing root, and faired in with a little filler.
| COLORS & MARKINGS |
 me too
much of RAF machine of WWII. It never looks quite happy to my eye on a WWI
machine.
me too
much of RAF machine of WWII. It never looks quite happy to my eye on a WWI
machine.
So I settled on a five colour scheme I had used for a later 1/48 Morane-Saulnier A-1 from Special Hobby. The colours were Italian Mimetic Green 2 and Italian Dark Olive 2, both from the Lifecolor range, Chocolate Brown from Vallejo, Sand from any range at all, and finally a couple of areas in black. Black is a colour I never use in camouflage because I is too stark, and leaves you with no place to go. I prefer to use a very dark grey, in this case German Black Grey from Vallejo. NATO black from Tamiya or Extra Dark Sea Grey can work just as well.
| FINAL CONSTRUCTION |
Once all that was done, the tailplanes were
stuck in place using superglue and it only took an evening of cursing my choice
of clay to get it done. The tail struts were made from plastic aerofoil rod. And
the skid from a length of wide diameter electric copper cable bent to shape with
needle nosed pliers.
 A quick
coat of clear, and I applied the decals from the spares box, including a nifty
little stork in a blue diamond for the fuselage. The French always did have the
most beautiful artwork on the sides of their aircraft. That Morane-Saulnier I
mentioned has a yellow square with a pair of blue swallows on it, and they were
the main reason I built it as they look just gorgeous.
A quick
coat of clear, and I applied the decals from the spares box, including a nifty
little stork in a blue diamond for the fuselage. The French always did have the
most beautiful artwork on the sides of their aircraft. That Morane-Saulnier I
mentioned has a yellow square with a pair of blue swallows on it, and they were
the main reason I built it as they look just gorgeous.
A coat of flat varnish before the two final
steps. The portholes were glazed using some clear adhesive tape (Sellotape),
careful cut around with a new blade and which then pulled some of the paint off.
Nothing that couldn't be touched up however. And finally the two rigging wires
each side, made from elastic mending thread, coloured silver with a gel pen and
attached with small drops of superglue applied with a toothpick.
| CONCLUSIONS |
Aside from that 1/48 machine on the French
website, I would like to bet there aren't many others out there.
| REFERENCES |
And my thanks to JC Carbonel, whose excellent
website it is , and which provided me with the inspiration.
http://www.theaerodrome.com/forum/aircraft/57365-riffard-rm-1-rdp-rocket-biplane.html
Chris Peachment
November 2013
Copyright ModelingMadness.com. All rights reserved. No reproduction in any form without express permission from the editor. If you would like your product reviewed fairly and fairly quickly, please
contact
the editor or see other details in the
Note to
Contributors.