1/72 Re.7
| KIT #: | 0 |
| PRICE: | $ |
| DECALS: | See Review |
| REVIEWER: | Carmel J Attard |
| NOTES: | Scratch-built |
| HISTORY |
Reconnaissance bomber of WWI The RE-7
 Aircraft on both
sides of the First World War were sent over enemy lines during the first
few months of the war to report the progress of troop movements or the
position and accuracy of their own sides’ artillery fire. The majority of
these aircraft were unarmed and an early attempt to arm these aircraft
against enemy offensive fighters was to arm the observer who is normally
sitting in the front cockpit. This began by taking with them service
revolvers, carbines or rifles and other weapons in the event they encounter
enemy machines when out on patrols. This situation also created the need to
evolve faster, more manoeuvrable and better-armed observation type of
aircraft that could defend themselves adequately against attack from enemy
fighters or other two seat aircraft.
Aircraft on both
sides of the First World War were sent over enemy lines during the first
few months of the war to report the progress of troop movements or the
position and accuracy of their own sides’ artillery fire. The majority of
these aircraft were unarmed and an early attempt to arm these aircraft
against enemy offensive fighters was to arm the observer who is normally
sitting in the front cockpit. This began by taking with them service
revolvers, carbines or rifles and other weapons in the event they encounter
enemy machines when out on patrols. This situation also created the need to
evolve faster, more manoeuvrable and better-armed observation type of
aircraft that could defend themselves adequately against attack from enemy
fighters or other two seat aircraft.
The lumbering RE-7 was a case in point where on those early days the observer used to sit in the front cockpit where he conducted his duties plus the eventuality of defending the aircraft as best he could against faster enemy fighters while the pilot in the back seat manoeuvres and work out his route the best he could. Considering the daring act at those early days of flying, the RE-7 must have played an important part in the early development of reconnaissance and bombing sorties before better aircraft started to appear.
One can imagine the conditions sitting in the front seat in place of the observer, with the engine block in front and struts and bracing wire on either sides or the pilot sitting in his separate cockpit behind him. In case of an attack the observer, holding a hand held gun had his position in the cockpit severely limited for defensive purposes and it was a little wonder if this RE-7 were knocked out of the sky. Notwithstanding the fact that the observer had to fly in an unheated flying suit, inside an open cockpit and the intense cold at high altitude besides other uncomfortable situations such as jammed guns, engine trouble of some sort, damp cockpit and other unimagined flying conditions. Despite these difficulties and other odd situations several successes were achieved.
Initial orders for the RE-7 were placed for a total of 500 aircraft. The early type was fitted with the 120 HP or 160 HP Beamore engines but as soon as supplies of 150 HP RAF 4A engines became available, this was adopted as the standard power plant. Deliveries began in 1925 and the first unit equipped with the type was No21 Sq. RFC.
 These went for
operations in France in January 1916. A few were also known to have flown
with No 12 Sq and at least one, which was a three seater, was on strength
of No 20 Sq.
These went for
operations in France in January 1916. A few were also known to have flown
with No 12 Sq and at least one, which was a three seater, was on strength
of No 20 Sq.
The RE-7 was employed for bombing missions early summer of 1916 but by August 1916 their replacement by BE-12 had already begun. The front seat observer cockpit was armed with a single Lewis machine gun. The maximum speed of the aircraft was 84.9 mph. operational ceiling was 6,500 feet and a maximum endurance was 6 hours. Following withdrawal from front line duties, the aircraft was employed at training establishments until 1918. Others were used in operational installations of the 190 HP Falcons 1, 200 HP RAF3A and 225 HP Sunbeam engines. Seven RE-7s were allocated to the RNAS.
One starts to wonder how kit manufacturers have forgotten such an important, early multi role aircraft. This was another important aircraft to add to my collection and at the same time fills a gap of RFC aircraft and early history of aviation.
Scratch building the RE-7
| THE MODEL |
Building a scale
model from scratch possesses a fascination that surpasses all other aspects
of scale modelling forms such as super detailing a kit or heavy conversion
projects, etc. Apart from the element of making the model one can also
make use of the wide range of modelling multi media that are now adays
available on the market. These take the form of struts, metal propellers,
wheels, wing parts and so on. In general, no matter what the subject may
be, the representation of it in all its details in scale form will never
fail to attract its host of admirers. Scratch building a complete kit is
very time consuming 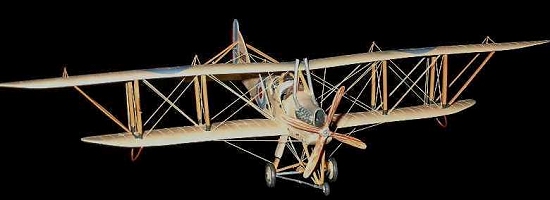 and in the end it is very rewarding as you have
satisfied in making a subject that you liked and that kit manufacturers
never seemed to think of releasing. Besides, I have never experienced so
much a deep feeling of satisfaction from making one of these models,
particularly so if it happens to be a biplane complete with all the glory
of rigging, a simple cockpit, etc, etc.
and in the end it is very rewarding as you have
satisfied in making a subject that you liked and that kit manufacturers
never seemed to think of releasing. Besides, I have never experienced so
much a deep feeling of satisfaction from making one of these models,
particularly so if it happens to be a biplane complete with all the glory
of rigging, a simple cockpit, etc, etc.
The choice of subject obviously has to be a representation of an aircraft that will attract you for its design, service history, interesting markings etc., which above all has never before been produced in kit form. Such a careful choice of subject gives a deep urge to go on with the progressive stages of building the model. It is an absorbing and a rather much longer process than making say a kit conversion. It will not be a surprise if during that same period you would be tempted to build a straight from the box kit in order to deviate for a while from the length of time that this will involve
Nowadays we read
of many kits being released on the market, which have never appeared in kit
form before, but still one may notice that there is still a certain amount
of neglect on subjects concerning early biplanes. Raising the issue of
British and Imperial German biplanes of WWI alone will be enough to place
you in an era where the choice of subjects that one can select from is
still wide and ranging. Having decided on the subject, there is a sequence
of different stages that has to be followed for building the scale model.
The most importa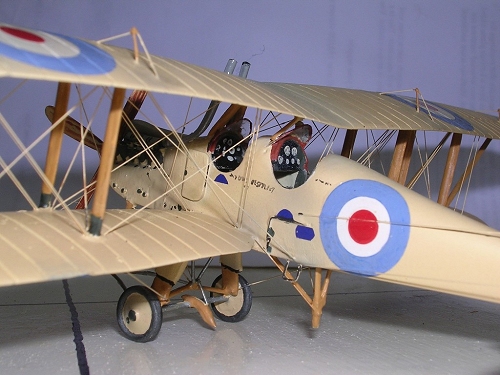 nt stage is to possess the aptitude to make a deep research
on the type of aircraft that you have selected and to produce accurate
scale plans to the scale that you work to. In my case the choice of
aircraft type fell on the RE-7, which is a two-seat reconnaissance bomber
of WWI. For the purpose of finding enough information and details for my
model, I had to make reference to no less than five different sources.
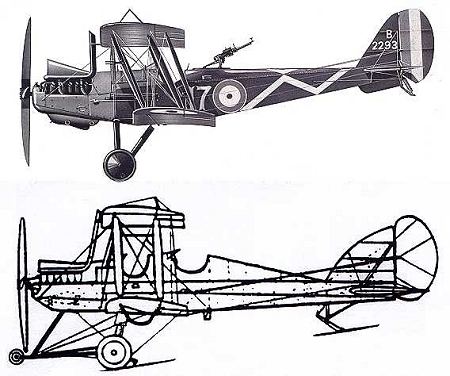
These were: Reference to an article that was published in a long past issue
of “Air Pictorial” by JM.Bruce under the heading of “Aircraft of the
1914-1918 war”. This contained reasonable scale plans that I could start
on, and update and enlarge to a scale of 1/72. Reference was also made to
“Cross and Cockade” issue Vol.15, No1. In it I found two highly detailed
photos of the aircraft that I was to make a model of. Reference was also
made to British Military Aircraft Serials of 1912-1963 by Bruce Robertson
and to the Pocket Encyclopaedia of Bombers 1914-1919 by Kenneth Musson.
Finally, reference was made to British Aeroplanes 1914-1918 (Putnam) by JM
Bruce, P422. All these references were essential in order to provide
accurate history, detailed photos and good scale plans that I could work
on.
nt stage is to possess the aptitude to make a deep research
on the type of aircraft that you have selected and to produce accurate
scale plans to the scale that you work to. In my case the choice of
aircraft type fell on the RE-7, which is a two-seat reconnaissance bomber
of WWI. For the purpose of finding enough information and details for my
model, I had to make reference to no less than five different sources.
These were: Reference to an article that was published in a long past issue
of “Air Pictorial” by JM.Bruce under the heading of “Aircraft of the
1914-1918 war”. This contained reasonable scale plans that I could start
on, and update and enlarge to a scale of 1/72. Reference was also made to
“Cross and Cockade” issue Vol.15, No1. In it I found two highly detailed
photos of the aircraft that I was to make a model of. Reference was also
made to British Military Aircraft Serials of 1912-1963 by Bruce Robertson
and to the Pocket Encyclopaedia of Bombers 1914-1919 by Kenneth Musson.
Finally, reference was made to British Aeroplanes 1914-1918 (Putnam) by JM
Bruce, P422. All these references were essential in order to provide
accurate history, detailed photos and good scale plans that I could work
on.
The next stage was to study details of the aircraft and made notes on and also adjustments as there was need for a slight alteration to the scale plans to alter such as the wheel struts, which were slightly different to the type I had in mind to do.
| CONSTRUCTION |
 Working
the main components like the fuselage and wings from soft wood such as
balsa or better still yellow pine that I am more familiar with was one way
of tackling this. However a close study will reveal that with regards to
the fuselage, this had a close resemblance to the RE-8. So by modifying the
fuselage at various places, which I could tell by first comparing, the side
views of the respective fuselages, then I could tell where these differed.
This meant that I could work out the fuselage of the RE-7 by utilising and
modifying the (Airfix) RE-8 one. This of course meant also cutting the
fuselage at various parts and modifying them to suit drawing and building
up using plastic card, wood and putty at the rear fuselage area. This
involved also a lot of rubbing down, building up over again, intervals to
allow drying, and smoothening down the sanding sealer at a number of areas
in order to obtain the desired smooth finish. The two-crew compartments
were then trimmed to final shape and internal details as seats, instrument
panels, seat belts, side levers foot pedals, and two clear acetate semi
circular windscreens were added at this stage.
Working
the main components like the fuselage and wings from soft wood such as
balsa or better still yellow pine that I am more familiar with was one way
of tackling this. However a close study will reveal that with regards to
the fuselage, this had a close resemblance to the RE-8. So by modifying the
fuselage at various places, which I could tell by first comparing, the side
views of the respective fuselages, then I could tell where these differed.
This meant that I could work out the fuselage of the RE-7 by utilising and
modifying the (Airfix) RE-8 one. This of course meant also cutting the
fuselage at various parts and modifying them to suit drawing and building
up using plastic card, wood and putty at the rear fuselage area. This
involved also a lot of rubbing down, building up over again, intervals to
allow drying, and smoothening down the sanding sealer at a number of areas
in order to obtain the desired smooth finish. The two-crew compartments
were then trimmed to final shape and internal details as seats, instrument
panels, seat belts, side levers foot pedals, and two clear acetate semi
circular windscreens were added at this stage.
 Building the
RAF4A engine to the front fuselage area also required some thought. This
was fashioned out of plastic sprue of the right thickness so that 12
cylinders, 6 on each side were cut to the required length, filed taper at
one end and glued in place. Other details to the engine such as exhaust
manifold etc were added at a later stage after the main planes were put in
place. Using the scale planes I have produced I then fashioned out the tail
fin and rudder using plastic card. These had rib positioned scribed out as
required.
Building the
RAF4A engine to the front fuselage area also required some thought. This
was fashioned out of plastic sprue of the right thickness so that 12
cylinders, 6 on each side were cut to the required length, filed taper at
one end and glued in place. Other details to the engine such as exhaust
manifold etc were added at a later stage after the main planes were put in
place. Using the scale planes I have produced I then fashioned out the tail
fin and rudder using plastic card. These had rib positioned scribed out as
required.
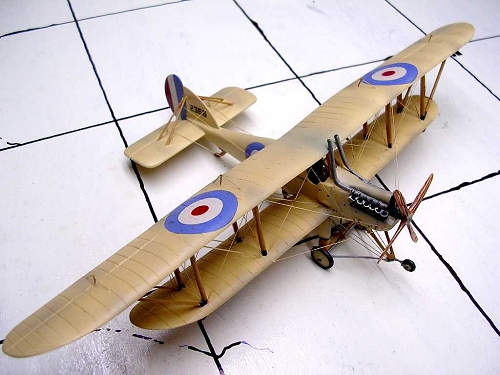
The next step was to make the main planes and tail planes. I have decided to produce the large wingspan from the blank wing parts that comes with sets from vac form “Roseplane Wings, and are made to a scale of 1/72. Incidentally, these wing sets come into a pack consisting of ten wings that have different wing chord but of identical length. These are available at: Rosemont Hobby shop, P.O.Box 33, Trexler Mall, Trexler Lown. PA 18087, USA. In order to obtain the large upper wingspan I had to join two of these wings together and work them out to the correct span. A lower wing and tail planes were also made out of these. Both main planes were sanded lightly at the leading edge and the trailing edge was thinned down to the correct thickness. Accurate marks were scribed chord wise to indicate rib marks. One may opt to apply thin strips of stretch sprue in these grooves. Control surfaces were finally accurately scribed.
Two different
types of wing struts were used. These came from Contrail set and were very
carefully marked for their length using scale plans for reference. The
position and height of the centre struts were then cut to size and fixed in
place. Mock 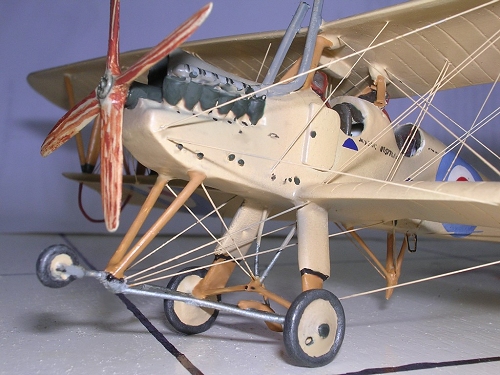 assembly of wings was carried out to check for truth and
correct position of the wings in relation to the fuselage. Needless to
emphasise on how important this stage is, as it will have in the end a
bearing on the overall appearance of the kit. The top wing was then removed
and the lower port and starboard wings were fixed in place. When this has
set strongly, all the remaining struts were fixed in their correct spot.
The position of the struts was checked for the correct stagger and the
upper wing was cemented on top of all the struts, ensuring that the correct
dihedral is maintained while this was in process of drying.
assembly of wings was carried out to check for truth and
correct position of the wings in relation to the fuselage. Needless to
emphasise on how important this stage is, as it will have in the end a
bearing on the overall appearance of the kit. The top wing was then removed
and the lower port and starboard wings were fixed in place. When this has
set strongly, all the remaining struts were fixed in their correct spot.
The position of the struts was checked for the correct stagger and the
upper wing was cemented on top of all the struts, ensuring that the correct
dihedral is maintained while this was in process of drying.
No model biplane looks as realistic as when the full array of bracing wire or rigging is added to it. I have tried several methods of applying rigging to biplanes before, in the end I found that the best method was the one using ‘invisible’ thread. The method that I used is illustrated in the attached sequence of drawing. Perhaps it is a long and tedious process but in the end it pays because it is not a messy method and produces a strong model with symmetrical rigging on both sides of the wings. In brief this consists of drilling premarked holes in the main planes using a 0.4mm diameter pin drill. These holes are countersunk. Thread is then passed through. I found that since the nylon thread is colourless and is almost invisible it is best to mark the end with a permanent black gem marker for obvious reason.
| COLORS & MARKINGS |
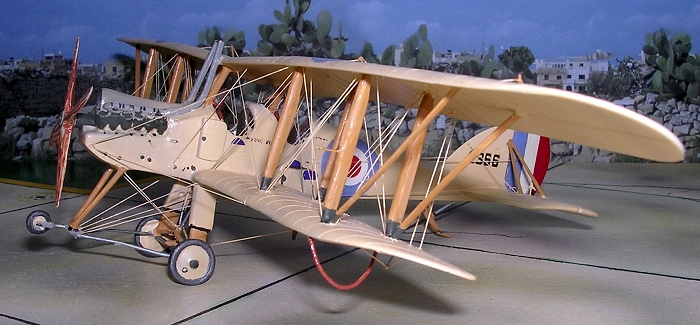
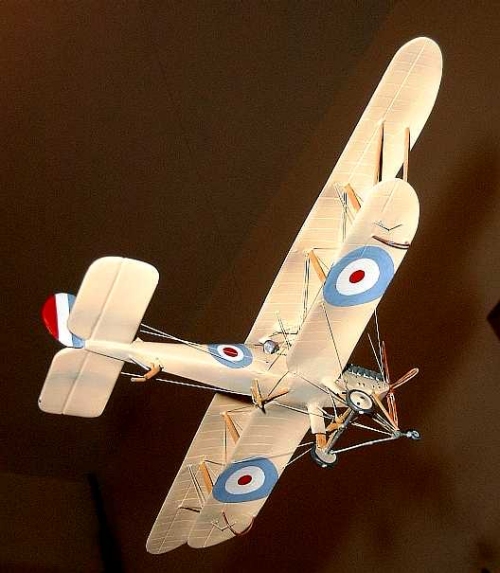
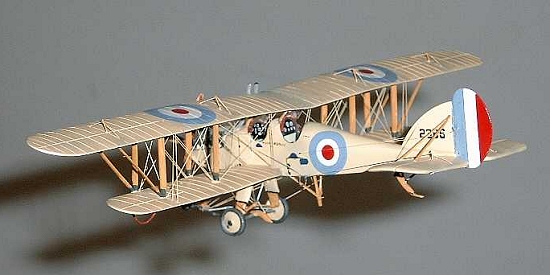
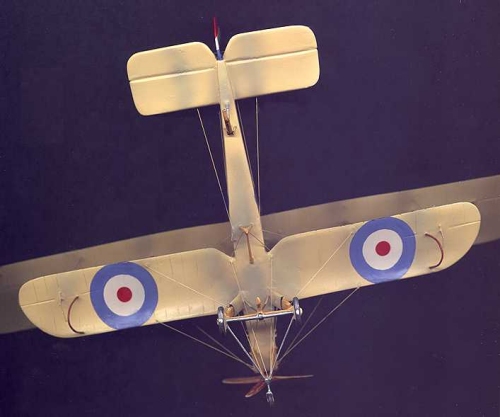 Tail planes and
tail unit was also fixed in place and struts and bracing wire added
accordingly. The tailskid was added as well as the wheel assembly, which
was made out of thicker struts and stretch sprue and wheels from my spares
box. The completed model was given a coat of semi matt white before it
received the final coat of varnished linen overall. Engine area was
airbrushed to give the effect of oil spill and engine exhaust/stain
accumulation effect. A suitable propeller was fixed to the RAF4A engine,
which came from an Aeroclub of Nottingham, UK, selection. I have sorted out
a set of roundel decals, which had light blue outer rim, suited for the era
of the RE-7 operation. This came from a set from Blue Rider range of
decals, while a four digit serial number came from Model Decal set. The
completed model then found a permanent place in the showcase where it
belongs to i.e., next to the RE-5 that I made some time earlier.
Tail planes and
tail unit was also fixed in place and struts and bracing wire added
accordingly. The tailskid was added as well as the wheel assembly, which
was made out of thicker struts and stretch sprue and wheels from my spares
box. The completed model was given a coat of semi matt white before it
received the final coat of varnished linen overall. Engine area was
airbrushed to give the effect of oil spill and engine exhaust/stain
accumulation effect. A suitable propeller was fixed to the RAF4A engine,
which came from an Aeroclub of Nottingham, UK, selection. I have sorted out
a set of roundel decals, which had light blue outer rim, suited for the era
of the RE-7 operation. This came from a set from Blue Rider range of
decals, while a four digit serial number came from Model Decal set. The
completed model then found a permanent place in the showcase where it
belongs to i.e., next to the RE-5 that I made some time earlier.
March 2005
Copyright ModelingMadness.com. All rights reserved. No reproduction in part or in whole without express permission from the editor.
IIf you would like your product reviewed fairly and fairly quickly, please contact the editor or see other details in the Note to Contributors.