Hi-Tech 1/48 Sopwith Salamander TF.2
| KIT #: | HT 017 |
| PRICE: | $49.96 MSRP ($44.96 at Squadron) |
| DECALS: | One option |
| REVIEWER: | Kyle Bodily |
| NOTES: | Short run with resin and photo etch parts |
| HISTORY |
I can’t think of much more to say about this aircraft except that only two were in service as of the end of the October reporting period in 1918. All of the other completed airframes were still going through the acceptance process. There is no doubt that if the war had gone on, this aircraft would have made a mark on the German Infantryman’s psyche just as the German J series aircraft did to the allies.
For more information on this kit, see the in box review.
| THE KIT |
 You will find the
instructions are hard to read. Their grammar is worse than mine. It is as
if they just word for word translate from the original French. They also
put a curious rivet detail on all the ribs of the wings and tail surfaces,
but this is only on the top. I can’t find any evidence of this on the
photos that I’ve been able to find of this aircraft. I assume that this is
an attempt to replicate the stitching that is sometimes seen through the
pinking strips “rib tapes”. The wings on my kit were very bowed and needed
to be straightened. The kit also contains parts to make a Sopwith Snipe
since the Salamander was an outgrowth of the Snipe. This is a good idea as
it allows the manufacturer to build two kits at a lower cost. Lastly the
plastic parts have a good deal of flash but this cleans up easy enough.
You will find the
instructions are hard to read. Their grammar is worse than mine. It is as
if they just word for word translate from the original French. They also
put a curious rivet detail on all the ribs of the wings and tail surfaces,
but this is only on the top. I can’t find any evidence of this on the
photos that I’ve been able to find of this aircraft. I assume that this is
an attempt to replicate the stitching that is sometimes seen through the
pinking strips “rib tapes”. The wings on my kit were very bowed and needed
to be straightened. The kit also contains parts to make a Sopwith Snipe
since the Salamander was an outgrowth of the Snipe. This is a good idea as
it allows the manufacturer to build two kits at a lower cost. Lastly the
plastic parts have a good deal of flash but this cleans up easy enough.
You will need some references for things like exact positioning of parts and rigging. The kit contains the parts necessary to build all the variants that I know of, from the first prototype to a production aircraft. There were many variants of the Salamander, so look at your references and study the particular aircraft you want to build.
| CONSTRUCTION |
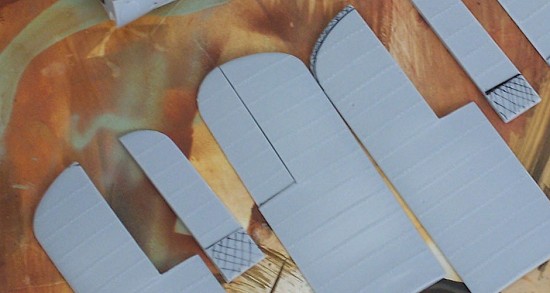
 I removed all the plastic parts from the
sprues and cleaned them up. The flash came off well and the parts look
nice. However I’ve noticed that the wings are not going to be of equal
span. I think that the top wing will be to short but am not quite sure at
this point. Also my research shows that Salamanders had three different
types of tails. A small one that was like the early snipes, (this seems to
only have been used on the prototype Salamanders) an intermediate tail that
looked like a cross between the early and the late tails and then the late
tail. The late tail was the largest rudder and vertical stabilizer, while
the early tail had the smallest rudder and vertical stabilizer. The kit
does not come with the early tail, so I’ll have to reshape the intermediate
tail that is included in the kit. I don’t see this kit as a stormy build
yet but I am starting to smell rain.
I removed all the plastic parts from the
sprues and cleaned them up. The flash came off well and the parts look
nice. However I’ve noticed that the wings are not going to be of equal
span. I think that the top wing will be to short but am not quite sure at
this point. Also my research shows that Salamanders had three different
types of tails. A small one that was like the early snipes, (this seems to
only have been used on the prototype Salamanders) an intermediate tail that
looked like a cross between the early and the late tails and then the late
tail. The late tail was the largest rudder and vertical stabilizer, while
the early tail had the smallest rudder and vertical stabilizer. The kit
does not come with the early tail, so I’ll have to reshape the intermediate
tail that is included in the kit. I don’t see this kit as a stormy build
yet but I am starting to smell rain.
I started by gluing the fuselage halves together and then glued on the firewall. I figure that I can assemble the cockpit and slip it in from the top this way. Since the instructions don’t give basic assembly suggestions as to the best way to assemble your model, you are just left to figure it out the best you can. Since the kit was originally designed as a Snipe, I have had to reshape the fire wall and rear bulkhead in the kit. This took some time since you have to build a component and let your work dry before you go on to prevent your work from mis-aligning before it dries.
 I had to shorten the bottom wings by
about 3mm on each wing panel and had to shorten the ailerons. The
prototype I’m building had short span ailerons. The top wing came in three
pieces and took a little work to get everything squared up. The bottom
wings were just butted up against the fuselage and the dihedral set. One
thing that I did here was to build the kit on a set of drawings in scale to
help get everything set up. Because as you will see, not all the parts fit
like a glove and building on the drawings help to compensate for this.
I had to shorten the bottom wings by
about 3mm on each wing panel and had to shorten the ailerons. The
prototype I’m building had short span ailerons. The top wing came in three
pieces and took a little work to get everything squared up. The bottom
wings were just butted up against the fuselage and the dihedral set. One
thing that I did here was to build the kit on a set of drawings in scale to
help get everything set up. Because as you will see, not all the parts fit
like a glove and building on the drawings help to compensate for this.
 I needed to use some filler putty to
fix some of the fit problems in the fuselage. Basically all the joints
including the cowling on the fuselage needed putty. The cooling cut out on
the underside of the cowling and the under side of the forward fuselage is
that of a prototype and incorrect for a production aircraft. All in all
you will need some good references to build any aircraft at all. This kit
requires you to do a lot of research and to add to that, I found it very
hard to get good references. There just aren’t any references that
specialize in the Sopwith TF2 Salamander.
I needed to use some filler putty to
fix some of the fit problems in the fuselage. Basically all the joints
including the cowling on the fuselage needed putty. The cooling cut out on
the underside of the cowling and the under side of the forward fuselage is
that of a prototype and incorrect for a production aircraft. All in all
you will need some good references to build any aircraft at all. This kit
requires you to do a lot of research and to add to that, I found it very
hard to get good references. There just aren’t any references that
specialize in the Sopwith TF2 Salamander.
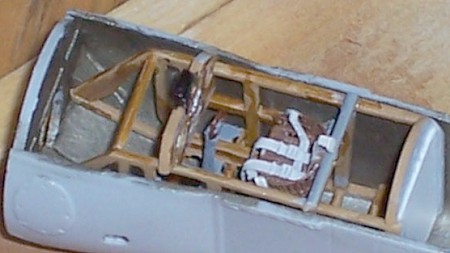
I’ve had to modify every part to one degree or another, but that is a hallmark of limited run kits. Another thing to keep in mind is that you will have to build several parts from scratch, including many of the cockpit details and the tail skid.
I think that you should only use the color guide in the instructions as a suggestion since it tells you to paint the sides of the fuselage clear doped linen. The cockpit was a 650 pound all metal tub similar to the German Junkers J.I, not fabric.
| COLORS & MARKINGS |
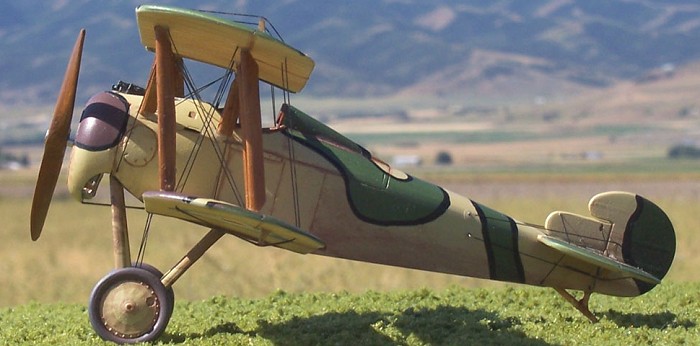
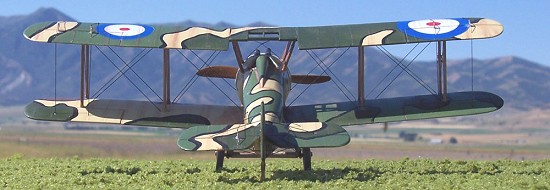
The kit gives you only one decal option. It is of a prototype aircraft. I am told prototype #3. This was the first of the prototype aircraft to have redundant or duel control horns for the ailerons, to increase survivability and harden the aircraft against ground fire. However I have seen some post war aircraft that had only one set of control horns, so check your references. The photographs also show that it had the short, non-horn-balanced ailerons like early Snipes. Further the tail looks to be braced by wire instead of the metal tubing as on later models. The rudder also looks to be the early type.
 I have seen many
different interpretations of this prototype aircraft’s camouflage. As I
study the only picture that I have been able to find of this aircraft, I
see shades that look to me like French five-color camouflage shades. So
that is what I am going to do. Paint it Beige, Light Green, Dark Green,
Chestnut and
I have seen many
different interpretations of this prototype aircraft’s camouflage. As I
study the only picture that I have been able to find of this aircraft, I
see shades that look to me like French five-color camouflage shades. So
that is what I am going to do. Paint it Beige, Light Green, Dark Green,
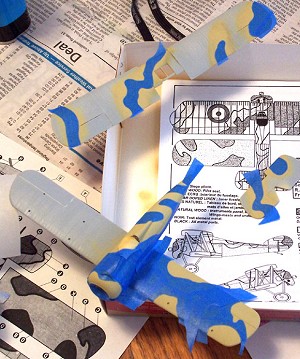
Chestnut and 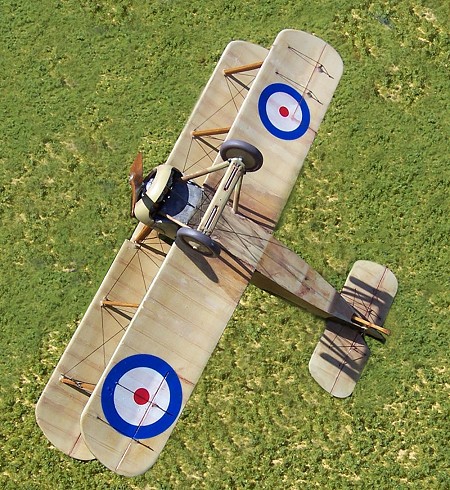 Black. This could be wrong but I can find nothing official
that states the true colors. This is where you have to sometimes take your
best guess. I painted a base of beige and then masked it off. I applied
the rest of the colors and masked as I went. I like to use the low tack
type tape by Scotch. Low-Medium adhesive #2080 for delicate surfaces to be
exact. I have found that this is the best brand for me. It adheres well
to complex surfaces and won’t lift the base paint. I’ve tried other less
expensive brands but have not been happy with them, I guess you get what
you pay for. Any way, I put the tape on parchment paper then draw out the
pattern and cut it out with scissors. The parchment paper will not stick
the tape so you can just pull it off and apply the tape to the model. I
finished this paint job with a border of black where the different colors
came together. The struts are painted by first applying a coat of paint, I
used Model Masters wood. You can get lots of different wood hues just from
the shade of your base paint, and I like to use oil paints to make wood
grains. I just apply a few splotches on the part and drag a Boars hair
brush across it. The stiff bristles will cause a wood grain to appear.
The only draw back is that you can’t touch it after it until it has dried
thoroughly. That takes about two to three days.
Black. This could be wrong but I can find nothing official
that states the true colors. This is where you have to sometimes take your
best guess. I painted a base of beige and then masked it off. I applied
the rest of the colors and masked as I went. I like to use the low tack
type tape by Scotch. Low-Medium adhesive #2080 for delicate surfaces to be
exact. I have found that this is the best brand for me. It adheres well
to complex surfaces and won’t lift the base paint. I’ve tried other less
expensive brands but have not been happy with them, I guess you get what
you pay for. Any way, I put the tape on parchment paper then draw out the
pattern and cut it out with scissors. The parchment paper will not stick
the tape so you can just pull it off and apply the tape to the model. I
finished this paint job with a border of black where the different colors
came together. The struts are painted by first applying a coat of paint, I
used Model Masters wood. You can get lots of different wood hues just from
the shade of your base paint, and I like to use oil paints to make wood
grains. I just apply a few splotches on the part and drag a Boars hair
brush across it. The stiff bristles will cause a wood grain to appear.
The only draw back is that you can’t touch it after it until it has dried
thoroughly. That takes about two to three days.
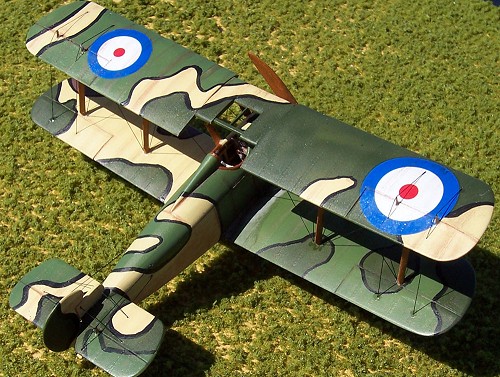
I applied all four decals and did a little weathering. I like to weather with alcohol based paints. This prevents the weathering paints from interact with the paint job. A little oil paint also does well here. You can dry brush and wash with them to get very different looks.
Lastly before final assembly I drilled all the little holes that I will need to rig. Rigging was done with 2lbs fishing line. This is fine and imparts a lot of strength to the kit.
I find that there is a universal thread in building limited run kits. They start out fun and as you build it gets progressively harder and not so fun. There seems to be a hump point were things start to get easy and more fun again. Usually by the end of the build you look back and see just how far you’ve come and you start to really like the kit. Oddly the more difficult a kit is, the more rewarding it is also. So many people get to a difficult process and they quit. The kit gets put on the back shelf to slowly get destroyed by neglect. I am always amazed by what I can accomplish when I continue to wade into the build and not give up. Some times I feel that the model is starting to look like a soup sandwich. But if I keep with it I always seem to pull it out in the end. Bottom line, nothing is more rewarding in the realm of model building then turning a difficult build in to something that you are proud of.
| CONCLUSIONS |
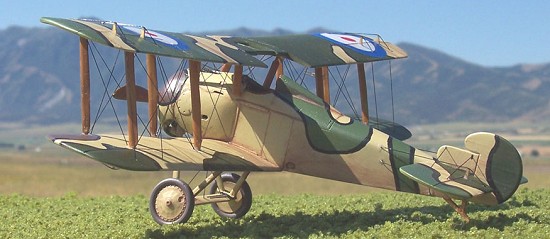
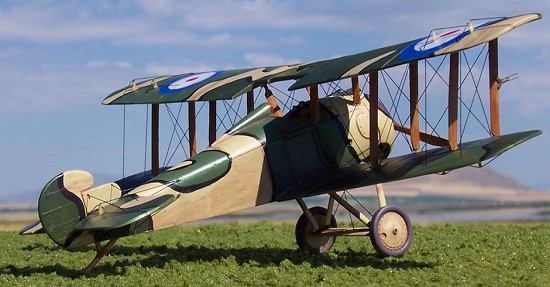
 Well, this was not
an easy build but I am very happy with the completed model. It is for the
advanced modeler or the modeler who really wants to stretch his/her
skills. If you want to build this kit, wade into it with your eyes open
and I think it will be rewarding for you. It was rewarding for me.
Well, this was not
an easy build but I am very happy with the completed model. It is for the
advanced modeler or the modeler who really wants to stretch his/her
skills. If you want to build this kit, wade into it with your eyes open
and I think it will be rewarding for you. It was rewarding for me.
Manufacturers of limited run kits need to put more thought into the kit’s instructions. I can’t emphasize this enough. Good instructions are one of the most important items in a kit and should be well thought out. If for no other reason then to assist a modeler who wants to improve his/her skills and tackle something a little beyond their comfort zone. Limited run kits are difficult and I think that these companies do themselves and the modeler a disservice when they dismiss the less experienced or the more timid builders out of hand.
 This kit took me
more time to build then I had expected. This was mostly from trying to
think of different ways to get things to fit. This kit was designed as a
Snipe and it is very obvious that the TF2 Salamander was an after thought.
The Snipe would be easier to build if only just barely. I think that the
Blue Max Snipe would be easier and that if they wanted to use their Snipe
as a springboard to do a TF2 Salamander then Blue Max would have a better
kit.
This kit took me
more time to build then I had expected. This was mostly from trying to
think of different ways to get things to fit. This kit was designed as a
Snipe and it is very obvious that the TF2 Salamander was an after thought.
The Snipe would be easier to build if only just barely. I think that the
Blue Max Snipe would be easier and that if they wanted to use their Snipe
as a springboard to do a TF2 Salamander then Blue Max would have a better
kit.
That being said this is the only Salamander in 1/48th scale that I know of. Toko/Eastern Express and Pegasus all have made Salamander kits. Eastern Express is the only company with a kit in production and is a very nice kit. If you want to build a Salamander and 1/72nd scale is OK then I recommend the Eastern Express kit. If you are like me and are not afraid of the challenge or just plain crazy enough to try it. I’m not quite sure which of the above I am, probably the latter. And you’ve got to have a 1/48th scale Salamander, then I guess this is the Beach you’ll have to come ashore on.
A philosopher once made the statement that “Life without pain is meaningless”, so go build this kit and give your life some meaning!!!!!!!
| REFERENCES |
“Jane’s All the Worlds Aircraft 1919” (Jane’s Fighting Aircraft of World War I)
“Fighter Aircraft of the 1914-1918 War” Harleyford Publications limited Letchworth, Herts
“Sopwith Fighters in Action” Squadron/Signal Publications, By Peter Cooksley
Lots of Google searches on the Internet.
August 2005
Copyright ModelingMadness.com. All rights reserved. No reproduction in any form without express permission from the editor.
If you would like your product reviewed fairly and fairly quickly, please contact the editor or see other details in the Note to Contributors.