| KIT #: | 04570 |
| PRICE: | 17 Swiss Francs (about $11 US) |
| DECALS: | Two options |
| REVIEWER: | Pierre-Andre Boillat |
| NOTES: | Reboxed Monogram kit. Simple build if built OOB. |
| HISTORY |
After several reviews and pre-views skillfully written by my honorable colleagues, I think you won’t mind if I shorten the historical chapter of this review. For those who don’t want to start searching the site for accurate technical descriptions or striking combat stories, here’s the basic data :
 Based on the earlier S.E.5, the S.E.5a was produced by the Royal Aircraft
Factory as well as several other subcontracors, and entered service in
1917. Initially plagued by mechanical problems and a lack of power (due to
its original Hispano-Suiza engine), the S.E.5a was re-engined with a
Wolesley Viper, but also enhanced and modified throughout its career.
Eventually, the aircraft won its pilot’s affection and earned the
reputation of being Britain’s finest fighter of the Great War… although
some think differently (I myself am a supporter of the Sopwith Snipe – but
that’s a different story). Anyway : the S.E.5a was fast, manoeuvrable,
decently armed (for the time) and easy to fly. It became the mount of many
British and Commonwealth aces, and fought on every front of WWI, and
afterwards during the Russian revolution and the Polish independence war.
Based on the earlier S.E.5, the S.E.5a was produced by the Royal Aircraft
Factory as well as several other subcontracors, and entered service in
1917. Initially plagued by mechanical problems and a lack of power (due to
its original Hispano-Suiza engine), the S.E.5a was re-engined with a
Wolesley Viper, but also enhanced and modified throughout its career.
Eventually, the aircraft won its pilot’s affection and earned the
reputation of being Britain’s finest fighter of the Great War… although
some think differently (I myself am a supporter of the Sopwith Snipe – but
that’s a different story). Anyway : the S.E.5a was fast, manoeuvrable,
decently armed (for the time) and easy to fly. It became the mount of many
British and Commonwealth aces, and fought on every front of WWI, and
afterwards during the Russian revolution and the Polish independence war.
After Britain’s premier fighter was found obsolete, many S.E.5as were sold on the civilian market, some being modified for “skywriting” and enjoying a long career in this new kind of advertisement (it seems most surviving S.E.5as are former skywriters retrofitted to fighter status by the museums).
| THE KIT |
Like many other modellers, I enjoy collecting state-of-the-art kits as soon
as they get released, but when it comes to actually building something,
I’ll more than often grab some old “thingie” , spend hours trying to bring
it up to standards and spare my wonderkits for a later occasion (which
seldom occurs). True, the results are not as good, but it’s generally more
fun (and I 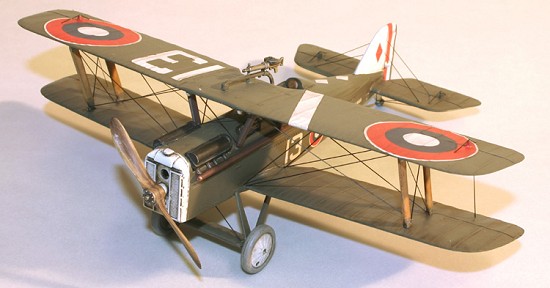 feel less nervous about goofing up anything). This is why, soon
after ordrering a Roden S.E.5a from an online shop, I all of a sudden
decided to build the Revell kit that had been waiting on my stash for a
year or two.
feel less nervous about goofing up anything). This is why, soon
after ordrering a Roden S.E.5a from an online shop, I all of a sudden
decided to build the Revell kit that had been waiting on my stash for a
year or two.
What do you get for half the price of the Roden kit ? Two small sprues (28 parts) of sand-coloured plastic packed in a bag and floating around in a pretty large, beautifully illustrated box, a well-designed plan (with two pages of miscellaneous safety warnings in all the EU’s languages), and – being the most interesting part, a superb decal sheet that almost justifies the kit’s purchase on its own. Two versions are provided : Eward “Mick” Mannock’s plane, and more originally, a machine of the 25th Aero Squadron, USAAC.
No clear parts are included (if you want a windshield, you’ll have to make it from scratch). A pilot figure of the “skinny, flat-chested humanoïd pointing out of the cockpit in a would-be heroïc pose”-type is included, but it went straight to the bin. The two MG’s are simplified, yet acceptable in my opinion.
| CONSTRUCTION |
Be aware that this is by no means a “Tamigawa” kit. It was conceived many years ago for young beginners who’d like to build a WWI biplane as easily as a 109 or Mustang, and play with it afterwards without the wings breaking apart at once. From this point of view, it is very good – I rarely saw such a strong and easy –to-assemble biplane layout. Nothing should go wrong… but you’ll have to hide all of this toylike sturdiness if you want it to look like an actual S.E.5a.
 This means of course that details were kept to a minimum. Yet, I wouldn’t
say it’s crude – in fact, it’s simplified. The fabric surfaces and
especially the radiator are quite excellent if you consider the mold’s age.
The wheels fabric covers’ structure is slightly overdone, but it’s not a
problem if you compare them with pictures of the actual aircraft.
This means of course that details were kept to a minimum. Yet, I wouldn’t
say it’s crude – in fact, it’s simplified. The fabric surfaces and
especially the radiator are quite excellent if you consider the mold’s age.
The wheels fabric covers’ structure is slightly overdone, but it’s not a
problem if you compare them with pictures of the actual aircraft.
A few bad surprises await you : First thing you’ll notice is that the interplane struts are strangely molded, with one side rounded and the other perfectly flat. Adding insult to injury, they are completely straight. I had to smile thinking of the recent AM Vindicator debate when I saw that this model is plagued with sink and ejector pin marks – even on the struts ! Quite a lot of flash is also to be noticed. Be ready for some filling, sanding and even filing if you want to get rid of these annoying marks. Maybe it’s due to the fact that the molds are some 30 years old.
The primary build itself can be done in one afternoon. Staying true to my general policy of building my kits mainly straight form the box, I decided to add only minor modifications and let this classic stay a classic. All I did to improve the model was to add some scratchbuilt detail in the cockpit. A decal is provided for the instrument panel (which is hardly visible anyway. Fit is OK for such a vintage kit, the main difficulty being to refine the molded-together interplane struts and hide their locating slots after gluing them in place (I had to fill, sand, prime, re-fill, and re-sand several times until these areas became acceptable. As ever on biplanes, I kept the main elements (airframe and lower wings, upper wing, landing gear parts) separate until all painting and weathering was finished.
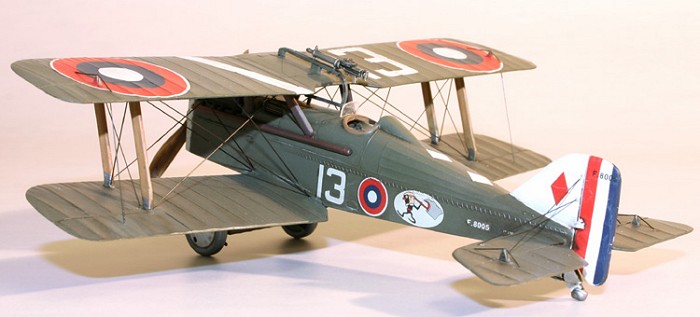
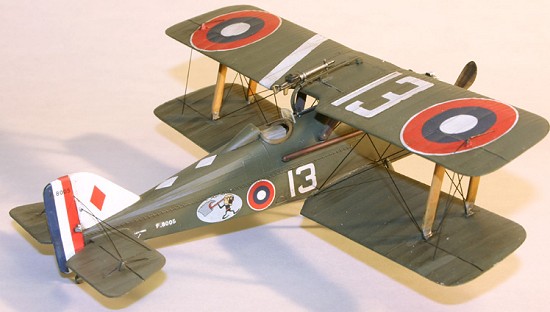
| COLORS & MARKINGS |
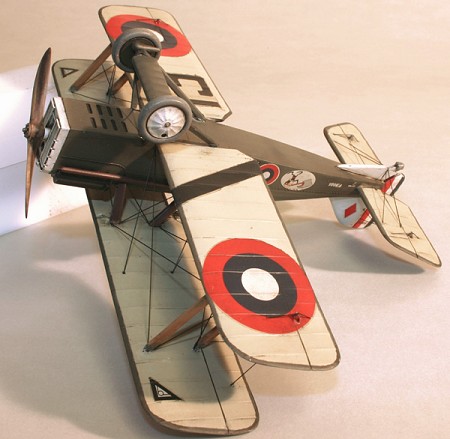
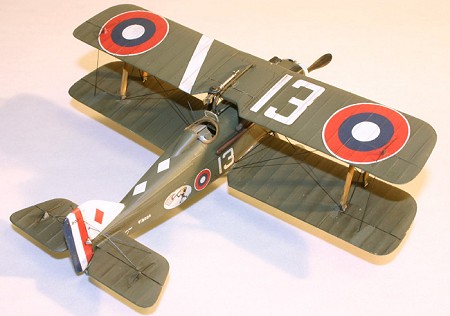
As every S.E.5a review on MM (1/72 and 1/48 alike) was about British
machines, I decided to do the American plane, which is also more colourful
than Mannock’s aircraft. As said above, it depicts a machine of the 25th
Aero Squadron, a unit that entered service in the very last days of WWI,
and was stationed in France during the following months. This aircraft is
generally described as 2nd lt. Rorison’s mount, based at Toul
airfield in December 1918, but a quick search for
 documentation on the web
(http://www.overthefront.com/issues/05_1.html) showed that it might be
another pilot’s plane, Reed B. Landis. Let the experts argue over this. At
least, the paint and decal scheme seems to be accurate.
documentation on the web
(http://www.overthefront.com/issues/05_1.html) showed that it might be
another pilot’s plane, Reed B. Landis. Let the experts argue over this. At
least, the paint and decal scheme seems to be accurate.
As ever, painting was done with Tamiya acrylics, self-mixed to match the actual colours. The gloss coat (prior to decalling) was made with water-thinned Lascaux artist’s acrylics, and the final matte coat with Vallejo acrylics. Weathering was kept to a minimum, as, for some reason, I like my WWI aircraft quite tidy and clean. A simple wash of burnt umbra oils was applied to underline the details.
Final assembly + rigging
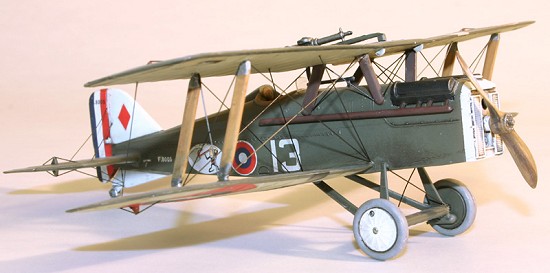
Once all of this was done and the “fiddly bits” painted and ready, I assembled all the elements. For this job, I recommend Tamyia’s extra-thin liquid glue, as it melts its way through the paint easily, dries quickly and does not damage the finish (in fact; I assemble the parts, then add a drop of glue that will stay where it’s supposed to stay because of the capillarity effect. All was going to work fine, until I discovered this kit’s main glitch : the main interplane struts are too short, something that could only be corrected in two ways : either by making new ones, or by shortening the cabane struts (but the aircraft would look definitely awkward. As I was much too far into this project to perform such major surgery, I decided to go on, applied superglue and forced the upper wing in place, thus loosing a lot of its typical dihedral (I should have noticed by watching the picture of the built model on the instructions sheet – silly me).
Needless to say I wasn’t too happy with the results. As my S.E.5a wasn’t going to look like the real thing after all, I hence decided to simplify the rigging job also and forget about the double wires. Even so, the S.E.5a is a dreadful “stringbag”. Rigging was made with segments of black streched sprue (I have lots of this stuff, having kept all the sprues of my Airfix Stirling for this purpose). Eventually, a small scratchbuilt windshield was added.
| CONCLUSIONS |
 If you want a perfect S.E.5a, you’d better take the Roden kit – as you can
see on the other MM reviews.
If you want a perfect S.E.5a, you’d better take the Roden kit – as you can
see on the other MM reviews.
I’d say this kit is ideal for someone on a budget who doesn’t feel comfortable with biplanes, and who’d like to practice on an easy one without taking the risk of ruining a more expensive kit. It’s also a fine subject for the vintage kit amateurs.
All in all, my final comment is that this kit looks like a very nicely drawn S.E.5a in a video game – decent enough as long as you don’t look too close. Most modellers will think it’s not worth the effort.
At first sight, everybody will recognize an S.E.5a… yet, if you put it less than 10 ft. from a Roden model, it won’t stand the comparison.
October 2005
| REFERENCES |
„Aero – das illustrierte Sammelwerk der Luftfahrt” – No.159.
Copyright ModelingMadness.com. All rights reserved. No reproduction in any form without express permission from the editor.
If you would like your product reviewed fairly and fairly quickly, please contact the editor or see other details in the Note to Contributors.