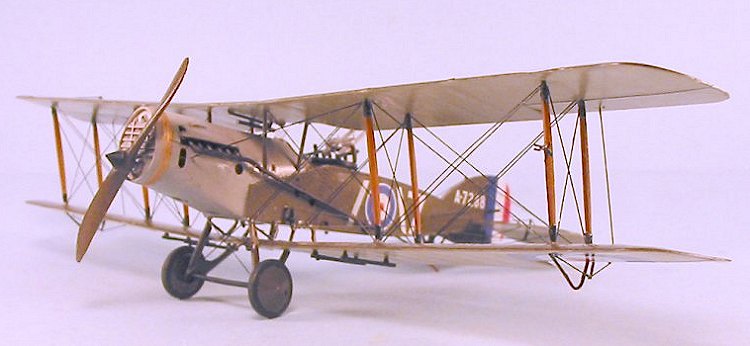
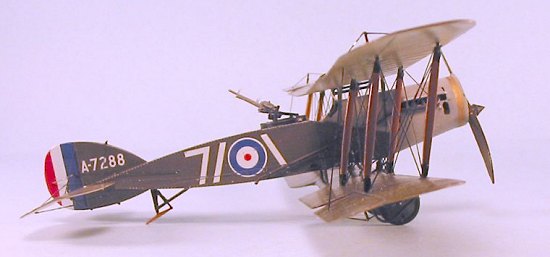
Roden 1/48 Bristol F2.B
| KIT #: | 425 |
| PRICE: | $19.96 MSRP |
| DECALS: | Six options |
| REVIEWER: | Tom Cleaver |
| NOTES: |
| HISTORY |
The Bristol Fighter is easily one of the most outstanding aircraft to have seen combat during the First World War. It was so good that it formed the backbone of the RAF in overseas service policing for the far-flung frontier territories of the Empire throughout the interwar period until it was finally retired from service in 1934.
 The versatile Brisfit - as it came to be known - was a maneuverable,
heavily armed two-seater biplane designed by Frank S. Barnwell, who would
later design the Blenheim, Beaufort and Beaufighter of the Second World
War.
The versatile Brisfit - as it came to be known - was a maneuverable,
heavily armed two-seater biplane designed by Frank S. Barnwell, who would
later design the Blenheim, Beaufort and Beaufighter of the Second World
War.
Design began in mid-1916, and took into account combat reports from the Western Front of the wretched B.E.2 series. Barnwell’s design was for a 2-seater that could survive in a hostile sky. Pilot and gunner were placed back to back, where they could coordinate their efforts. The strange design, with the lower wing attached to the fuselage by struts, was done so that the upper wing could be lowered sufficiently to give the pilot excellent visibility and to allow the gunner to fire his weapons in a full 360 degrees, while maintaining sufficient separation of the biplane wings to maximize lift without increasing drag. Barnwell also chose the powerful and reliable new Rolls-Royce Falcon as the aircraft’s powerplant, providing it with both good speed and lifting ability. The prototype F.2A flew in late 1916 and was soon ordered into production. The definitive F.2B differed from the original Fighter in having a smaller horizontal tail with larger elevators, thus improving maneuverability.
At first, the pilots of the Royal Flying Corps didn’t understand that the
name Bristol Fighter meant just that. The airplane was originally
seen as just another 2-seat Corps Reconnaissance aircraft, and when it was
handled the way one handled a B.E.2 or R.E.8, losses were severe. The
inexperienced pilots and observers of 48 Squadron - the first unit to take
the airplane on operations - mistakenly believed from looking at it that
the Bristol Fighter t was structurally weak. Squadron C.O. Leefe-Robinson -
who wore the dull red ribbon of the Victoria Cross as the first pilot to
down a Zeppelin - instructed his pilots to avoid violent maneuvers during
combat. 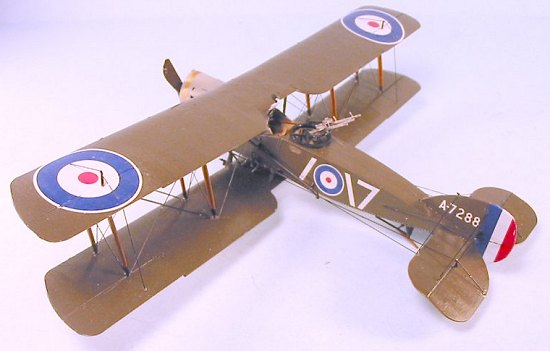
Leefe-Robinson perished following his own advice, when he and the pilots of six Bristol F.2A Fighters encountered Manfred von Richthofen and his flight of five Albatros D.IIIs near Douai in late April, 1917. In a fight that lasted almost 30 minutes, four of the British aircraft were shot down, including that of the commander. The disastrous fight with Jasta 11 almost convinced the British to withdraw the aircraft from service.
The pilots of 11 Squadron, the second unit to go on operations, fortunately did not make the mistake their compatriots had in 48 Squadron, basing their view of the airplane on their experience flying it. They soon discovered that this was not just another 2-seater, but really was instead a 2-seat fighter, one that was fully capable of mixing it with German single-seaters successfully, with the additional advantage of not having a “blind spot” to the rear. By the late summer of 1917, the Jastaflieger had decided that attacking more than two Brisfits with less than a full Jasta was harmful to their continued good health. Several pilots, including Major Keith Parks of 48 Squadron, achieved high scores with the Brisfit.
Andrew McKeever - the Brisfit Ace of Aces:
 Canadian ace Andrew McKeever achieved the highest score with the Bristol
Fighter, downing 31 enemy planes during the summer and fall of 1917.
Canadian ace Andrew McKeever achieved the highest score with the Bristol
Fighter, downing 31 enemy planes during the summer and fall of 1917.
Upon the outbreak of war in 1914, McKeever joined the Queen's Own Rifles of Canada. Arriving on the Western Front in 1915, he quickly proved to be an expert marksman in the trenches of France. Like many stuck in the mud of Flanders, McKeever looked up at the airplanes overhead and decided to fight a cleaner war. In late 1916 his transfer to the Royal Flying Corps was approved and he entered flight training in January 1917. Upon graduation from flight school in May 1917, he was assigned to 11 Squadron, which was replacing its outdated B.E.2s with the then-new Bristol Fighter.
Aerial combat in the summer of 1917 was heavy as the R.F.C. attempted to regain the air supremacy it had held the previous year during the Battle of the Somme, which had been contested by the introduction of new German scouts in the fall of 1916, and was destroyed in the disastrous losses of “Bloody April” 1917. The new British fighters - the Sopwith Camel and S.E.5a - were at least the equal if not superior to the Albatros D.III and the new D.Vs that began appearing in the summer of 1917. By that fall, due to the achievements of pilots like McKeever, the Bristol Fighter would be added to that list of successful combatants.
In July, McKeever and two other Brisfits were on patrol over the front when
they spotted a Jasta maneuvering to attack. McKeever, who already
had three victories, turned into the eight Albatroses and attacked at close
range, engaging the Germans in close-in dogfighting. The first victim
exploded when hit in the fuel tank, and within minutes McKeever had short
 down five others out of control. He would be awarded the Military Cross in
September for this action.
down five others out of control. He would be awarded the Military Cross in
September for this action.
Through August and early September, McKeever and his gunner, Sergeant L.F. Powell, engaged in numerous combats. In one, he attacked five German scouts alone, shooting down two while Powell accounted for a third. At the end of the month, leading a patrol, he attacked nine Albatros D.Vs, destroying two, driving a third to crash out of control, and dispersing the rest before they could attack the rest of his flight.
By late November, 1917, McKeever had been awarded the Military Cross and his score stood at 29, while Powell had become a “gunner ace.”
On November 30, McKeever and Powell took off just before noon for a patrol
over the lines. The winter weather was bad, and they ducked in and out of
cloud as they searched out enemy aircraft. Just as they were ready to turn
back in frustration, Powell spotted two German two-seaters below. McKeever
broke out of the clouds and immediately spotted seven Albatros escorts.
With surprise on his side, he dove on the two-seaters and exploded one. As
McKeever turned to head back for his
 lines, five of the seven escorts
attacked him. The redoubtable Powell hit two of them, putting them on fire
as they headed down. McKeever turned on the three survivors, engaging in
close maneuvering that drove the combatants lower and lower. After several
long minutes, one Albatros overshot its gunnery run and McKeever exploded
it. At this point, Powell’s weapons jammed in the face of attack by the two
remaining enemies. McKeever rolled and then put the Bristol into an
intentional spin, falling through the low clouds over No Man’s Land.
Thinking they had got him, the Germans turned back. McKeever pulled out of
the spin a mere 50 feet above the British trenches, and retreated to
safety. It would be his last combat of the war, resulting in a final score
of 31 - all scored between July and November, all in the Brisfit.
lines, five of the seven escorts
attacked him. The redoubtable Powell hit two of them, putting them on fire
as they headed down. McKeever turned on the three survivors, engaging in
close maneuvering that drove the combatants lower and lower. After several
long minutes, one Albatros overshot its gunnery run and McKeever exploded
it. At this point, Powell’s weapons jammed in the face of attack by the two
remaining enemies. McKeever rolled and then put the Bristol into an
intentional spin, falling through the low clouds over No Man’s Land.
Thinking they had got him, the Germans turned back. McKeever pulled out of
the spin a mere 50 feet above the British trenches, and retreated to
safety. It would be his last combat of the war, resulting in a final score
of 31 - all scored between July and November, all in the Brisfit.
For his actions in the fall of 1917, McKeever would be awarded the Distinguished Flying Cross and the Distinguished Service Order for his final combat.
After the war, he returned to Canada, where he worked with Billy Bishop and Raymond Collishaw to establish a Canadian Air Force. Having accepted but not yet started a position as manager of an airfield in the United States, McKeever was badly injured in an automobile accident in his home town that September, surviving with a broken leg and internal injuries that hospitalized him. He died on Christmas Day from complications, aged 24.
| THE KIT |
For a look at what’s in the box, please visit the preview.
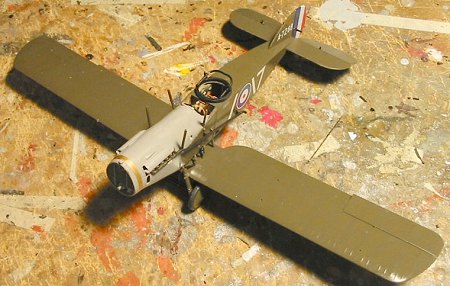
| CONSTRUCTION |
While the Bristol Fighter looks daunting as a model due to its configuration, the truth is it is not as hard as it appears. This is even more so a fact when one takes into consideration that Roden appears to have finally solved the problem of designing a kit in which the parts actually fit together with ease. If you’ve built a World War I model like the Sopwith Camel successfully, the Bristol Fighter is almost the logical next step in your progression.
I began with the wings. I cut off the ailerons, cleaned them up and then attached them in a more dynamic position. If you decide to do this, remember that ailerons do not deflect up and down equally! An aileron travels up approximately one-third the amount it travels down. You need to also remember if you are going to pose the control surfaces that you will need to pose the controls in the cockpit correctly for the deflections you have created. I also scored the elevators and rudder and deflected them, running some glue along the score line to reinforce the weakened joint.
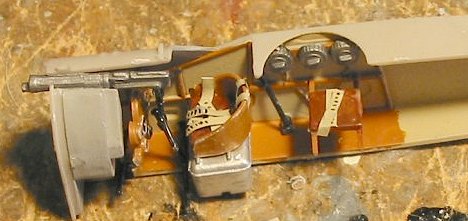 With that, I turned to the cockpit. I first painted the interior with
Gunze “Sail Color” to simulate the fabric, then painted the molded-in
stringers and frames with my mixture for “Yew” - a combination of Gunze
“Light Brown” and “Orange.” I painted the interior of the upper part of the
forward cockpit with Tamiya Sky Grey, a good color for British “Battleship
Grey” which was the actual color. The control stick, rudder pedal and
throttle were painted gloss black, since they were metal parts and were
“Japanned.” The Lewis Gun ammo drums were painted with Model Master
Metalizer “Magnesium,” with a coating of Tamiya “Smoke” to “pop out”
detail. The seat belts were made from lead foil taken from a wine bottle,
painted with “Sail Color.” The cockpit parts went into place with no
difficulty once the paint was dry, and the fuselage halves were glued
together.
With that, I turned to the cockpit. I first painted the interior with
Gunze “Sail Color” to simulate the fabric, then painted the molded-in
stringers and frames with my mixture for “Yew” - a combination of Gunze
“Light Brown” and “Orange.” I painted the interior of the upper part of the
forward cockpit with Tamiya Sky Grey, a good color for British “Battleship
Grey” which was the actual color. The control stick, rudder pedal and
throttle were painted gloss black, since they were metal parts and were
“Japanned.” The Lewis Gun ammo drums were painted with Model Master
Metalizer “Magnesium,” with a coating of Tamiya “Smoke” to “pop out”
detail. The seat belts were made from lead foil taken from a wine bottle,
painted with “Sail Color.” The cockpit parts went into place with no
difficulty once the paint was dry, and the fuselage halves were glued
together.
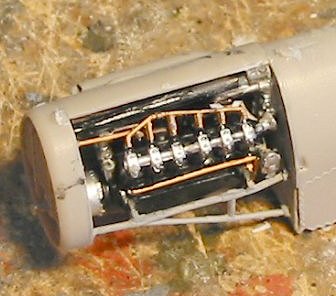 The kit provides a Rolls-Royce Falcon engine that has 20 parts and is a
very accurate model itself. I fully assembled it and painted it, to see if
it would fit inside the cowling. It would, but the cowling fit better when
I later pulled off everything but the engine block and the cylinders, which
are needed to fill the interior which can be seen through the large cooling
holes, and for the exhausts to attach to. The engine is so nicely detailed
that with only a bit of work to wire the sparkplugs and a few other small
details, a very nice model could be done with the cowling taken off. The
nice thing here is that the engine does not force the cowling to be too
large in circumference when installed around the engine, as is the case
with the Fokker D.VII models if one is not careful to not use the engine
mounts.
The kit provides a Rolls-Royce Falcon engine that has 20 parts and is a
very accurate model itself. I fully assembled it and painted it, to see if
it would fit inside the cowling. It would, but the cowling fit better when
I later pulled off everything but the engine block and the cylinders, which
are needed to fill the interior which can be seen through the large cooling
holes, and for the exhausts to attach to. The engine is so nicely detailed
that with only a bit of work to wire the sparkplugs and a few other small
details, a very nice model could be done with the cowling taken off. The
nice thing here is that the engine does not force the cowling to be too
large in circumference when installed around the engine, as is the case
with the Fokker D.VII models if one is not careful to not use the engine
mounts.
Once the fuselage and engine cowling and radiator were assembled, I applied Mr. Surfacer 500 to the seams, and when it was dry I sanded everything smooth, then attached the tail feathers. The model was now ready for painting.
| COLORS & MARKINGS |
Painting:
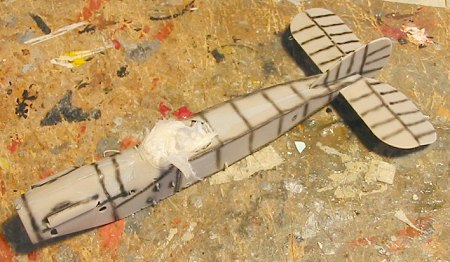 I first pre-shaded the model on the ribs and frames, then painted the
cowling and radiator with Tamiya Sky Grey. While that was drying I painted
the lower surfaces of the wings and horizontal stabilizer with Gunze-Sangyo
“Sail Color.” I then masked off the cowling and painted the entire
fuselage and the upper surfaces of the wings and tail with my mixture of
P.C.10, which for this model included a bit more green poured into the
Tamiya Khaki and Red Brown mixture. There is no “right shade” for this
color, so I try to vary it from model to model for overall look inside the
collection. When all was dry, I gave the sub-assemblies a coat of Future.
I first pre-shaded the model on the ribs and frames, then painted the
cowling and radiator with Tamiya Sky Grey. While that was drying I painted
the lower surfaces of the wings and horizontal stabilizer with Gunze-Sangyo
“Sail Color.” I then masked off the cowling and painted the entire
fuselage and the upper surfaces of the wings and tail with my mixture of
P.C.10, which for this model included a bit more green poured into the
Tamiya Khaki and Red Brown mixture. There is no “right shade” for this
color, so I try to vary it from model to model for overall look inside the
collection. When all was dry, I gave the sub-assemblies a coat of Future.
The interplane struts were painted with “Yew” with the landing gear and cabane struts painted P.C.10, while the metal wing skids, bomb racks and tail skid braces were in gloss black.
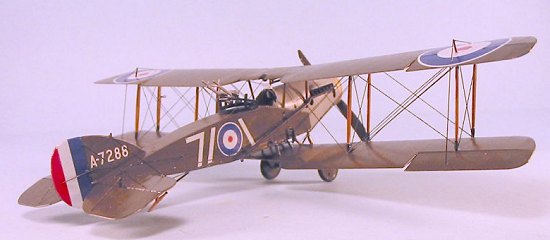
 Decals:
The Roden decals were used for the kit and went on with no difficulty under a coat of Micro-Sol. Roden’s kit decals have improved in quality with their recent releases and can now be used with confidence. When everything was set, I washed the sub-assemblies and applied a coat of Future. When that was dry, I gave the model an overall coat of thinned Testor’s Glosscote to give a less-shiny final look to everything.
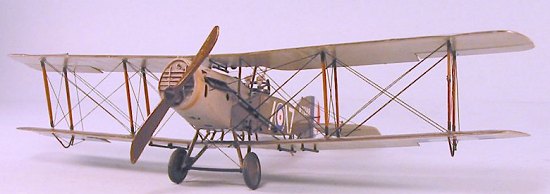
| FINAL CONSTRUCTION |
I first attached the exhausts in position, then proceeded to attach the wings.
The cabane struts were glued in and tested for correct position with the
upper wing. Then I attached the lower cabane struts and did the same
testing with the lower wing. When these were all in position, I applied a
drop of cyanoacrylate glue to each to strengthen the attachment. I then
assembled the landing gear and attached it to the lower wing.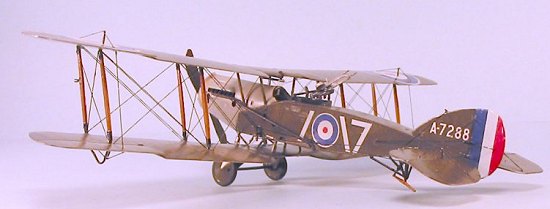
I then attached the lower wing, using cyanoacrylate glue to strengthen the attachment points as I had done with the other end of the various struts. The upper wing was attached to the cabane struts, and I then attached the interplane struts, using cyanoacrylate glue. Yes, it was very fiddly to have to do both upper and lower wings with cabane struts, but by taking my time all was easy.
With the model assembled, I then spent the next two days with several rigging sessions to fully rig it. Since RFC/RAF airplanes of the period had “Japanned” raf wires for interplane rigging, I painted the wire with Tamiya Semi-Gloss Black. Yes, rigging is a Major Pain, but the model doesn’t begin to really take on character until this is done.
The last thing was to attach the Scarff ring on the rear cockpit and the twin Lewis Guns.
| CONCLUSIONS |
This is definitely the best Bristol Fighter kit currently available. I wish more companies would look at how Blue Max reproduces the look of fabric-covered wings and tail surfaces, but this kit gets a good look with the very thin wings and subdued “hills and valleys” molding that gives it a close second to the Blue Max look. The kit is so accurate it even has the “up tilt” to the cowling, which no other Bristol Fighter kit I have done has reproduced. The kit decals also provide markings for Keith Parks’ Brisfit from 48 Squadron, and the Brisfit that Billy Barker used when he took the Prince of Wales on a mission in Italy in 1918, in addition to several other attractive schemes. I am sure there will be at least one more of these well-designed and attractive models that will show up in my collection. For a serious World War I modeler, this kit is a “must have” that doesn’t disappoint.
Thanks to Roden for the review kit.
October 2004
Copyright ModelingMadness.com
If you would like your product reviewed fairly and fairly quickly, please contact the editor or see other details in the Note to Contributors.