Revell 1/72 DH-2
| KIT #: | ?04677 |
| PRICE: | £3.15 |
| DECALS: | One option - 24 Squadron |
| REVIEWER: | Stephen Foster |
| NOTES: |
This kit is not for the beginner, and would not advise as a first
biplane. |
| HISTORY |
The
advent of the tractor scout (single seat pursuit as opposed to two seat
reconnaissance aircraft), required the use of an interruptor gear if the pilot
was not to shoot his own propellor off. Anthony Fokker solved this problem in
late 1915 so that his monoplanes could fire forwards and thus increase their
ability to interfere with RFC reconnaissance machines: the "Fokker scourge" had
begun. The Allies were slower in developing an efficient interruptor gear and
resorted instead to using various pusher designs where the engine was mounted on
the back of a fuselage nacelle and the tail unit was carried on booms. In these
two seater gun carriers (the term fighter was not in wide use at the time), this
gave the gunner a wide field of fire, as in the Vickers Gunbus, de Haviland DH1
and FE 2. The DH 2 was designed by Geoffrey de Haviland as a single seat scout
which was to be faster and more manoeverable than the two seaters, yet retain a
good view for the pilot who could now also aim his machine like any
 other scout.
The type entered service with 24 squadron in February 1915 and was the first
single seat fighter squadron in the world to be equipped with one type of
machine. Together with the FE 2 these aircraft quickly gained a reputation for
outclassing the Fokker monoplanes and helped to give the RFC aerial supremacy
over the Somme during the summer months of 1916. The DH2 had an early reputation
for spinning, so L. G. Hawker developed the techniques necessary to recover from
a spin and taught his pilots how to do so. This gave them the confidence to take
the fight to the enemy with the result that the "Fokker scourge" was eliminated.
However another problem was less easily solved: the 100hp Monosoupape engine was
a rotary with two or four bladed propellors, and had a tendency to shed
cylinders in the air, with catastrophic consequences for the pilot and his
machine.
other scout.
The type entered service with 24 squadron in February 1915 and was the first
single seat fighter squadron in the world to be equipped with one type of
machine. Together with the FE 2 these aircraft quickly gained a reputation for
outclassing the Fokker monoplanes and helped to give the RFC aerial supremacy
over the Somme during the summer months of 1916. The DH2 had an early reputation
for spinning, so L. G. Hawker developed the techniques necessary to recover from
a spin and taught his pilots how to do so. This gave them the confidence to take
the fight to the enemy with the result that the "Fokker scourge" was eliminated.
However another problem was less easily solved: the 100hp Monosoupape engine was
a rotary with two or four bladed propellors, and had a tendency to shed
cylinders in the air, with catastrophic consequences for the pilot and his
machine.
Armed with a single Lewis machine
gun which was fitted into a slot in the front of the nacelle, the machine proved
to be a valuable asset in the hands of pilots like L. G. Hawker and J. O.
Andrews. The DH 2 also served with 32 squadron on the western front where it
continued in service until the spring of 1917 when it was completely outclassed
by the Albatross and Halberstadt scouts. It also served in Palestine and
Macedonia where the opposition was less modern, and with home defence and
training squadrons in the UK. Major L. W. B. Rees was awarded a VC while flying
a DH2 when he attacked 10 German two seaters on 1st July 1916, and Major L. G.
Hawker was flying one when he was shot down and killed by Manfred von Richthofen
on 23rd November 1916. Like so many other machines used by the RFC, this
continued in service long after it had become obsolete because there were no
suitable alternatives available to replace it, and many aircrew and machines
were lost as a result, especially in the spring of 1917. Yet in its heyday in
the summer of 1916 this rather ungainly looking aircraft helped to dominate the
skies in favour of the allies and so contributed an important part to aviation
history.
| THE KIT |
 This was originally released by Revell in
the mid-1960's and is one of very few injection moulded kits of pusher aircraft
in this scale on the market: indeed it remains the only one produced by a large
manufacturer, so any modeller of early WW1 RFC aircraft has little choice but to
add this to their collection. Fortunately it is reasonably accurate despite its
age, although it lacks any cockpit detail, but the decals have been upgraded
recently so that roundels are supplied with separate red centres which avoids
the register problem inherent in some earlier kits. The instructions are on a
single folded sheet and provide a short history and clear cartoon type drawings
for assembly and painting. A machine of 24 squadron is depicted in the early
months of 1916: if you wish to model a later period machine you will need to add
the white outline on the upper wing and fuselage roundels. The plastic is beige
in colour and there is a little flash but not enough to cause major problems,
indeed surprisingly little given the age of the moulds. The wheels seem to be
oversize and are best replaced if you have some spares, and the machine gun is
best thrown away and replaced from another source.
This was originally released by Revell in
the mid-1960's and is one of very few injection moulded kits of pusher aircraft
in this scale on the market: indeed it remains the only one produced by a large
manufacturer, so any modeller of early WW1 RFC aircraft has little choice but to
add this to their collection. Fortunately it is reasonably accurate despite its
age, although it lacks any cockpit detail, but the decals have been upgraded
recently so that roundels are supplied with separate red centres which avoids
the register problem inherent in some earlier kits. The instructions are on a
single folded sheet and provide a short history and clear cartoon type drawings
for assembly and painting. A machine of 24 squadron is depicted in the early
months of 1916: if you wish to model a later period machine you will need to add
the white outline on the upper wing and fuselage roundels. The plastic is beige
in colour and there is a little flash but not enough to cause major problems,
indeed surprisingly little given the age of the moulds. The wheels seem to be
oversize and are best replaced if you have some spares, and the machine gun is
best thrown away and replaced from another source.
| CONSTRUCTION |
Assembly
is very straightforward as far as the cockpit and fuselage are concerned, but if
you leave out the pilot you will need to add some detail such as a seat,
joystick and rudder bar and some instruments. I painted the interior clear doped
linen with a wood floo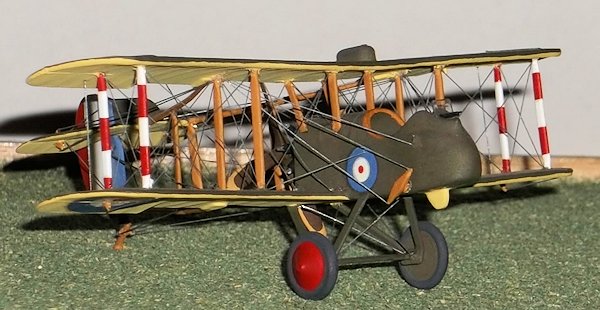 r. Very small amounts of filler were needed around the
wing to fuselage joints but generally the fit of parts was good. I added extra
push rods to the engine from stretched sprue or very thin rod before I made the
engine sub-assembly, although purists will want to replace the engine
altogether. This should be fitted to the rear of the fuselage but I left off the
propeller until after painting was complete. On my model I used a four-bladed
propeller because I happened to have an old one from a model which had long
disappeared: I cut the blades from the old propeller and added them to the new
one, but I could easily have shaped some pieces of plastic card if I had wanted
to. I added the compass fairing under the nose from a piece of plastic card:
these were not fitted to all machines so check photos or drawings if you do not
want to stick with the aircraft depicted by the model. Do not add the gun until
you have painted the whole aeroplane.
r. Very small amounts of filler were needed around the
wing to fuselage joints but generally the fit of parts was good. I added extra
push rods to the engine from stretched sprue or very thin rod before I made the
engine sub-assembly, although purists will want to replace the engine
altogether. This should be fitted to the rear of the fuselage but I left off the
propeller until after painting was complete. On my model I used a four-bladed
propeller because I happened to have an old one from a model which had long
disappeared: I cut the blades from the old propeller and added them to the new
one, but I could easily have shaped some pieces of plastic card if I had wanted
to. I added the compass fairing under the nose from a piece of plastic card:
these were not fitted to all machines so check photos or drawings if you do not
want to stick with the aircraft depicted by the model. Do not add the gun until
you have painted the whole aeroplane.
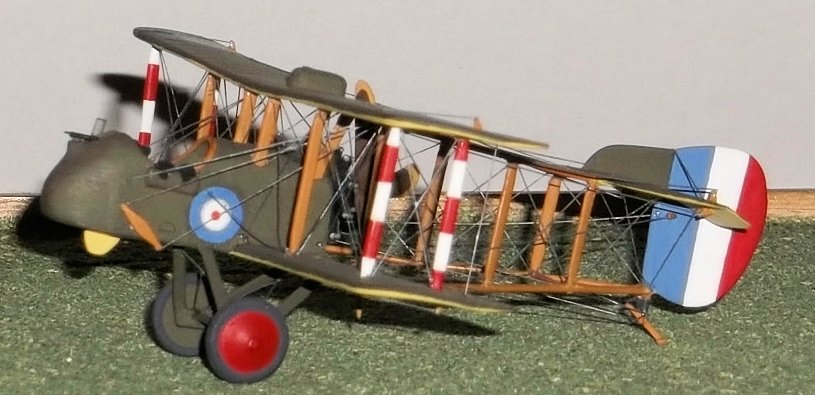
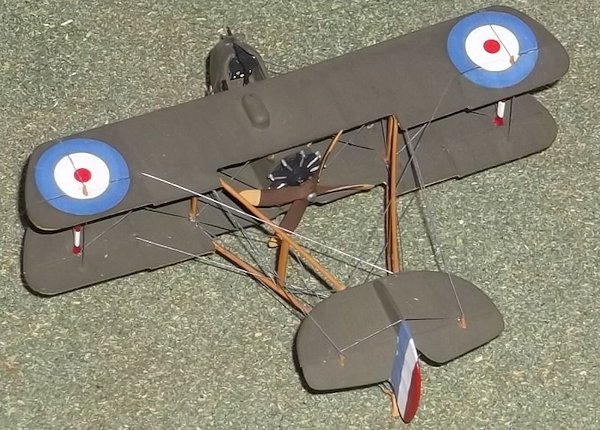
| COLORS & MARKINGS |
 I paint my biplanes before I fix the top wing as
this makes the whole job much easier. The colour scheme was standard PC10 upper
surfaces and sides with clear doped linen undersurfaces, and here I use Humbrol
colours. For the PC10 I use a mix of olive green (matt 155) and dark earth (matt
26 or 29): the shade of this colour varied considerably according to the age and
pigments used to mix it, so look at colour reproductions of the shades in books
and mix your own. For the clear doped linen I use a mix of 3 to 4 parts matt
white with one part matt 74. This is still a little yellow so I add a little
light grey - again the exact shades do not matter too much as the originals also
varied greatly. The aircraft depicted in the kit had blue wheel discs and bands
on the struts, whereas mine were red because it was from a different flight.
Struts and booms were light brown and the propeller natural wood (dark brown:
matt 26). Tyres were medium grey. I also added the markings at this stage. The
kit provides rudder stripes but I always hand paint them on my models - that is
just a personal touch as getting the decals to wrap around the edge of the
rudder is a fiddle for me. Because I had no suitable serial numbers at the time
I omitted this detail from my model, but a serial is provided in the kit.
I paint my biplanes before I fix the top wing as
this makes the whole job much easier. The colour scheme was standard PC10 upper
surfaces and sides with clear doped linen undersurfaces, and here I use Humbrol
colours. For the PC10 I use a mix of olive green (matt 155) and dark earth (matt
26 or 29): the shade of this colour varied considerably according to the age and
pigments used to mix it, so look at colour reproductions of the shades in books
and mix your own. For the clear doped linen I use a mix of 3 to 4 parts matt
white with one part matt 74. This is still a little yellow so I add a little
light grey - again the exact shades do not matter too much as the originals also
varied greatly. The aircraft depicted in the kit had blue wheel discs and bands
on the struts, whereas mine were red because it was from a different flight.
Struts and booms were light brown and the propeller natural wood (dark brown:
matt 26). Tyres were medium grey. I also added the markings at this stage. The
kit provides rudder stripes but I always hand paint them on my models - that is
just a personal touch as getting the decals to wrap around the edge of the
rudder is a fiddle for me. Because I had no suitable serial numbers at the time
I omitted this detail from my model, but a serial is provided in the kit.
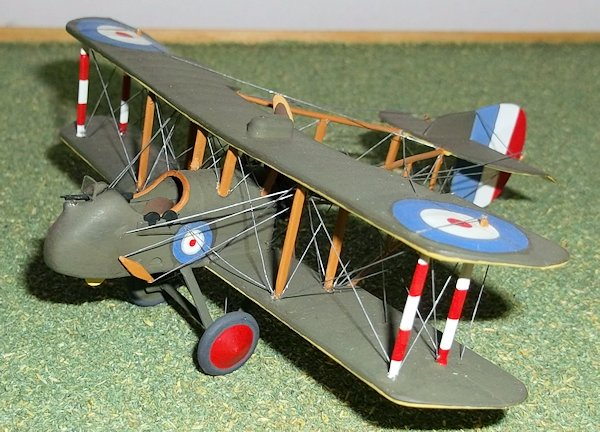
| FINAL CONSTRUCTION |
The struts can now be glued into the lower
wing and fuselage: this is an old kit so there are no bars on them as on later
biplane models. This in turn means that you have to be careful when you align
the struts or they will not be where you want them when you place the upper wing
on top. I drop a tiny blob of glue into the holes on the upper wing and then
gently lower it on to the struts: this means less glue is smeared over the wing
surface. The top wing must be fitted while the struts are still moveable, and
the glue added quickly, so this is a bit of a rushed fiddle. Do allow the
assembled wing to dry out thoroughly (i.e. overnight) before proceeding further,
and support it while it dries so that it does not move and distort.
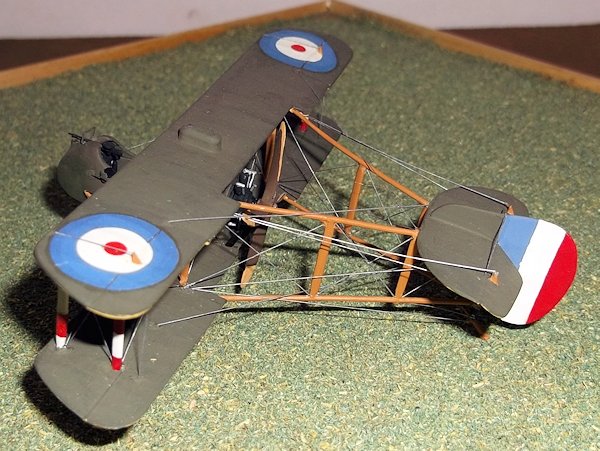
 The booms fit into two rather large slots
moulded on the underside of the wings which is not strictly accurate but makes
assembly easier. This again is a bit of a fiddle but not too difficult for an
experienced modeller and I filled and rubbed them down to make them less
obtrusive. The tail unit is fixed in the same way. The undercarriage and wheels
are a bit oversized and purists will want to replace them with card and new
smaller wheels although I did not bother. Add the propeller, gun and a
windscreen cut from clear acetate, new control horns for the fuselage as the kit
parts are over thick, control horns to the flying surfaces, Lewis drums and
holder to the left side of the fuselage by the cockpit, a fuel pipe from the
gravity tank on the top wing to the fuselage and your model is ready for
rigging.
The booms fit into two rather large slots
moulded on the underside of the wings which is not strictly accurate but makes
assembly easier. This again is a bit of a fiddle but not too difficult for an
experienced modeller and I filled and rubbed them down to make them less
obtrusive. The tail unit is fixed in the same way. The undercarriage and wheels
are a bit oversized and purists will want to replace them with card and new
smaller wheels although I did not bother. Add the propeller, gun and a
windscreen cut from clear acetate, new control horns for the fuselage as the kit
parts are over thick, control horns to the flying surfaces, Lewis drums and
holder to the left side of the fuselage by the cockpit, a fuel pipe from the
gravity tank on the top wing to the fuselage and your model is ready for
rigging.
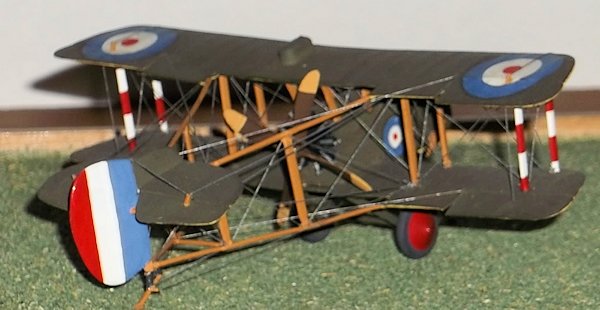
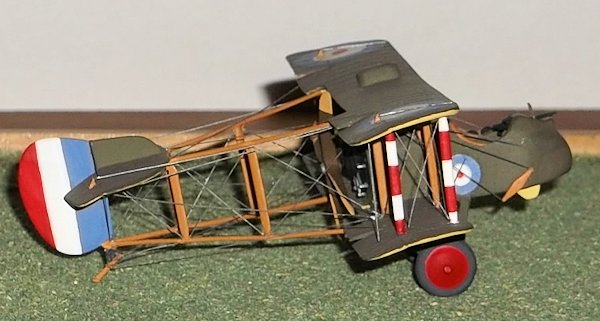
Rigging this model was time consuming and took longer than the assembly, but it adds to the birdcage look of the pushers and so is well worth the effort. The rigging is more complex than on some biplanes but if it is tackled systematically it is not more difficult. Try to find a good rigging diagram before you start as this will mean that you will get it right first time. Start with the fuselage struts and then the rear struts on the wings. Wires between the wing struts are added next, followed by those in the front of the wings, and then the booms. Complete the tail bracing and control wires on the on the wings, and the wires from the control horns to the wing, and wing to tail-plane. Finally add the anti-drag wires on the rear and then the front. I used stretched sprue painted silver on this model as I made it many years ago, but today I would use thin wire, but you could also use monofilament thread and superglue if you have the patience to drill the necessary holes.
| CONCLUSIONS |
 This is a veteran kit which plugs part of an
important hole in the representation of early RFC machines. Pusher models are
not the easiest of biplanes to build and in this scale are not popular with
manufacturers: this is not one for a beginner, nor for one who has not tried
biplanes before. Having said that it is not a difficult kit to make - it has its
moments because the wing struts are single pieces and keeping them in line is a
fiddle, otherwise with a few small improvements it makes up into a respectable
model. The Revell range of WW1 kits date from the 1960's but in spite of their
age they are inexpensive and can easily be made into good representations of
their types. As one who is fascinated by this early period of military aviation
and by British pusher designs generally, and who only has the room and pocket
for God's Own Scale of models, this was a must for me. I think that these often
neglected kits offer satisfying challenges to the modeller and well repay the
time and effort put into them.
This is a veteran kit which plugs part of an
important hole in the representation of early RFC machines. Pusher models are
not the easiest of biplanes to build and in this scale are not popular with
manufacturers: this is not one for a beginner, nor for one who has not tried
biplanes before. Having said that it is not a difficult kit to make - it has its
moments because the wing struts are single pieces and keeping them in line is a
fiddle, otherwise with a few small improvements it makes up into a respectable
model. The Revell range of WW1 kits date from the 1960's but in spite of their
age they are inexpensive and can easily be made into good representations of
their types. As one who is fascinated by this early period of military aviation
and by British pusher designs generally, and who only has the room and pocket
for God's Own Scale of models, this was a must for me. I think that these often
neglected kits offer satisfying challenges to the modeller and well repay the
time and effort put into them.
| REFERENCES |
The AMC DH2,
Windsock Datafile No 48, Albatross Publications.
DH2
Profile No 91, J. M. Bruce.
Pusher Aces of World War 1, J. Guttman, Osprey Publications, 2009.
April 2013 If you would like your product reviewed fairly and fairly quickly, please
contact
the editor or see other details in the
Note to
Contributors.