| KIT #: | 8109 |
| PRICE: | $13.46 |
| DECALS: | See review |
| REVIEWER: | Jason Blair |
| NOTES: | Basic kit |
| HISTORY |
Not being a big researcher and trusting the model companies that they know more than me, I will refrain from adding to the piles of information that can be found on the web.
| THE KIT |
 The kit contains 2 spruces
of tanish grey colored plastic. Molding has engraved panel lines and raised
surface detail where appropriate. Also included are Eduard’s express masks for
the wheels and front cowling. Along with these are masks for one of the version
to be built.
The kit contains 2 spruces
of tanish grey colored plastic. Molding has engraved panel lines and raised
surface detail where appropriate. Also included are Eduard’s express masks for
the wheels and front cowling. Along with these are masks for one of the version
to be built.
Decals are provided for 3 different aircraft. The first one is for Ltn. Walter Boning, from Jasta 76b flying in early 1918. The second plane is Ltn. Kurt Monnington, Jasta 15, 1917 and the final version is a squadron bird from Jasta 12 dated summer of 1917.
Instructions are contained on a single piece of paper showing 8 steps in diagram form. The instructions make color callouts along the way. A second sheet is included that shows where the express masks are placed and painting instructions for all 3 versions.
Eduard kits are probably the best 1/48th scale kits made of World War One aircraft. However with that said, the moldings are not the same quality as a Tamiya or Hasegawa kit and some care must be taken prior to beginning construction
| CONSTRUCTION |
This was to be my first bi-plane attempt. In reading one of Tom Cleaver’s articles he had used decals for the wood look on the interior and exterior of the plane. I had started in this manner and then put the kit away for a couple of years.
Fast forward to the present
I decided to attempt to paint the wood texture instead of using decals. Once the
decals were removed I 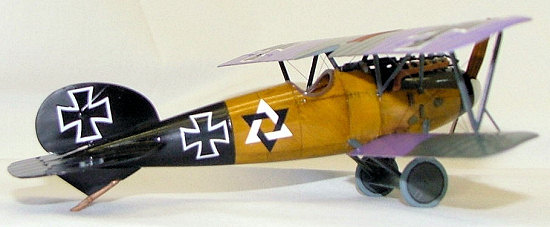 began by spraying model master wood on all appropriate
parts. Once painted, I added a gloss coat and let it dry. Using raw sienna oil
paints I began putting the grain effect onto all wood parts. Once this was done
to my liking I overcoated it with another coat of clear followed by Tamiya clear
yellow. With all the wood portions painted it was time to begin construction.
began by spraying model master wood on all appropriate
parts. Once painted, I added a gloss coat and let it dry. Using raw sienna oil
paints I began putting the grain effect onto all wood parts. Once this was done
to my liking I overcoated it with another coat of clear followed by Tamiya clear
yellow. With all the wood portions painted it was time to begin construction.
The molded-in dimples are not very deep and I found it hard to get the pieces in the interior lined up perfectly. A little work prior to beginning by drilling out these dimples goes a long way. With cockpit finished I buttoned it up and began work on the tail and lower wing. I had to use a little Mr. Surfacer 500 on the lower wing and around the horizontal stabilizer. Not bad for me.
I drilled out the holes for the inner struts that attached to the fuselage. I also drilled holes in the bottom wing and fuselage for rigging. Here is where my first problem occurred. I didn’t want to unnecessarily put holes in the kit and therefore didn’t drill holes in the upper wing for rigging. Big mistake. The second mistake was I missed drilling holes at the wing root for the landing gear struts. I did the front and totally spaced the rear ones. This ended up costing me alignment of the landing gear struts on the finished aircraft.
With all subassemblies built and glued together as far as I could without making painting too difficult, it was off to the paint shop.
| COLORS & MARKINGS |
Since I had decided to
paint the wood grain finish on I started here. A coat of model master wood was
sprayed and allowed to dry. Gloss coat was next, allowed to dry then rather
thick wash of Raw Sienna was stroked onto the aircraft. I tried to vary the
direction of grain as to what would bend the easiest if I was building the real
thing. Once that was dry I followed with a coat of Tamiya clear y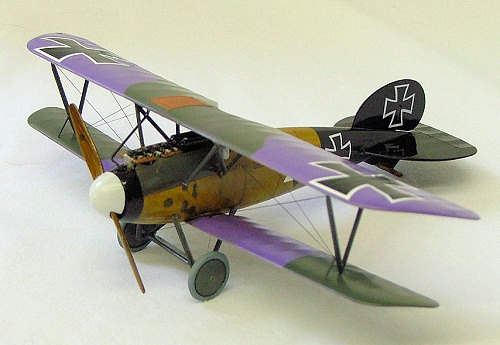 ellow. Next
came the gray-green. A nice touch is the masks that are provided. Without these
a couple hours would be spent trying to paint all the metal hatches on the
forward fuselage. Since the masks delineate the front ring just behind the prop
I went ahead and painted this as well. Floquil engine black was used for all
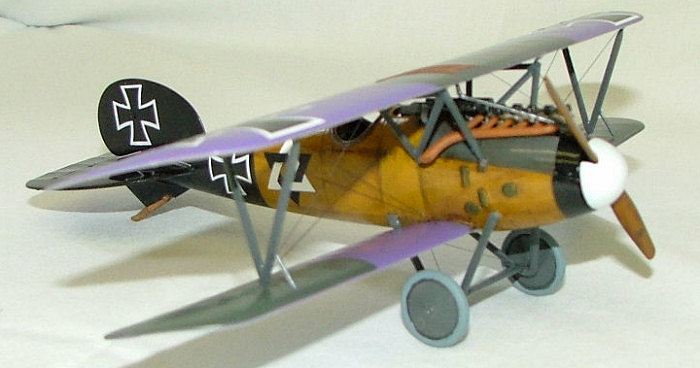
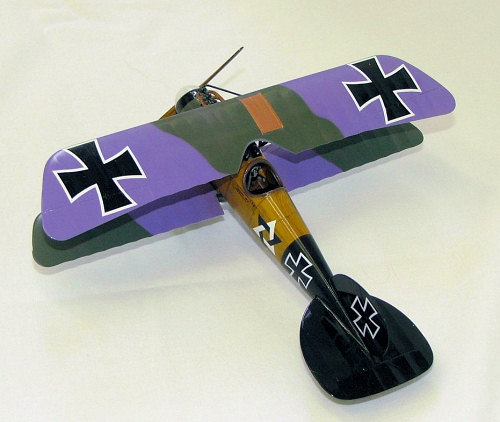
black areas. With that done, I went on to the wings. The bottom was painted RLM
76 for the light blue. Napoleonic violet for the violet and RLM 71 for the dark
green. I used paper masks with rolled up blu-tack to delineate the dark green
from the violet. With all the colors sprayed I put several light coats of
Glosscote on in preparation for decals.
ellow. Next
came the gray-green. A nice touch is the masks that are provided. Without these
a couple hours would be spent trying to paint all the metal hatches on the
forward fuselage. Since the masks delineate the front ring just behind the prop
I went ahead and painted this as well. Floquil engine black was used for all
black areas. With that done, I went on to the wings. The bottom was painted RLM
76 for the light blue. Napoleonic violet for the violet and RLM 71 for the dark
green. I used paper masks with rolled up blu-tack to delineate the dark green
from the violet. With all the colors sprayed I put several light coats of
Glosscote on in preparation for decals.
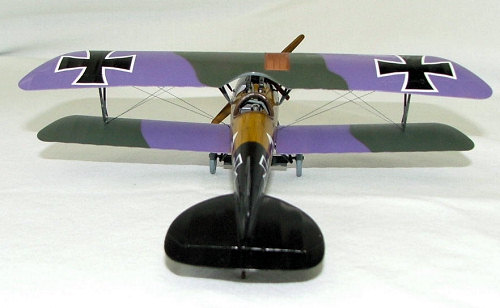
I had decided to do the bird on the box which was a squadron bird from Jasta 12 dated summer of 1917. Decals went on without any problems with the exception of my own doing. I had masked and painted the tail in black and as I was applying the decals I realized that where I had masked the black was not correct. With the decal sitting on its wet backing I quickly re-masked and shot more Floquil Black mixed with glosscote. 10 minutes later the decal was placed and all was well.
After drying for 1 week or so I was ready for the final push.
| FINAL CONSTRUCTION |
Final construction began by
looking at how I was going to attach the upper wing. One thing nice about this
airplane is that the outer struts line up exactly over the bottom location. This
made aligning the outer struts somewhat easy. I glued the outer struts to
 the
bottom of the top wing. I used a small drafting triangle to align these as close
to vertical as possible. Then using super-glue and an accelerator I glued the
inner struts. It took a couple of tries and some swearing to get this all on. In
the end it looks like I got pretty close to having it all line up.
the
bottom of the top wing. I used a small drafting triangle to align these as close
to vertical as possible. Then using super-glue and an accelerator I glued the
inner struts. It took a couple of tries and some swearing to get this all on. In
the end it looks like I got pretty close to having it all line up.
Next came the landing gear struts. Since I had forgotten to drill the rear holes out to help line up the struts I had to try and visually get them to line up. Of course my luck ran out and if viewed from the bottom a noticeable twist is seen.
With the airframe 90% complete I began rigging. I started by coloring loops of fishing line with a black Sharpie then, looping 2lb monofilament fishing line through the holes that I had drilled. Since I didn’t drill the holes in the upper wing I wrapped each piece of line around the attachment point and super glued it in place. Of the entire construction this was the most tedious aspect of the entire project. I cheated on rigging and didn’t do every line since I was afraid that my heavy hand would break something loose.
After attaching the last remaining bits she was done. I did manage to lose the small piece that attaches to the upper wing radiator. Oh well, par for the course.
| CONCLUSIONS |
Whew. My first biplane complete. Although not 100% accurate this was for all intents and purposes a test kit.
Upon finishing it I thought about what lessoned I learned. The 2 items that stick out are making sure to drill out all the location holes including the rigging holes into the top wing. The other thing is to come up with a better way of attaching the wing struts. I had actually thought about building a jig. Would it have helped? Probably, but like so many of my other kits as it gets close to finishing all I want to do is just finish. World War 1 planes are the coolest planes to look at in that there colors stand out. Because I get tired of modern day grays I can’t wait to build another. I would recommend this kit to anyone with medium skills and a little bit of patience.
Kit courtesy of Christmas and my son Dalton
April 2007
| REFERENCES |
Google search Albatross D.V
If you would like your product reviewed fairly and fairly quickly, please contact the editor or see other details in the Note to Contributors.