| KIT: | Roden 1/32 Albatros D. III |
| KIT #: | 606 |
| PRICE: | $64.99 MSRP |
| DECALS: | Seven options |
| REVIEWER: | Klye Bodily |
| NOTES: |
| HISTORY |
The Albatros series of fighters were the most numerous of all German fighters. In other words they were the backbone of the German Army Air Service. Virtually all German Aces flew Albatros aircraft and achieved victories in them. Even Manfred von Richtofen the infamous Red Baron himself scored the better part of his victories in Albatros aircraft. His score in the Fokker Dr.I was virtually the same as his score in the Halberstadt D.II.
The impact of Albatros D.III is always understated. From the day it was introduced to the field units these aircraft fought for the sky over Central Powers troops until the armistice. Albatros Pilots scored victories over virtually every type of aircraft the allies were able to field in the war.
The Albatros was not the best fighter to come out of the war. Better Allied aircraft and Central Powers aircraft overtook it. I can think of no other aircraft that served longer at the front than the Albatros D.III. For most of its service life it comprised over half of all German front line fighters. Yet, I have never seen one in a movie. Just lots of red biplanes.
| THE KIT |
| CONSTRUCTION |
Well like usual I started by removing
the parts from the trees. I separated them by the color they would be painted.
I prepped and painted all the wood and little bits that would make up the
internals. As I did this I began to notice some of the detail on the fuselage
like the cowling louvers and the attaching points for the cabanes, were damaged
in the molding process. All my friends
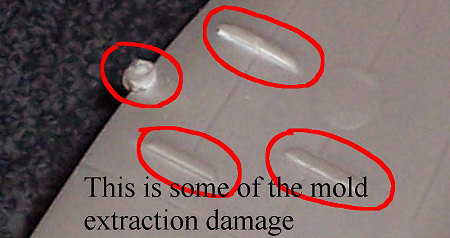 who have this kit tell me that this
damage is present on their copies also. I further found that on every part of
any thickness there are sink marks, ripples or sinkholes. Some parts will be
hidden in the fuselage and others will have to be filled with putty. I had to
go over the top wing with Mr. Surfacer as the top wings have an odd snake like
patterns emanating from the mold gates in them. They are too fine for putty but
too large for a coat of paint to cover up.
who have this kit tell me that this
damage is present on their copies also. I further found that on every part of
any thickness there are sink marks, ripples or sinkholes. Some parts will be
hidden in the fuselage and others will have to be filled with putty. I had to
go over the top wing with Mr. Surfacer as the top wings have an odd snake like
patterns emanating from the mold gates in them. They are too fine for putty but
too large for a coat of paint to cover up.
Well a little more prep then I had hoped, but now back to the assembly. Because all the bulkheads and bits that will make up the cockpit look to be a bit fiddley, I taped the fuselage together and started to test fit all the parts to discern the best way to assemble the whole thing. All looked O.K. until I test fit the bottom wings and the top decking. The difficulty of fit reminded of the old 1/72 scale Roden Albatros kits. The fit could only be described as poor and disappointing. The fuselage was too narrow even with all the bulkheads in, and the wings were to shallow. The same was true for the top decking. In addition to the top decking problem was the damaged cabane strut mounts, they wouldn’t allow the top decking to come close to fitting.
So taking all this all in. I decided to assemble the fuselage halves and then mount the wing. After the fuselage halves had dried for two days I forced the body apart and press the fuselage in front and behind the wing to MAKE IT FIT. This worked. I then carefully assembled the components of the fuselage. Basically you have three main components and a few smaller sub assemblies. I positioned the aft most bulkhead then the cockpit assembly then the engine mount. And all the rest of the parts were placed in from the top. I placed the fuel tank in from the top last of all. A little fiddley but I just couldn’t see a better way considering the problems. Who knows, you may find a better way. If so please tell us.
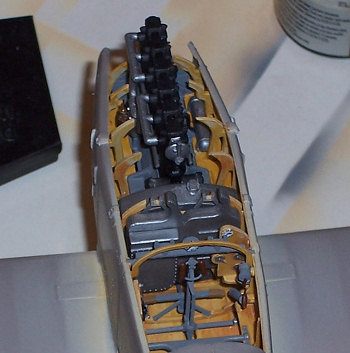 Now I turned to the engine. The
engine looks good except for one thing. It is a Mercedes D.III engine and while
it looks good, it is missing the very noticeable camshaft oil pump. This is a
very dominant poky outy part that is smack on the front of the camshaft. Its
job was to lubricate the camshaft and has a very prominent oil reservoir that
looks somewhat like someone stuck a brass soda can on the front of the engine.
The British exhaustively studied the MERCEDES D.III and D.IIIa engines. So the
engine is very well documented and you have a vast amount of materiel on this
engine in English. This feature is often missed even in reference drawings (in
fact it is not seen on the datafile drawings of the D.III but is on the D.V and
D.II drawings) but can easily be seen once you know what you are looking for.
Even when it is partially obscured by the water reservoir of the D.I and D.II
early if you know what you are looking for it is easy to start seeing. Several
good pictures of the pump are on page 22 and 26 of The Windsock Datafile Special
ALBATROS FIGHTERS in the top pictures on both pages. You can also see a color
picture of this oil pump mounted on an Albatros D.V at the NASM in Washington
D.C. (or page 4 of the same datafile). I am not quite sure why this part was
not modeled since it is on all of their 1/72 and 1/48 scale Mercedes engines.
Well I guess I will just have to make this part from scratch.
Now I turned to the engine. The
engine looks good except for one thing. It is a Mercedes D.III engine and while
it looks good, it is missing the very noticeable camshaft oil pump. This is a
very dominant poky outy part that is smack on the front of the camshaft. Its
job was to lubricate the camshaft and has a very prominent oil reservoir that
looks somewhat like someone stuck a brass soda can on the front of the engine.
The British exhaustively studied the MERCEDES D.III and D.IIIa engines. So the
engine is very well documented and you have a vast amount of materiel on this
engine in English. This feature is often missed even in reference drawings (in
fact it is not seen on the datafile drawings of the D.III but is on the D.V and
D.II drawings) but can easily be seen once you know what you are looking for.
Even when it is partially obscured by the water reservoir of the D.I and D.II
early if you know what you are looking for it is easy to start seeing. Several
good pictures of the pump are on page 22 and 26 of The Windsock Datafile Special
ALBATROS FIGHTERS in the top pictures on both pages. You can also see a color
picture of this oil pump mounted on an Albatros D.V at the NASM in Washington
D.C. (or page 4 of the same datafile). I am not quite sure why this part was
not modeled since it is on all of their 1/72 and 1/48 scale Mercedes engines.
Well I guess I will just have to make this part from scratch.
I installed the engine from the front and then the little pressurized fuel tank that sat next to it.
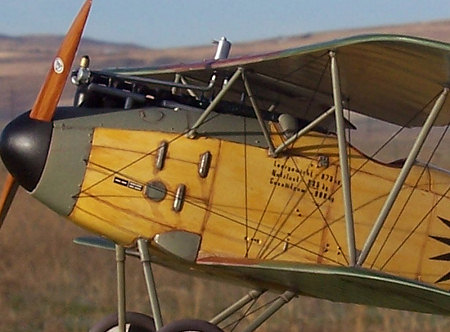
Just before I put the top decking on I installed the seat. The kit doesn’t have seat belts so you will have to make some or buy some. The kit is so big that no seat belts are a very noticeable omission.
I got the top decking on with a good amount of fiddling, but it looks good and in the end I used only a small amount of putty. However I am quite convinced if I had not built the fuselage like I did and fiddled with the kit so much I would have surely used much more putty. The sad thing here is that after you close the forward fuselage you will never see the fruits of your hard work.
| COLORS & MARKINGS |
 The ever important finish. Roden
gives you seven decal options but because they only include a wing with a center
section radiator you can only build four options. It looks as if they figured
that they could use the same sheet for an up coming D.III late with the
off-center radiator. In short Options 1,2,3 and 4 can be made from this kit but
5,6 and 7 can not. You will need to do some heavy modifications to use the
decals for the5, 6, 7 decal options. Now it was common to replace the upper
wing with the off-center radiator as they were sent in for maintenance as
aircraft are seen with both wings. The problem with the center section radiator
and why the Germans wanted to replace it with the off-center variety was that if
it was punctured the pilot got a face full of scalding water. So pilots and
units would replace the old wings with the new ones when ever possible.
The ever important finish. Roden
gives you seven decal options but because they only include a wing with a center
section radiator you can only build four options. It looks as if they figured
that they could use the same sheet for an up coming D.III late with the
off-center radiator. In short Options 1,2,3 and 4 can be made from this kit but
5,6 and 7 can not. You will need to do some heavy modifications to use the
decals for the5, 6, 7 decal options. Now it was common to replace the upper
wing with the off-center radiator as they were sent in for maintenance as
aircraft are seen with both wings. The problem with the center section radiator
and why the Germans wanted to replace it with the off-center variety was that if
it was punctured the pilot got a face full of scalding water. So pilots and
units would replace the old wings with the new ones when ever possible.
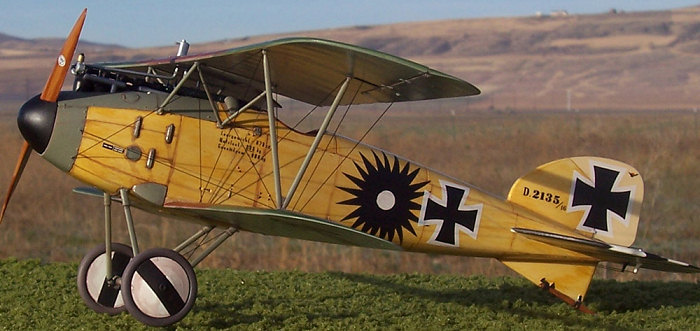
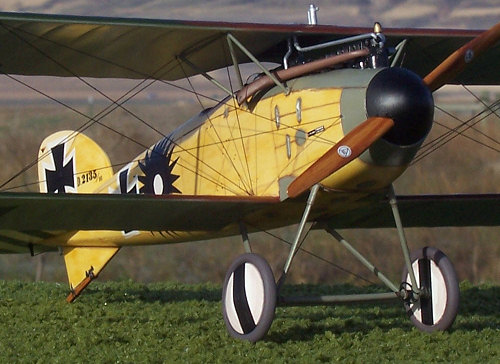
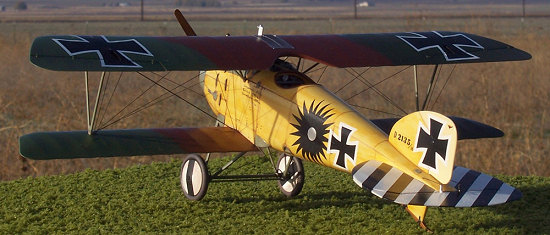
Werner Voss’s famous D.III, the one with the white tail, red hearts and wreathed swastika was just such a bird. In an early picture you can clearly see the distinctive plumbing of the center section radiator and in another the off-center type is visible. On page 21 of The Windsock Datafile Special ALBATROS FIGHTERS you can see another aircraft with both radiators. In the lower picture you will see Albatros D.III War. D.2135/16 with the center section radiator just plain as day. However if you just look up to the top of the page you will see the same aircraft sporting the later off-center radiator with its distinctive plumbing. As they say check your references, make up your mind and just go for it. In fact, as I study these pictures I can feel the Muse upon me. So I think I will build this very aircraft. I will have to make some of my own decals but I think that this aircraft looks better than any of the options that are provided in the kit
There are a lot of good schemes for the D.III early. I am sure that someone will come out with an after market set of decals. I think that Roden kind of let me down with their decals since I think that they should have made a specific set of decals for the D.III early and not try to build one decal sheet for the whole D.III series.
 Well, lets look at the colors.
Using the same reference (The Windsock Datafile Special ALBATROS FIGHTERS) we
can see two good pictures that give you basically all the information that you
need to build this aircraft. Since I have no images of the left side of this
aircraft and since most aircraft had the same or very similar markings on both
sides I will assume that the left side looked the same as the right. This
aircraft belonged to Oberleutnant Kurt Grasshoff who was the Commander of Jasta
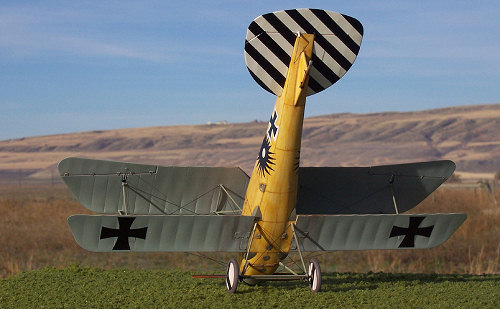
37. Aircraft in this unit were painted with black and white diagonal striped,
horizontal tail surfaces, Black spinner and white wheel disks with one black
stripe of equal width bisecting the wheel covers. As a rule all individual
markings were said to be in black and white, but as you my know, there are
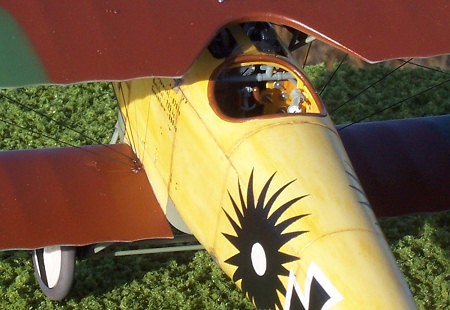
always exceptions to the rules. The personal markings on this aircraft appear
to be a black or red sun burst with a white or maybe a blue center disk. I
think I’ll go for a black sunburst with a white disk in the center. Above all
remember we just can’t know for sure how something looked unless we can get that
time machine in the garage to work and have Mr. Peabody set the way-back to 1917
so we can see for ourselves.
Well, lets look at the colors.
Using the same reference (The Windsock Datafile Special ALBATROS FIGHTERS) we
can see two good pictures that give you basically all the information that you
need to build this aircraft. Since I have no images of the left side of this
aircraft and since most aircraft had the same or very similar markings on both
sides I will assume that the left side looked the same as the right. This
aircraft belonged to Oberleutnant Kurt Grasshoff who was the Commander of Jasta
37. Aircraft in this unit were painted with black and white diagonal striped,
horizontal tail surfaces, Black spinner and white wheel disks with one black
stripe of equal width bisecting the wheel covers. As a rule all individual
markings were said to be in black and white, but as you my know, there are
always exceptions to the rules. The personal markings on this aircraft appear
to be a black or red sun burst with a white or maybe a blue center disk. I
think I’ll go for a black sunburst with a white disk in the center. Above all
remember we just can’t know for sure how something looked unless we can get that
time machine in the garage to work and have Mr. Peabody set the way-back to 1917
so we can see for ourselves.
Oh well back to the build.
This picture also shows the three color standard camouflaged wings. Up until recently D.IIIs were thought to have been only camouflaged in two tone color schemes. This is still argued but I am one that believes that the D.Is and some early D.II were in two-tone schemes. Later D.IIs and D.III were in three-tone schemes or in the case of later D.IIIs lozenge. Finely the D.Vs were in two-tone paint or lozenge fabric. That is my opinion and may not necessarily reflect the views of Modeling Madness or its affiliates.
 I used the kit decals for the most
part. As for the personnel markings I just made a template and cut out the sun
from a sheet of black decal film and used a paper punch to punch out the white
center dot. I went through my spares pile and found some numbers that would
work for the work numbers on the vertical stabilizer.
I used the kit decals for the most
part. As for the personnel markings I just made a template and cut out the sun
from a sheet of black decal film and used a paper punch to punch out the white
center dot. I went through my spares pile and found some numbers that would
work for the work numbers on the vertical stabilizer.
Now for my opinion on the decals. I am not happy with the new decals. They seem to be just like the old ones only thinner and a little more flexible. The white is not opaque I am sad to say. They did not respond to Solvaset at all. I had to press the decals very hard to get them to set and adhere to the complex surfaces. One good thing is that they didn’t break up like some of the earlier ones that I’ve used did, even with a heavy coat of Model Masters Gloss Coat. The decals did not want to lie down around some of the more complex features and I had to come back to the decals several times to keep working them down. In my opinion the decals are definitely usable but I don’t think Roden has really done a lot to improve them.
The horizontal stabilizer and elevator were painted white and then masked off and black was sprayed on. The same thing was done to the wheels. Not that difficult and I like the way it looks. I wanted a colorful Albatros with an unpainted wood fuselage. I think if it weren’t for the fact that I like to see wood fuselages on Albatros fighters I would have done Leutnent Bruno Lorzer’s Albatros D.III.
Well I think that rigging was quite easy since this is a large kit. My BIG OLD HAM HANDS seemed to fit a little better. One thing here is that D.2135/16 had some non-standard rigging so check your references.
| CONCLUSIONS |
 This was a fun and challenging kit.
I really like the way it looks and it is big. Heavens knows that we have wanted
a 1/32nd scale model of the Albatros. The kit is basically a good
kit and very buildable. But I don't think it is for the beginner or someone not
wanting a challenging build. I think it is one of the more fiddly kits that
Roden has produced.
This was a fun and challenging kit.
I really like the way it looks and it is big. Heavens knows that we have wanted
a 1/32nd scale model of the Albatros. The kit is basically a good
kit and very buildable. But I don't think it is for the beginner or someone not
wanting a challenging build. I think it is one of the more fiddly kits that
Roden has produced.
I guess you could say that this kit has a little bit of a multiple personality. While it has some very nice traits and detail. It was difficult and there are many little things you’ll find that will need fixing. In this way you could say that it builds very much like a limited run kit. (Now remember, I like limited run kits and build a lot of them, so to me calling a kit limited run is not a bad thing.) The fit is not the best I have seen from Roden. In other words it is a fiddly build. Dimensionally the kit has its problems. While the wing cord is perfectly correct the tips of the lower wing are incorrectly shaped and the main wings are too short in span. I don’t want to go into all of the problems because for the most part you can fix a good number of them. In other words if I can fix it with a little sanding or putty I don’t worry about it, but cutting and lengthening wings is a little more than just putty. As I think of it, may be you could just shorten the lower wings, reshape the tips and call it good enough. I don’t think that most people will notice.
Now in defense of Roden I am using the drawings by Ian Stair in the data files that I blew up to 1/32 scale. They could be wrong, but I don’t think they are. And just in case someone thinks that I may have enlarged the plans incorrectly remember, that would render all they got right wrong. They did get a lot right.
 Now for the big question. Is this
kit the best 1/32nd scale Albatros D.III on the market? I would say
yes. But don’t throw away your Eduard kits just yet. Because I think that the
Eduard Albatros D.III is still the best all around kit. Especially the
profipack Albatros D.III. Now the Eduard Albatros does have its problems also
but it does go together very well and you get resin and photo-etched parts to
flesh your kit out.
Now for the big question. Is this
kit the best 1/32nd scale Albatros D.III on the market? I would say
yes. But don’t throw away your Eduard kits just yet. Because I think that the
Eduard Albatros D.III is still the best all around kit. Especially the
profipack Albatros D.III. Now the Eduard Albatros does have its problems also
but it does go together very well and you get resin and photo-etched parts to
flesh your kit out.
I have seen Roden kits improving over time and to be honest I had expected a little better accuracy and decals than I got. In short if you’ve been told or thinking that the decals have improved to a point where they are just like mainstream company decals you will be disappointed as I was.
I think that the biggest problem for this kit is its MSRP of $64.99 and as I see it, the builder kind of expects that as the price goes up the detail should get better and you should experience fewer fit problems. A fret of P-E and a few resin parts would have gone a long way to add to the detail. Also a decal sheet that was designed only for the Albatros D.III early (centerline radiator) and decals that respond to solvents and adhere like some of the mainstream model companies decals do.
| REFERENCES |
“Albatros Fighters” Windsock Datafile Special
“Albatros Aces of World War I” Osprey Publishing
“Albatros Fighters in Action #46” Squadron/Signal Publications
“Jane’s All the Worlds Aircraft 1919” (Jane’s Fighting Aircraft of World War I)
Earls Hobby Hangar in Logan, Utah graciously provided review kit. Get yours at http://www.earlshobbyhangar.com
November 2006
If you would like your product reviewed fairly and quickly by a site that has over 325,000 visitors a month, please contact me or see other details in the Note to Contributors.