Czech Master Resin
1/72 Albatros C.III
|
KIT #: |
5016 |
|
PRICE: |
$ |
|
DECALS: |
Five options |
|
REVIEWER: |
Kyle Bodily |
|
NOTES: |
Resin kit |
The name “Work Horse” fits quite well
the Albatros C.III.
The first aircraft started to show up at the front
in December 1915 and were continuously delivered until the end of the war.
It’s combat life span started in December 1915 and
tapered off by the middle
 of 1917.
After this they were used as trainers.
In fact it bodes well for German aircraft production
that they were able to build over 1000 brand new airframes from mid 1917 to the
armistice for training purposes only.
It was simple to build, and accordingly seven firms
built them during its life span.
of 1917.
After this they were used as trainers.
In fact it bodes well for German aircraft production
that they were able to build over 1000 brand new airframes from mid 1917 to the
armistice for training purposes only.
It was simple to build, and accordingly seven firms
built them during its life span.
Pilots who flew the aircraft
liked it.
It handled nicely and responded to the controls well.
It trained many German pilots as a primary and
secondary trainer.
It would also train observers in all the necessary
skills needed to survive and accomplish missions in one of the most deadly
dimension of the First World War.
Many other countries used the Albatros C.III after
the war.
It saw further action in some of the civil wars that sprang
up with the power vacuum left by Germany and Austria-Hungary, so if you have
some good references you have many options.
See the earlier
preview.
The first thing I do is remove all the
mold blocks and any flash. Then I examine all the parts to make sure they are
going to fit and that I have all the necessary parts.
Before I start to assemble the model I check for
hidden air bubbles.
I find it easiest is to fill t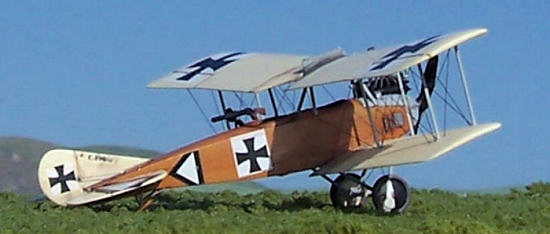 hem
now instead of having one open up while sanding.
It is easy to find these hidden devils by looking at
the parts with a bright light behind them. The bubbles will show up as lighter
spots. I mark them with a very fine tip marker and then drill the bubbles out
and fill the drill holes with stretched sprues, then sand smooth. Since resin
has a bad reputation of not letting paint bite or stick well, I think it is a
good idea to give all the parts a rub down with acetone and a light spray of
automobile paint primer.
Most of the time I don’t have a hard time with
painting but sometimes I’ve had problems.
I find it easier to prime the parts with automobile
paint primer as a preventative measure since if you run in to a particularly
obstinate piece of resin it can makes life really hard.
hem
now instead of having one open up while sanding.
It is easy to find these hidden devils by looking at
the parts with a bright light behind them. The bubbles will show up as lighter
spots. I mark them with a very fine tip marker and then drill the bubbles out
and fill the drill holes with stretched sprues, then sand smooth. Since resin
has a bad reputation of not letting paint bite or stick well, I think it is a
good idea to give all the parts a rub down with acetone and a light spray of
automobile paint primer.
Most of the time I don’t have a hard time with
painting but sometimes I’ve had problems.
I find it easier to prime the parts with automobile
paint primer as a preventative measure since if you run in to a particularly
obstinate piece of resin it can makes life really hard.
Basically from here on out I
find that resin kits go together pretty much the same as regular plastic kits.
In fact if you use super glue to assemble model
kits, the assembly is the same as you’ve been doing.
If you are used to plastic model cement you will get
the opportunity to try a new adhesive.
Now for the glue. Some people
like epoxy and others like super glue. I find epoxy a little more difficult to
deal with than super glue. So I like super glue and I don’t limit myself to one
viscosity. I like the gap filling slow glue for large parts like the fuselage
halves and thin fast glue for smaller parts.
I’ve even been known to hit the weld again with
thicker glue for added strength.
Just like plastic parts, I’ll clean off the paint
and any other contaminants that the glue might not like wherever a bond needs to
be made.
I just apply a fine bead of super glue on one of the parts
to be glued and put them together just like a regular plastic kit.
This kit built just like any other plastic kit of a
similar aircraft.
The parts matched up well and needed very little
sanding and polishing.
This brings us to another
point of resin kits.
As with most airborn particles, the resin dust is
not good for your lungs.
To limit any problems, most resin kit builders will
use a wet sanding process or a good fan to pull the particles outside and away
from the builder and anyone else that may be adversely effected by the dust.
I have a friend that uses a painting booth and
really likes it.
You can find the process you like.
Just remember resin dust is NOT GOOD TO BREATH.
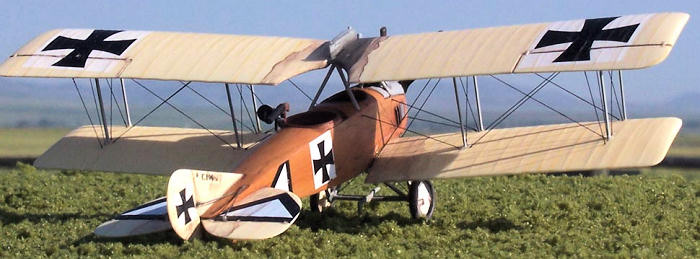
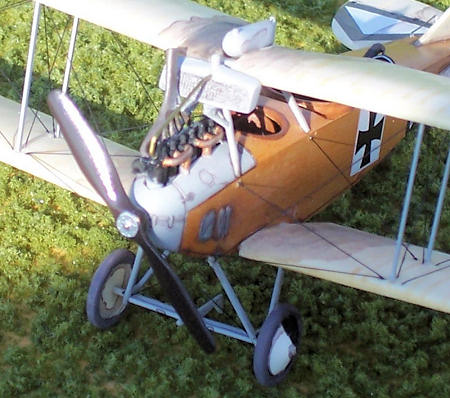
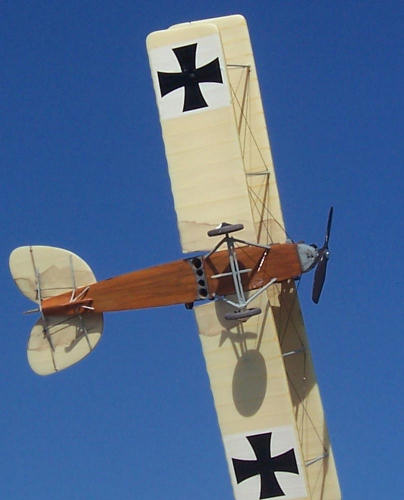
Painting this model is fun since I like
to paint wood and most early Albatros C.IIIs were varnished wood and the wings
were clear doped linen.
Now don’t let this put you off because as time went
on they were also painted a light gray or sky blue.
I’ve seen a picture of a polished aircraft that had
Lozenge fabric wings.
The kit comes with decals to build a Turkish and
Latvian aircraft, both with unique paint schemes.
Your imagination is your only limit here.
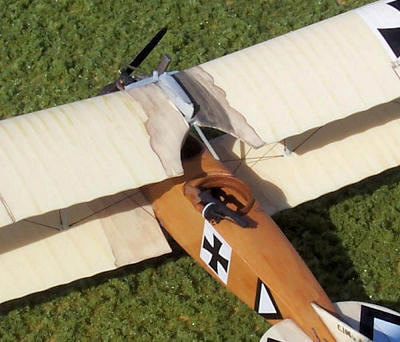
I began with the wood
fuselage and painted a base coat of Testers Model Masters Wood and then streaked
on oil paints to simulate the wood grain.
The cool thing about this process is that the oils
dry slowly and allow you to work until you are happy.
I
 have
several shades of brown and tan and mix them as needed to get the depth of
finish that suits me.
I’ve been told that it looks hard but I think it is
quite easy.
Trust me if I can do it, you can also.
I think that most people can pick this process up in
an evening.
Just get an old model or some styrene and experiment.
The only hard part is not touching it until it is
dry and that takes about two days at room temperature.
have
several shades of brown and tan and mix them as needed to get the depth of
finish that suits me.
I’ve been told that it looks hard but I think it is
quite easy.
Trust me if I can do it, you can also.
I think that most people can pick this process up in
an evening.
Just get an old model or some styrene and experiment.
The only hard part is not touching it until it is
dry and that takes about two days at room temperature.
I painted the wings,
stabilizers and control surfaces clear doped linen.
I like modelmasters raydome tan for this.
You can lighten it or shade it to suite what you may
like the best
All the metal parts were
painted light gray.
I can’t tell you the exact color, not because it is
a proprietary secret but because I mixed it some time ago and forgot the exact
mix.
To weather it, I used a
drybrush technique and I oil stained it with water based paint so I could get a
oil growth ring effect that seems to be endemic of this era of aircraft.
The rule of thumb I use for weathering these
aircraft is that the aircraft would get filthy during operations but were
meticulously cleaned as soon as tactical conditions permitted.
If you didn’t clean these aircraft, the fuel, oil
and general grime would quickly make then unserviceable.
That is to say nothing of all the extra weight that
this crud adds to the airframe, a slow sluggish airplane is not what you want to
bet your life on in combat.
Also one of the more common forms of weathering on
these aircraft was to the paint.
The ground crews would touch up the paint job as
needed and then repaint, sometimes several times.
So I decided to what degree this aircraft would be
in service and weather accordingly.
Basically use your references and have fun
The kit came with decals for
five different aircraft.
As I approached the final assembly I got out an old
Pegasus Albatros C.III that I had started last year and used the decals to
finish it.
The decals fit the CMR kit just fine.
I now have several different Alb C.IIIs.
While challenging, I liked it. If you
want a shake and bake kit you will not find it here.
It is well built and did fit together very well,
virtually like a plastic kit.
I did substitute the kit struts with brass stock and
I think it worked out well.
I think that the kit struts would have worked but I
have started to make it my habit to use brass on most of my resin kits.
Other then that every thing is from the kit.
I would say that this would be great for the World
War One modeler with intermediate skills that wants to try a resin kit on for
size.
That’s my story and I’m sticking to it.
 “Windsock
Datafile #13 Albatros C.III” Albatros Productions LTD
“Windsock
Datafile #13 Albatros C.III” Albatros Productions LTD
“Reconnaissance & Bomber Aircraft of the 1914-1918 War”
Harleyford Publications limited
“Jane’s All the Worlds Aircraft 1919” (Jane’s Fighting
Aircraft of World War I)
My thanks to
 Czech Master Resin for providing the review copy,
Ed.
Czech Master Resin for providing the review copy,
Ed.
Kyle Bodily
July 2008
If you would like your product reviewed fairly and quickly, please
contact
me or see other details in the
Note to
Contributors.
Back to the Main Page
Back to the Review
Index Page