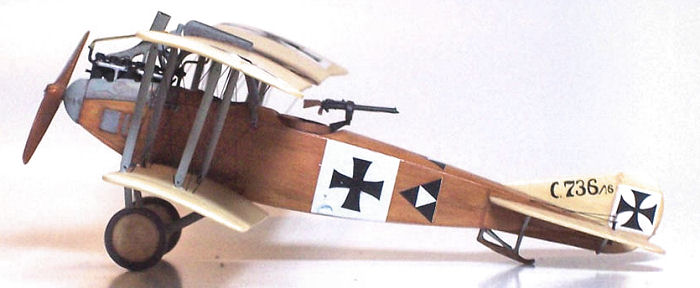
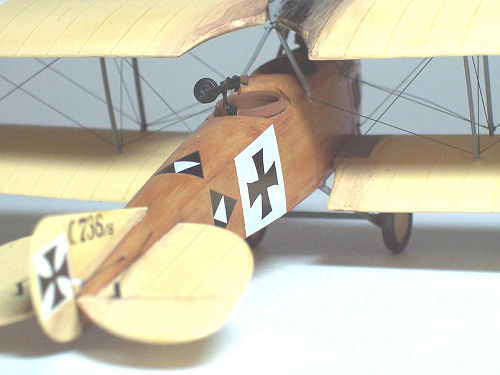
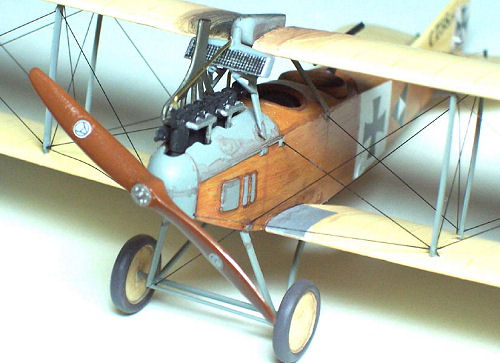
Pegasus 1/72 Albatros C.III
| KIT #: | 4008 |
| PRICE: | $22.98 MSRP |
| DECALS: | One option |
| REVIEWER: | Kyle Bodily |
| NOTES: | Short run |
| HISTORY |
The name (Work Horse) fits quite well the Albatros C.III. The first aircraft started to show up at the front in December 1915 and were continuously delivered to the end of the war. Its combat life span started in December 1915 and tapered off by the middle on 1917. After this they were used as trainers. In fact it bodes well for German aircraft production that they were able to build over 1000 brand new airframes from mid 1917 to the armistice JUST for training purposes only. It was simple to build and accordingly seven firms built them during its life span.
 Pilots who flew the aircraft liked
it. It handled nicely and responded to the controls well. It trained many
German pilots as a primary and secondary trainer. It would also train observers
in all the necessary skills needed to survive and accomplish missions in the
most deadly dimension of the First World War.
Pilots who flew the aircraft liked
it. It handled nicely and responded to the controls well. It trained many
German pilots as a primary and secondary trainer. It would also train observers
in all the necessary skills needed to survive and accomplish missions in the
most deadly dimension of the First World War.
In fact one of the best documented pictures of actual aerial combat was taken from an Albatros C.III. The Germans were very good at documenting the air war. So a motion picture camera was attached to the right wing to film the aircraft as they performed their duties. As the crew went about their business, an Airco DH-2 was spotted. The observer defended the aircraft with a Parabellum MG. As the observer rattled away with his MG, the pilot performed an evasive maneuver, which allowed the DH-2 to fly smack through the camera field of view. Very cool to see.
Many other countries used the ALBATROS C.III after the war. It saw further action in some of the civil wars that sprang up with the power vacuum left by Germany and Austria-Hungary. So if you have some good references you have many options.
| THE KIT |
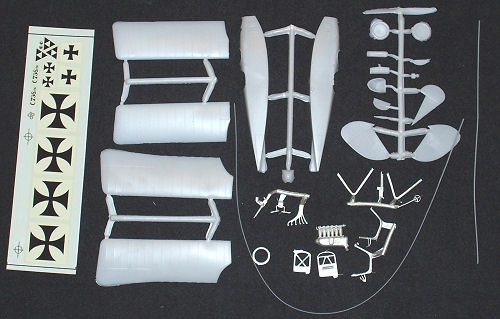 In the box you will find light
colored injection molded parts, strut and rod stock. Decals are for one
aircraft. The plastic is the standard Pegasus format, white with a some flash.
All in all really not bad they just need to be cleaned up. The wings have thin
trailing edges and washout. The panel lines and details are nicely reproduced
with either raised or engraved lines where appropriate. The cockpit is a little
light on detail as is common with this company. The good thing is that in 1/72
scale a lot of detail here is hard to see. But, if you want to you can just go
to town and add scratched detail until your heart’s content.
In the box you will find light
colored injection molded parts, strut and rod stock. Decals are for one
aircraft. The plastic is the standard Pegasus format, white with a some flash.
All in all really not bad they just need to be cleaned up. The wings have thin
trailing edges and washout. The panel lines and details are nicely reproduced
with either raised or engraved lines where appropriate. The cockpit is a little
light on detail as is common with this company. The good thing is that in 1/72
scale a lot of detail here is hard to see. But, if you want to you can just go
to town and add scratched detail until your heart’s content.
The metal parts are usually well done. This is common with British made limited run kits. Like with the other parts you will need to clean them up but as a rule of thumb they don’t need as much clean up.
 The box states that the kit is for
experienced modelers, that is because you'll have to do some fabrication. The
rod and strut stock will need to be fashioned into things like wheel axle,
control stick, rudder and tail skid struts. The strut stock is used for wing
struts and a large piece is used for a spreader for the landing gear. A section
of airfoil shaped plastic strip is included so you can build the landing gear.
Though it seems rather flimsy, once the gear is built, it is sturdy. Now don’t
fret, the instructions help here by telling you the lengths and all. I still
recommend a good reference when building Pegasus and Blue Max Kits. If you keep
mistakes to a minimum you should have more then enough material.
The box states that the kit is for
experienced modelers, that is because you'll have to do some fabrication. The
rod and strut stock will need to be fashioned into things like wheel axle,
control stick, rudder and tail skid struts. The strut stock is used for wing
struts and a large piece is used for a spreader for the landing gear. A section
of airfoil shaped plastic strip is included so you can build the landing gear.
Though it seems rather flimsy, once the gear is built, it is sturdy. Now don’t
fret, the instructions help here by telling you the lengths and all. I still
recommend a good reference when building Pegasus and Blue Max Kits. If you keep
mistakes to a minimum you should have more then enough material.
The instructions are more or less adequate, in other words basic. On one side you have an exploded drawing of the kit and on the other side you get construction notes. Also included are little templates to cut the interplane struts and other items that will need to be fabricated out of the supplied stocks. On the back of the box you will find nice three view drawings. I find that if you have these enlarged to scale you can build the model on them. This allows you to make sure that all the parts are lined and squared up. One more thing to keep in mind is that the molding gates on some of the Pegasus kits at times extend into the parts, so care must be exercised as you clean up the plastic parts.
| CONSTRUCTION |
The construction is simple and
straight forward. I started by removing all the parts from their trees. I
painted all the metal parts with white primmer. The cockpit consists of a
control column, seat, instrument panel, bulkheads and floor, this is adequate in
1/72 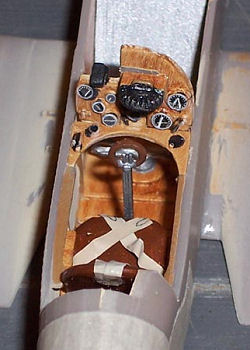 scale, but you may wish to do some detailing. I decided to build this kit
with only the parts provided by the manufacturer and painted the inside of the
fuselage halves, floor, bulkheads and instrument panel wood. The seat and
control column were painted black and gray respectively and the engine was
painted black with silver intake manifolds. The cockpit was assembled and along
with the engine was mounted in the right fuselage. Work was needed to adjust the
engine so it stood out of the fuselage correctly. The only problem that I faced
with this kit was encountered here. The bulkheads need to be trimmed or the
fuselage needs to be thinned. I chose a third option and used a drummel tool to
carve channels in the fuselage to allow the bulkheads to fit into the closed
fuselage halves. Now that every thing was test fitted and I knew all would work
out, I glued the two halves together.
scale, but you may wish to do some detailing. I decided to build this kit
with only the parts provided by the manufacturer and painted the inside of the
fuselage halves, floor, bulkheads and instrument panel wood. The seat and
control column were painted black and gray respectively and the engine was
painted black with silver intake manifolds. The cockpit was assembled and along
with the engine was mounted in the right fuselage. Work was needed to adjust the
engine so it stood out of the fuselage correctly. The only problem that I faced
with this kit was encountered here. The bulkheads need to be trimmed or the
fuselage needs to be thinned. I chose a third option and used a drummel tool to
carve channels in the fuselage to allow the bulkheads to fit into the closed
fuselage halves. Now that every thing was test fitted and I knew all would work
out, I glued the two halves together.
Pegasus kits don’t have pins, tabs or slots to help you build. So you will have to tack some time getting everything glued and set correctly. I like to build these kits on a set of scale drawings. This lets you set everything and let it dry and if anything goes askew (I.E. one of your kids bump the table) you will see it before the glue hardens. This saves time and money with a therapist.
The bottom wings just butt up against the fuselage, so to make this joint stronger, I drilled some small holes in the fuselage and the wings to accept some pieces of brass rod. I usually build the fuselage and put on the lower wings and stop there until I paint. Sometimes I will build a little more or less, it all depends on the kit and the paint scheme that I want.
You will need to make the interplane struts from the strut stock that is provided. This is really not as hard as it sounds and the experience that is gained from this process is very useful in future projects. I drill the holes that I will use for the rigging and before I paint I will build the other components and test fit the whole thing at least twice. The secret to build a Pegasus kit and have fun is to take your time and test fit, test fit, test fit.
| COLORS & MARKINGS |
This is a kind of easy kit to paint since the early Albatros aircraft were not painted. That means that all you need to do is paint the fuselage wood, the wings a tan linen, and all the metal parts gray.
On the other hand if you want, for a while they were painted an overall gray. While some had lozenge fabric. Still others were painted camouflage. In other words your imagination is your only limit here.
 Well, to do the wood fuselage, I
began with Testers Model Masters Wood and used oil paints to simulate the wood
grain. The cool thing about this process is that the oils dry slowly and allow
you to work until you are happy. I have several shades of brown and tan and mix
them as needed to get the depth of finish. I know that it looks hard but I
think it is quite easy. I think that most people can pick this process up in an
evening. Just get an old model or some styrene and experiment. The only hard
part is not touching it until it is dry and that takes about two days at room
temperature.
Well, to do the wood fuselage, I
began with Testers Model Masters Wood and used oil paints to simulate the wood
grain. The cool thing about this process is that the oils dry slowly and allow
you to work until you are happy. I have several shades of brown and tan and mix
them as needed to get the depth of finish. I know that it looks hard but I
think it is quite easy. I think that most people can pick this process up in an
evening. Just get an old model or some styrene and experiment. The only hard
part is not touching it until it is dry and that takes about two days at room
temperature.
Now for the wings, stabilizers and control surfaces. They are linen. Now what color is linen, what is linen and what is it made from. Linen is a fabric made out of plant fibers usually a grass fiber and Flax is most common. The fibers are spun in to a fine thread much the same way as rope only MUCH FINER. It is then woven in to fabric, moistened and pressed between hot rollers. The goal it to produce a fabric of around 200 Denier weight. Linen of this weight is light and strong. To give you an idea of how it looked, it is very similar to the fabric used in modern dress shirts and bed sheets. However most modern linens are a poly/nylon/cotton blend of some sort.
Now, what color is linen. If it is
unbleached it is the color of dry grass in all its autumn hues. If it is
bleached it can range in colors from white to dry grass tan and all the colors
in between. An other factor that effects the color is the dopes used and as you
know, 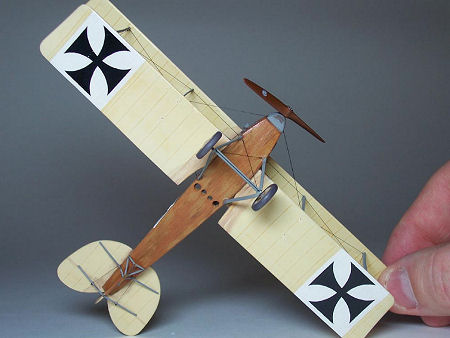 the white will have a tendency to take on the color of the dope. Lastly
as the dope ages it had a tendency to yellow on the upper surfaces and gray on
the lower surfaces. This is only a rule of thumb as dopes and fabrics will age
differently from lot to lot. This is very common today so you can imagine how
lots may have differed almost one hundred years ago.
the white will have a tendency to take on the color of the dope. Lastly
as the dope ages it had a tendency to yellow on the upper surfaces and gray on
the lower surfaces. This is only a rule of thumb as dopes and fabrics will age
differently from lot to lot. This is very common today so you can imagine how
lots may have differed almost one hundred years ago.
The aircraft would get filthy during operations but were meticulously cleaned as soon as tactical conditions permitted. If you see a picture of a dirty airplane it is of an aircraft that has just returned from a mission or multiple missions or it is a write off. If you didn’t clean these aircraft the fuel, oil and general grime would quickly make then unserviceable. That is to say nothing of all the extra weight that this crud adds to the airframe, a slow sluggish airplane is not what you want to be in combat with. Basically the most common form of weathering is painting and touching up the paint job as needed and then repainting. As I said earlier that lots differed. Paint was no exception, colors were a little different every time a new shipment came in. Just like today if you try to touch up something the shades will be off, just a little even if you use paint from the same can.
So, basically use your references and don’t get all wrapped around the axle. This is a fun hobby with a depth and breath to satisfy everyone. Just let your imagination run and have fun.
| CONCLUSIONS |
While not the easiest kit. I sure liked it. It was hard enough to challenge me but not impossible to build. If you want a shake and back kit you will not find it here. I think that when I build my next one I’ll use some of the more ridged brass strut stock (STRUTZ). The extruded plastic just seems flimsy to me. This is not a kit for beginners but would really push a determined intermediate modeler and will definitely add to your Canvas Falcon Collection.
January 2006
| REFERENCES |
“Windsock Datafile #13 Albatros C.III” Albatros Productions LTD
“Reconnaissance & Bomber Aircraft of the 1914-1918 War” Harleyford Publications limited
“Jane’s All the Worlds Aircraft 1919” (Jane’s Fighting Aircraft of World War I)
Copyright ModelingMadness.com
If you would like your product reviewed fairly and fairly quickly, please contact the editor or see other details in the Note to Contributors.
Back to the Review Index Page 2019