| KIT #: | 5907 |
| PRICE: | $25.00 when new. Now long OOP |
| DECALS: | Four options |
| REVIEWER: | Kyle Bodily |
| NOTES: | Fun to build |
| HISTORY |
In the WWII modeling crowd there is a group of modelers that like to model Luft46 kits. These kits are of things that were about to be produced by the Germans. Had the War gone on for two more years these weapons systems most assuredly would have come on line. Who knows, maybe they could have made a difference.
What is over
looked in the realm of WWI is that the same kind of thing happened almost
twenty years earlier. By the fall of 1918 Idflieg (Inspektion der
Fliegertruppen - "Inspectorate of Flying Troops") had already chosen
several successors to the Fokker D.VII. Most would never see the front but
Fokker’s own replacement for the D.VII would see action. It was known as
the Fokker E.V and later as the D.VIII. In fact, at that time the Fokker
and Junkers companies were connecte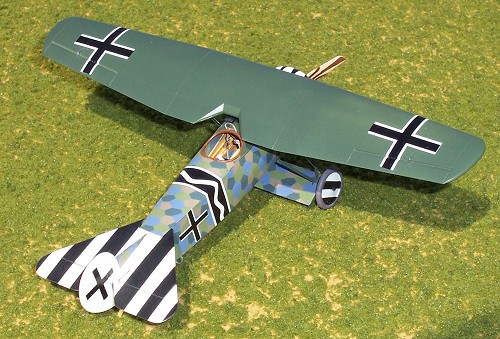 d through a business relationship, so
some of the earliest British intelligence reports state that there was a
possibility the D.VIII was an all metal aircraft. It was also the British
who gave it the nickname “The Flying Razor Blade” or “Razor” for short.
Possibly because of the idea that it was thought to be all metal and the
trailing edge of the wing was as sharp as a razor blade or because it
resembled the new shaving razor designs that were becoming popular at the
time.
d through a business relationship, so
some of the earliest British intelligence reports state that there was a
possibility the D.VIII was an all metal aircraft. It was also the British
who gave it the nickname “The Flying Razor Blade” or “Razor” for short.
Possibly because of the idea that it was thought to be all metal and the
trailing edge of the wing was as sharp as a razor blade or because it
resembled the new shaving razor designs that were becoming popular at the
time.
The D.VIII was
derived from the D.VII when, at the request of Anthony Fokker, the bottom
wings were removed from a D.VII and it was found that this new
configuration actually out preformed the normal D.VII in many ways. This
experimental aircraft was given the designation V.26. The V.26 was
modified into the V.28 the change being a rotary engine. The E.V was a
modified V.28 with an all-new very advanced cantilever wing. The first E
types seem to have had a 110 h.p. engine that was replaced by the 140 h.p
engine as they came available. When an aircraft came from the factory with
a 140 h.p engine it was designated as a D.VIII. If it was retrofitted with
a 140 h.p. engine it kept the E.V designation. Some sources state that the
engine for the D.VIII was a 160 h.p. and that the E.V was originally fitted
with the 140 h.p. engine. The point being is that it seems to be
differentiated E or D type by the engine horsepower and not by the fact it
had one wing or any other factor in its production. I know that it is a
hard habit to break and the myth has been around for so long, But E does
not mean Einedecker and D does not mean Doppledecker. You can read an
excellent article on the World War One modeling page at
http://www.wwi-models.org/misc/desig.html on this very subject.
The only stain on the D.VIII’s is the fact that it had a wing problem that was induced by the fact that it was so advanced. Of course there were some engine issues that seemed to have been a result of the fact that the Germans were forced to use synthetic oil instead of the better castor oil.
The wing was the first of its kind. It was all plywood. Its ribs were three-ply with the entire outer surface including the ailerons being covered with three-ply also. When it came time to test it, there was no data to work with. It was tested to the old wire-braced standards and it was found that the rear spar needed to be strengthened. Fokker complied and the first aircraft were sent off to the front. Within a few weeks three crashed due to wing failure. Production was stopped and the fleet grounded until the answers for the accidents could be found. That’s right it was the rear spar. The strengthened rear spar would not allow the wing to flex properly and the resultant torsion would cause the wing to fail.
Production was started again with the original wing design used. It turned out that the wing was perfectly adequate in its original state. The grounded aircraft were to be retrofitted with the new original wing and the fleet would be given a clean bill of health. But this was not meant to be, very valuable time had been lost and the war would be over soon.
 However, if the
war had continued you would have seen more and more of these aircraft at
the front. Who knows, Fokker D.VIIIs could have been responsible for
another Bloody April in 1919. The Fokker D.VIIf was known as the Me.262 of
its day you can just imagine what the D.VIII might have done had it been
given the chance. On top of this, if you ever get the chance to see
drawings of the V.29 which was a Fokker D.VIIf body married to the Fokker
D.VIII wing and rudder, you kind of start to see a little of what could
have been. Just a little what if, you know. The leap in technology is just
astounding throughout the war years. In fact, to include Jet engines,
Cruise missiles, Ballistic rockets and Air to Air Rockets, all were at
least tested in the 1914-1918 time period. What came to be known as Wonder
Weapons in WWII were just refinements on things used or at least tested in
WWI.
However, if the
war had continued you would have seen more and more of these aircraft at
the front. Who knows, Fokker D.VIIIs could have been responsible for
another Bloody April in 1919. The Fokker D.VIIf was known as the Me.262 of
its day you can just imagine what the D.VIII might have done had it been
given the chance. On top of this, if you ever get the chance to see
drawings of the V.29 which was a Fokker D.VIIf body married to the Fokker
D.VIII wing and rudder, you kind of start to see a little of what could
have been. Just a little what if, you know. The leap in technology is just
astounding throughout the war years. In fact, to include Jet engines,
Cruise missiles, Ballistic rockets and Air to Air Rockets, all were at
least tested in the 1914-1918 time period. What came to be known as Wonder
Weapons in WWII were just refinements on things used or at least tested in
WWI.
The D.VIII did see good service after the war with several
countries to include Poland and Holland.
| THE KIT |
This kit is now out
of production. However I think it is the best Fokker D.VIII kit to be
had. I have not had the opp ortunity to build the new Battle Axe kit in
1/32nd scale, the price tag is a little scary and I’ve not heard
too many good things about it from friends who are attempting it. The DML
kit definitely looks right and it is very strong when you use the
photo-etched struts that come in the kit. In fact if the kit has one setback it would be that the PE struts don’t have the oval cross section of
the original struts.
ortunity to build the new Battle Axe kit in
1/32nd scale, the price tag is a little scary and I’ve not heard
too many good things about it from friends who are attempting it. The DML
kit definitely looks right and it is very strong when you use the
photo-etched struts that come in the kit. In fact if the kit has one setback it would be that the PE struts don’t have the oval cross section of
the original struts.
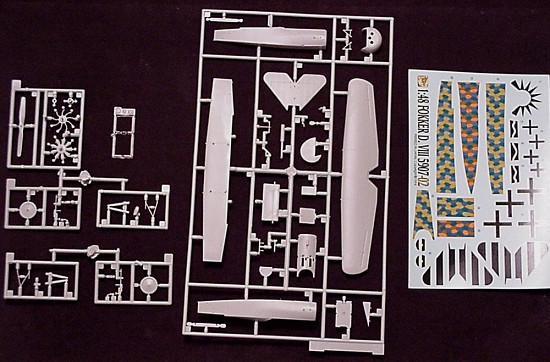
The kit contains (44) gray and (1) clear injection molded plastic parts along with (34) photo-etched bits and one 12” long steal wire for rigging, there won’t be much of that. You get decals for one aircraft from Jasta 6 flown by Oberleutnant Erich Loewenhardt. The instructions are very good and will help guide you through all steps. The kit will make an excellent out of the box build and with the addition of some after market decals you can have a lot of options.
 I’ve built all the
WWI offerings by DML and find them to be the easiest WWI kits to build and
about as accurate as you can get. All in all the kit is just one of those
kits that look good in the box. It is always begging you to start building
it every time you rummage through your to do pile.
I’ve built all the
WWI offerings by DML and find them to be the easiest WWI kits to build and
about as accurate as you can get. All in all the kit is just one of those
kits that look good in the box. It is always begging you to start building
it every time you rummage through your to do pile.
You may still find a release of the same kit with a 1/12th scale resin bust of Vizeflugmeister Hans Goerth. He was top Ace of Marine Feld Jasta 3 with seven confirmed victories. Goerth was one of a select few aces to fly the D.VIII in combat. The nice thing about this kit is you get two sets of decals. One set for Jasta 6 and one set for Marine Feld Jasta 3 along with that cool resin bust of Goerth. I sure wish that Dragon would re-release these D.VIII kits again, heck while I’m wishing, I wish they would re-release all there WWI kits again with the 1/12th busts. Oh, yah, and that someone would give me a million dollars, just figured I’d throw that in while I was wishing.
As I write this, I have just learned that Eduard will be releasing a retool of their Fokker D.VIII in 1/48th scale. I look forward to seeing it since some of their retooled kits are nice and we need a good 1/48th scale D.VIII.
| CONSTRUCTION |
I know that this may sound like a broken
record but I started with the cockpit. All the inner parts fit together
without a hitch. One thing to keep in mind when building a Fokker Dr.I or
a D.VIII is that they had plywood fairing inside of the cockpit that could
be seen from the cockpit opening. It was in the shape of an arrowhead or
long triangle that was sealed with dope and left natural wood color and had
three stiffeners for added strength. I used aeromasters four color Lozenge
decals that I lightened with a little dry-brushing to simulate the inside
of the Lozenge fabric and put this above and the below the plywood
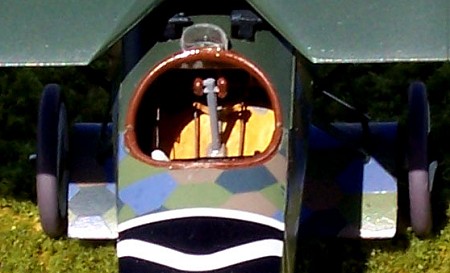 triangle. The cockpit went into the fuselage and the fuselage halves went
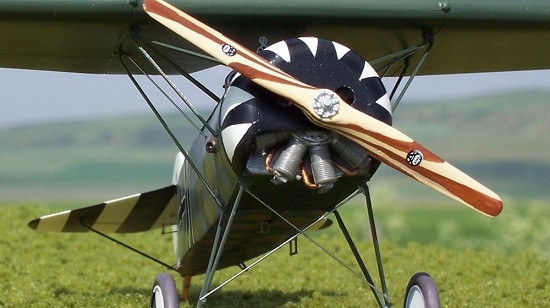
together with no seams. The machine guns have little PE cooling jackets
and the engine is beautiful. In my opinion some of the best out of the box
detail you can get. I put the cabanes and the for-decking on then prepared
the fuselage for painting by just sanding the seams.
triangle. The cockpit went into the fuselage and the fuselage halves went
together with no seams. The machine guns have little PE cooling jackets
and the engine is beautiful. In my opinion some of the best out of the box
detail you can get. I put the cabanes and the for-decking on then prepared
the fuselage for painting by just sanding the seams.
The wing is in two pieces, a top and bottom The only place that needed putty was the rear seem on the wing and you only need to fill out to the ailerons, not bad. At this point I finished removing all the parts from the sprues and cleaned them up for painting.
After painting I decaled and let them dry well before I began the final assembly. I put the wing on first so I would not have to fight with any other peripheral junk. I laid the wing on my work bench attachment points up and began to bend the cabane struts until they fit in to the attachment holes. I then leveled the fuselage as close as possible by propping up the tail with coins and super-glued the cabanes in to the wings. After a second I attached the rear struts to the wing and then to the bottom of the fuselage. I let things sit for a while and then attached the forward struts. I attached the stabs and undercarriage, no problem here. It really went together well. Finely I added all the little bits and was done.
| COLORS & MARKINGS |
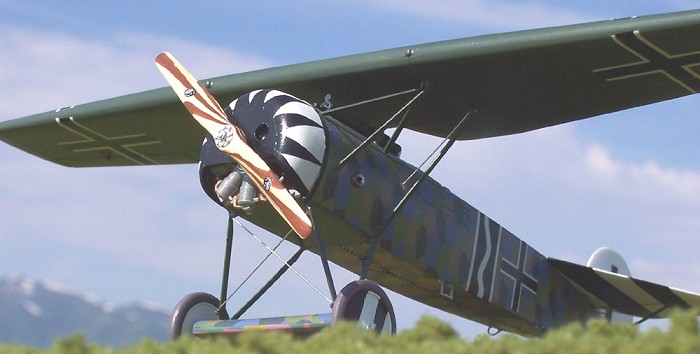
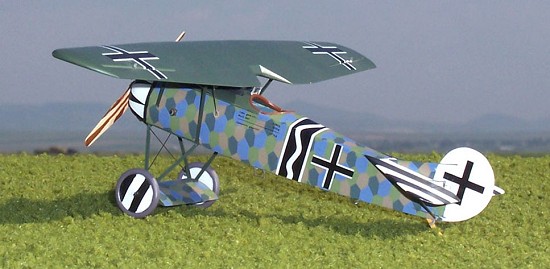
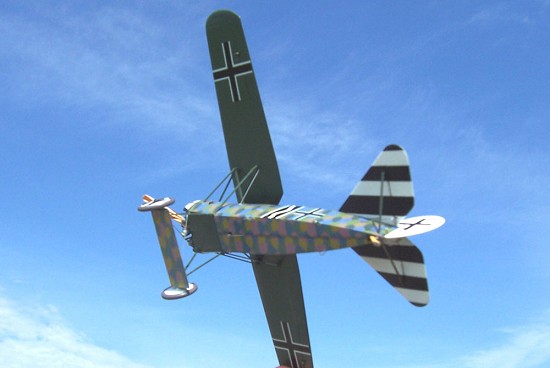
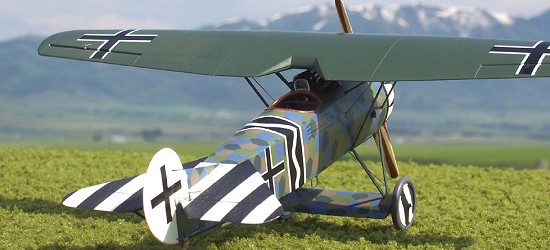
 I built the Jasta 6
aircraft. The decals are good but I like the after market lozenge decals
better so that is what I used, Good old Aeromasters. I painted the
horizontal plains by hand because the supplied decals for the black and
white striped decals of Jasta 6 are wrong. They are just black and white
stripes so no big deal Paint the tail white then mask it and paint it
black, remove the tape and wow, black and white stripes. I painted the
engine cowl white and the faceplate black. I used the kit decal for the
tulip design. I did cut off all the carrier film that I could so I would
not have to fight with it during application. Now for the weathering, at
this point you need to decide weather the aircraft is in before or after
condition. Before a mission or after one. Before a mission WWI aircraft
were in pretty good condition, surprisingly clean. After a mission they
were just plain filthy, oil and soot everywhere and maybe some battle
damage. I chose before a mission.
I built the Jasta 6
aircraft. The decals are good but I like the after market lozenge decals
better so that is what I used, Good old Aeromasters. I painted the
horizontal plains by hand because the supplied decals for the black and
white striped decals of Jasta 6 are wrong. They are just black and white
stripes so no big deal Paint the tail white then mask it and paint it
black, remove the tape and wow, black and white stripes. I painted the
engine cowl white and the faceplate black. I used the kit decal for the
tulip design. I did cut off all the carrier film that I could so I would
not have to fight with it during application. Now for the weathering, at
this point you need to decide weather the aircraft is in before or after
condition. Before a mission or after one. Before a mission WWI aircraft
were in pretty good condition, surprisingly clean. After a mission they
were just plain filthy, oil and soot everywhere and maybe some battle
damage. I chose before a mission.
A cool idea here might be to paint it in a Luft’1919 paint job. You could just let your mind wander and have a lot of fun with it. It’s your kit and you can do whatever you want with it.
| CONCLUSIONS |
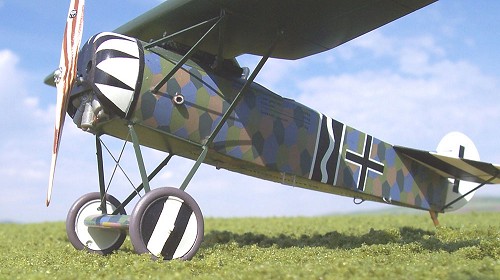
 If you can’t tell
yet I really liked the kit. Very little rigging, a break after my FE2b.
It went together well with very little fiddling. If you have ever wanted
to do a World War One kit and have not yet, this is as close to a training
kit as I know of. In other words, It couldn’t be easier if it came with
training wheels. If you haven’t built World War One aircraft they are
different and take different techniques. But don’t give up because it’s
different or that you may have to learn something new. For me, new and
different things are the spice of life. I find WWI subjects to be very
interesting and rewarding.
If you can’t tell
yet I really liked the kit. Very little rigging, a break after my FE2b.
It went together well with very little fiddling. If you have ever wanted
to do a World War One kit and have not yet, this is as close to a training
kit as I know of. In other words, It couldn’t be easier if it came with
training wheels. If you haven’t built World War One aircraft they are
different and take different techniques. But don’t give up because it’s
different or that you may have to learn something new. For me, new and
different things are the spice of life. I find WWI subjects to be very
interesting and rewarding.
I highly recommend this kit to just about anyone. Oh yes, and make lots of engine noises, have a few dogfights with the kids in the living room or just stay of the sofa and remember what it was like when you started to build. Keep the hobby fun and live vicariously through your kids
I don’t know maybe I’ll do a kit bash of a Fokker D.VII and D.VIII, call it a Fokker D.IX and start a Luft’1919 club.
July 2005
| REFERENCES |
“Jane’s All the
Worlds Aircraft 1919” (Jane’s Fighting Aircraft of World War I)
“Windsock Fabric Special No.1 von Richthofen’s Flying Curcus” Albatros
Productions LTD
“Windsock Datafile #25 Fokker D.VIII” Albatros Productions LTD
“Fighter Aircraft of the 1914-1918 War” Harleyford Publications limited
Letchworth, Herts (Now out of print, but if you can find one a good
investment.)
If you would like your product reviewed fairly and fairly quickly, please contact the editor or see other details in the Note to Contributors.