DML 1/48 Fokker Dr.I
| KIT #: | 5906 |
| PRICE: | $24.95 MSRP when new. Now long OOP |
| DECALS: | Two options |
| REVIEWER: | Kyle Bodily |
| NOTES: | Aeromaster 48-074 decals used |
| HISTORY |
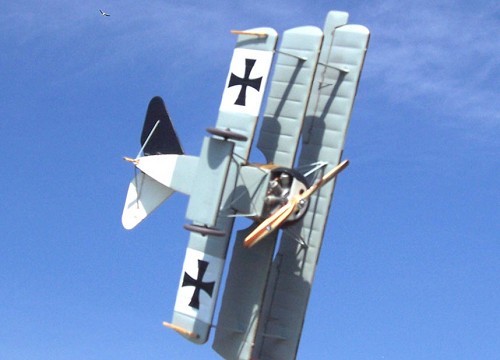
Wow, what new can you say about the Fokker Triplane. It was slow but could turn inside any other aircraft of the war. It could climb like nothing else but performed poorly at high altitudes. The pilot had poor visibility and the aircraft had to be flown almost to a stop after landing. It could do astounding maneuvers but if you took your hands and feet off the stick and pedals, the aircraft quickly went out of control. Only some 320 airframes were built, yet this aircraft seemed to define the Imperial German Air Service. Two of Germany’s Greatest pilots died at its controls (Manfred von Richthofen and Werner Voss) yet the greatest Dr.I ace is relatively unknown (leutnant Josef Jacobs of Jasta 7). Also, it killed several pilots because of wing failures yet pilots had confidence in it.
 There are those
that believe that the German Air Service wasted precious time and resources
on the tri-plane that would have been better placed in a conventional
aircraft.
There are those
that believe that the German Air Service wasted precious time and resources
on the tri-plane that would have been better placed in a conventional
aircraft.
The first triplanes were not German but British and were an outgrowth of the Sopwith pup. In an attempt to reduce the cord of the Pups wings while keeping the same wing area. This was to improve the pilot’s visibility. In fact the allied focus on the triplane seemed on giving the pilot better visibility while the German focus seemed to be on maneuverability. The result of this was a high-aspect wing. A high-aspect wing is characterized by long span and narrow cord. It produces lots of lift for its area and lots of drag.
The first squadrons of Sopwith Triplanes began to make their presence known in the Flanders sector of the front early in 1917. In the spring of 1917 the British moral was at its lowest point. April 1917 became known as "Bloody April”. The triplanes were operated by the Royal Naval Air Service (RNAS). The Royal Flying Corps was going to be equipped with the Camel. The British only operated six squadrons of Sopwith Triplanes but the impact made against the Imperial German Air Service greatly exceeded their numbers.
This impact set
off a triplane craze where everyone thought that all you had to do was take
an existing airframe and slap three wings on it and you would get awesome
performance. In practice the proper balance would remain elusive. All but
two triplanes would never see general service. They were the Sopwith
triplane and the Fokker Dr.I. 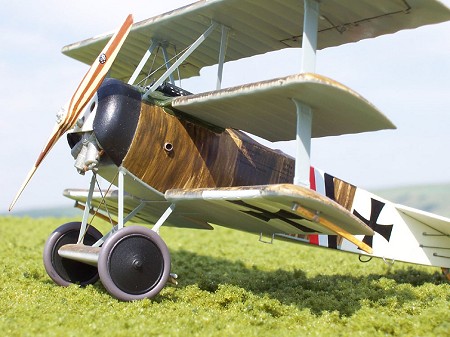
But before the Fokker Dr.I would see production the Germans basically shut down all aviation research and development in an attempt to replicate the Sopwith triplane. This was time, effort and money that the Germans could ill afford. The other factor here was that Manfred von Richthofen was a champion of the triplane and he pushed it very hard. It’s quite ironic that the aircraft he had the most influence in creating, fought so hard to have built, and seems to have preferred above all other aircraft would be the aircraft he met his end in.
In the end, the Fokker Dr.I never impacted the allies like the Sopwith triplane did the Germans. If it weren’t for the influence of the red baron and the fact that he was killed in one. The triplane would surely not be so well known. When you see that there were other German aircraft that were built in greater numbers and really influenced the war to a greater degree you kind of wonder what why this particular aircraft seems to catch the imagination. I don’t know, I like them for the garish paint jobs, the bat-like trailing edges of its wings and that they just look COOL!!!!
| THE KIT |
This is another of the out of production DML kits. In my opinion it is the best 1/48th you can get and one of the best in any scale. I have a Roden Dr.I in 1/32 scale and it looks to be an extremely high quality kit, however I’ve not started to build it yet so I can’t really compare them.
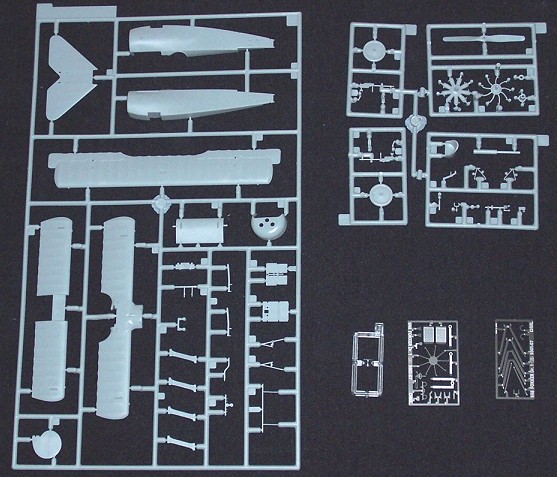 The kit consists
of 77 parts, 48 gray and 1clear injection molded plastic parts along with
27 photo-etched pieces and two 12” long steal wire for rigging. This is
another kit that doesn’t need a lot of rigging. The kit scales out pretty
good according to the Datafile. The elevator is a little odd shaped but is
easily reshaped to its correct outline with a little sanding. The cowling
is not totally correct but it seems that this is the most difficult part of
a Dr.I to model since I know of no kit manufacturer who has gotten it
totally right yet. The curves of the cowl are surprisingly complex. That
being said, the kit has lots of good points. First is the great
photo–etched parts you get. I found the instructions were well written and
easy to follow. The machine guns are jewels with little P-E cooling
jackets. The engine is excellent and the surface detail is world class.
The kit consists
of 77 parts, 48 gray and 1clear injection molded plastic parts along with
27 photo-etched pieces and two 12” long steal wire for rigging. This is
another kit that doesn’t need a lot of rigging. The kit scales out pretty
good according to the Datafile. The elevator is a little odd shaped but is
easily reshaped to its correct outline with a little sanding. The cowling
is not totally correct but it seems that this is the most difficult part of
a Dr.I to model since I know of no kit manufacturer who has gotten it
totally right yet. The curves of the cowl are surprisingly complex. That
being said, the kit has lots of good points. First is the great
photo–etched parts you get. I found the instructions were well written and
easy to follow. The machine guns are jewels with little P-E cooling
jackets. The engine is excellent and the surface detail is world class.
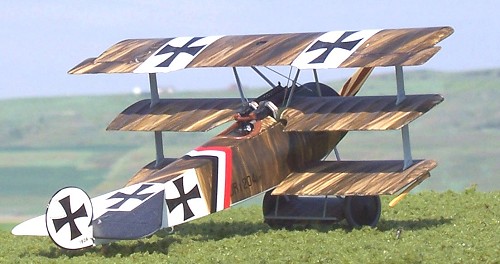
While the wing detail might be argued to be a bit overdone, they are the first manufacturer I know of to simulate the pull down that occurs between the ribs of WWI aircraft. It is different on the underside of the wings than it is on the top. It is difficult to reproduce this well, so DML should be commended for their attempt.
 Under and over
camber pulldown was prevalent on World War One aircraft. Manufacturers
have tried for a long time to model this, but to little success. Wings
either have it overdone or they don’t do anything and mold raised rib tapes
for the look. Both are not quite right. If you have an air museum with
old fabric covered aircraft, go and take a look. You will see that
ribtapes are paper-thin and some aircraft have more fabric pull down than
others do.
Under and over
camber pulldown was prevalent on World War One aircraft. Manufacturers
have tried for a long time to model this, but to little success. Wings
either have it overdone or they don’t do anything and mold raised rib tapes
for the look. Both are not quite right. If you have an air museum with
old fabric covered aircraft, go and take a look. You will see that
ribtapes are paper-thin and some aircraft have more fabric pull down than
others do.
Lots of people misinterpret this as loose fabric or the starving cow look or just a baggy saggy look. Nothing could be further from the truth. That is the sign of good tight fabric. That is not to say that some model companies overdo it a bit. But the amount of pull down is a factor of two main things. First is the space between the ribs and the second is the height of the wing camber or depth of the under camber. Since the early wings did not have stiffeners to help hold the fabric out it naturally would shrink in to the spaces between the ribs.
 During the
covering process the fabric was sewn to the wings. If you look closely at
an old wing you can see these stitches under the ribtapes or pinking
strips, as they are known. This process creates a basic square of fabric
between every rib and these squares behave independently of each other, in
general. The fabric was linen and it shrinks. Like any other fabric that
shrinks, take your blue jeans for instance, it could shrink up to one inch
per every twelve to fifteen inches of material. Since the space between
the ribs was sometimes measured in inches and the cord was measured in feet
you can see how much the fabric would shrink from the leading to trailing
edges as compared to the span between ribs. This also helped to make the
scalloped trailing edges seen on some World War One aircraft. So here’s
the rule, The smaller the space between the ribs the less pull down. As
the space increases the more pulldown will occur. As the height of the
camber increases and cord length decreases, you will see more pull down.
As you change any of these variables the pull down changes. That is why
allied aircraft like the SPAD and Se5 had little pulldown and the Dr.I had
it comparably pronounced. All fabric wings with over and under camber have
pulldown to one degree or another. Some times pull down is so slight that
it would be very hard to reproduce in scale correctly. Other aircraft like
the Dr.I need it to look correct. Look at your references and find
pictures with low-angle lighting and you will be able to count every rib.
If the lighting is right, it is very obvious. I’ve noticed that Roden is
doing an excellent job in this department with their kits. That is why I
like the wings in this kit.
During the
covering process the fabric was sewn to the wings. If you look closely at
an old wing you can see these stitches under the ribtapes or pinking
strips, as they are known. This process creates a basic square of fabric
between every rib and these squares behave independently of each other, in
general. The fabric was linen and it shrinks. Like any other fabric that
shrinks, take your blue jeans for instance, it could shrink up to one inch
per every twelve to fifteen inches of material. Since the space between
the ribs was sometimes measured in inches and the cord was measured in feet
you can see how much the fabric would shrink from the leading to trailing
edges as compared to the span between ribs. This also helped to make the
scalloped trailing edges seen on some World War One aircraft. So here’s
the rule, The smaller the space between the ribs the less pull down. As
the space increases the more pulldown will occur. As the height of the
camber increases and cord length decreases, you will see more pull down.
As you change any of these variables the pull down changes. That is why
allied aircraft like the SPAD and Se5 had little pulldown and the Dr.I had
it comparably pronounced. All fabric wings with over and under camber have
pulldown to one degree or another. Some times pull down is so slight that
it would be very hard to reproduce in scale correctly. Other aircraft like
the Dr.I need it to look correct. Look at your references and find
pictures with low-angle lighting and you will be able to count every rib.
If the lighting is right, it is very obvious. I’ve noticed that Roden is
doing an excellent job in this department with their kits. That is why I
like the wings in this kit.
Now, that being said, is the wing detail perfect? The answer is no. Does it look good? I think the answer is yes.
| CONSTRUCTION |
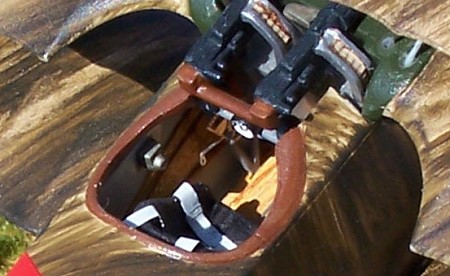 I began with the cockpit. The parts are
fine and delicate so you will need to be careful. I broke one of the seat
brackets but it was easy to fix. I painted all the parts separately then
assembled them. If you get the chance to see inside of a Dr.I cockpit you
will notice a steel tube frame with wood floor and side fairings the rest
is linen. So the cockpit is quite bright. The paint that is seen on the
outside of the Fokkers like the streaky colors are not seen from the
inside. In other words the fabric is just plain linen colored.
I began with the cockpit. The parts are
fine and delicate so you will need to be careful. I broke one of the seat
brackets but it was easy to fix. I painted all the parts separately then
assembled them. If you get the chance to see inside of a Dr.I cockpit you
will notice a steel tube frame with wood floor and side fairings the rest
is linen. So the cockpit is quite bright. The paint that is seen on the
outside of the Fokkers like the streaky colors are not seen from the
inside. In other words the fabric is just plain linen colored.
I assembled the fuselage, engine, re-shaped the horizontal stabilizer and removed the remaining parts from the trees to get everything ready to paint. I like to paint in components since the same was done on the original and it just makes things easier for me.
The bottom and middle wings were easy to mount. The top wing posed a little problem. So, I used the lower wings as a base to align the upper wing since the leading edges of all the wings aligned in a slightly forward sloping angle. The cabanes went in with a snap and some super glue just fine.
I then put on the tail components, engine, cowling and undercarriage. All went without a hitch. I finished with all the little detail pieces that come with the kit and rigged. As I said earlier the rigging is very minimal. You just cut the wire to size and super glue.
| COLORS & MARKINGS |
I decided to do
Leutnant Paul Baumer’s aircraft. He was a civilian pilot before the war
and he tried to join the Navel Air Service but was denied. He was among
the pilots that began their service in the infantry and was wounded like so
many of the early pilots. He finally got into air service as a dental
assistant. Over time he was able to work his way into a flying slot.
 He
finished the war with 43 victories and won the Pour Le Merite (Blue Max).
After the war he found work in the aviation industry and pursued a
doctorate in dentistry before he started his own Aircraft Company. He died
in Copenhagen on 15 July 1927 in an air accident. The hero in ALL QUIET ON
THE WESTERN FRONT was given his name because the author and Paul were close
friends.
He
finished the war with 43 victories and won the Pour Le Merite (Blue Max).
After the war he found work in the aviation industry and pursued a
doctorate in dentistry before he started his own Aircraft Company. He died
in Copenhagen on 15 July 1927 in an air accident. The hero in ALL QUIET ON
THE WESTERN FRONT was given his name because the author and Paul were close
friends.
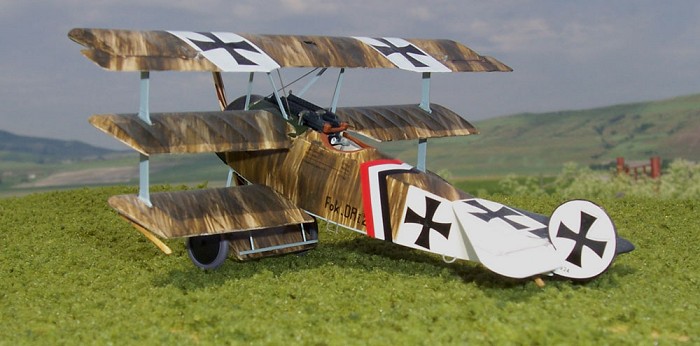
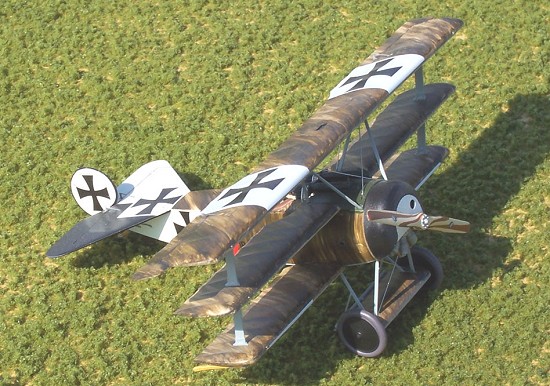
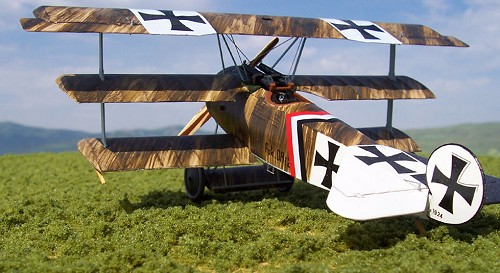
I built an early version of his aircraft. I started by painting the underside first and masked it off. Then I painted a base coat of tan on all the upper surfaces. The streaking is done by diluting the dark olive with a clear base. I dip a stiff bristle brush in this mixture very lightly and streak. The pattern is at an angle from upper right to bottom left and can be at different angles on every surface and is vertical on the sides of the fuselage. This process takes some practice so you may want to try on an old model. The faceplates of Jasta 2 aircraft were white while the horseshoe was black. I decaled the kit and then finished the assembly.
| CONCLUSIONS |
The kit was very fun with few problems. The Fokker Dr.I is a good looking aircraft that gives you many options to build. They all seem to carry a very garish paint job. If the Fokker streak is a little hard for you there were many that carried fill paint jobs that hid the factory finish. This is another kit that would be a good World War One starter. Little rigging and the parts go together well, what more could you want. Except for DML to re-issue the kit again. Every WWI collection is just incomplete without a Dr.I and this Kit will fit that space quite well.
| REFERENCES |
“Fokker Dr.I in action” aircraft #98 Squadron/signal publications
"German Knights of the Air 1914-1918" By Terry C. Treadwell & Alan C. Wood
“Jane’s All the
Worlds Aircraft 1919” (Jane’s Fighting Aircraft of World War I)
“Windsock Fabric Special No.1 von Richthofen’s Flying Curcus” Albatros
Productions LTD
“Windsock Datafile Special Fokker Dr.I Albatros Productions LTD
“Fighter Aircraft of the 1914-1918 War” Harleyford Publications limited
Letchworth, Herts (Now out of print, but if you can find one, a good
investment.)
Kyle Bodily
July 2005
If you would like your product reviewed fairly and quickly, please contact me or see other details in the Note to Contributors.