Warbirds 1/72 Junkers D.I
| KIT #: | ? |
| PRICE: | $long out of production |
| DECALS: | Pegasus/Blue Max markings used |
| REVIEWER: | Kyle Bodily |
| NOTES: | Kit bash using some parts from the Roden kit. |
| HISTORY |
The Junkers D.I was like the J.I, an aircraft ahead of its time. The only thing that you could say bad about either was that they were underpowered. The Junkers D.I was such a leap forward that it out stepped power plant technology.
Hugo Junkers was a professor of mechanical engineering at Aachen before becoming involved in aircraft production. In 1918 he designed the world's first all-metal fighter, the Junkers D-I.
 Junkers
D.I really stood out for several reasons (1) Its wing was a true cantilevered.
In other words its wing had no external bracing. (2) The fuselage was mounted
on the wing like the Spitfire and Mustang of some twenty years later. (3) It’s
skin, like that of the J.I, Cl.I and even later the Junkers JU-52 was corrugated
duralumin. Duralumin was also used in Zeppelin construction.
Junkers
D.I really stood out for several reasons (1) Its wing was a true cantilevered.
In other words its wing had no external bracing. (2) The fuselage was mounted
on the wing like the Spitfire and Mustang of some twenty years later. (3) It’s
skin, like that of the J.I, Cl.I and even later the Junkers JU-52 was corrugated
duralumin. Duralumin was also used in Zeppelin construction.
Junkers aircraft were always considered to be very strong and rugged. Even though they were somewhat difficult to handle, pilots liked them.
To give you an idea of how rugged the Junkers D.I was. On 21 January 1919 a D.I was found abandoned in the open on a Belgium airfield. Remember that would be close to three months at least in the winter weather. The D.I was considered to be still basically airworthy. Four Fokker D.VIIs that were found at the same time and at the same airfield had so badly deteriorated in the weather that they were considered totally unrepairable.
In the end around forty-one airframes were built. Oddly the majority were built after the armistice was signed. While the D.I was not really used against the allies, they did get to be used against Poland and Communist forces in the wars that followed the First World War. They operated from Wainoden and Swinemunde as elements of the most feared wing of the German Naval Air Service, The Geschader Sachenberg.
| THE KIT |
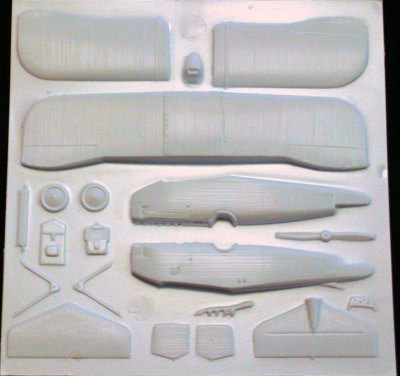 This is a vac-u-form kit. It has no
photo etched or resin, not even decals. It is just one sheet of well-formed
plastic and a set of instructions. The corrugation detail is very good and the
kit is manufactured in such a way that the corrugation is not damaged in the
building process.
This is a vac-u-form kit. It has no
photo etched or resin, not even decals. It is just one sheet of well-formed
plastic and a set of instructions. The corrugation detail is very good and the
kit is manufactured in such a way that the corrugation is not damaged in the
building process.
 I was asked by one of my friends,
“why are you building a vac kit when you can get the Roden kit”. The answer is
that I like this kit and the Roden kit has some problems. To start with it has
an incorrect rudder. For some reason they chose to model the Cl.I rudder on the
D.I. This rudder is only seen on the prototype. For some reason they didn’t
fix it when they built the production D.I. The rudder looks more like the one
on the J.8/Cl.I or J.10.Also the leading edge boots on the wing tips extend too
far back.
I was asked by one of my friends,
“why are you building a vac kit when you can get the Roden kit”. The answer is
that I like this kit and the Roden kit has some problems. To start with it has
an incorrect rudder. For some reason they chose to model the Cl.I rudder on the
D.I. This rudder is only seen on the prototype. For some reason they didn’t
fix it when they built the production D.I. The rudder looks more like the one
on the J.8/Cl.I or J.10.Also the leading edge boots on the wing tips extend too
far back.
In general I just think that the Warbirds vac kit is just a little more accurate. But don’t worry I will use some parts from my Roden Junkers D.I to make the Warbirds kit even better.
My plans are to take the wheels, engine, exhaust pipes, guns and propeller from the Roden kit. The rest will be from the Warbirds kit or scratch built. I’ll use decals from my decal stash or hand paint them since I have never had a good experience with Roden’s decals.
| CONSTRUCTION |
I know that you have all heard it,
but vac kits are just like injection molded kits. In injection molded kits you
cut the parts from the sprues and clean up any flash, then paint and glue. In
vac kits you clean up the flash (a lot of flash), then you paint and glue. It
is 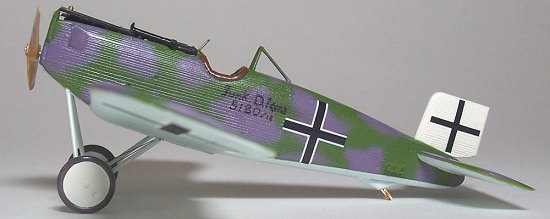 really that easy. Just like with injection molded kits you are only limited
by your imagination. If you want to super detail, build it straight from the
kit, or anything in between you can. It is all up to you.
really that easy. Just like with injection molded kits you are only limited
by your imagination. If you want to super detail, build it straight from the
kit, or anything in between you can. It is all up to you.
Like with all the vac kits I’ve built I cut the sheet down into more manageable pieces. This is quite easy. All you need to do is lightly score the surface of the plastic. This is where most people go wrong and they try to actually cut through the plastic. Just lightly score it where you want it to separate and slowly start to bend the plastic and it will separate right where you scored it. Now I carefully score next to the part. Remember you don’t need to get it perfect at this point and don’t push too hard. Pushing too hard is how you damage parts and have to find where the kids put all those stinking bandages you just bought. All in all it took me about two afternoons to prep all the parts.
I began by building the interior,
sounds oddly like a regular model right. I built a forward bulkhead to separate
the engine from the cockpit and an aft bulkhead just behind the seat. I built
an instrument panel from a piece of the plastic sheet. I detailed the sidewalls
with plastic strip and built a throttle quadrant from the same stock. I built
some engine mounts from some sheet styrene and closed the fuselage. I opened up
the top of the nose so the engine would fit and trimmed the engine mounts to
accept the 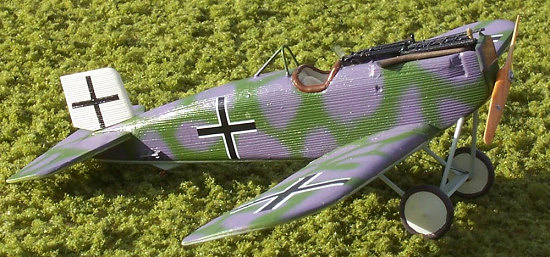 engine and glued it in. Lastly I glued on the radiator and was done
with the body of the model.
engine and glued it in. Lastly I glued on the radiator and was done
with the body of the model.
Now for the wings and tail planes. After I cleaned up the parts, all I did was glue them together just like any other kit. I built the handling points step and roll bar from brass rod. I attached them all and painted.
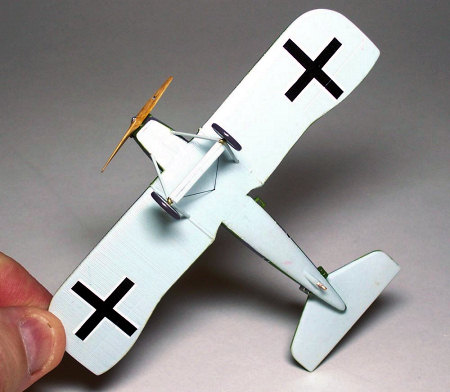
After the paint had dried I built the landing gear from more brass rod. The spreader is brass rod with leading and trailing edge made from sheet styrene. The gun troughs were made from plastic sheet that I cut two channels in with a drummel tool and trimmed down. I glued the troughs to the guns and then glued the guns to the model, making sure that the front of the troughs just cleared the radiator. I then decaled it and glued a small piece of film in place for the windscreen. The only rigging that I needed to do was for the undercarriage and that was just two wires.
| COLORS & MARKINGS |
 I painted the inside of the cockpit
very light gray. I know that most people say that the inside was bare metal,
but as a rule of thumb the Germans painted metal to help preserve it and I think
that the inside of their all metal aircraft would have been painted also. So I
decided to paint it the same shade that Roland and Pfalz painted the inside of
their aircraft.
I painted the inside of the cockpit
very light gray. I know that most people say that the inside was bare metal,
but as a rule of thumb the Germans painted metal to help preserve it and I think
that the inside of their all metal aircraft would have been painted also. So I
decided to paint it the same shade that Roland and Pfalz painted the inside of
their aircraft.
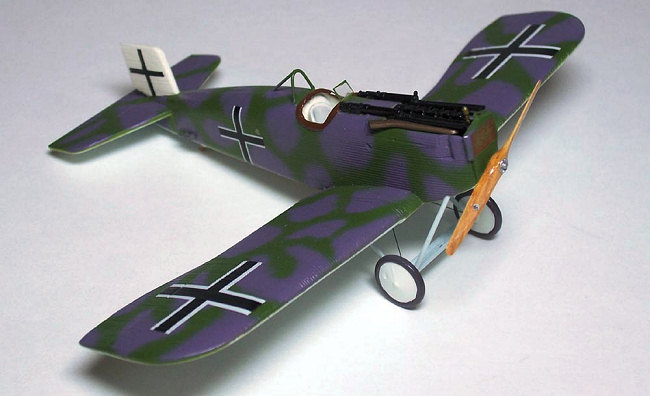
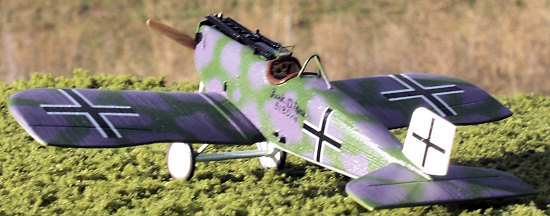
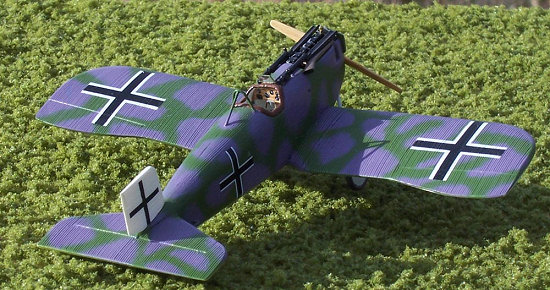
The upper surface of the model was painted in green and purple. This could just as easily been painted in tan and green.
Aircraft at the factory look to be painted in one color, possibly green or beige/tan, the other color or colors could have been painted by the unit.
Bottom line, no standard paint scheme was used on any Junkers aircraft. That included the Junkers J.I and Cl.I also. This fact gives you a little leeway in what you do.
I got the crosses from the Pegasus/Blue Max decal sheet WWI German National Markings Vol.2 (iron crosses). The Pegasus decals settled right down in to the corrugation. The decals look good and the registration is spot-on. What more could you want.
I finished the markings with an extra-fine tipped paint pen to produce the lettering and shot a final coat of semi-gloss clear on the model and was done.
| CONCLUSIONS |
This was a very fun kit. I like the way it looks and I think it is more accurate then the Roden kit. If you want to build one of these kits you will have to look around for one, since it is out of production but I see them now and again at model shows and in old collections.
If you run across something that you like and it is a vac kit, don’t reject it out of hand. They are like any other kits, some are easy and others are difficult. Most of the kits that are given to friends are the difficult ones.
Vac-u-form building is something new for most of us, and it is very rewarding.
| REFERENCES |
“Profile #187 The Junkers Monoplanes” Profile Publications
“Fighter Aircraft of the 1914-1918 War” Harleyford Publications limited
I would like to add a small footnote. On the 29th of September 2006 Peter M Grosz, distinguished historian and author passed away. He was without a doubt the most knowledgeable person on the subject of WWI aircraft and will be sorely missed. I can’t recall ever picking up a modern reference book on World War One aircraft that he was not credited in some way with its production.
Copyright December 2006,
ModelingMadness.com
If you would like your product reviewed fairly and fairly quickly, please
contact
the editor or see other details in the
Note to
Contributors.