Eduard 1/48 Pfalz D.IIIa 'weekend edition'
|
KIT: |
Eduard 1/48 Pfalz D.IIIa 'weekend edition' |
|
KIT #: |
? |
|
PRICE: |
$10.50
|
|
DECALS: |
One option |
|
REVIEWER: |
Kyle Bodily |
|
NOTES: |
Aftermarket decals used in build |
Pfalz Flugzeugwerke von Speyer
am Rhein built very good machines and never received the credit it was due. In
fact at one time, Pfalz Aircraft constituted a full 25% of all front line
fighters in service. The only real strike against Pfalz was it was not a
Prussian company, being from the
German
State
of Rheinland-Pfalz.
It fell more under the Bavarian
sphere of influence and so Pfalz aircraft were commonly issued to Bavarian,
Saxon and Wuerttemberg units.
The idea
that things not made in
Prussia
were of poor quality seems to have effected the Pfalz Company.
Pfalz aircraft never seemed to find
favor with many German pilots. However reports from the front sight excellent
maneuverability with very fast dive
 and pull out. This was because the Pfalz had
a two spar lower wing so it didn’t flap like the Albatros wing did.
The Pfalz wing was much less likely
to snap off like the Albatros was prone to.
The Pfalz, in fact could not out
turn the Albatros. However the margin between out turning the Pfalz and
catastrophic failure was a slim one.
Even Baron Manfred von Richthofen
(the Red Baron) stopped flying the Albatros after he experienced a cracked wing
during a heated a dogfight. He was lucky enough to land the aircraft and flew
the Halberstadt D.II for a time.
and pull out. This was because the Pfalz had
a two spar lower wing so it didn’t flap like the Albatros wing did.
The Pfalz wing was much less likely
to snap off like the Albatros was prone to.
The Pfalz, in fact could not out
turn the Albatros. However the margin between out turning the Pfalz and
catastrophic failure was a slim one.
Even Baron Manfred von Richthofen
(the Red Baron) stopped flying the Albatros after he experienced a cracked wing
during a heated a dogfight. He was lucky enough to land the aircraft and flew
the Halberstadt D.II for a time.
At the time, the preferred German attack was made from
above and in mass. After you positioned yourself you dove on the enemy guns
blazing and escaped without getting entangled in a dogfight. The Pfalz was
perfectly suited for this kind of tactic. The aircraft was strong and fast, you
could put it in a very steep dive and hard pullout without fear of catastrophic
failure.
A fitting complement was made in Jane’s All the Worlds
Aircraft 1919, and can be read in the reprints of this publication (JANE’S
Fighting Aircraft of World War I "page # 180"). In this publication it’s stated
"It answers to the controls, much better than does the Albatros D.5, but tends
to turn to the left in flight. It is not tiring to fly, and is normally easy to
land." It is important to note at this time, aircraft did not have trim tabs so
they often wandered when power was applied or reduced.
Let’s talk about the
kit.
Well it’s Eduard, The best all
around manufacturer of World War One aircraft.
It is well done with no flash or
ejector pin marks that will be seen after the kit is assembled.
I have yet to have a decal from
Eduard give me a moment of trouble.
Everything fits together with
little to no fiddling.
The only real problems I’ve had
with fit were always self induced.
 Finally, you always get a lot for
your money.
No matter what you pay for an
Eduard kit you will always get more for your money then any other manufacturer
that I know of.
Finally, you always get a lot for
your money.
No matter what you pay for an
Eduard kit you will always get more for your money then any other manufacturer
that I know of.
I
was lucky with this kit because I got both the early triangular and later
rounded tipped wings.
The kit is supposed to only have
the triangular lower wing.
I don’t know if this was a mistake
or if Eduard is now giving you both wings but I hope they are giving you both
wings in the kit.
Because of the after market decals
both wings will give the modeler more options than the out of the box model will
since so few of the D.IIIas had the triangular wings.
Another
advantage to this kit is for only $9.00 more you can get the Eduard Pfalz D.III
photo-etch set and now you have a model that is every bit as good if not better
than any comparable kit on the market.
If you are new to modeling or just
want to build on a budget it still can’t be beat.
As with just about every kit I’ve
built I start with all the innards.
No surprises here the whole thing
fit together about as well as it gets.
Even though the engine will end up
covered the detail is such that you could open up the cowlings to show it off in
some kind of diorama.
I
painted the inside and cockpit area silvergray.
You don’t have to paint it that way
but the more pictures that I am able to find of the D.III the less I believe
that the interior was varnished wood.
I have only one picture that shows
anything that looks like varnished wood and that is on an instrument panel.
However the sides of that aircraft
were definitely light gray.
Some pictures show a very dark
cockpit with white instrument faces.
The darkness of these cockpits
looks much darker than the light color of the varnished wood of the albatross
and LVGs.
After seeing a Hannover fuselage
and the Junkers J.I tub in Berlin I think the
 darker color seen in these
pictures would have been more of a shade of graygreen.
darker color seen in these
pictures would have been more of a shade of graygreen.
I’ve
built many Pfalz D.IIIs with wood interiors and I personally like the varnished
wood look but I just don’t think that it is correct for the Pfalz D.III.
I know that to some people this is
an unforgivable blasphemy.
But oh well mark me and make me
wander aimlessly through the cold and cruel world.
After
I got the fuselage together I added the lower wings.
This is the only place I used any
putty and it was just to make the smooth fillet look a little better.
After the glue dried I put a thin
coat of putty on the joint and then got a cotton ball with finger nail polish
remover and softly rubbed the seem until it was smooth.
All this took me about fifteen
minutes.
The
tail parts went on without a hitch and now I was ready to paint.
I painted the model Silvergray.
This shade is based on a German
navy paint chip from 1898 called silbergrau.
It looks more like aluminum oxide
than metallic to me.
I was use to metallic silver and I
kind of liked it but I am getting use to this shade now.
This
was a somewhat simple model to rig since all the rigging runs inboard to out.
I used the same rigging method that
I always use.
I
just drilled small holes (#80 drill bits) half way through the upper wing.
I drill the holes in the bottom
wing all the way through.
I then anchor the monofilament
thread in the top wing and after it has dried threaded it through the bottom
wing and set it with a drop of super glue.
When this has dried I clip the
thread and apply the decals.
Most of the time the decals cover
up the holes that I used for rigging if not I apply some touch up paint to the
model.
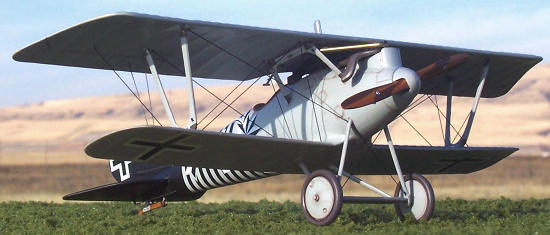
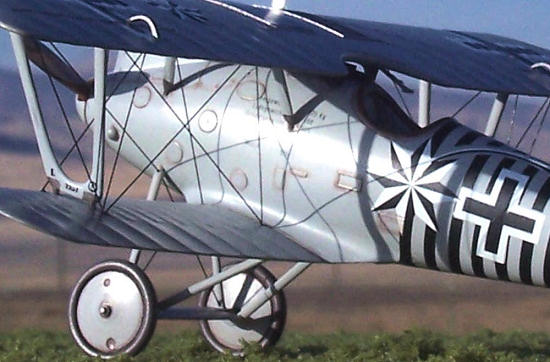 While I liked the decals supplied
in the kit, I liked the old Aeromaster decals choice better.
They are part 48-185 Pfalz fighter
collection part 1.
I used the decals to build the
aircraft of Vzfx Max Holtzem of Jasta 16b (the b stood for the fact that this
Jasta was under the Bavarian sphere of influence).
I like the comet and the story that
goes with it.
Max Holtzen said “My symbol the
comet was the guardian angel who flew with me.
It was my dear mother who I had
lost when I was nine years old.
It was on my
Pfalz D.IIIin 1917 at
Verdun
and in Flanders,
1918 at the Somme
and later the Ypres
offensives.”
I’ll save the kit decals and that
makes for a very nice set of spares for the spare decal pile.
While I liked the decals supplied
in the kit, I liked the old Aeromaster decals choice better.
They are part 48-185 Pfalz fighter
collection part 1.
I used the decals to build the
aircraft of Vzfx Max Holtzem of Jasta 16b (the b stood for the fact that this
Jasta was under the Bavarian sphere of influence).
I like the comet and the story that
goes with it.
Max Holtzen said “My symbol the
comet was the guardian angel who flew with me.
It was my dear mother who I had
lost when I was nine years old.
It was on my
Pfalz D.IIIin 1917 at
Verdun
and in Flanders,
1918 at the Somme
and later the Ypres
offensives.”
I’ll save the kit decals and that
makes for a very nice set of spares for the spare decal pile.
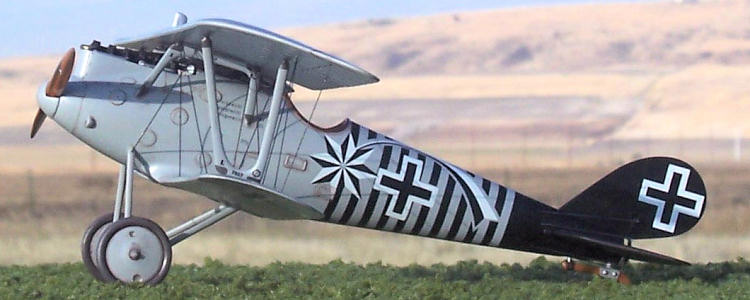
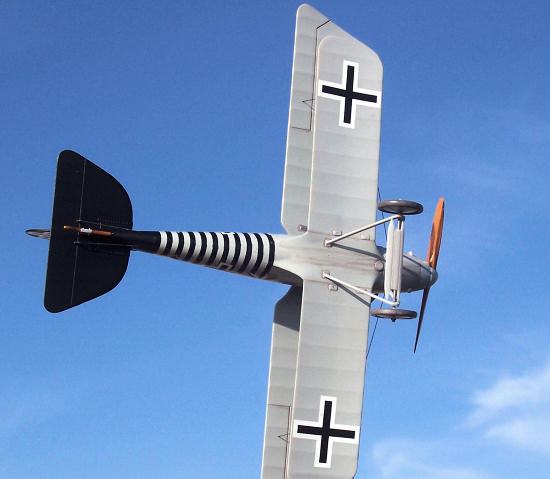
The
overall color of the model was silvergray.
The only other somewhat large use
of color was the tail.
I masked it off and shot on black.
The decals did the rest.
This would be an excellent first
biplane model.
You get simple construction with
very nice detail.
If you want to stretch your skills
just buy an after market set of decals and some PE and now you have an above
average model for less than $30.00.
Like I said Quality, Quantity and
Price, you just can’t beat Eduard
"WWI Warplanes ‘Great
War’ classics in profile Vol. one" Windsock Albatros Productions LTD
"Pfalz D.IIIa Windsock
Datafile 21" Albatros Productions LTD
"German Knights of the Air 1914-1918" By Terry C.
Treadwell & Alan C. Wood
"JANE’S Fighting Aircraft of World War I"
Kyle Bodily
July 2008
If you would like your product reviewed fairly and quickly, please
contact
me or see other details in the
Note to
Contributors.
Back to the Main Page
Back to the Review
Index Page