Roden 1/48 Fokker D.VII (early)
| KIT #: | ? |
| PRICE: | $19.95 MSRP |
| DECALS: | Four options |
| REVIEWER: | Tom Cleaver |
| NOTES: |
| HISTORY |
The Fokker D.VII can fairly be compared to the Me-262 of the Second World War in terms of being the most technologically-advanced fighter to see service during the First World War. With its internally-braced structure that obviated the need for external bracing wires, it in fact was so advanced in terms of aerodynamics that - other than some other fighters build by Fokker during the 1920s - it was not equaled until the introduction of monoplanes in the 1930s. It was fast, maneuverable and easy to fly. It was said of the D.VII that it made the average pilot good and the good pilot great.
Even with the inferior Mercedes D.IIIau engine, the D.VII went a long way toward providing the Germans with technological superiority, even if they were vastly outnumbered by the Allies in the air. It was said of the D.VII that it could "hang on its prop" and shoot an Allied fighter from below. This was due to the excellent stall/spin characteristics of the design.
 By late May, 1918, leading Jastas were able to re-equip completely with the
D.VII and establish local air superiority. Unfortunately, this came too
late to save the German 1918 Offensive, which had been designed to end the
war. The offensive ground to a halt at the moment the D.VII became more
available, and was decisively defeated in June 1918. By July, the Fokker
D.VII could only try to forestall the inevitable, as Allied squadrons
increased with the introduction of the Americans to combat, and the Allied
fall offensive which began in late August sealed the fate of Imperial
Germany.
By late May, 1918, leading Jastas were able to re-equip completely with the
D.VII and establish local air superiority. Unfortunately, this came too
late to save the German 1918 Offensive, which had been designed to end the
war. The offensive ground to a halt at the moment the D.VII became more
available, and was decisively defeated in June 1918. By July, the Fokker
D.VII could only try to forestall the inevitable, as Allied squadrons
increased with the introduction of the Americans to combat, and the Allied
fall offensive which began in late August sealed the fate of Imperial
Germany.
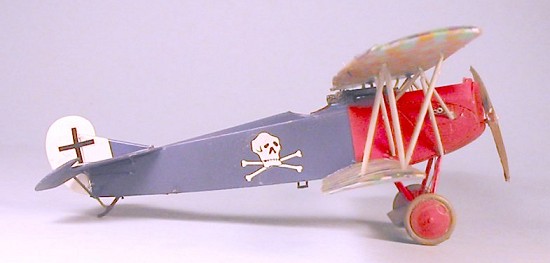
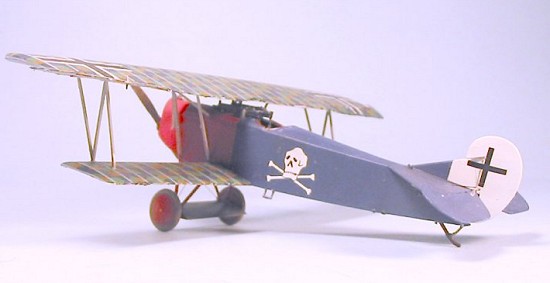
Among the Jastas that put the D.VII to good use was the Prussian Jasta 15. Originally commissioned in 1916 as Jasta 18 and commanded by the redoubtable Rudolf Berthold, the pilots of the unit were exchanged with the original Jasta 15 when Berthold was named commander of Jagdgeschwader II in April 1918, since he wanted his men to continue to serve with him. Jagdgeschwader II initially entered combat against the Royal Air Force in Flanders, but with the opening of the Allied offensive in late July and early August that would end the war, the unit was transferred to first the French and then the American sectors of the Western Front.
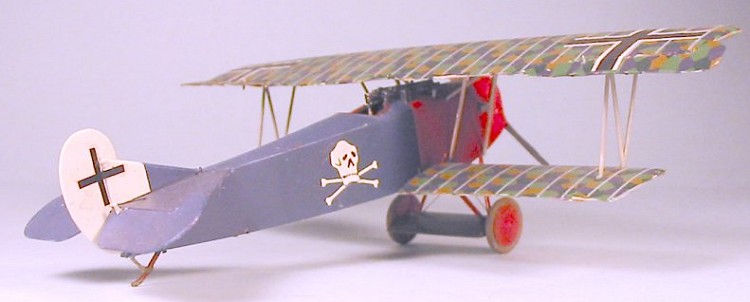
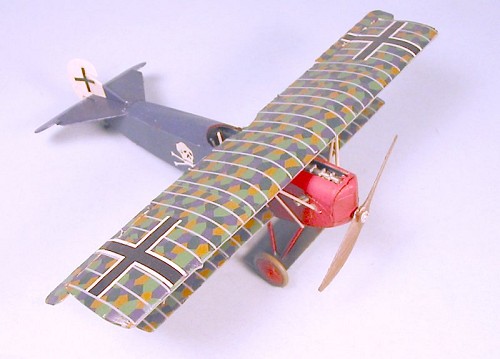
Leutnant Georg von Hantelmann was one of the outstanding young pilots of Jasta 15, who would make his name and the Prussian Hussar’s Death’s Head insignia he carried on the fuselage of his aircraft well-known to the British, French and American flyers he would meet in combat during the final six months of the war.
 Born in 1898 in
Kokietnice, East Prussia, the eldest son of a minor Junkers family, von
Hantelmann joined the army in 1916 at age 18. He served with a Prussian
Hussar cavalry regiment before transferring to the German Air Force a year
later. Primarily mounted on an early Fokker-built D.VII, but also flying a
Siemens-Shuckert D.III, Leutnant von Hantelmann claimed at least
three Allied aces among his 25 victories.
Born in 1898 in
Kokietnice, East Prussia, the eldest son of a minor Junkers family, von
Hantelmann joined the army in 1916 at age 18. He served with a Prussian
Hussar cavalry regiment before transferring to the German Air Force a year
later. Primarily mounted on an early Fokker-built D.VII, but also flying a
Siemens-Shuckert D.III, Leutnant von Hantelmann claimed at least
three Allied aces among his 25 victories.
One of the Allied aces von Hantelmann encountered in combat was 2nd Lt. Joseph Wehner of the 27th Pursuit Squadron, U.S.A.S. Wehner, son of a German immigrant, he had been the subject of a loyalty investigation by the Secret Service while in flight training for his ancestry and the fact he had worked in Berlin for the YMCA for the year prior to the entry of the United States into the war. He was finally permitted to rejoin his unit and go to France in February 1918. After combat training at Issoudun, he was assigned to the 27th Pursuit Squadron, where he did not fit in to the upper-class Ivy League atmosphere of the unit. Bitter over his treatment, Wehner had become friends with another outsider in the unit, 2nd Lt. Frank Luke. Flying together during the height of the Meuse-Argonne Offensive in September 1918, Luke and Wehner carved an immortal niche for themselves in the history of the American Air Service as balloon busters.
Luke and Wehner had opened their offensive against the German balloons on September 15. While Luke went low, after the balloons, Wehner’s job was to keep the patrolling German fighters off his mate. In three days of combat, Wehner had single-handedly shot down five Fokker D.VIIs and exploded a balloon, in addition to destroying two other balloons in company with Luke.
 On the evening of
September 18, 1918, von Hantelmann led four D.VIIs on a mission to
intercept two American SPADs that had just destroyed two observation
balloons just north of the German trenches bordering the Argonne Forest.
Von Hantelmann spotted the two American SPAD XIIIs just as one went low,
headed for the third balloon, while the other soared up to attack the
German formation. In his first pass, Wehner scored his final victory,
shooting down one of the D.VIIs with its engine in flames. Seeing the
light of the burning airplane in the darkening sky, Luke looked up to see
his comrade engaged with the survivors - it was his last sight of Wehner.
On the evening of
September 18, 1918, von Hantelmann led four D.VIIs on a mission to
intercept two American SPADs that had just destroyed two observation
balloons just north of the German trenches bordering the Argonne Forest.
Von Hantelmann spotted the two American SPAD XIIIs just as one went low,
headed for the third balloon, while the other soared up to attack the
German formation. In his first pass, Wehner scored his final victory,
shooting down one of the D.VIIs with its engine in flames. Seeing the
light of the burning airplane in the darkening sky, Luke looked up to see
his comrade engaged with the survivors - it was his last sight of Wehner.
Von Hantelmann became involved in turning fight with Wehner, and suffered damage to his own airplane as he tried to match Wehner’s wild flying. After several minutes, Wehner overshot a stern attack, allowing von Hantelmann to zoom up beneath and put a final burst into the cockpit and engine of the SPAD, which spun down to crash in No Man’s Land. Joseph Wehner was Georg von Hantelmann’s 16th victory.
Over the next five weeks of near-daily combat, von Hantelmann would score 9 more victories and be recommended for the Pour le Merite on November 3, 1918. Unfortunately, the war ended before he could receive the award. After the war, von Hantelmann settled on a farm in Charcice, West Prussia, near the Polish border, where he was murdered by Polish poachers he discovered on the estate on September 7, 1924.
| THE KIT |
The D.VII has been well-served in 1/72 scale in recent years with the release by Roden of 1/72 kits of each of the major production sub-types of the D.VII, which are probably the best kits in that scale generally available.
 In 1/48, the D.VII
has not been so well-served. Until the arrival of the D.VII kit produced
by DML, the only thing available was a kit based on the release Aurora
brought out in 1956, which was resurrected in the late 1970s by Monogram
with a general clean-up involving deletion of the raised markings, and has
been released at different intervals ever since, with the latest release
from Revell of Germany coming this past summer. The kit is so inaccurate
that it is only of value to a modeler if price alone is the criterion. The DML kit, released in1992, was the best kit yet of the D.VII, even if the
photo-etch wing struts and undercarriage struts were too thin. While the
kit did get the taper of the wings right, a modeler of this kit frequently
has to de-warp the single-piece upper wing to get rid of the continuous
tip-to-tip curve from poor production. DML dropped production of the kit in
1995. The kit has also been released by Hasegawa, and any version of it
that can now be found commands collectors prices that start around $35 and
head north quickly.
In 1/48, the D.VII
has not been so well-served. Until the arrival of the D.VII kit produced
by DML, the only thing available was a kit based on the release Aurora
brought out in 1956, which was resurrected in the late 1970s by Monogram
with a general clean-up involving deletion of the raised markings, and has
been released at different intervals ever since, with the latest release
from Revell of Germany coming this past summer. The kit is so inaccurate
that it is only of value to a modeler if price alone is the criterion. The DML kit, released in1992, was the best kit yet of the D.VII, even if the
photo-etch wing struts and undercarriage struts were too thin. While the
kit did get the taper of the wings right, a modeler of this kit frequently
has to de-warp the single-piece upper wing to get rid of the continuous
tip-to-tip curve from poor production. DML dropped production of the kit in
1995. The kit has also been released by Hasegawa, and any version of it
that can now be found commands collectors prices that start around $35 and
head north quickly.
This new series of D.VIIs from Roden are the most accurate D.VIIs released by any company in 1/48 scale. Each major production version is being covered, and they have the best detail of any kit of the model released in this scale. Most important, they look good when complete. However, it is a Roden kit, which means it is "fiddly." For a look at the parts that come in the box, please visit the preview of a representative kit.
| CONSTRUCTION |
Those modelers who want to see what happens when the instructions are followed can check out Scott Van Aken's review. This review covers what to modify in order to get the model you want in the end. The process is pretty simple, and involves no advanced modeling skills other than the ability to "fiddle" with the kit.
 Before starting
construction, a modeler should decide how they want the final result to
look. There are three possible ways to display the model: with the cowling
completely closed up, with the engine partially exposed, and with the
engine fully exposed. Your decision about this point will dominate how you
go about building the model. All of the extra work comes in assembly of
the fuselage and engine cowling.
Before starting
construction, a modeler should decide how they want the final result to
look. There are three possible ways to display the model: with the cowling
completely closed up, with the engine partially exposed, and with the
engine fully exposed. Your decision about this point will dominate how you
go about building the model. All of the extra work comes in assembly of
the fuselage and engine cowling.
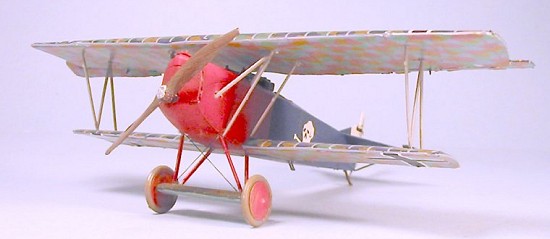
For this model, I went with the cowl completely closed up. The early-production cowling pretty much encloses the entire engine. The first thing to do is to sand down the upper cowling parts to thin them about 50 percent. You should then attach each side part of the cowling to the appropriate unassembled fuselage half, and strengthen the glue joint inside with CA glue. Be sure to open the hole in the right side panel for the exhaust.
At this point, I went ahead and built up the cockpit. Since this airplane emerged from the factory in overall lozenge fabric before being re-painted in the field, I applied lozenge decal to the inside of the fuselage before assembling the cockpit. The proper color for the welded-steel airframe parts you can see is RLM02 (a color the Germans have used for over 100 years now). The floor is wood, painted black. The foot guides and controls were "japanned" in their finish, as was the aluminum seat, which means paint them gloss black. The rear bulkhead is actually a fabric cover, and should be painted in some linen shade. The gas tank and ammo can are also RLM02.
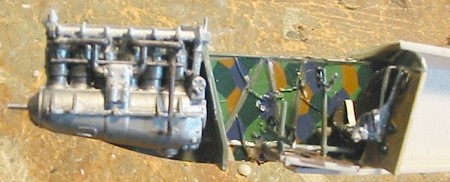 Once I had the
cockpit assembled and the fuselage glued together, it was time to proceed
with the engine. I built up the Mercedes D.III engine per the
instructions, painting it overall black, with the piston heads in
Magnesium, intake control in Stainless Steel, intake piping in Burnt Iron,
and the exhaust pipes in Burnt Iron. If you are closing up the cowl as I
was, you really only need to worry about painting the piston heads and the
exhaust since the rest will be invisible.
Once I had the
cockpit assembled and the fuselage glued together, it was time to proceed
with the engine. I built up the Mercedes D.III engine per the
instructions, painting it overall black, with the piston heads in
Magnesium, intake control in Stainless Steel, intake piping in Burnt Iron,
and the exhaust pipes in Burnt Iron. If you are closing up the cowl as I
was, you really only need to worry about painting the piston heads and the
exhaust since the rest will be invisible.
I attached the engine to the fuselage by gluing it directly to the firewall, and to the forward engine mounts molded into the side walls. I test-fitted the lower cowling panel and found it was a bit wide, I sanded it down and attached it, then attached the upper cowling parts and finally attached the radiator.
The wings are easily assembled, but you need to sand the inner joint of the upper surface of the lower wing so that when you test fit it to the fuselage, the upper surface of the wing will be 90 degrees to the fuselage side, with the dihedral of the wing sloping up to the tip. If you don’t get this right, the struts will never fit correctly to the upper wing.
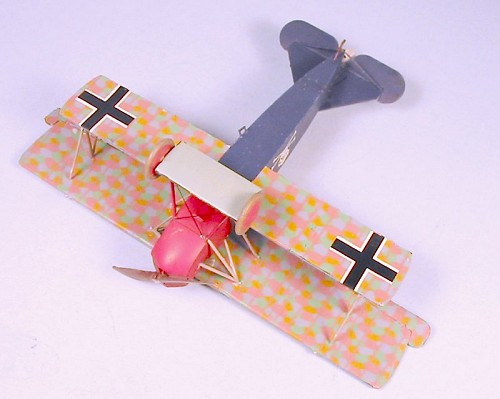
I also assembled the upper wing, and attached the horizontal stabilizer and elevators. At this point the model was ready for painting and applying the lozenge decals to the wings.
| COLORS & MARKINGS |
Painting: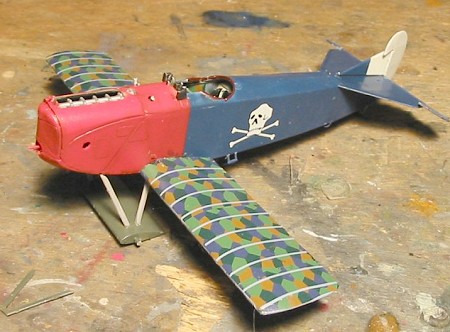
I used Gunze-Sangyo “Blue Angel Blue” for the rear fuselage and the horizontal tail surfaces, masking that and then painting the forward fuselage red. The interplane struts were painted grey, while the gear legs and wheel hubs were painted red. The axle wing was painted Fokker Green on the upper surface and Fokker Blue on the lower. For these colors, I used RLM71 Green and RLM65 Blue. The fuselage was in the uniform colors of the Prussian Hussars, in which many of the officers of Jasta 15 - including von Hantelmann - had originally served. I then gave the model a coat of Future.
Decals:
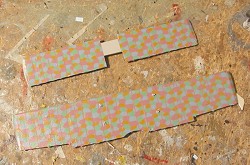 The first decals to
do were the lozenge on the wing. I used the Blue max 4 color Lozenge for
upper and lower surfaces, which I think is the best any company has
produced. These are very thin decals and do not need any solvent. Apply
them with water, let them dry completely. If there are any air bubbles
afterwards, poke them with a knife and use a very light coat of
MicroSol to hide them. I used the light blue rib tape decals after the
lozenge was down. Doing lozenge is a tedious process - you do the lower
surface, let it dry, do the upper surface, let it dry, then apply the rib
tapes. Give each decal a coat of Sealer before handling the part further,
or you stand a very good chance of harming the very thin decals.
The first decals to
do were the lozenge on the wing. I used the Blue max 4 color Lozenge for
upper and lower surfaces, which I think is the best any company has
produced. These are very thin decals and do not need any solvent. Apply
them with water, let them dry completely. If there are any air bubbles
afterwards, poke them with a knife and use a very light coat of
MicroSol to hide them. I used the light blue rib tape decals after the
lozenge was down. Doing lozenge is a tedious process - you do the lower
surface, let it dry, do the upper surface, let it dry, then apply the rib
tapes. Give each decal a coat of Sealer before handling the part further,
or you stand a very good chance of harming the very thin decals.
Once that was complete, I used the kit decals for the national insignia, and got the Death’s Head insignia from a sheet for the Eduard Siemens-Shuckert kit that was in the decal dungeon.
| FINAL CONSTRUCTION |
I attached the vertical fin and rudder and the horizontal stabilizer brace struts, and the machine guns. I then attached the cabane struts in position, test-fitting them to the upper wing. Once they were in position I strengthened the joints with a drop of cyanoacrylate glue, then attached the upper wing with cyanoacrylate. Then I attached the interplane “N” struts, and finished off by attaching the landing gear.
Rigging is easy, since there is only bracing wire on the landing gear and some wire for the controls.
| CONCLUSIONS |
I think the Jasta 15 Fokker D.VIIs are some of the most attractively-finished of this airplane to serve. Von Hantelmann’s insignia is certainly distinctive. Doing the all-lozenge wings also results in a good-looking model that impresses those who see it. Another nice model of my favorite German fighter of The Great War.
November 2004
Review Kit courtesy of my wallet.
Thanks to Blue Max for the lozenge decals.
If you would like your product reviewed fairly and quickly, please contact me or see other details in the Note to Contributors.