| KIT: | Roden 1/48 Fokker D.VII (Fokker-built - Late) |
| KIT #: | 417 |
| PRICE: | $22.95 MSRP |
| DECALS: | Four options |
| REVIEWER: | Tom Cleaver |
| NOTES: |
| HISTORY |
Leutnant zur See Gotthard Sachsenberg:
In the fall of 1916, in answer to air raids conducted over the Flanders front by the Royal Naval Air Service, the German Navy combined two Kampfeinsizter Kommandos into Marine-Flieger Abteilung II, based at Neumuenster. The unit was renamed the Marine Feld Jasta in January 1917, under the command of Leutnant zur See Gotthard Sachsenberg. By October 1917, Marine Jagdgruppe Flandern was formed from MFJ I and MFJ II; these were joined by MFJ III in June 1918 and MFJ IV that September, when the unit became the Marine-Geschwader Flandern. Throughout this organizational growth, Sachsenberg was chosen top commander, and he was considered “The Navy’s Richtofen.”
 Born in 1891, Gotthard Sachsenberg joined the Navy in 1912, and became an
aerial observer in 1915. Trained as a pilot in 1916, Sachsenberg first
flew Fokker Eindekkers. Following his appointment to command MFJ
I, Sachsenberg scored his first victories - a Belgian Farman and an
R.N.A.S. Sopwith “Strutter” - on May 1. By August, with a score of six,
Sachsenberg was awarded the Hohenzollern Cross. A year later his score was
15.
Born in 1891, Gotthard Sachsenberg joined the Navy in 1912, and became an
aerial observer in 1915. Trained as a pilot in 1916, Sachsenberg first
flew Fokker Eindekkers. Following his appointment to command MFJ
I, Sachsenberg scored his first victories - a Belgian Farman and an
R.N.A.S. Sopwith “Strutter” - on May 1. By August, with a score of six,
Sachsenberg was awarded the Hohenzollern Cross. A year later his score was
15.
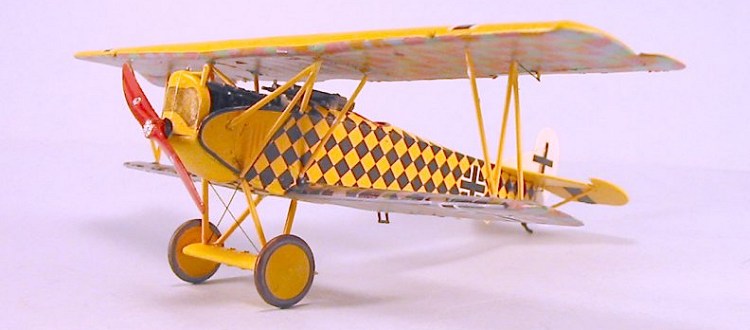
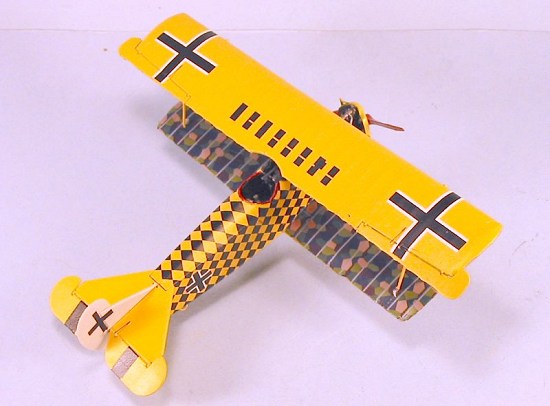
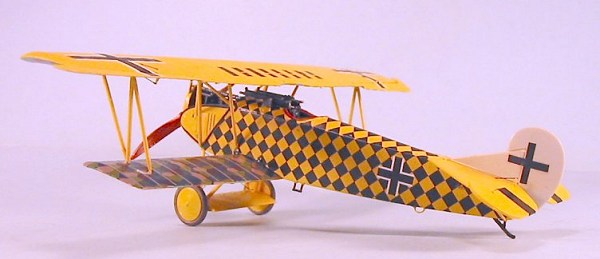
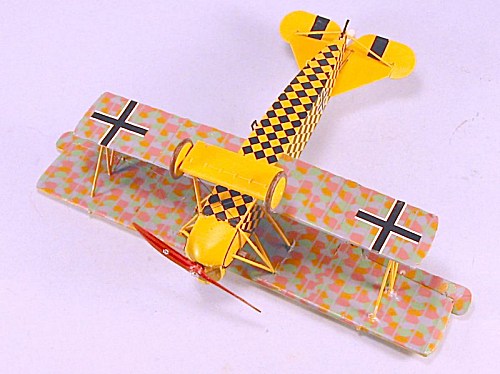
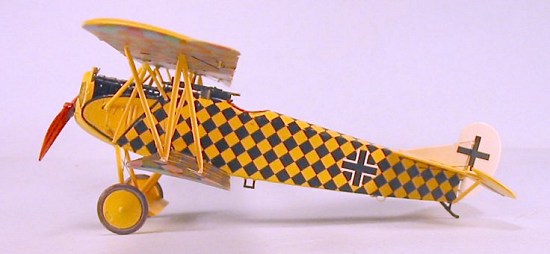
The Marine-Fliegern first received the Fokker D.VII in mid-June 1918. Sachsenberg’s airplane was a D.VIIf, though he had it re-engined with the high-compression Mercedes D.IIIau, for reasons unknown. By the middle of July the Jagdgruppe Flandern was completely re-equipped with D.VIIs, which were immediately identifiable to their opponents because of their yellow noses and tails. Sachsenberg’s was even more identifiable with its upper wing painted yellow and the fuselage repainted yellow with a black diamond checkerboard, making it one of the most colorful D.VIIs flown by any German pilot.
Many of the air combats Sachsenberg participated in were over the North Sea, as was the battle on August 12, 1918 - a week after Sachsenberg had been awarded the Pour le Merite - when he and his pilots encountered D.H.9s of 218 Squadron RAF, escorted by Camels of the 148th Pursuit Squadron, U.S.A.S. Sachsenberg scored two of the seven aircraft shot down, a Camel flown by 1st Lt. R.D. Gracie which Sachsenberg shot to pieces at low altitude, and one of the D.H.9s, which took his score to 21. During the three months of battle left, Sacsenberg continued to score, bringing his final tally to 31.
 Following the end of the war, Sachsenberg went on to organize the
Freikorps Sachsenberg to fly and fight against the Bolsheviks in
Latvia, Estonia and Lithuania during 1919-20. Accompanied by fellow
Marine Flieger ace Theo Osterkamp and Army ace Josef Jacobs,
Freikorps Sachsenberg was instrumental in providing air cover to the
anti-communist forces in the Baltic States in their struggle for
independence against the Red Army. Following his return to Germany,
Sachsenberg took a position with Junkers and ended up in the upper ranks of
management.
Following the end of the war, Sachsenberg went on to organize the
Freikorps Sachsenberg to fly and fight against the Bolsheviks in
Latvia, Estonia and Lithuania during 1919-20. Accompanied by fellow
Marine Flieger ace Theo Osterkamp and Army ace Josef Jacobs,
Freikorps Sachsenberg was instrumental in providing air cover to the
anti-communist forces in the Baltic States in their struggle for
independence against the Red Army. Following his return to Germany,
Sachsenberg took a position with Junkers and ended up in the upper ranks of
management.
During the Second World War, Sachsenberg’s cousin, Heino Sachsenberg, became a 104-victory experte on the Eastern Front with JG 52. Heino demonstrated an affinity for flying garishly-marked fighters as his uncle had done in the Great War, ending his wartime service as Staffelfuehrer of the well-known Papagei Staffel of JV 44, the most wildly-marked Fw-190s to see service with the Luftwaffe.
| THE KIT |
For a look at what’s in the box, please visit the preview of the initial boxing. This kit differs from the earlier kit in that it provides the side and top cowling panels associated with the BMW-powered D.VIIf, considered the best of the series. The kit provides lozenge decals that are one-piece upper and lower for the upper wing and two lower wings; the colors are not right for the lower surfaces, but are “close enough” for the upper surfaces. For purists, I continue to recommend the 4-color and 5-color lozenge decals made by Blue Max as the most accurate lozenge decal available.
| CONSTRUCTION |
The Roden D.VII is definitely a “fiddly” kit, but if one is certain to cover the following points, an accurate and good-looking model will result:
1. Do
not use the separate airframe parts inside the cowling if you are going to
close it up. To insure proper fit of the nose to the rest of the fuselage,
glue the side panels of the cowling to the fuselage halves before
proceeding further with 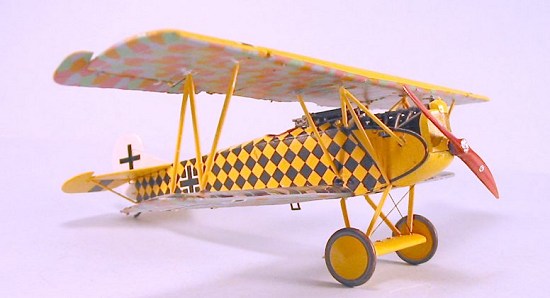 construction.
2. Sand the inner edge of the upper half of the lower wings so that when you attach the lower wing to the fuselage, the upper surface of the wing will be horizontal when seen head-on. If you do not modify the upper half of the wing, the result will be “anhedral” with the lower surface horizontal and the upper surface tapering down - the exact opposite of what you want.
3. When attaching the wings, do not open the guide holes on the wings for the wing struts, or you will have the result of the upper wing being too low. In relation to the fuselage and lower wing.
Past that, test fit everything. For this particular model, you only want to attach the lower wing to the fuselage before proceeding with painting and marking it.
| COLORS & MARKINGS |
Decals for Sachsenberg’s airplane are found on AeroMaster 48-612, “Fokker D.VIIs, Part II”. This complicated scheme requires that you paint the model yellow overall first. I used Xtracrylix RLM04 “Gelb” for this, including the fuselage and lower wing, upper wing, horizontal stabilizer, axle wing, wheels and all struts, which I cut off the sprue tree and cleaned up prior to painting. When this was dry, I gave the model a coat of Future and proceeded with the decals.
 I
began with the fuselage. The AeroMaster decals are fitted for the DML
D.VII kit, and don’t quite fit the Roden kit, leaving “open areas” along
the edges. When these decals had thoroughly set up, I took some
proper-size checkerboard decals from a MicroScale sheet and used them
individually to cover the gaps. This was a complicated and time-consuming
process, but the result looks good.
I
began with the fuselage. The AeroMaster decals are fitted for the DML
D.VII kit, and don’t quite fit the Roden kit, leaving “open areas” along
the edges. When these decals had thoroughly set up, I took some
proper-size checkerboard decals from a MicroScale sheet and used them
individually to cover the gaps. This was a complicated and time-consuming
process, but the result looks good.
Once the fuselage was finished, I gave it a coat of Future to protect the decal from handling.
Next was application of the lozenge and the rib tapes. The lower surface lozenge decals from the kit were wildly inaccurate as regards colors, so I used some Blue Max 4-color lower surface lozenge decal for the upper and lower wings. The Blue Max decals are extremely thin and do not need any decal solvent (in fact, using any will ruin them!). When they were thoroughly set, I covered them with a coat of Future. I decided to use the kit decals for the upper surface of the lower wings, since they were “close enough” color-wise, and being in one piece would be easier to apply. Roden’s decals have improved 100 percent. These decals were almost as thin as the Blue Max decals, which almost led to disaster in applying them - be sure to have a lot of water on the surface you’re putting them on, so you can move them into proper position before they set on you. When these were done, I applied a coat of Future to them. In both cases of the upper and lower decals, once they had set I went over them and sliced open the air bubbles that had formed, then applied a very little drop of decal solvent to make them disappear. When the lozenge was on, I then applied the rib tapes, using rib tapes, using light blue rib tapes from the Blue Max sheet. I then applied the national insignias from the AeroMaster sheet.
When all the decal work was done, I gave the whole model a coat of Xtracrylix semi-gloss varnish.
| FINAL CONSTRUCTION |
First, I attached the engine. Since this was not the BMW, but the Mercedes, it used the early exhaust, which meant I had to open a hole in the right cowling side panel, which wasn’t there in this kit. Also, Sachsenberg’s airplane did not use the upper cowling cover, so I dispensed with that.
Next, I attached the horizontal stabilizer and rudder and the machine guns; Sachsenberg used a telescopic sight, which I made with some Evergreen rod.
 I
then assembled the forward tripod cabane struts, test-fitting with the
upper wing to insure I had them properly splayed. I then attached the rear
cabane struts and test-fitted them with the upper wing. All these joints
were strengthened with a little cyanoacrylate glue. I then attached the
wing, got it in proper position, and applied cyanoacrylate glue to the
joints. I then test fitted and trimmed as necessary to get the outer
N-struts in position and applied a little cyanoacrylate glue to those
joints.
I
then assembled the forward tripod cabane struts, test-fitting with the
upper wing to insure I had them properly splayed. I then attached the rear
cabane struts and test-fitted them with the upper wing. All these joints
were strengthened with a little cyanoacrylate glue. I then attached the
wing, got it in proper position, and applied cyanoacrylate glue to the
joints. I then test fitted and trimmed as necessary to get the outer
N-struts in position and applied a little cyanoacrylate glue to those
joints.
I then assembled and attached the landing gear. I finished up with the tail struts, the pilot’s stirrup and the lifting handles - these are fiddly little parts and easily lost. Once I had them attached I applied a little more cyanoacrylate glue to those joints with a pin to insure they were solidly attached.
The prop was hand-painted and attached.
I finished off attaching the control wires. For those who fear biplanes because of their rigging, the Fokker D.VII is easy with its internally-braced wings.
| CONCLUSIONS |
 Definitely a model that lives up to the legend of the German “flying
circuses” of the Great War. The Roden kits are the most accurate Fokker
D.VIIs currently available. Yes, they are fiddly, but with “some modeling
skill required,” the result is a really nice model.
Definitely a model that lives up to the legend of the German “flying
circuses” of the Great War. The Roden kits are the most accurate Fokker
D.VIIs currently available. Yes, they are fiddly, but with “some modeling
skill required,” the result is a really nice model.
Review Kit Courtesy of Roden.
If you would like your product reviewed fairly and quickly by a site that has nearly 300,000 visitors a month, please contact me or see other details in the Note to Contributors.