| KIT #: | 32015 |
| PRICE: | $59.00 and that includes shipping |
| DECALS: | Five options |
| REVIEWER: | Otis Goodin |
| NOTES: |
Simply the best Albatros in any scale |
| HISTORY |
As most of you know
by now Wingnut Wings has released a number of high quality WWI kits in 1/32
scale. The Albatros DV and DVa were in their second batch of kit releases,
coming a few months after their initial four kits. This review is of the DVa kit
(Tom Cleaver did an earlier review of the DV kit).
There is really
nothing to add to the history of the Albatros that is not already on this
website and many others. Suffice it to say that Albatrosses were produced in
prolific numbers and flown at one time by almost every German fighter pilot in
WWI. For interesting color and camo schemes they are hard to beat making them
popular subjects among modelers of WWI aircraft.
| THE KIT |
None of the
aircraft sport lozenge camouflage, but the green and purple doped surfaces are
as attractive in their own right. There is also a small photo etch plate
containing seat belts and
| CONSTRUCTION |
Construction begins
inside the fuselage and you are instructed to assemble the framework that holds
the pilot’s seat, attaching the seat and support brackets. If you are going to
install the seat belts now would be the time to do it. Other parts are attached
inside the fuselage including the control column, the wooden panel on the right
side that holds various air and fuel controls, the fuel pump pressurizer, and
the prominent bar that goes in front of the pilot and holds the tachometer and
supports the machine guns. This is the most visible feature in the fuselage so
take care to assemble it correctly so that it connects to the other half of the
fuselage when it is installed. Following this, the ammo cans are installed to
another bulkhead on the other side of which is installed the fuel tank. The
control column is also attached to this bulkhead.
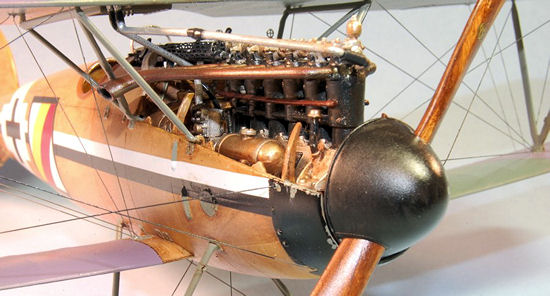
 The next
item to be constructed is the 180PS Daimler-Benz engine. If you are an engine
junkie (I am not) you could spend many hours super detailing by adding wiring,
spark plugs, extra pipes and so forth. The instructions provide three pages of
detailed color photos for reference. But if you don’t want to do all that, you
can simply follow the assembly and painting instructions provided and you will
end up with a very nice looking engine that will look great installed in the
engine bay. While you’re at it be sure to add the rest of the bulkheads in the
engine compartment as this is what the engine bearers sit on. There is also a
great looking oil tank that is very visible if the cowling covers are left off.
Finally be sure to attach the radiator pipe to the engine which will be
connected underneath the top wing later on.
The next
item to be constructed is the 180PS Daimler-Benz engine. If you are an engine
junkie (I am not) you could spend many hours super detailing by adding wiring,
spark plugs, extra pipes and so forth. The instructions provide three pages of
detailed color photos for reference. But if you don’t want to do all that, you
can simply follow the assembly and painting instructions provided and you will
end up with a very nice looking engine that will look great installed in the
engine bay. While you’re at it be sure to add the rest of the bulkheads in the
engine compartment as this is what the engine bearers sit on. There is also a
great looking oil tank that is very visible if the cowling covers are left off.
Finally be sure to attach the radiator pipe to the engine which will be
connected underneath the top wing later on.
Before attaching
the left side of the fuselage add a couple of control items including the
magneto switch and magneto. Once this is done you should be able to successfully
mate the fuselage halves making sure the tachometer bar is appropriately
attached. Not much filler or sanding is required as the parts fit like a finely
engineered machine. I recommend that you apply tape to the areas that may be
affected by any sanding or filling to reduce loss of detail. You will notice on
the bottom of the fuselage that
 there are
tiny holes evenly spaced its entire length. These holes provided drainage for
the fuselage in the event of rain or other “liquids” entering the fuselage. Once
the fuselage was assembled I added the tailplane, rudder and rear flap. In all
probability you will paint these items prior to attaching them. You may wish to
strengthen the attachment of the rudder and stabilizer flap by drilling small
holes in the pieces and installing thin wire to which the rudder and flaps are
glued. The instructions also call for the
there are
tiny holes evenly spaced its entire length. These holes provided drainage for
the fuselage in the event of rain or other “liquids” entering the fuselage. Once
the fuselage was assembled I added the tailplane, rudder and rear flap. In all
probability you will paint these items prior to attaching them. You may wish to
strengthen the attachment of the rudder and stabilizer flap by drilling small
holes in the pieces and installing thin wire to which the rudder and flaps are
glued. The instructions also call for the
I added the
windshield (you have three choices depending on your version), making sure to
cover it with tape (removed later) so it won’t get sprayed or otherwise spotted.
Wingnut recommends that you leave the engine cowlings off and I agree. The
exposed engine really adds a lot of detail and it would be a shame to hide it.
Next it’s time to
add the bottom wing, the cabane and V struts. The DVa version used the V struts
with the bracing bar to help keep the bottom wing from tearing off in a dive.
I’m not sure this problem was ever totally resolved but I guess it’s like adding
seat belts in a car. You’re better off with ‘em than without ‘em. I thought I
would be smart and attach the V struts to the top wing first leaving me with
only two as opposed to four connections when the top wing was connected to the
bottom wing. I know in theory this should work, but when I connected the V
struts to the bottom wing the cabane struts on one side got squeezed between the
top wing and the fuselage causing them to bend. To relieve the pressure I cut
the struts, removed a small piece and reconnected the struts with super glue. It
turned out fine and you can’t even see it, but maybe I should just follow the
instructions next time. Prior to installing the top wing I added the radiator
shutters to the underside. This is a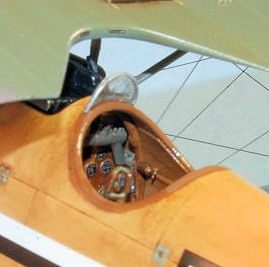 real nitpick but I was a little disappointed that Wingnut didn’t provide the
handle to open and shut the radiator louvers. Eduard included it on their 1/48
scale version so I expected Wingnut to have it in 1/32 scale, especially since
they pointed it out in a photo included with the instructions. Of course I could
have scratch built one.
real nitpick but I was a little disappointed that Wingnut didn’t provide the
handle to open and shut the radiator louvers. Eduard included it on their 1/48
scale version so I expected Wingnut to have it in 1/32 scale, especially since
they pointed it out in a photo included with the instructions. Of course I could
have scratch built one.
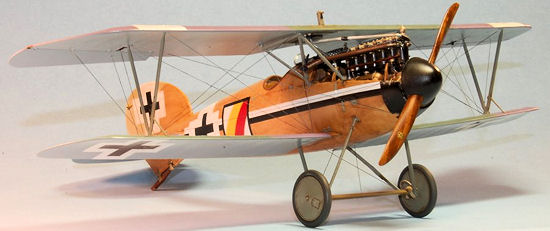
With the top wing
attached be sure to connect the radiator pipes to the radiator. I added the
ailerons after attaching the top wing. Here is the main difference between a DV
and a DVa. The DV had its aileron control lines in the top wing that fit in
large vertical housings. The DVa reverted back to the control lines in the lower
wing that were used on the Albatros DIII and did not have the housings.
Following this the
landing gear struts, axle wing, wheels and wheel covers were attached. Take care
here as the struts are somewhat flimsy and could break easily. I’m not sure what
could be done about it as the struts are in scale and thickness with the
originals. It’s just that plastic struts of the correct dimensions are obviously
not as strong as metal ones. Three propellers are provided, a Niendorf, Axial
and Wolff depending on the version chosen, and it is installed now. Finally the
spinner, anemometer and engine exhaust are added.
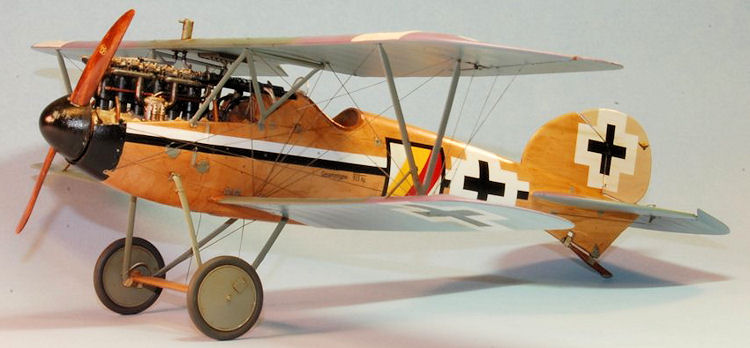
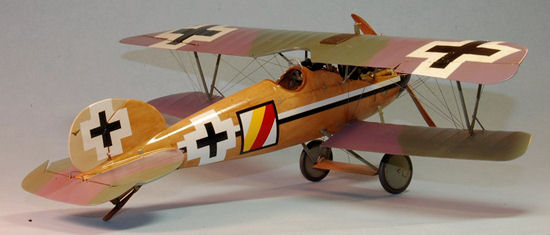
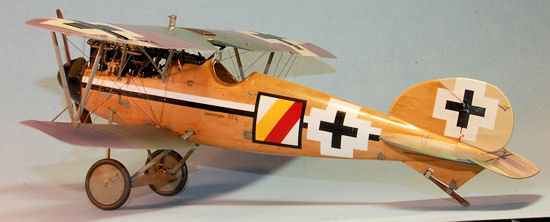
| COLORS & MARKINGS |
The fuselage of the
Albatros was mostly wood so much of the painting involved making gray plastic
look like wood. I accomplish this pretty simply first spraying a base coat of
Model Master Tan (acrylic). Once dry I then add the wood grain using Griffins
Alkyd Burnt Umber. Griffins is a quick drying oil paint made with oil modified
alkyd resin which causes it to dry in about 24 hours. It dries faster than
traditional oils which can take several days but slower than acrylics which can
dry in a few hours. To me it’s the perfect medium for making wood grain and also
for weathering. I use a fairly thin mixture (i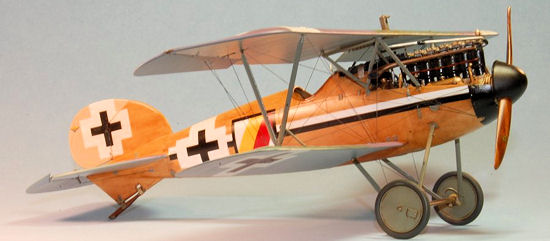 t
thins with paint thinner) and apply it to the base coat with a brush I use for
weathering. Because Albatrosses were made of several panels of birch plywood I
alternate the direction of the grain on each panel. For DVs the plywood was
typically finished in a clear coat of varnish (no stain) so I applied a light
coat of the Griffins Burnt Umber (you could also use Yellow Ochre) to represent
the wood grain panels. On a few of the interior areas I applied it a little
heavier for differentiation.
t
thins with paint thinner) and apply it to the base coat with a brush I use for
weathering. Because Albatrosses were made of several panels of birch plywood I
alternate the direction of the grain on each panel. For DVs the plywood was
typically finished in a clear coat of varnish (no stain) so I applied a light
coat of the Griffins Burnt Umber (you could also use Yellow Ochre) to represent
the wood grain panels. On a few of the interior areas I applied it a little
heavier for differentiation.
The interior metal
parts were generally painted in Model Master RLM Gray. The instrument dials were
painted Silver and then coated with Future prior to applying the instrument
decals. Once dry I then put a drop or two of Testors Clear Parts Cement on the
instruments to represent glass covers. The seat was painted with Polly Scale RLM
66 and weathered with Burnt Umber to represent leather. The seat belts were
painted with Gunze Sail Color and the buckles were finished in RLM Gray. The
fuel and air pressure gauge panel was finished as wood, then decals were applied
to represent the controls. The magneto parts were painted RLM 66 and highlighted
with a little MM Aluminum.
The engine
compartment was finished as wood, although many were painted RLM Gray. The
engine was finished with Aluminum, the cylinders in Gun Metal, and Polly Scale
Copper was used to finish the brass parts. Polly Scale Copper is more brass than
copper and I also used it on the oil tank. I weathered the engine and
compartment with Burnt Umber and pastels. The exhaust was painted in MM Jet
Exhaust, then drybrushed with Gunze Burnt Iron, MM Rust and a little Dark Gray.
The radiator pipes were painted Aluminum. I broke the main pipe leading from the
engine to the radiator so I re-glued it and repainted part of it to look like a
connector. The radiator was painted silver and weathered. The radiator shutters
were painted RLM Gray.
 The
Spandaus were painted MM Gun Metal, highlighted with a little Metallic Gray.
The
Spandaus were painted MM Gun Metal, highlighted with a little Metallic Gray.
All the struts were
painted RLM Gray as were the wheel covers. The wheels themselves were painted
Light Gray and weathered by drybrushing with darker shades. I painted the bungee
cord shock absorbers Gunze Sail Color and weathered with Burnt Umber. The prop
spinner was painted RLM Gray, then I used a little masking fluid to cover some
of it. I then painted the spinner Black and removed some of the paint/masking
fluid to reveal a few spots of RLM Gray underneath to represent paint chipping.
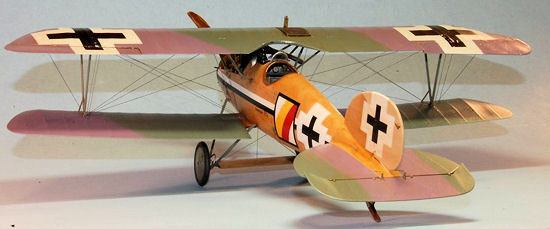
The wings and tailplane were all painted RLM 65 on the bottom, with the top side
finished in Dunkelgrun 71 and Tamiya Purple. The rudder was painted Gunze Sail
Color. The propeller was painted a base coat of MM Tan, the laminations masked
off and painted Gunze Red Brown, and when dry the whole prop was given a wash of
Griffins Burnt Umber. Once dry it was sealed with Future, the Niendorf decal
applied, and then given another final coat of Future. The tailskid was also
painted Tan and given a Burnt Umber wash for wood graining.
Before applying the
exterior decals the model was given a thorough spraying of Future to provide a
slick surface for the decals. All the decals went on with no problem. The
trickiest part was applying the white and black fuselage stripe but it wasn’t
too bad. Once the decals were dry I sprayed them with Future again, then sprayed
the model with a light coat of MM Satin.
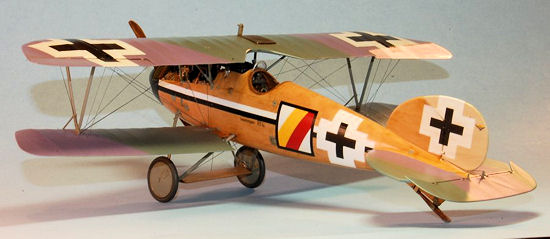
| FINAL CONSTRUCTION |
No WWI model would
be complete without rigging which I proceeded to do after most everything was
finished. Wingnut makes it as easy as possible providing a good rigging diagram
as well as pre-drilling many of the rigging locations. I used invisible
monofilament to rig the Albatros. I applied a drop of super glue to each
location on the underside of the upper wing and attached
 the end of
a rigging line to it until it set up. To speed the process I dip the end of the
line in super glue accelerator before installing it in the hole. I do this for
all the locations under the top wing then I thread the rest of the lines through
holes I have drilled in the bottom wings. I apply a little super glue in the
hole and attach a pair of tweezers or hemostats to the line and let the line
“hang” until the glue sets up. Once
dry I trim off the excess and patch the exit points. This usually involves a
little more super glue, some sanding and a little touch up paint. If there are
decals on the bottom wing I usually wait until all the patching is done before
applying them. The decals also help to hide the touch up.
the end of
a rigging line to it until it set up. To speed the process I dip the end of the
line in super glue accelerator before installing it in the hole. I do this for
all the locations under the top wing then I thread the rest of the lines through
holes I have drilled in the bottom wings. I apply a little super glue in the
hole and attach a pair of tweezers or hemostats to the line and let the line
“hang” until the glue sets up. Once
dry I trim off the excess and patch the exit points. This usually involves a
little more super glue, some sanding and a little touch up paint. If there are
decals on the bottom wing I usually wait until all the patching is done before
applying them. The decals also help to hide the touch up.
| CONCLUSIONS |
The Albatros DVa is
my favorite aircraft of any era, and this kit was a joy to build. I have waited
many years to see an Albatros DVa in 1/32 scale and Wingnut Wings far exceeded
my expectations. If you love WWI models you have probably already experienced
Wingnut Wings. If you have never built a WWI model before, I recommend that you
give their kits a try. The Pfalz DIII might be a little easier than the Albatros,
but the kits are designed to be user friendly so dive in! Highly recommended.
| REFERENCES |
 Wingnut
Wings Albatros kit instructions
Wingnut
Wings Albatros kit instructions
Albatros Aces of
World War I,
Norman Franks, Osprey Publishing, 2000.
Albatros DVa,
Famous Aircraft of the National Air and
Otis Goodin
December 2012
Review kit courtesy
of my kit collection.
If you would like your product reviewed fairly and fairly quickly, please contact the editor or see other details in the Note to Contributors.