Roden 1/48 Fokker D.VI
| KIT #: | 603 |
| PRICE: | $37.98 MSRP |
| DECALS: | Three options |
| REVIEWER: | Otis Goodin |
| NOTES: |
| HISTORY |
Because
of its appearance and place on the timeline in the development of the
Fokker line of WWI aircraft, it’s easy to take one look at the Fokker DVI
and conclude that this airplane is simply a set of Fokker DVII wings
married to a Fokker Dr1 fuselage.
 However, even though the Fokker DVI
appeared after the Dr1 and before the DVII, it is actually its own distinct
airframe. The similarities are obvious, of course, but there are minor
differences not readily visible that give it a separate place in the Fokker
evolutionary line. The fuselage, for instance, is actually a few mm longer
than the Dr1. The top wing, on the other hand, is actually two ribs shorter
in length than the DVII wing.
However, even though the Fokker DVI
appeared after the Dr1 and before the DVII, it is actually its own distinct
airframe. The similarities are obvious, of course, but there are minor
differences not readily visible that give it a separate place in the Fokker
evolutionary line. The fuselage, for instance, is actually a few mm longer
than the Dr1. The top wing, on the other hand, is actually two ribs shorter
in length than the DVII wing.
One interesting fact about DVIs is that it was quite the norm for the fuselage to be covered in 4 color lozenge fabric and the wings to be covered in 5 color fabric. Apparently the fuselages and wings were manufactured in separate plants, and then brought together in one plant to complete assembly of the aircraft. This probably had more to do with economy than any plan for a new camouflage technique to confuse the enemy (or future modelers!). For more detail on the development and history of the Fokker DVI, please refer to Scott’s preview of the Roden kit.
| THE KIT |
The
initial reaction when this kit was first announced was “Why a 1/32 scale
Fokker DVI?” This is understandable considering the aircraft’s relatively
obscure role in WWI aviation history. However, if you have seen Roden’s
previous 1/32 scale release, the Fokker Dr 1, it becomes pretty obvious why
they chose to follow that kit up with the Fokker DVI. For the money of
 course! Seriously, the similarities between the two aircraft are such that,
with only minor modifications, Roden was able to produce another kit
without investing a lot of time and money in new molds. Pretty smart if you
ask me, and we, the modeling public, are the beneficiaries of their
judicious use of resources. Not that I gave it much thought, but I must
admit, I never thought I’d ever see a 1/32 scale Fokker DVI.
course! Seriously, the similarities between the two aircraft are such that,
with only minor modifications, Roden was able to produce another kit
without investing a lot of time and money in new molds. Pretty smart if you
ask me, and we, the modeling public, are the beneficiaries of their
judicious use of resources. Not that I gave it much thought, but I must
admit, I never thought I’d ever see a 1/32 scale Fokker DVI.
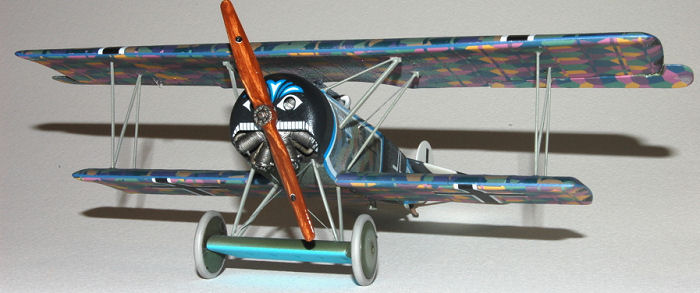
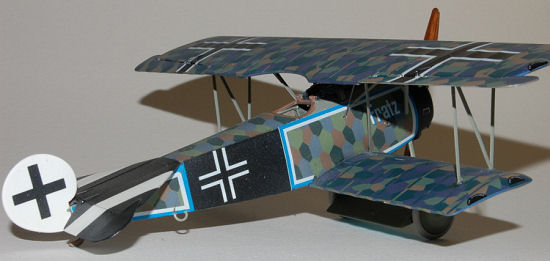
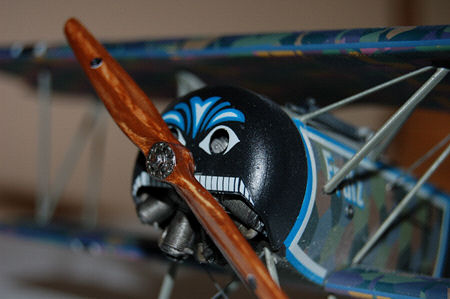
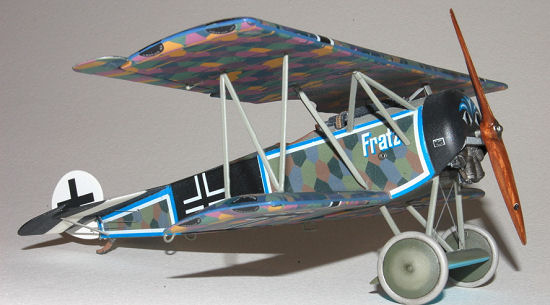
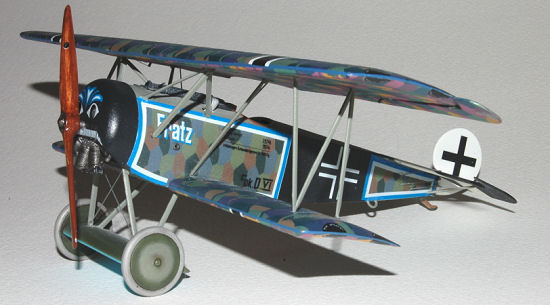
The kit provides the decals for three versions of the DVI, and frankly, those three choices are pretty representative of all the DVIs ever produced. I chose to model the one flown by Lt Kurt Siet of Jasta 80b as it appeared in early 1918. This aircraft is distinctive for its toothy grin on the cowl and the word “Fratz” on the fuselage. Following the war, Seit became a dentist, and perhaps the prominent row of teeth on the cowling face is indicative of his interest in the field. The word “Fratz” has a number of interpretations, among them mischievous brat, grimace, grotesque face, or mug, any of which is consistent with the face on the cowling.
| CONSTRUCTION |
This
particular kit had a prominent film of injection mold release lubricant on
it, so I gave the whole thing a warm soapy bath in the sink to remove it.
Following that, construction begins in the cockpit. I removed the injection
pin marks on the inside of the fuselage, sanded it smooth, and then gave it
a coat of RLM Grey to provide a good surface for the interior lozenge
decals. The DVI was built as a metal tubing frame covered in lozenge
fabric. I decaled the interior using the Americals set of 1/32 scale 4
color 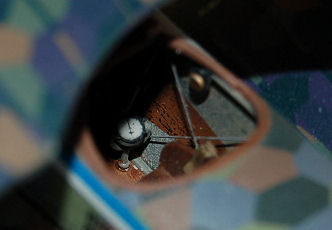 lozenge. Once the decals had set up, I trimmed off the excess, and
then spray painted the lozenge with a light coat of Gunze Sail Color to
create the effect of the lozenge print showing through the back or
unprinted side of the lozenge fabric. This idea came from the Americals
instructions and I trust their judgment as to what is an accurate way to
portray this.
lozenge. Once the decals had set up, I trimmed off the excess, and
then spray painted the lozenge with a light coat of Gunze Sail Color to
create the effect of the lozenge print showing through the back or
unprinted side of the lozenge fabric. This idea came from the Americals
instructions and I trust their judgment as to what is an accurate way to
portray this.
Roden
basically used the fuselage from their Fokker Dr 1 kit and construction of
this kit is almost identical. The cockpit framing is secured to the
fuselage walls. I added support cables in an “X” fashion to the framing on
each side of the cockpit using invisible thread painted Metallic Gray. The
seat assembly consists of floorboard, joystick, rudder pedals, seat mounts,
and the seat (to which I added Eduard seat belts). This assembly attaches
to one side of the fuselage as do the ammo boxes and fuel tank. I think the
modeler could omit the fuel tank, because it is basically not visible once
the whole thing is closed up. Once the seat assembly was in place, I
installed rudder cables along the floor and under the seat using invisible
thread painted Metallic Gray. The hand operated pump on the starboard side
of the fuselage was installed in a different location from that shown in
the instructions, in accordance with the Datafile drawings. I added
 some
tubing from the bottom of the pump into the engine area. Finally, I added
the gun mounting bar to the fuselage side and prepared to mate the fuselage
halves. There is a lot of “stuff” in the interior that must match up to the
other side, making the fuselage somewhat difficult to close. I did a lot of
test fitting and adjusting beforehand to make sure everything ended up
where it was supposed to. I still had to do a good bit of puttying and
sanding of the fuselage to get a smooth finish.
some
tubing from the bottom of the pump into the engine area. Finally, I added
the gun mounting bar to the fuselage side and prepared to mate the fuselage
halves. There is a lot of “stuff” in the interior that must match up to the
other side, making the fuselage somewhat difficult to close. I did a lot of
test fitting and adjusting beforehand to make sure everything ended up
where it was supposed to. I still had to do a good bit of puttying and
sanding of the fuselage to get a smooth finish.
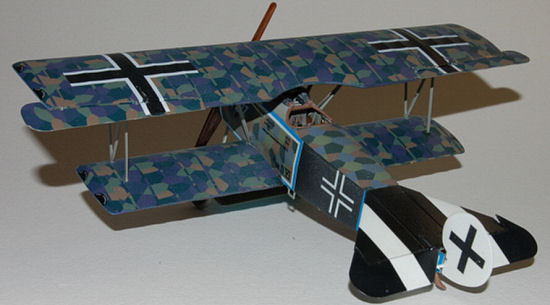
The wings (including the axle wing) went together easily, but still needed some sanding to make the edges smooth. I like the fact that Roden provides the ailerons as separate parts as I despise having to separate them myself. The same is true of the elevator flaps. The rear stabilizer attaches to the fuselage with no problem. There is a visible join line on top where the stabilizer and fuselage meet, and this was true of the real thing. Make sure the line is clean, but don’t fill it or otherwise try to eliminate it. The Roden stabilizer has a strange recessed flat area in the middle (the same is true of their Dr 1 kit) that doesn’t resemble anything I have ever seen on these aircraft before. The modeler can either fill it in or ignore it. I decided to ignore it here, mainly to make it visible in this article (although it doesn’t show that much). I would be interested to see what research Roden is relying on for this.
Roden supplies a nicely detailed engine that fits onto the firewall that fits onto the front of the fuselage. Spend a lot of time here making sure everything fits together well and lines up with the fuselage correctly. If this is not done right, then the cowling won’t fit correctly and you’ll have a very visible problem on your hands. I ended up thinning down the inside of the cowling and removing part of the engine cylinders so the cowl would fit over the engine properly. Roden supplies two propellers, one an Axial and the other a Heine (I think). I opted for the Axial because that is the one I had the decals for, plus the Datafile photos of this aircraft showed it with an Axial prop.
 The
wings and fuselage were covered with lozenge fabric prior to assembling the
completed airframe. I attached the bottom wings first. Something about the
way the wings attach to the fuselage causes them to have an anhedral
(instead of dihedral) effect. I did some carving and sanding where the
wings and fuselage meet, but the wings still tended to droop until the top
wing was attached. Before installing the top wing I installed the cabane
and N struts. Roden does a very nice job with the various struts, although
the N struts are flimsy. When I attempted to attach the top wing I ran
into a problem. If I lined up the cabane struts to the attachment points
under the top wing, then the N struts did not line up, and vice versa.
After much trial and error, I determined that the N struts are too long, so
I trimmed them and sank them deeper into the bottom wing. The fit was
better, but I still had to trim and refit the cabane struts.
The
wings and fuselage were covered with lozenge fabric prior to assembling the
completed airframe. I attached the bottom wings first. Something about the
way the wings attach to the fuselage causes them to have an anhedral
(instead of dihedral) effect. I did some carving and sanding where the
wings and fuselage meet, but the wings still tended to droop until the top
wing was attached. Before installing the top wing I installed the cabane
and N struts. Roden does a very nice job with the various struts, although
the N struts are flimsy. When I attempted to attach the top wing I ran
into a problem. If I lined up the cabane struts to the attachment points
under the top wing, then the N struts did not line up, and vice versa.
After much trial and error, I determined that the N struts are too long, so
I trimmed them and sank them deeper into the bottom wing. The fit was
better, but I still had to trim and refit the cabane struts.
The axle wing struts were attached to the axle wing and then attached to the bottom of the fuselage. Just take care to be sure they are evenly spaced. I added the wheels after the struts had set. Finally, I attached the rudder, and then proceeded with the rigging. If fear of rigging has kept you from building WWI aircraft, you have nothing to fear here. Like its cousins the Dr 1 and the DVII, the DVI requires only a minimal amount of rigging, which I accomplished using both invisible thread and steel wire (High E guitar string).
| COLORS & MARKINGS |
I previously mentioned decaling the interior fuselage walls with lozenge from Americals. The interior framing was painted RLM Grey, as were the joystick, rudder pedals, and gun mounts. The area behind the seat was also covered in lozenge fabric, printed side up this time. The floorboard and joystick handles were painted Gunze Wood Brown, glazed with a thinned coat of Testor’s Brown to simulate wood grain. The seat was painted Model Master Leather, the seatbelts painted Sail Color and the seat assembly given a wash of Burnt Umber and then drybrushed for highlights. Cockpit coaming was painted with Gunze Wood Brown.
 The various struts were painted RLM
Grey, even though the instructions say to paint them Metallic Gray. The
Datafile says they were a light gray color which sounds a lot like RLM Grey
to me, since we know it was used frequently for this purpose.
The various struts were painted RLM
Grey, even though the instructions say to paint them Metallic Gray. The
Datafile says they were a light gray color which sounds a lot like RLM Grey
to me, since we know it was used frequently for this purpose.
The wheels were painted RLM Grey and then the edges were outlined by hand in Polly Scale Fokker Dark Green. I drybrushed it on to give it “fuzzy” edges. The tires were painted Tamiya Medium Gray.
As this aircraft was covered almost entirely in lozenge fabric, covering it in lozenge decals took up a large part of the assembly time. I first painted the wings and fuselage with RLM Grey, then coated it all in Future to provide a smooth surface for the decals. Roden provides a set of upper and lower 4 color lozenge decals. The colors are close, but because I chose to use 5 color on the wings and 4 color on the fuselage, I wanted the colors to be consistent with each other, and therefore I decided to use lozenge decals made by Americals, which most WWI modelers would agree produces some of the best lozenge decals on the market today. In fact, in 1/32 scale, his product is about the only game in town. The colors are extremely accurate and the quality of the decals is very good. I did have a problem with the 5 color sheet, as it was brittle and tended to shred at the edges when cut. This, however, is not typical of their product.
Idflieg directed that aircraft
wings be covered with lozenge fabric so that there was a seam where two
pieces of fabric met in the center of the wings. Most manufacturers
probably started in the center and worked their way to the outer edges of
the wings. Also, most lozenge fabric was applied on the wings with the
fabric bolts running in opposite directions (think north/south) to each
other. Fokker, however, did things his own way, preferring to start at one
end, one rib inward from the outer edge, and work across the wing to the
other side. He probably never had a seam in the center of the wing. He also
applied all his fabric in the same direction (think north/north). Flaps
were covered with fabric lying approximately perpendicular to the direction
of the wing fabric. I tried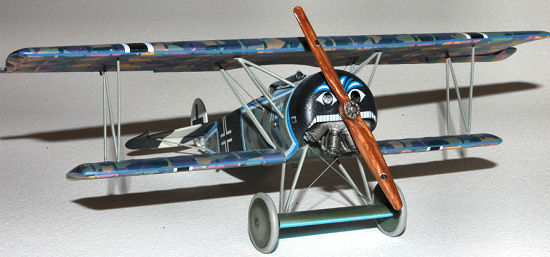 to adhere to Fokker’s methodology when applying
the decals. Applying lozenge is not hard, but it is tedious and time
consuming. It takes patience to measure, cut, and apply the many different
pieces, and then wait on them to set up before applying rib tapes. The rib
tapes of most DVIs were made of the corresponding fabric so it was
necessary to cut thin strips of 5 color lozenge from the larger decal. As
far as I know, no after market provider makes rib tape decals of lozenge
fabric, but it would sure be nice if someone would. There are 90 individual
rib tapes applied to this model. It’s simply not possible to get them all
the same width, but once applied, the differences are not noticeable and
the overall effect is good. I applied the 4 color lozenge to the fuselage
by cutting pieces to the approximate size and shape of the area to be
covered, applying the decal and then trimming the excess once dry. Once all
the lozenge and decals were applied and set up, I gave the whole thing a
good coat of Future to seal them. I then turned my attention to the other
decals.
to adhere to Fokker’s methodology when applying
the decals. Applying lozenge is not hard, but it is tedious and time
consuming. It takes patience to measure, cut, and apply the many different
pieces, and then wait on them to set up before applying rib tapes. The rib
tapes of most DVIs were made of the corresponding fabric so it was
necessary to cut thin strips of 5 color lozenge from the larger decal. As
far as I know, no after market provider makes rib tape decals of lozenge
fabric, but it would sure be nice if someone would. There are 90 individual
rib tapes applied to this model. It’s simply not possible to get them all
the same width, but once applied, the differences are not noticeable and
the overall effect is good. I applied the 4 color lozenge to the fuselage
by cutting pieces to the approximate size and shape of the area to be
covered, applying the decal and then trimming the excess once dry. Once all
the lozenge and decals were applied and set up, I gave the whole thing a
good coat of Future to seal them. I then turned my attention to the other
decals.
The Roden decals are of very good quality, a huge improvement over their earlier ones that tended to break apart or not adhere well. These new decals go on with just a bit of water and a soft cloth or brush to press out the bubbles. Don’t use MicroSet or Sol as it is not necessary and may damage them. Once dry I sealed them with Future, then gave the whole kit a spray of Polly Scale Satin finish clear coat.
| CONCLUSIONS |
This was an enjoyable kit to build, and my overall impression of it is very favorable. The quality of the parts and decals is very good. Construction, however, is typical Roden, being somewhat fiddly in places. The kit does not fall together, but with patience, the end product certainly looks like a Fokker DVI. Roden is to be commended on their choice of subject, and I hope they will expand their offerings of WWI kits in 1/32 scale.
January 2006
Copyright ModelingMadness.com. All rights reserved. No reproduction in part or in whole without express permission.
If you would like your product reviewed fairly and fairly quickly, please contact the editor or see other details in the Note to Contributors.