Wingnut Wings 1/32 DFW C.V (late)
| KIT #: | 32057 |
| PRICE: | $99.00 |
| DECALS: | Five options |
| REVIEWER: | Otis Goodin |
| NOTES: |
Outstanding kit of this important aircraft. First of its kind in
1/32 scale. |
| HISTORY |
Deutsche
Flugzeugwerke (DFW) was a German aircraft manufacturer
established by Bernhard Meyer and Erich Thiele at Lindenthal in 1910. It
initially produced Farman designs under license, and later the Etrich Taube.
Eventually it moved to its own designs and the DFW CV was its most successful
venture. Designed primarily by Heinrich Oelerich, the CV was a two seater
biplane of mostly wooden construction. The aerodynamically improved fuselage
consisted of a wooden frame covered by plywood. The wings were also of wooden
frames but covered by canvas. The upper wing was of slightly greater size, with
extended ends and ailerons. The size and length of the wings compared to the
fuselage gave the
 aircraft
excellent lift. Coupled with the Benz Bz. IV engine, the airplane demonstrated
significantly better performance than earlier versions.
aircraft
excellent lift. Coupled with the Benz Bz. IV engine, the airplane demonstrated
significantly better performance than earlier versions.
The CV was a multi role aircraft
used for reconnaissance, observation, and bombing. In the hands of a skilled
pilot it could outmaneuver most allied fighters of the period. So popular was
the design that nearly 4000 were produced, more than any other German aircraft
during World War I. About half were manufactured by DFW, and the other half were
produced under license by LVG, Halberstadt, and Aviatik. The aircraft appeared
in early 1917 and was in service through the end of the war.
Following the war, most CVs were
scrapped under the terms of the Treaty of Versailles; however, a few survived
and served Poland, Finland, the Netherlands, Switzerland and Estonia. As late as
1925 seven copies were made by the Bulgarian state aircraft works, designated
the DAR Uzunov-1 and used as a trainer for Bulgaria’s secret air force. Only a
fuselage of an Aviatik built DFW CV remains today in the Polish Aviation Museum.
| THE KIT |
 No
information on what's in the box was provided. Ed
No
information on what's in the box was provided. Ed
The decals included with the kit are from Cartograf
and give you a choice of five options:
(1)
Aircraft 799/17, manned by Albert Hahnel and Eugen Mann of FA 7, July 1917;
(2)
An
LVG produced aircraft 2164/17, of FA 10, July 1917;
(3)
A
Halberstadt version, 2523/17, flown from mid 1917 to early 1918;
(4)
DFW
version with the names “Gretel” and “Lo” stenciled on the fuselage, mid 1918,
and sporting an odd mix of green and distressed camouflage; and
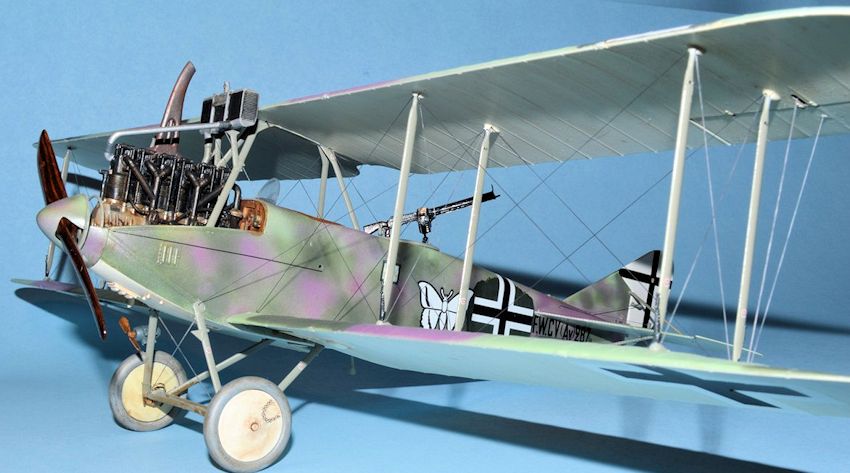
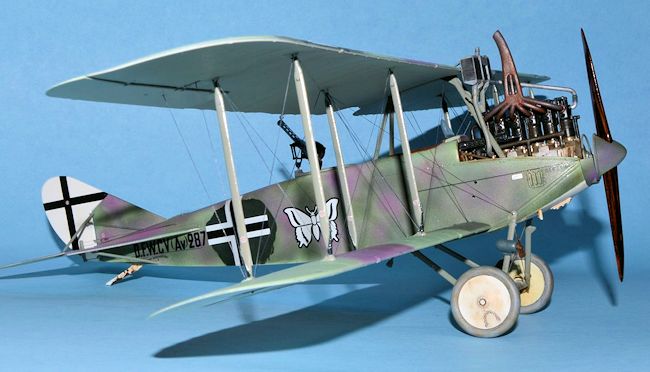
(5)
The
aircraft shown here, an Aviatik produced version, aircraft number 287/18, manned
by Teisler and Weiss and sporting the distinctive Butterfly motif when it was
captured in May 1918.
| CONSTRUCTION |
 contains
all the usual dials and instruments, a magazine, empty belt container, radiator
shutter winder, and synchronizing gear, along with plenty of decals to heighten
the detail. Unfortunately, once the top wing is installed, this part of the
cockpit is not that visible. The other side of the panel faces the engine
compartment and forms a well defined structure for placement of the engine. To
this is also attached the engine bearers, which were wooden structures also
containing a metal bar running lengthwise on one side. Presumably this was used
to stabilize the engine
contains
all the usual dials and instruments, a magazine, empty belt container, radiator
shutter winder, and synchronizing gear, along with plenty of decals to heighten
the detail. Unfortunately, once the top wing is installed, this part of the
cockpit is not that visible. The other side of the panel faces the engine
compartment and forms a well defined structure for placement of the engine. To
this is also attached the engine bearers, which were wooden structures also
containing a metal bar running lengthwise on one side. Presumably this was used
to stabilize the engine
There are highly detailed photo
etch seat belts for both the pilot and observer. Anneal the belts prior to
positioning them, making it easier to bend and fold them. Finish up the
floorboard by attaching the foot pedal bar and adding the control column
assembly. I found this part a little confusing as there is nowhere obvious to
glue the brackets to the floorboard. Also be sure to drill small holes in the
brackets with an 80 bit for rigging. The rigging is not difficult and it adds a
lot to the completed space. Detailed instructions for painting the interior are
also included
To the completed floorboard
assembly are added the side panel framework. Do a lot of test fitting here as
there are specific points for attaching the framework. A few minor details are
added to the side panels and when installed a bar will be fitted across the
interior of the fuselage in front of the instrument panel. On this is mounted
the pilot fired Spandau machine gun. I substituted a cooling jacket and barrel
from Master for the kit supplied photo etch version of the Spandau. You don’t
have to worry about rolling the jacket and more importantly, the Master jacket
doesn’t bend and crush as easily as the kit supplied version. It’s expensive
(@$17) but worth it to me.
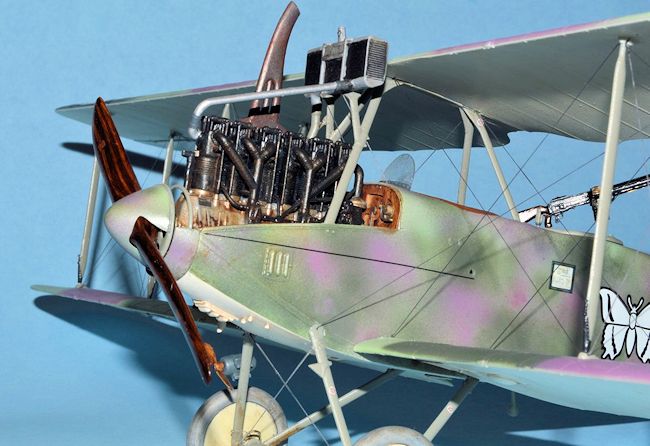 Once the interior is finished it’s
time to move on to the engine. The DFW used a 230 hp Benz Bz. IV engine, the
first time I have seen this engine in a kit. It’s actually a bit simpler than
the usual Daimler Benz DIII engines used in most German aircraft. Take care when
assembling the rocker assemblies as there are 3 sets and each is joined back to
back to make a complete set. The instructions point this out but don’t do like
some modelers I know and start gluing without paying attention to the
instructions. I assembled the crankcase, cylinders, intake manifolds, and
assorted details, painted it all and set it aside for installation later. The
real thing has a few more wires and such, but the kit supplied version is pretty
darn complete.
Once the interior is finished it’s
time to move on to the engine. The DFW used a 230 hp Benz Bz. IV engine, the
first time I have seen this engine in a kit. It’s actually a bit simpler than
the usual Daimler Benz DIII engines used in most German aircraft. Take care when
assembling the rocker assemblies as there are 3 sets and each is joined back to
back to make a complete set. The instructions point this out but don’t do like
some modelers I know and start gluing without paying attention to the
instructions. I assembled the crankcase, cylinders, intake manifolds, and
assorted details, painted it all and set it aside for installation later. The
real thing has a few more wires and such, but the kit supplied version is pretty
darn complete.
Getting back to the fuselage, there
are various modifications/removals required depending on which version you are
building. Once this is done, then install the completed interior to one half of
the fuselage. Once satisfied with the fit add the other half then the two bottom
panels. (Again, depending on the version you are building…..). Add the cockpit
coaming and the cabane struts. I added the observer’s platform after the
fuselage was painted. Next the instructions call for you to add the cowlings,
including the winter cowlings if desired. I chose not to add any cowlings to
display the engine more clearly, which I added after the fuselage was assembled.
Next step in the assembly process
is to add the radiator to the front of the cabane struts. The radiator fits just
in front of the top wing. Assembly is relatively simple, you just glue the
radiator panels to the radiator body and then add the shutter control. I had a
small problem in that there were gaps in various locations once I added the
radiator panels so I had to fill and sand these. A drain hose leading to the
engine is added to the left side of the radiator. Once completed add the
radiator to the designated location on the cabane struts.
Then attach the
radiator pipe from the radiator to the engine. The radiator pipe fits in one of
two locations depending on the version you are building. Make sure the radiator
sits level (mine doesn’t). There are some rigging wires that run from the
fuselage to the radiator shutter. These are tricky to install. I drilled holes
in the bottom of the shutter assembly, attached rigging lines using EZ Line to
the small holes in the fuselage, then stretched the lines through the holes I
had drilled in the shutter and glued them with super glue. A lot of work for
something that doesn’t show that much, but at least I know they are there.
Following all this, the tailplane
assembly was attached, and the undercarriage assembly was added before the lower
wings are added. I recommend assembling the entire undercarriage before
attaching it to the fuselage. This is a solid assembly, although I managed to
break one of the axle ends onto which a wheel is attached. Despite that I was
able to repair the damage and attach the wheel in place.
 The lower wings are solidly connected with the correct
dihedral. It’s really hard to mess this part up. Before attaching the upper wing
I added rigging for the internal “X” rigging between the interplane struts to
the bottom of the upper wing. If I had it to do over I would probably wait and
add all the rigging at once, but I wasn’t sure how easy it would be to reach the
rigging attachments on the inside of the struts. As it turned out it was not
that difficult as the rigging attachment points are very prominent, just like
they were on the real aircraft. Before attaching the top wing I added the
windscreen with clear parts cement. I attached the top wing by gluing the center
section to the prominent base on the cabane struts. Just be careful and don’t
add too much glue or it will come oozing out the sides. After this assembly had
set up, I began adding the individual interplane struts. Prior to adding the
struts I drilled holes in them as needed for rigging the “X” rigging. Wingnut
has done a marvelous engineering job here in that specific struts go in specific
spots, and the struts are designed so that they will only fit where they are
supposed to go. The holes in the bottom wing into which the struts are attached
are specifically designed to accommodate the correct strut. The attachment holes
on the bottom of the top wing are also very deep so the struts fit securely in
their designated locations.
The lower wings are solidly connected with the correct
dihedral. It’s really hard to mess this part up. Before attaching the upper wing
I added rigging for the internal “X” rigging between the interplane struts to
the bottom of the upper wing. If I had it to do over I would probably wait and
add all the rigging at once, but I wasn’t sure how easy it would be to reach the
rigging attachments on the inside of the struts. As it turned out it was not
that difficult as the rigging attachment points are very prominent, just like
they were on the real aircraft. Before attaching the top wing I added the
windscreen with clear parts cement. I attached the top wing by gluing the center
section to the prominent base on the cabane struts. Just be careful and don’t
add too much glue or it will come oozing out the sides. After this assembly had
set up, I began adding the individual interplane struts. Prior to adding the
struts I drilled holes in them as needed for rigging the “X” rigging. Wingnut
has done a marvelous engineering job here in that specific struts go in specific
spots, and the struts are designed so that they will only fit where they are
supposed to go. The holes in the bottom wing into which the struts are attached
are specifically designed to accommodate the correct strut. The attachment holes
on the bottom of the top wing are also very deep so the struts fit securely in
their designated locations.
I let the top wing set up before
continuing with the rigging. I use EZ Line for rigging and I find it works quite
well, even if a little “fine” in scale. For the DFW I used a method I had read
about on the Wingnut website. Rather than drilling holes through the bottom wing
and pulling the rigging through as I usually do, I attached one end of the EZ
Line to the underside of the top wing. Once that had set up (a few minutes max),
I then cut the line a bit shy of the bottom wing. I applied a tiny drop of super
glue in the
 small
attachment hole next to the strut on the bottom wing; then using a pair of
crossgrip tweezers stretched the EZ Line to the attachment hole and held it in
place until it had set up. Usually this took about 30 seconds but sometimes
longer. Because stretched EZ Line doesn’t sag it is not necessary to stretch it
too tight. In fact, overstretching it puts too much tension on the line and
makes it difficult for the super glue to hold the line as it dries. Stretch it
just enough to take the slack out. I finished the rigging over about three
nights, and, despite numerous self-inflicted frustrations, was generally pleased
with the result.
small
attachment hole next to the strut on the bottom wing; then using a pair of
crossgrip tweezers stretched the EZ Line to the attachment hole and held it in
place until it had set up. Usually this took about 30 seconds but sometimes
longer. Because stretched EZ Line doesn’t sag it is not necessary to stretch it
too tight. In fact, overstretching it puts too much tension on the line and
makes it difficult for the super glue to hold the line as it dries. Stretch it
just enough to take the slack out. I finished the rigging over about three
nights, and, despite numerous self-inflicted frustrations, was generally pleased
with the result.
Once rigging the wing was finished,
I added the rigging to the undercarriage and the tailplane. Following that, I
completed assembly by attaching the tailskid, the exhaust, the propeller, the
wireless generator, and finally the observer’s Parabellum machine gun. Again I
used the Master set to enhance the kit supplied version. Attaching the gun to
the mounting fixture required some finesse.
| COLORS & MARKINGS |
I painted the interior in a wood
grain finish using a base coat of Model Master Tan then finished with a glaze of
Griffin’s Burnt Umber Alkyd paint. Alkyd dries in 24 hours unlike traditional
oils which can take weeks. The various instrument panel details were painted
Model Master Gun Metal or Silver. The instrument dials were added, then decaled
with kit supplied decals and given a drop of clear parts cement to represent the
glass covers. The seat/fuel tank was painted Model Master Schwarzgrau with a few
Brass details added. The seat cushion was painted MM Leather then weathered with
Griffin’s Burnt Umber. The rudder bar and control stick assembly were painted MM
RLM Grau. The rear screen for the observer’s space was painted MM Aged White
then weathered with a wash of Burnt Umber. All the seat belts were painted Tan,
details picked out in Silver, and weathered with a Burnt Umber wash. The
observer’s seat was painted Leather and weathered as well. The bombs were
painted MM Hellblau.
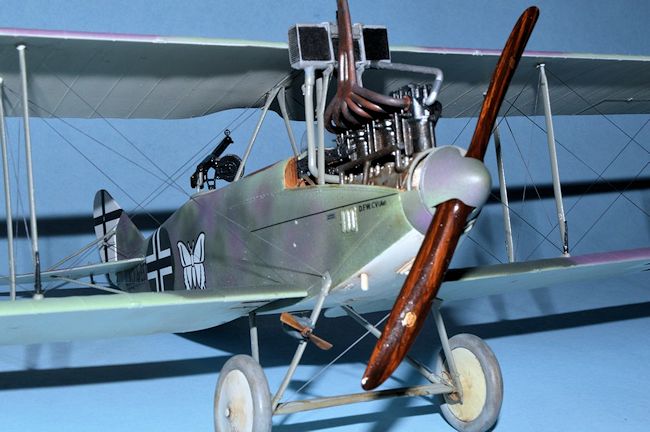 The engine compartment was
generally painted in the wood grain finish and heavily weathered with a Burnt
Umber and Black wash. The engine itself had the crankcase painted Silver, the
cylinders, manifolds and rocker assembly painted Gun Metal, with a few details
picked out in MM Brass and Silver. The engine was then weathered with Tamiya
Metallic Gray and a Burnt Umber and Black wash. The exhaust was painted with
Gunze Burnt Iron, then weathered with MM Rust and Schwarzgrau. The pipe leading
from the engine to the radiator was painted MM Aluminum with the connectors
painted in Schwarzgrau. The radiator housing is painted Model Master Neutral
Gray with the radiator panels painted Gunze Cowling Color. The drain hose is
painted RLM Grau.
The engine compartment was
generally painted in the wood grain finish and heavily weathered with a Burnt
Umber and Black wash. The engine itself had the crankcase painted Silver, the
cylinders, manifolds and rocker assembly painted Gun Metal, with a few details
picked out in MM Brass and Silver. The engine was then weathered with Tamiya
Metallic Gray and a Burnt Umber and Black wash. The exhaust was painted with
Gunze Burnt Iron, then weathered with MM Rust and Schwarzgrau. The pipe leading
from the engine to the radiator was painted MM Aluminum with the connectors
painted in Schwarzgrau. The radiator housing is painted Model Master Neutral
Gray with the radiator panels painted Gunze Cowling Color. The drain hose is
painted RLM Grau.
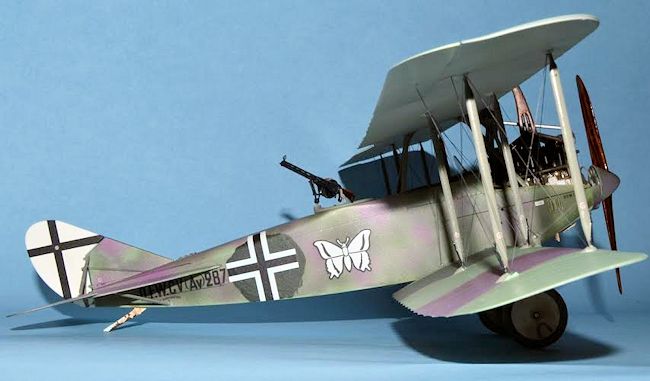
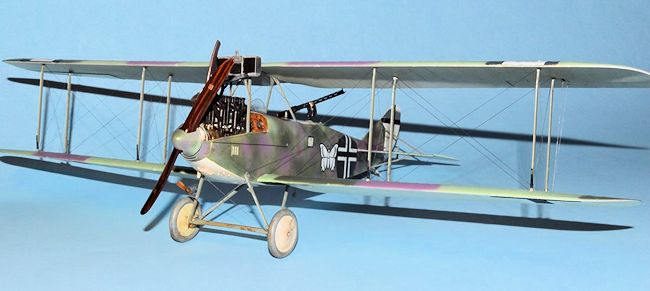
The underside of the wings and
tailplane are painted to represent bleached linen. I made up a shade by blending
Model Master Aged White with 50% Flat White. The underside of the fuselage is
Flat White. The underside of the wings and fuselage was given a light wash of
Burnt Umber. The topside of the wings and tailplane is a three tone camouflage
of MM Pale Green mixed with about 20% White to lighten and cool it down some; MM
German Dark Green 82, and Polly Scale German Mauve. The area underneath the top
wing insignias shows where the earlier applied eisernkreuz were crudely painted
out with a darker green and replaced by the balkenkreuz. I used Tamiya JN Green
for this. Oddly, the underside of the bottom wing shows no evidence of
overpainting in another color, although the insignias are the later style.
The wing and tail struts as well as the undercarriage
were all painted in RLM Grau. The brackets on the interplane struts were painted
MM Gun Metal. The wireless generator was painted Schwarzgrun and the small prop
was given a wood grain finish.
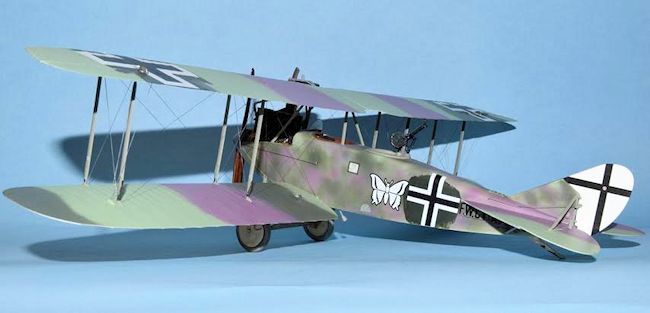
The fuselage featured a muddled camouflage of Dark
Green 82 and German Mauve sprayed on over a base of the lightened Pale Green.
This took several passes to get it the way I wanted it, but ultimately I was
happy with it. Again, the fuselage shows where the eisernkreuz were painted over
and replaced by the balkenkreuz. The cockpit coaming was painted with MM
Leather, and the observer’s platform is RLM Grau. The rudder is painted White.
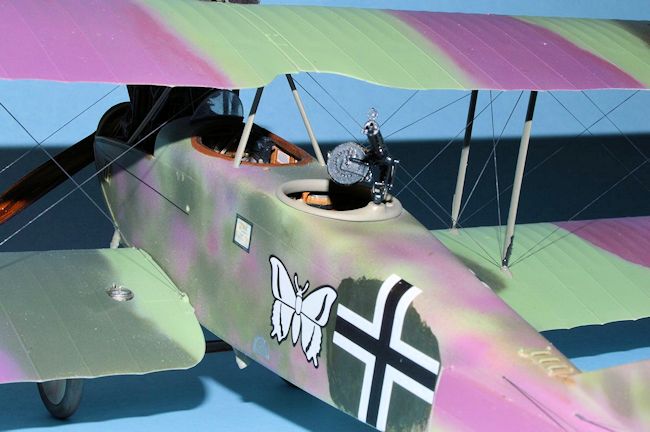
 Following
a few coats of Future, the fuselage decals were applied. The butterfly decal is
applied asymmetrically on each side of the fuselage. There are decals for the
rigging instructions, datum lines, various Aviatik logos in numerous places, and
other miscellaneous markings. The Future was later toned down with some MM Satin
finish.
Following
a few coats of Future, the fuselage decals were applied. The butterfly decal is
applied asymmetrically on each side of the fuselage. There are decals for the
rigging instructions, datum lines, various Aviatik logos in numerous places, and
other miscellaneous markings. The Future was later toned down with some MM Satin
finish.
The wheels were painted Schwarzgrau, highlighted with
Neutral Gray and Dark Earth. The wheel covers were painted White and weathered
with a Burnt Umber wash and some Dark Earth to represent mud/dirt, etc. The
Parabellum gun was painted MM Gun Metal highlighted with a little Metallic Gray.
The gun stock and handle were given a wood grain finish. The tail skid was first
painted with a wood grain finish, the metal parts painted Gun Metal or RLM Grau,
and when dry some masking fluid was randomly applied. The whole thing was then
sprayed Flat White, the dried masking fluid removed, and the result is a
distressed look on the tail skid. A little Burnt Umber and Dark Earth were
applied for the finishing touches. Finally the propeller was painted with a base
coat of MM Tan, and the lighter laminations masked off with thin strips of
Tamiya masking tape cut to size. The darker laminations were painted with Gunze
Red Brown. When dry the masking tape was removed and any imperfections corrected
before the whole prop was given a glaze of Griffin’s Burnt Umber. When dry this
was sealed with Future, the prop decals applied, and another coat of Future
added.
| CONCLUSIONS |
Wingnut Wings has done it again with this superb kit
of one of the most important aircraft of WWI. Building this model was
challenging, skill advancing, and ultimately fun. Although the kits are designed
to be built by both experienced and novice modelers, I would recommend those new
to WWI to start with something a little simpler, like a Pfalz D III. Wingnut
Wings has released over 45 kits since their first releases six years ago, and I
get the feeling they are just getting warmed up. Their kits are getting more
advanced, more ambitious, and yes, more expensive. But for lovers of WWI
aviation, they are the ultimate in scale modeling.
| REFERENCES |
DFW CV,
Wikipedia.
Wingnut Wings kit instructions.
March 2015 If you would like your product reviewed fairly and
fairly quickly, please
contact
the editor
or see other details in the
Note to
Contributors.