| KIT #: | 32037 |
| PRICE: | $99.00 SRP |
| DECALS: | Five options |
| REVIEWER: | Otis Goodin |
| NOTES: | Fantastic kit. Well worth the effort. |
| HISTORY |
Rumpler Flugzeugwerke, known simply as Rumpler, was a German aircraft manufacturer founded in Berlin in 1909 by Austrian engineer Edmund Rumpler. The firm originally manufactured copies of the Etrich Taube monoplane, but after the start of WWI started focusing on building reconnaissance biplanes of its own design.
One of those designs, the Rumpler C.IV, was its most successful aircraft. As a
two seater aircraft
 the
C.IV first appeared in February 1917 and was very adept at reconnaissance,
artillery spotting and light bombing. Its primary asset was its ability to fly
on long missions at extremely high altitudes (up to 23,000 ft.). Rumplers
carried a lot of gear in flight including two machine guns, a wireless radio, a
camera and a small load of bombs. Powered by the 260 hp Daimler Mercedes D.IVa
the aircraft’s top speed was 107 mph. Over the course of its service the C.IV
underwent a number of improvements including strengthening its fuselage,
replacing the control stick with a steering wheel, and removing the original
spinner which, surprisingly, made the aircraft more aerodynamic and about 7 mph
faster. The Rumpler was very similar in appearance and coloration to the DFW
C.V, and although the Rumpler could fly higher and faster, almost twice as many
DFW were built. Some Rumplers were built by Pfalz and known as the Pfalz C.I.
Following the end of World War One Rumpler was unable to survive and the company
was liquidated in 1920.
the
C.IV first appeared in February 1917 and was very adept at reconnaissance,
artillery spotting and light bombing. Its primary asset was its ability to fly
on long missions at extremely high altitudes (up to 23,000 ft.). Rumplers
carried a lot of gear in flight including two machine guns, a wireless radio, a
camera and a small load of bombs. Powered by the 260 hp Daimler Mercedes D.IVa
the aircraft’s top speed was 107 mph. Over the course of its service the C.IV
underwent a number of improvements including strengthening its fuselage,
replacing the control stick with a steering wheel, and removing the original
spinner which, surprisingly, made the aircraft more aerodynamic and about 7 mph
faster. The Rumpler was very similar in appearance and coloration to the DFW
C.V, and although the Rumpler could fly higher and faster, almost twice as many
DFW were built. Some Rumplers were built by Pfalz and known as the Pfalz C.I.
Following the end of World War One Rumpler was unable to survive and the company
was liquidated in 1920.
| THE KIT |
 The
Wingnut Wings Rumpler C.IV Late Version was released in November 2011, along
with an Early Version (Kit #32023). The kit is typical Wingnut Wings meaning
very high quality moldings, lots of detailed parts (259) spread over twelve
sprues, a 26 page elaborately illustrated instruction booklet with several
historical photos and reference detail, a photo etch panel and three extensive
sheets of decals including two sheets of lozenge should you decide to build that
version. The kit allows you to build one of five different aircraft: (1) Rumpler
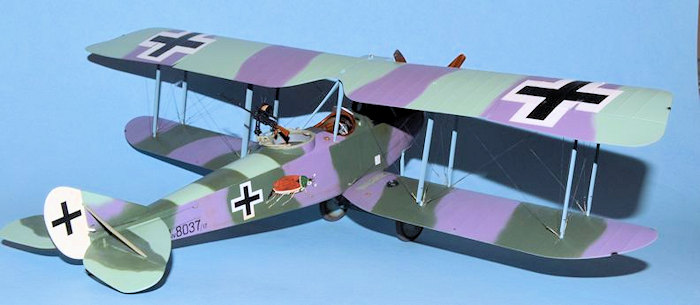
C.IV 1421/17; (2) Rumpler 1449/17 “Black 6,” featuring German flag colors
painted on the wing struts, wheel covers, and top of the wings; (3) Rumpler
8231/17 featuring lozenge camouflage on the wings and part of the fuselage; (4)
Rumpler C.IV with “Good People Don’t Shoot” stenciled on the fuselage, and (5)
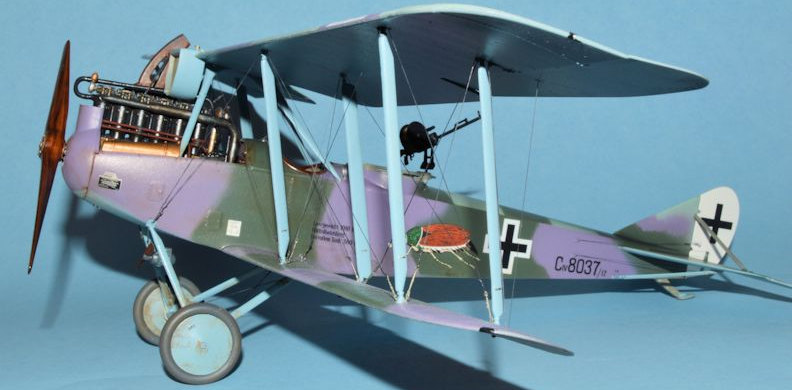
the one I chose to build, Rumpler 8037/17 featuring a distinctive Scarab beetle
painted on its fuselage sides. The aircraft is shown as it appeared in mid to
late 1918 after its crosses had been converted from the original eisernkreuz to
the straight sided balkenkreuz.
The
Wingnut Wings Rumpler C.IV Late Version was released in November 2011, along
with an Early Version (Kit #32023). The kit is typical Wingnut Wings meaning
very high quality moldings, lots of detailed parts (259) spread over twelve
sprues, a 26 page elaborately illustrated instruction booklet with several
historical photos and reference detail, a photo etch panel and three extensive
sheets of decals including two sheets of lozenge should you decide to build that
version. The kit allows you to build one of five different aircraft: (1) Rumpler
C.IV 1421/17; (2) Rumpler 1449/17 “Black 6,” featuring German flag colors
painted on the wing struts, wheel covers, and top of the wings; (3) Rumpler
8231/17 featuring lozenge camouflage on the wings and part of the fuselage; (4)
Rumpler C.IV with “Good People Don’t Shoot” stenciled on the fuselage, and (5)
the one I chose to build, Rumpler 8037/17 featuring a distinctive Scarab beetle
painted on its fuselage sides. The aircraft is shown as it appeared in mid to
late 1918 after its crosses had been converted from the original eisernkreuz to
the straight sided balkenkreuz.
| CONSTRUCTION |
As usual construction begins in the cockpit where various components are added to the floorboard including the rear screen in the observer’s area to which are added a camera and bomb sight. Don’t overlook adding the glass (clear plastic) to the camera opening but be sure to cover it with tape during all the painting to keep it clear. Also in the observer’s compartment is the support panel to which is added the Telefunken Wireless unit. Next the rudder pedals are added to the pilot’s portion of the floorboard. After this is added the fuel tank to which is attached the pilot’s seat. Behind this is attached the reserve fuel tank. A bomb rack with space for four bombs is installed in the observer’s section.
More details are added to the interior including the steering wheel and control
column, photo etch seat belts, and instrument panel. The instrument panel is
detailed with the Bosch starter magneto, grease pump and several highly detailed
decals including a map posted to the panel. Next are added the engine bearers
and the side panels which contain various details including an aerial winder for
the wireless unit and a few instrument dials. You have a choice of two observer
seats to use depending on the version you are building. Unfortunately I
misplaced the one I was supposed to use so I went with the other one which is a
much more solid structure. At this stage you could opt to apply some rigging to
the interior which are attached to the control column and rudder pedals and run
along the lower part of the side panels to the r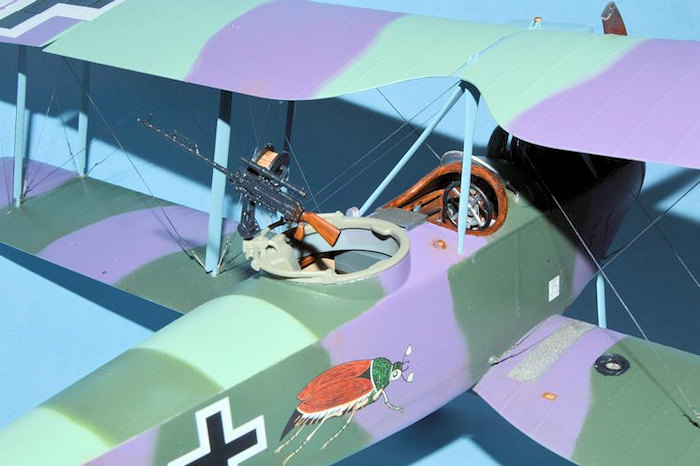 ear
of the aircraft. I used EZ Line for this and found the result very satisfying if
not that visible; although I do think it’s worth the trouble.
ear
of the aircraft. I used EZ Line for this and found the result very satisfying if
not that visible; although I do think it’s worth the trouble.
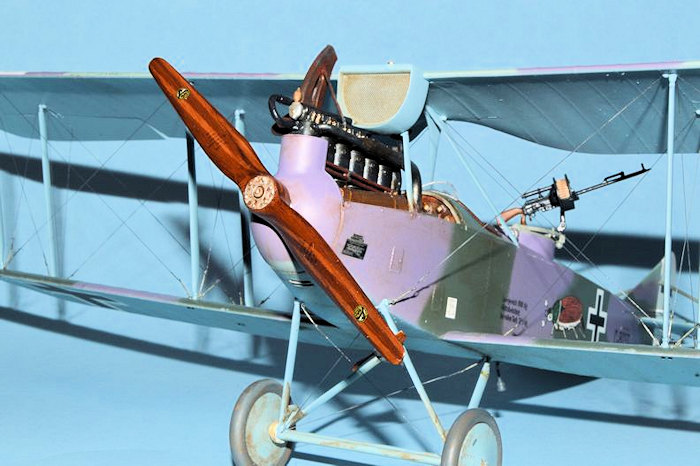
Following completion of the interior attention is turned to the engine which is actually a relatively simple affair although detailing possibilities exist if you want them. I chose just to assemble and paint the engine per instructions and I still ended up with a very nice engine. However, I chose to install my engine later in the process. An interesting feature of the Rumpler is that the engine was installed with a slight lean to it to provide more room for the cabane struts. This was accomplished by placing the right engine bearer slightly lower than the left so that when you look at the aircraft head on the engine leans to the left. For the longest time I couldn’t figure out why my engine was leaning then I read the instructions more closely and discovered the comment about the engine next to one of the photographs. One thing I’ve learned about Wingnut Wings instructions over the years is that the information is probably in there even if not always where you might expect it to be.
There is a Spandau machine gun that fits next to the engine with the trigger portion fitting on the instrument panel side so that the pilot could reach it to fire the gun. I used the “High Detail” parts which includes a cooling jacket. I’m not the best “jacket roller” but fortunately this one turned out OK and any defects are not visible. On the other engine bearer are placed a large oil tank and a small generator. Again I added these parts after the engine was installed later.
Next up was assembly of the fuselage. Depending on the version built there are various holes to drill and stitching to remove. Following this the fuselage sides are attached to the interior and joined together. I usually end up with a few gaps with my WNW fuselages but they are resolved with putty, super glue, tape and sanding. Seriously all the stuff in the interior makes it a tight fit and I haven’t discovered the secret to an easy, “seamless” fit. Wingnut Wings kits are engineered to very tight tolerances so that, in some cases, even a layer of paint will throw off the fit. However, there’s nothing a little work and patience won’t fix.
Added to the fuselage are some more panels including the observer’s coaming, bottom panels and the horizontal tailplanes. You could also add the rudder fin now but I kept knocking mine off during sanding so I opted to keep it off until all the filling and sanding were done. Once I did add the fin, I also installed the upper struts from fin to tailplane to give the whole structure some strength. I attached the lower tailplane struts after I finished painting the fuselage so they wouldn’t get in the way during painting. I attached the rudder late in the assembly process.
The lower wing was added next along with the cabane struts
which are a two part component. I added the separate interplane struts after the
top wing was attached to the cabane structure. This is not what the instructions
tell you to do but I find it easier than trying to glue the top wing to all
those individual struts. I suppose if I used a jig I wouldn’t have that problem
but I have never used a jig in all my 50+ years of building biplanes so I doubt
I’ll start now. Once the t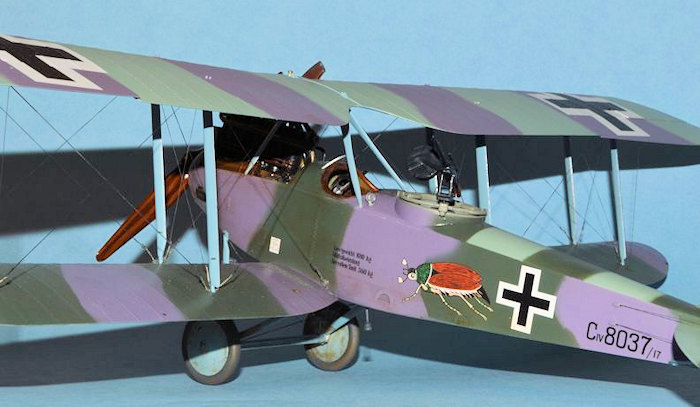 op
wing was attached I started adding the wing struts one at a time starting from
the inside and switching from side to side until all the struts were in place. A
word of caution: there are two sets of four different wing struts, one for each
side of the lower wing. However, WNW has done us all a great favor by making the
strut ends and the corresponding holes in the wing for each set of struts
uniquely designed so that they will only fit the correct hole. For example,
looking down at the bottom wing, the four struts on each side will only fit into
the hole that matches the end of the strut designed to go there. Seriously all
the modeler has to do is paint the struts and glue them into the correct hole
which is one of only two holes it will fit in. Pretty much foolproof.
op
wing was attached I started adding the wing struts one at a time starting from
the inside and switching from side to side until all the struts were in place. A
word of caution: there are two sets of four different wing struts, one for each
side of the lower wing. However, WNW has done us all a great favor by making the
strut ends and the corresponding holes in the wing for each set of struts
uniquely designed so that they will only fit the correct hole. For example,
looking down at the bottom wing, the four struts on each side will only fit into
the hole that matches the end of the strut designed to go there. Seriously all
the modeler has to do is paint the struts and glue them into the correct hole
which is one of only two holes it will fit in. Pretty much foolproof.
Prior to installing the top wing be sure to add the windscreen, covering it with easily removed tape to protect it during painting. Add the Maximal fuel gauge, map stowage locker, and the Spandau cocking lever. You can also add some optional flares to the fuselage. There are also some engine cowls to be installed but Wingnut Wings recommends leaving these off to show the engine detail, which I did.
Once the top wing was added I attached the ailerons on each side. I also added the engine, radiator, water pipe and exhaust. Next up was the undercarriage which consists of struts, axle, wheels and wheel covers. The struts fit deep into the fuselage giving the undercarriage a secure fit. I’ve had problems in the past with some WNW kits where even though the undercarriage was correct in scale and shape it was not strong enough to prevent the model from leaning to one side. I didn’t have that problem with the Rumpler. Finally, I added the nose cover, the propeller, machine gun mount and the Parabellum machine gun, and assembly was all but finished.
Rigging
Wingnut Wings provides a good rigging diagram, although you would also benefit from some photos of actual Rumplers or even a Datafile with a rigging drawing. On this model I decided I would try the new Gaspatch turnbuckles. Gaspatch is a modeling company located in Greece and I ordered my turnbuckles directly from them although I think they are available from other retailers such as Sprue Brothers. The Gaspatch turnbuckles come in four different types and for this model I used the “A” version. The turnbuckles are as accurate as I have ever seen in 1/32 scale. There are 30 in a package and they are all mounted onto a light metal base. To remove them I grabbed one with a pair of tweezers as close to the base as possible and bent it until it snapped off. I then glued the turnbuckle into its appropriate location with super glue. The Rumpler comes with well defined rigging locations and not much else is required other than maybe drilling the hole a little deeper with an 80 bit.
I installed a few turnbuckles and then attached the rigging line, then moved on
to more. The Rumpler did not use turnbuckles on the top wing so I just attached
a piece of EZ Line to the location underneath the top wing with super glue.
After drying a few minutes I then threaded the line through the t urnbuckle
hole and used a drop of glue to secure it in place. EZ Line reacts pretty
quickly to super glue so a few seconds later I would then wrap some excess EZ
Line about three times around the rigging line and apply some more super glue to
attach it in place. Once dry I would just pull the remaining EZ Line free from
the rigging and voila! the rigging line was complete. At first I tried cutting
off the excess with scissors but I wasn’t able to cut it closely enough or worse
I would accidentally cut the rigging line I had just installed forcing me to
start over with that particular line. The more I did it the more I got the hang
of it and although not perfect I was generally pleased with the result. I think
the next model will be better. I completed the rigging by adding lines to the
tail flaps and rudder as well as the undercarriage.
urnbuckle
hole and used a drop of glue to secure it in place. EZ Line reacts pretty
quickly to super glue so a few seconds later I would then wrap some excess EZ
Line about three times around the rigging line and apply some more super glue to
attach it in place. Once dry I would just pull the remaining EZ Line free from
the rigging and voila! the rigging line was complete. At first I tried cutting
off the excess with scissors but I wasn’t able to cut it closely enough or worse
I would accidentally cut the rigging line I had just installed forcing me to
start over with that particular line. The more I did it the more I got the hang
of it and although not perfect I was generally pleased with the result. I think
the next model will be better. I completed the rigging by adding lines to the
tail flaps and rudder as well as the undercarriage.
| COLORS & MARKINGS |
Painting the Rumpler was a complex and time consuming process. I had recently read an article by Stephen Lawson dealing with painting acrylic over plastic. He made the excellent point that acrylic is water based and plastic is petroleum based so these two substances mix like, well, oil and water. The result being that acrylic will often peel easily from plastic. I’ve had that problem quite often in the past so this article got my attention. Mr. Lawson recommended initially painting all the plastic parts with a layer of light gray enamel to separate the acrylic from the plastic. This made sense to me so before beginning construction of the Rumpler I sprayed all the parts with a light coat of Master Modeler Gull Gray enamel. This simple step all but eliminated any paint peeling problem.
Beginning with the interior all wood parts such as the floorboard, instrument
panel, side panels and engine bearers were painted to represent stained wood. To
do this I first painted the parts with a coat of Model Master Tan. Once dry I
then coated it with a thinned down layer of Griffins Burnt Umber Alkyd paint
applied to resemble wood grain. As I’ve mentioned in other articles Griffins is
an alkyd version of oil paint made by Winsor and Newton. As an alkyd it dries in
24 hours compared to the several days required by traditional oils. Once dry I
applied a light coat of Future to the wood portions by brush and applied any
decals required. WNW pr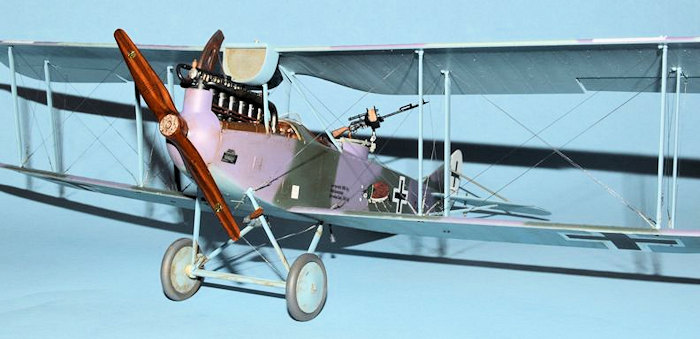 ovides
an extensive set of decals including instrument dials, stenciling, and even a
map. Most of the interior metal parts were painted Model Master RLM Gray with
the exception of the metal tubes on the side panels which were painted with
Misterkit Albatros Light Blue. The bombs were also painted this color. The
leather seat cushions were painted with Model Master (MM) Leather and weathered
some with Burnt Umber. The seat belts were painted Tan and also weathered with
the Burnt Umber. The two fuel tanks and the wireless unit were painted MM
Schwarzgrun and decaled as directed. The fuselage interior sides were painted a
combination of Gunze Sail Color on the fabric portion, wood grain on the wooden
portion and RLM Gray on the lower portions of the engine area.
ovides
an extensive set of decals including instrument dials, stenciling, and even a
map. Most of the interior metal parts were painted Model Master RLM Gray with
the exception of the metal tubes on the side panels which were painted with
Misterkit Albatros Light Blue. The bombs were also painted this color. The
leather seat cushions were painted with Model Master (MM) Leather and weathered
some with Burnt Umber. The seat belts were painted Tan and also weathered with
the Burnt Umber. The two fuel tanks and the wireless unit were painted MM
Schwarzgrun and decaled as directed. The fuselage interior sides were painted a
combination of Gunze Sail Color on the fabric portion, wood grain on the wooden
portion and RLM Gray on the lower portions of the engine area.
The engine itself was painted Flat Aluminum on the crankcase and MM Gun Metal on the cylinders, rocker boxes and intake manifold. These areas were drybrushed slightly with Tamiya Metallic Gray. The air pump was painted a combination of aluminum and brass as were various other small parts of the engine. The tube for spark plug leads was painted rust. A few engine plate decals were added to the crankcase and cylinders and a thermometer decal was added to the water pipe connection to the radiator. The Spandau and Parabellum machine guns were painted MM Gun Metal, with the stock painted in wood grain.
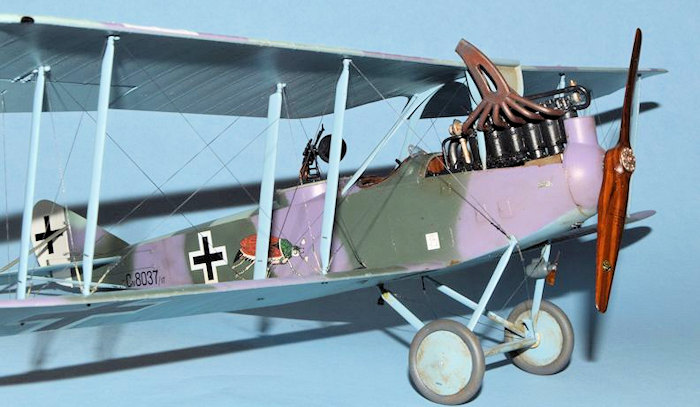
The fuselage and wings took the most time and effort painting. For this portion of the model I used Misterkit Albatros colors Light Blue, Pale Green, Purple and Dark Green. I ordered the Misterkit colors directly from the manufacturer in Italy, although at one time there was a distributor in the US. I have used Misterkit in the past and I find the colors to be extremely accurate and the paint is very forgiving. I thin it with distilled water and a touch of 90% isopropyl alcohol. I also use the alcohol for cleanup. I have had to touch the paint up at times by hand and even over an airbrushed portion I couldn’t tell the difference. The undersides and undercarriage were all painted Light Blue. The top of the fuselage was painted with Pale Green first, and then the Purple and Dark Green areas were painted using a loosely applied mask in places. The top of the bottom wing was painted just using Dark Green and Purple. Inevitably I would have little mistakes that required retouching. The combination of the enamel undercoat and the Misterkit paints made this a relatively painless process. No paint pulled off at any time.
 The
tires were painted MM Schwarzgrau and weathered with a bit of Tamiya Buff. The
propeller was painted a base coat of MM Tan over the light gray enamel. Once dry
I then masked off laminations and sprayed it a coat of MM Leather. When this was
dry I removed the tape and went back over it with some thinned down Griffins
Burnt Umber to blend the two tones and give it a wood appearance. Once this was
dry I applied a light brush coat of Future, added the Axial prop decals, then
applied another coat of Future to finish things up. The wireless generator
attached to the left undercarriage strut was painted MM Schwarzgrun and the
small prop given the Tan/Burnt Umber treatment. I applied some oil and dirt
weathering to the fuselage and undercarriage using Burnt Umber and some dirty
thinner.
The
tires were painted MM Schwarzgrau and weathered with a bit of Tamiya Buff. The
propeller was painted a base coat of MM Tan over the light gray enamel. Once dry
I then masked off laminations and sprayed it a coat of MM Leather. When this was
dry I removed the tape and went back over it with some thinned down Griffins
Burnt Umber to blend the two tones and give it a wood appearance. Once this was
dry I applied a light brush coat of Future, added the Axial prop decals, then
applied another coat of Future to finish things up. The wireless generator
attached to the left undercarriage strut was painted MM Schwarzgrun and the
small prop given the Tan/Burnt Umber treatment. I applied some oil and dirt
weathering to the fuselage and undercarriage using Burnt Umber and some dirty
thinner.
Various decals were added to the aircraft. Before application a generous coat of Future was applied to give a glossy surface. The crosses were the later straight sided balkenkreuz. The scarab beetle image probably represents some hobby or interest of one of the crew members. The weight table and various lettering and number panels were added. A final coat of Polly Scale Satin finish was applied to tone down the gloss and at long last the model was finished.
| CONCLUSIONS |
The Rumpler is another success story for Wingnut Wings. They have a real knack
for two-seater aircraft and the Rumpler, LVG and DFW are all excellent models. There were some things I could have done better on this model but those were the fault of the builder, not the kit. For a compelling, attention getting model that is also a great learning experience this kit is highly recommended.
| REFERENCES |
Wingnut Wings kit instructions.
Rumpler C.IV, Wikipedia.
Deutsches Museum website, Rumpler C.IV.
15 August 2016
Copyright ModelingMadness.com
If you would like your product reviewed fairly and fairly quickly, please contact the editor or see other details in the Note to Contributors.