
| KIT #: | 004 |
| PRICE: | €6,95 @ www.plasticmodelbouw.nl |
| DECALS: | Four options |
| REVIEWER: | Jeroen Koen |
| NOTES: | Techmod 4 colour Lozenge and Eduard pre-painted seatbelts used. |
| HISTORY |
Normally I'm trying to write something in here, but Tom Cleaver already wrote a
very good history in his review of the 1/48th Eduard Kit, to which I
have nothing to add...
So allow me to chicken out and point there:
http://www.modelingmadness.com/reviews/w1/tc/tmcev.htm
| THE KIT |
There's a rather large sinkmark on the single piece top wing, too. The scribing
on the wing is so subtle, it nearly disappears under a coat of paint, so I
scribed the lines a bit deeper using a needle in a pin vise. The rudder and tail
are partic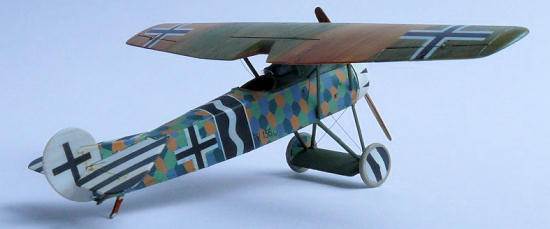 ularly noteworthy, if you hold them against the light they are nearly
transparent, so thin as they are! Typical for Roden the struts are also very
delicate and will require great care when removing them from the sprue's and
subsequent cleaning up.
ularly noteworthy, if you hold them against the light they are nearly
transparent, so thin as they are! Typical for Roden the struts are also very
delicate and will require great care when removing them from the sprue's and
subsequent cleaning up.
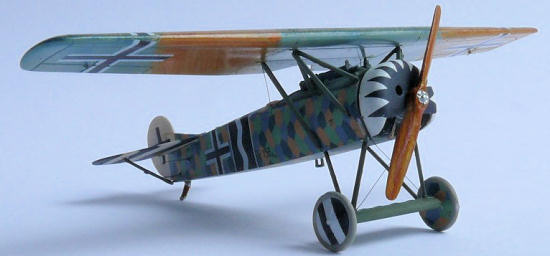
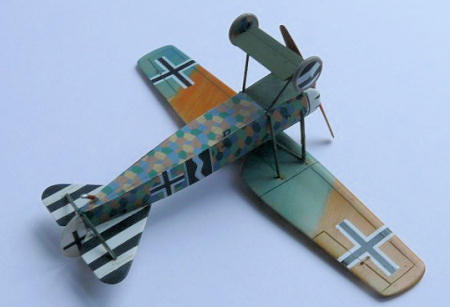
Decals for four versions are included; one Polish E.V, one Dutch D.VIII, and two
German E.Vs, one apparently flown by Theo Osterkamp and one of Jasta 6 that was
apparently tested by Erich Löwenhart. Except for the Jasta 6 plane, most are
basically Lozenge and national insignia; the checks for the Polish and
| CONSTRUCTION |
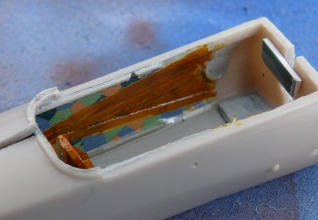 The cockpit is decent, with internal framework, a throttle handle, stick, seat,
instrument bar and rudder pedals. A box that goes after the instruments is also
included. (oil tank?). Curiously the fabric cover behind the seat is missing, as
is the wood triangular framework that's quite noticeable I also scratch built
new seat framework, the rear cover, and the triangular frames were made of thin
strips of Evergreen, which were painted with Humbrol Sand #63 , then 'streaked'
with Humbrol Leather #62 and finally a thin coat of Tamiya Clear Yellow. Then
Lozenge was applied to the fabric rear cover and remaining visible fuselage
sides in between the framework. I know it should be reversed and perhaps
lighter, but I thought it looked good enough. The seat framing was not really
worth building as you can't see it after assembly, but hey, I know it's there! I
used the Eduard kit instructions that you can download from their site as a
detailing guide, by the way. The framing was painted RLM02 equivalent, and the
seat
The cockpit is decent, with internal framework, a throttle handle, stick, seat,
instrument bar and rudder pedals. A box that goes after the instruments is also
included. (oil tank?). Curiously the fabric cover behind the seat is missing, as
is the wood triangular framework that's quite noticeable I also scratch built
new seat framework, the rear cover, and the triangular frames were made of thin
strips of Evergreen, which were painted with Humbrol Sand #63 , then 'streaked'
with Humbrol Leather #62 and finally a thin coat of Tamiya Clear Yellow. Then
Lozenge was applied to the fabric rear cover and remaining visible fuselage
sides in between the framework. I know it should be reversed and perhaps
lighter, but I thought it looked good enough. The seat framing was not really
worth building as you can't see it after assembly, but hey, I know it's there! I
used the Eduard kit instructions that you can download from their site as a
detailing guide, by the way. The framing was painted RLM02 equivalent, and the
seat 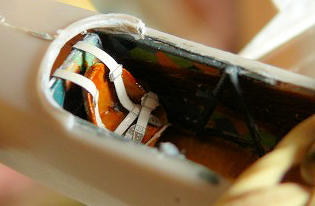 painted wood, although I read that both could have been wrapped in Lozenge
fabric as well. Then the Eduard pre-painted seatbelts were added which really
add to the look of the cockpit; it was the first time I used these and they look
very pretty!
painted wood, although I read that both could have been wrapped in Lozenge
fabric as well. Then the Eduard pre-painted seatbelts were added which really
add to the look of the cockpit; it was the first time I used these and they look
very pretty!
I used a bit of plastic card to make alignment tabs, as is usual for Roden they
have no locating pins. Then the interior was assembled in one half and and
fuselage halves mated with Humbrol Tube glue that seems to work as fast as
superglue on that soft Roden plastic! When that had dried I inserted the top
decking and cleaned up the engine cowling. The nice engine was then painted and
given a wash with Raw Umber oil paint and a light dry-brush with Humbrol
equivalent Light Gull Grey.
 The top deck is slightly short, so to ensure a good fit on the cowling I put it
as far forward as possible and stuffed the remaining small gaps with a bit of
0,5mm card, sanded, filled and sanded again. The fuselage seams were also
treated at the same time, as were the sides of the forward decking. Small strips
of Evergreen were then glued back to restore destroyed detail, and all holes for
rigging and struts were either deepened or drilled.
The top deck is slightly short, so to ensure a good fit on the cowling I put it
as far forward as possible and stuffed the remaining small gaps with a bit of
0,5mm card, sanded, filled and sanded again. The fuselage seams were also
treated at the same time, as were the sides of the forward decking. Small strips
of Evergreen were then glued back to restore destroyed detail, and all holes for
rigging and struts were either deepened or drilled.
When everything looked satisfactory, primer was shot, the remaining parts (tail, rudder, axle wing, wheels) were removed from the sprue's and cleaned up. Then it was off to the paint shop!
| COLORS & MARKINGS |
 First I used Humbrol gloss white #22 to paint the tail, rudder, wheels and
cowling. After that I took the colour Roden recommended, Humbrol Light Olive #86
and painted the fuselage and axle wing -disaster! The paint was so old it had
separated and dried with lumps and splattered all over the fuselage as it was
clogging my airbrush... I quickly wiped the fuselage with a rag with Humbrol
Thinner and got all of it off. Then I bought a new tin, as the other one was at
least 15 years old, (that's what you get for a modelling pause!) and that went
on much better. The struts, while still on the sprue, were also painted that
colour by brush.
First I used Humbrol gloss white #22 to paint the tail, rudder, wheels and
cowling. After that I took the colour Roden recommended, Humbrol Light Olive #86
and painted the fuselage and axle wing -disaster! The paint was so old it had
separated and dried with lumps and splattered all over the fuselage as it was
clogging my airbrush... I quickly wiped the fuselage with a rag with Humbrol
Thinner and got all of it off. Then I bought a new tin, as the other one was at
least 15 years old, (that's what you get for a modelling pause!) and that went
on much better. The struts, while still on the sprue, were also painted that
colour by brush.
The back of the box has a nice colour scheme that I had expected to be 1/72
-unfortunately it is not so for masking the Jasta 6 rudder stripes, when the
paint was fully cured,I measured the centre white area, divided by 2 and viola,
4mm wide it should be in 1/72. Unfortunately, while taping, I still had one
stripe to go, but ran out of tail! I don't know if the tail itself or the
drawing is screwed up, but with 3mm wide strips it got on eventually. The same
trick was used for the wheel stripes; decals are provided but I prefer to mask
these things. The wheel stripes are 2mm each. Then slightly lightened Revell
Gloss black #7 was airbrushed. The wing was airbrushed with the remains of my
Revell Aqua clear doped linen mixture from the
 When the green was fully cured, I shot it it with Humbrol Gloss coat to prepare
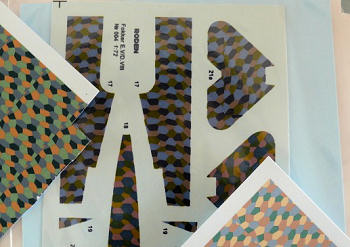
for the Lozenge decals. The kit Lozenge decals looked rather weird, so I ordered
some Techmod 4 colour Lozenge from Adalbertus of
When the green was fully cured, I shot it it with Humbrol Gloss coat to prepare
for the Lozenge decals. The kit Lozenge decals looked rather weird, so I ordered
some Techmod 4 colour Lozenge from Adalbertus of 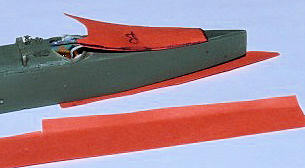 the small piece of
the tail fin and the inside of the wheels. I left the wing axle green as that's
what it apparently was according to some guys at the Aerodrome forums, though Roden provides Lozenge for it and it is shown as such on the box art, too.
the small piece of
the tail fin and the inside of the wheels. I left the wing axle green as that's
what it apparently was according to some guys at the Aerodrome forums, though Roden provides Lozenge for it and it is shown as such on the box art, too.
The
decals are not only very fragile on the backing, but also on the model they are
so brittle I was unable to cut the overlapping edges straight, cracking and
tearing occurred. Instead, bending them a few times made them crack sharply on
the edge, quite handy! They are also very thin so don't even need setting
solutions, just press them down and they'll follow hills and valleys quite
nicely. Before they got damaged another coat of Gloss sealed them and the Roden
decals were added on top. These are much better than the 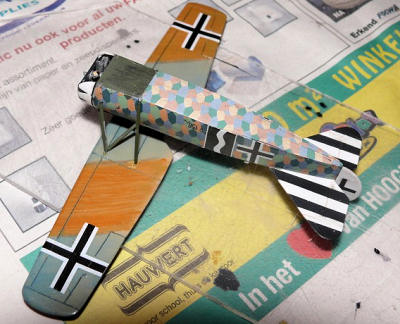 details. The wavy thing behind the cockpit is
too long, so the wave 'breaks' at the wrong place where the fuselage stops. It's
also a bit off-register, so where both decals meet in the centre, a bit of black
paint was used for touch-ups. I find that very curious, as the far more complex
design on the cowling is a perfect fit. Then the fuselage was then flat coated.
details. The wavy thing behind the cockpit is
too long, so the wave 'breaks' at the wrong place where the fuselage stops. It's
also a bit off-register, so where both decals meet in the centre, a bit of black
paint was used for touch-ups. I find that very curious, as the far more complex
design on the cowling is a perfect fit. Then the fuselage was then flat coated.
Finally the top wing was painted to look as if it was stained and then varnished, this took a few times, but eventually I got the hang of it. I used heavily diluted Humbrol to lay down a very transparent layer, then slowly using a toothpick I added a few dots of less thinned paint and used a bigger brush to blend it all into streaks. This works best on matte paint. I think the topside came out better than the bottom, the colours just look too dark to me, but after about 4 tries I gave up and left it like this. The colours are debatable anyway (just go and have a look at The Aerodrome forums and do search for Fokker E.V/D.VIII wing colour!) and out of 3 possibilities (standard green, streaked green, four colour stained) I chose the most colourful simply because I liked that the most, authentic or not. Then Gloss was applied and the decals (which are oversize and after cutting are now a-symmetric... drat!) put on. Finally a wash of acrylic artists paint (Payne's Gray) was put on and everything sealed with satin varnish to simulate the gloss varnish used on the real thing. A bit of the same acrylic stuff, but brown, was added to the tail and wheels to give it a bit of a used look -not too much, as they were operational only for a very short time.
| FINAL CONSTRUCTION |
 As is usual with this kind of kit, a lot of construction happens after the
painting and decalling stage. First the tail, minus the struts, was assembled
and added to the fuselage. After that I added the cowling, a near perfect fit,
and engine. Finally the windscreen I cut from acetate and guns (which had to be
trimmed, as they sit too high OOB) were added.
Then I cleaned up all struts and poked a pin through the pre-drilled
rigging holes now hidden under that Lozenge. Then it sat around for months
because I did not know how to properly attach the top wing.
As is usual with this kind of kit, a lot of construction happens after the
painting and decalling stage. First the tail, minus the struts, was assembled
and added to the fuselage. After that I added the cowling, a near perfect fit,
and engine. Finally the windscreen I cut from acetate and guns (which had to be
trimmed, as they sit too high OOB) were added.
Then I cleaned up all struts and poked a pin through the pre-drilled
rigging holes now hidden under that Lozenge. Then it sat around for months
because I did not know how to properly attach the top wing.
Finally it hit on me, that if you add the forward triangular supports, and
immediately add their outer supports, they'll automatically have the right
angles. I cut off the pins on the outer supports as fitting 2 pins in one hole
would be a bit difficult... I attached these struts with Humbrol tube glue as
that's rather thick and gives ample time make adjustments, unlike superglue.
When properly dried I found I should have cut the pins off the triangles
instead... I had to re-drill the holes in the wing as they were now mis-matched
and with everything painted and decaled I had no way to repair the old holes.
One lives and learns... the model was then put upside down on a piece of paper
with the proper angles, the tail raised a bit to have proper alignment from the
side and the top wing was glued into place with superglue. The rigging was next,
just a few wires near the tail for rudder and elevator, and a few more near the
ailerons and from the fuselage to the wing. Then the tail struts
and skid were added.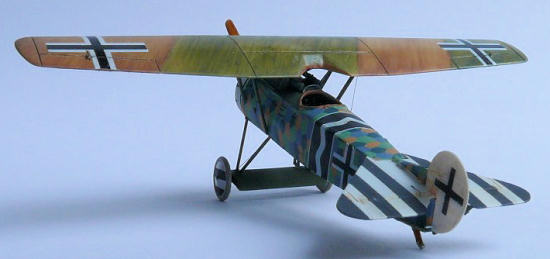
The undercarriage proved to be most difficult, as you get one axle wing, four
dents in the fuselage and four separate struts. In the end I used the trusty
tube glue and when that had dried a bit I aligned it properly. Unfortunately
when putting the model away, I bumped into the mess on my modelling table and
broke one of the struts. I was able to fix that, but when looking from the
bottom the wing axle is a bit twisted. Then rigging wires and wheels were added,
as was the pilot entry step under the fuselage. I tried making the hand-holds on
the rear fuselage from copper wire, but after 10 attempts to attach them without
glueing them to my tweezers or fingers, I gave up. I might add these later if
I'm in the mood. With that, I called her finished!
| CONCLUSIONS |
Though not the easiest kit around, it's not that hard either. If you don't do
the stupid things I did you can make it look even better, but it really attracts
attention, as it looks curious, has these nice Lozenge colours and for the Jasta
6 plane the black-and-white markings really set it off.
| REFERENCES |
www.theaerodrome.com
(forums)
Roden Box art
A built of this same kit by “Öcsi” here: http://www.modellboard.net/index.php?topic=29903.45
PS the loose aileron control wire has been tightened already!
December 2009
If you would like your product reviewed fairly and quickly, please contact me or see other details in the Note to Contributors.