
| KIT #: | 00074 |
| PRICE: | $5.00 MSRP |
| DECALS: | One option |
| REVIEWER: | Bill Michaels |
| NOTES: | Very old kit; no cockpit; decals are not same as instructions. |
| HISTORY |
In early 1917, the Germans were evaluating a captured Sopwith Triplane. The German Air Service was astounded at how maneuverable it was, compared to the Albatros fighters, and were very impressed with the rate of climb it possessed. A call went out to the aircraft manufacturers for a triplane fighter design.
Fokker’s first design was never submitted for evaluation. However, Fokker’s second design, the V.4, won the design competition. The V.4 was the prototype of what would become the Red Baron’s most famous mount- the Fokker Dr.1.
 Initial deliveries
were slow, and the production Fokker Triplane didn’t really enter service
until October of 1917. Ironically, by then, the Sopwith Triplane had
already been phased out of front-line service, replaced by the Sopwith
Camel. Approximately 320 triplanes were built, serving in front-line
squadrons from October of 1917 until June of 1918, when they were replaced
by the superb Fokker D-VII.
Initial deliveries
were slow, and the production Fokker Triplane didn’t really enter service
until October of 1917. Ironically, by then, the Sopwith Triplane had
already been phased out of front-line service, replaced by the Sopwith
Camel. Approximately 320 triplanes were built, serving in front-line
squadrons from October of 1917 until June of 1918, when they were replaced
by the superb Fokker D-VII.
Manfred von Richtofen’s all red Fokker Triplane is one of the most recognizable aircraft that ever existed. Because it is so common, it seems to be the default color scheme for anyone producing a Fokker Triplane model. This plane’s claim to fame is that it is the one the Red Baron was flying when he scored his last victory, and the plane he was flying when he was shot down.
There are a number of interesting color schemes for the Triplane, more than just all red. The Baron himself flew several different aircraft, and only 425/17 was all red. Triplanes came from the factory in a light blue-turquoise sort of color, with a streaky dark olive green finish over all the upper surfaces. German pilots took these drab machines and marked them with colorful squadron and personal markings. For example, the Baron’s planes had red accents, while planes from Jasta 26 had yellow cowls.
Project Background:
I have a collection of 1/72 scale WW1 aircraft (15 of them, so far) in a large mobile hanging over my desk at work. About a year ago, I had given away my Fokker Triplane, so I needed a replacement for the office. I looked in the stash, and found I had four-- the old Airfix kit, the new Revell-Germany molding, plus the Eduard and Roden kits.
 Most of my regular
builds get my best effort, as many are built for publication or as possible
contest entries. While working on such projects, I find it enjoyable to
also have a simpler side project underway- something fun to work on while
waiting for things to set on the “big” project, or just as a change of pace
from one of the more tedious tasks when I need a break. So, I decided to
do a quick build of the Airfix Fokker Triplane.
Most of my regular
builds get my best effort, as many are built for publication or as possible
contest entries. While working on such projects, I find it enjoyable to
also have a simpler side project underway- something fun to work on while
waiting for things to set on the “big” project, or just as a change of pace
from one of the more tedious tasks when I need a break. So, I decided to
do a quick build of the Airfix Fokker Triplane.
Models I build for the office mobiles are generally simple builds. As a mobile component, they are built in in-flight mode, with pilots and gear up where applicable. These side builds are not supposed to become “projects”—the standard is, “Will it look OK when hanging from the ceiling?” As such, I stick to basics, doing some filling and sanding, but no rescribing, no PE, etc. If I can brush paint it, I do that instead of hassling with the airbrush. This was one of those builds- but the result came out pretty well, so I went ahead and wrote it up. (I’ll probably spend as much time writing this as I did on the build!)
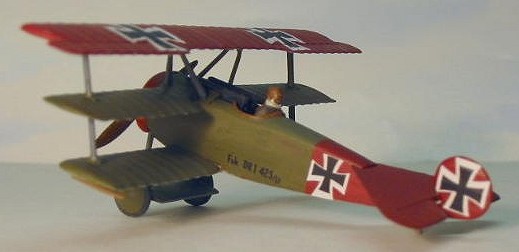
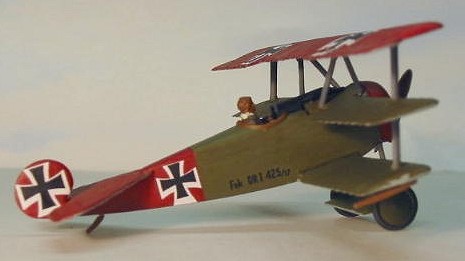
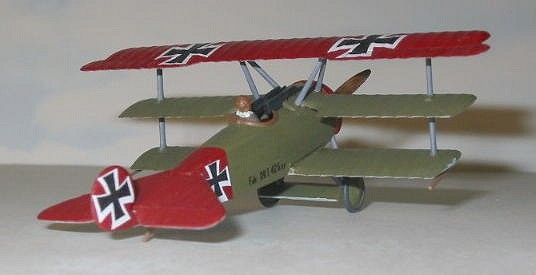
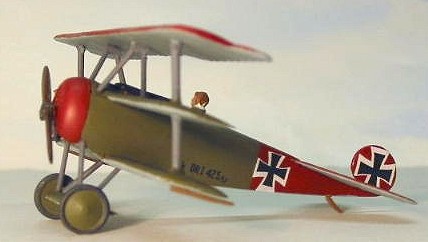
As this was a simple, OOB build, I did want to do something other than vonRichtofen’s 425/17. On the back of the Squadron In Action book, there is a drawing of 152/17, which was one of the Baron’s earlier mounts, green with red tail and cowling. I decided to use that color scheme on my model.
| THE KIT |
 Airfix’s WW1 kits
have been around for a long time—they date back to the 1960s, where they
originally appeared in “card and bag” packaging. There was a period of
time where the kits were released Aircraft of specific aces, with the
pilot’s image on the box. At that time, the Fokker Triplane was released
as Werner Voss’s aircraft, instead of as the all red Von Richtofen fighter.
Airfix’s WW1 kits
have been around for a long time—they date back to the 1960s, where they
originally appeared in “card and bag” packaging. There was a period of
time where the kits were released Aircraft of specific aces, with the
pilot’s image on the box. At that time, the Fokker Triplane was released
as Werner Voss’s aircraft, instead of as the all red Von Richtofen fighter.
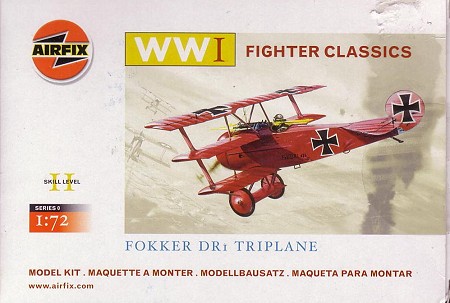
 The WW1 kits have
been in and out of production ever since. Within the past couple of years,
the kits were released in “WW1 FIghter Classics” boxes. The back of the
box lists the others in the series: Albatross D-Va, Sopwith Pup, Sopwith
Camel 2F1, Spad VII, and Bristol Fighter.
The WW1 kits have
been in and out of production ever since. Within the past couple of years,
the kits were released in “WW1 FIghter Classics” boxes. The back of the
box lists the others in the series: Albatross D-Va, Sopwith Pup, Sopwith
Camel 2F1, Spad VII, and Bristol Fighter.
The kit consists of about 20 parts, molded in bright red plastic. Overall, considering the age of the kit, the parts don’t look too bad. There was some flash on the smaller parts, and small mold lines on nearly every part. Surface detail is fairly restrained, as well—the fabric detail is overdone, but not as bad on some models of this era. (I knew that brush painting would help tone this down a bit, too.)
The kit does have a few weak areas, though. The machine guns are poor, just a basic shape with no surface detail at all. The prop is bad too- it has very thin blades that are flimsy, with a thin profile that doesn’t come close to the shape of the blades in all the pictures.
| CONSTRUCTION |
There are not a lot of parts to the kit. The fuselage consists of left and right halves, with the rudder molded to both sides. The cowl has a radial engine molded in. The wings are one piece each, and there is a separate cowl. Add in a handful of parts for the struts, guns, and landing gear, and that’s nearly all of them.
There is a bit of a gaffe with the instructions. The instruction sheet packaged with the kit is for Werner Voss’ aircraft. The finishing instructions and decal placement guide is for that plane- not Von Richtofen’s all red mount. (But the decals are for MvR’s aircraft- the one on the box art.) However, the parts numbers are correct, so assembly shouldn’t be compromised. (Though few builders are going to need them, given the low parts count of this kit.)
 Assembly went
quickly- there’s not a lot to say. First the fuselage halves were glued
together, and clamped. The cockpit is typical for Airfix kits of the era.
Detail consists of two pegs for the included pilot figure to sit on.
That’s it- no seat, no instrument panel, nothing!
Assembly went
quickly- there’s not a lot to say. First the fuselage halves were glued
together, and clamped. The cockpit is typical for Airfix kits of the era.
Detail consists of two pegs for the included pilot figure to sit on.
That’s it- no seat, no instrument panel, nothing!
While that dried, I spent the time cleaning up the wings. The middle and bottom wings each had four fairly prominent ejector pin marks to clean up, and the top wing had similar issues on the underside. Most of them were cleaned up by scraping a bit with a knife blade, but a couple were too deep, and needed some filler.
Because this was a simple build, I was going to brush paint as much as I could. Knowing the wings would need two coats to cover the red plastic, I applied a coat of WW2 German light blue (RLM 62). On a simple project like this, I go with the “what do I have- that’s close enough” school of color selection. The fuselage seam was cleaned up, and then the bottom and middle wings were attached.
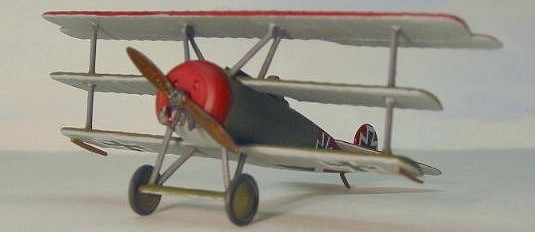
The rest of the model went together quickly—struts, top wing, and landing gear. I didn’t have any Spandaus in the spares box, so I didn’t replace the kit’s guns. I did have a white metal Aeroclub prop, so I used that instead of the Airfix prop.
| COLORS & MARKINGS |
 I painted the model
with PollyScale acrylics. As already mentioned, I used some RLM 62 light
blue for the underside color. For the olive green, I used some British
slate gray. For the red, I like Floquil’s Pacemaker red, from their line
of railroad colors, which is a little darker shade than a bright red.
I painted the model
with PollyScale acrylics. As already mentioned, I used some RLM 62 light
blue for the underside color. For the olive green, I used some British
slate gray. For the red, I like Floquil’s Pacemaker red, from their line
of railroad colors, which is a little darker shade than a bright red.
The decal sheet is OK, but not great. The decals are not too thick, and went down well. However, my sheet was printed a little out of register, as the black crosses are not centered in the white outlining. But it wasn’t so bad that I went looking for replacements! I used the kit markings for the aircraft serial, even though I know they’re wrong- just to dress up the model that little bit extra. (And because it will be hanging from the ceiling, so who will know?)
| CONCLUSIONS |
Conditionally recommended. This is a good kit for beginners. This is a simple model, inexpensive, and is easy to assemble. The way the two lower wings attach to the fuselage make for a sturdy model, and mounting the top wing is pretty easy, too.
| REFERENCES |
Fokker Dr.1 Triplane In Action, Squadron/Signal Publishers.
Review kit courtesy of my wallet.
October 2005
Copyright ModelingMadness.com. All rights reserved. No reproduction in part or in whole without express permission.
If you would like your product reviewed fairly and quickly, please contact the editor or see other details in the Note to Contributors.
Back to the Review Index Page 2022