Eduard 1/48 Albartos D.V/Va
|
KIT # |
8013 |
|
PRICE: |
$24.98 |
|
DECALS: |
See Review |
|
REVIEW : |
|
|
NOTES: |
Go Build One! |
|
HISTORY |
By now, most everyone is familiar with the history of the Albatros fighters in World War One. As the most prolifically produced aircraft of the War, they were used at one time by almost every famous German pilot in many theaters of the war.
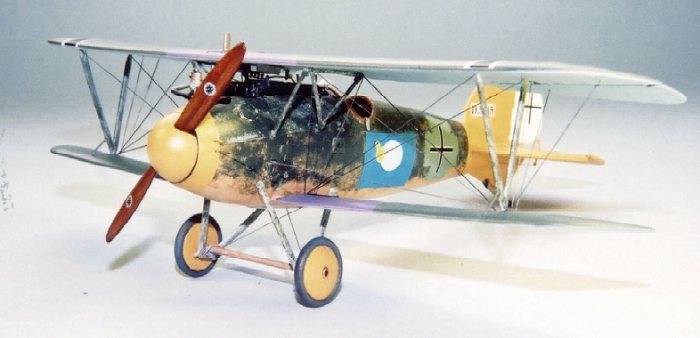
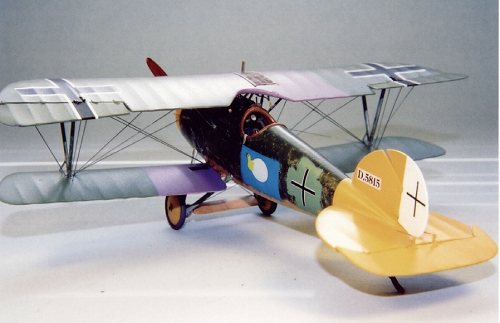
Some of the more obscure theaters of operations were along the North Sea coast where Albatrosses were used as both fighter escorts and attack planes in the “private little war” between RNAS and German naval seaplanes. The subject of this review is an Albatros flown by Flgmt. Gerhard Hubrich of Marine Feld Jasta IV in late 1918.
 German Marine Feld Jastas trace their beginnings back to Seefrontstaffel I which was formed at the beginning of the war to operate German naval aircraft over the North Sea. As the war progressed, their opponents, Royal Navy aviators, experienced success targeting places such as Ostende, Seebrugge, and shipping and U-boat bases in and around Dunkirk. In February 1917 Marine Feldjagdstaffel I was formed to protect the German naval aircraft and to counter the threat posed by the RNAS. MFJ I scored its first victory on February 7, 1917 when Vzfg. Wirtz shot down a RNAS Sopwith 1 1/2 Strutter.
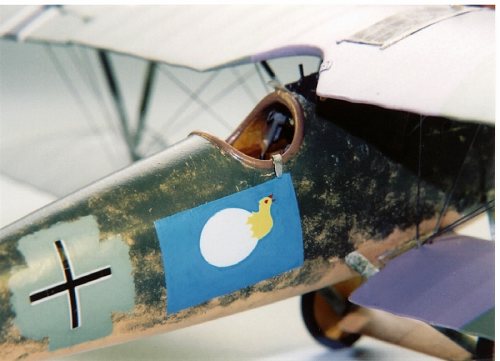
Following the success of MFJ I, Seefrontstaffel II was formed on October 1, 1917 as a single seat fighter unit to protect other German seaplanes along the North Sea coast. Gerhard Hubrich served in this unit and scored four victories. Seefrosta II lasted until mid September 1918 when it was disbanded and its planes and pilots used to form Marine Feld Jastas IV and V. Hubrich ended up in MFJ IV, where he served until the end of the war, scoring eight more victories. Hubrich is probably best known for his nickname “kuchen” which means “chicken” in German. Based on his service record it is doubtful that it refers to his courage under fire, but I have been unable to determine the origin of the nickname. However, Hubrich made the most of it, adopting a personal insignia of a yellow chick hatching from a white egg on a blue background which he had painted on his aircraft.
|
THE KIT |
This model was my contribution to “The Great Albatros Cookup” initiated by members of the World War One Modeling List, an eclectic and somewhat zany group of dedicated World War One modelers who exchange information, ideas, opinions and pictures of World War One subjects and models. The group decided to build as many different variants of the Albatros as possible by September 30. You can view some more examples at the World War One Modeling Page, (http://pease1.sr.unh.edu/index.html).
 This model was built using the 1:48 scale Eduard Albatros DV/Va kit. In Eduard history, this kit falls somewhere in the “middle” period, an improvement over the earliest offerings, but not quite up to today’s kits. Still, it is a good kit and, with a little patience, builds into a very nice example of the Albatros DVa. Built out of the box, the kit provides decals and parts for two aircraft, a DV flown by Herman Goring, and a DVa flown by Hans Joachim von Hippel. As usual, there is a generous photo-etch offering to detail the model including several cockpit parts, a fully detailed radiator, and various external hatches. The kit also contains a white metal Mercedes engine that provides a good starting point for engine detailing. I supplemented my model with the Albatros DV photo-etch set from Eduard, sold separately from the kit. It contains several additional parts enabling one to build a more accurate cockpit, and is a worthwhile investment if you want a fully detailed model. Instructions are good, although I recommend the use of the National Air and Space Museum book on their restored Albatros by Robert Mikesh for detailing ideas.
|
CONSTRUCTION |
I began my construction by separating all control surfaces, and by modifying the upper wing. The primary difference between the DV and the DVa variants is in the aileron control horns. The DV used rather large, vertically placed horns located in triangular shaped housings, while the DVa reverted back to the horizontal, less visible control “tube” previously used on the Albatros DIII. I separated the ailerons, drilled a small hole on the inside edge in the appropriate location and inserted a small piece of stainless steel wire to represent the control tube. I then cut out a notch at each of the two corresponding locations on the upper wing to create the space surrounding the control tube. These notches are located between the two wing ribs under the upper wing crosses, on the trailing edge between the wing and the ailerons. On the actual aircraft, one of the aileron control lines runs from inside the respective right and left tubes, down to and through the lower wing into the control column located in the cockpit. I further modified the upper wing and the stabilizer by adding hinges made of small pieces of Tamiya masking tape glued in place.
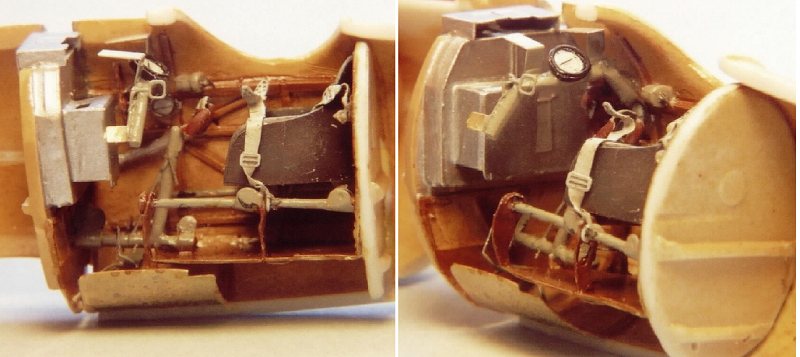
I next turned my attention to the cockpit which offered a wealth of detailing opportunities. The separate Eduard photo-etch set requires you to discard much of the kit provided cockpit parts. I did, however, use the kit supplied seat and rear bulkhead which served as a base on which to attach the photo-etch bulkhead. Quite a bit of filing, gouging and sanding of both the bulkhead and the fuselage interior was required to get the bulkhead to fit properly in the enclosed fuselage.
I added formers and stringers cut from Evergreen plastic strip and glued in place with liquid cement. The various cockpit components were glued in their respective positions and the fuselage walls and details were painted. There is a prominent bar at the front of the cockpit that supports the machine guns and the tachometer gauge. Eduard supplies this as a flat piece of PE. I built mine up using a piece of Evergreen plastic rod flattened on one side and glued to the PE piece. The result is a more realistic three dimensional effect. The tachometer and floorboard compass were also supplemented with the Eduard WWI instruments set which provides decals and bezels. The floorboard and seat support system are from the Eduard DV set. All that is needed to complete it are a couple of straight pins cut to size to represent the metal bars on which the seat rests. This unit also needed to be filed down to fit into the enclosed fuselage. The Eduard PE set provides attachment mounts for the seat belts on both the rear bulkhead and the seat support bars, making for a realistic seat belt appearance. After painting, the seat belts were attached, but not glued in their permanent positions until the model was completed.
Most of the cockpit components were painted separately before placing them into the fuselage and this will be discussed in more detail in the Painting section below.
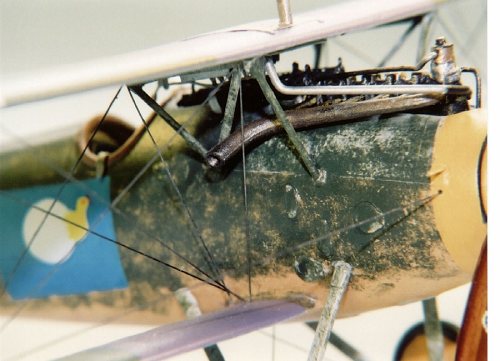 Once the pilot’s area of the cockpit was completed, attention was turned to the forward portion of the fuselage interior. This area contains the ammo cans, engine mount and the engine itself. The Eduard PE set provides a spent ammo container that attaches to the plastic ammo cans, into which the spent ammo chutes feed. These are placed later in the construction. The ammo can assembly was glued in place and painted. The engine mount was glued in place, painted and then the completed white metal engine was glued in place. I decided not to attach the exhaust pipes yet, as I was sure to knock them off several times during construction. I did, however, drill indentations into the engine to provide a better attachment point for the pipes.
One item of note, on the real aircraft, there are prominent fuel tanks that sit between the engine and the ammo cans. Eduard chose not to supply them in this kit, and I did not add them, as they are not all that visible once the top wing is added. However, for a more complete model they should probably be scratch built and added.
Once the fuselage interior was assembled and painted, it was time to glue the two halves together. Because of the difficulties in getting the bulkheads and other components to fit, I spent quite a bit of time fitting and reworking to make sure everything would line up properly before to gluing the two halves together. One especially tricky item was the tachometer bar, as it tended to shift slightly whenever I closed the fuselage halves together. Once the fuselage halves were connected, I went ahead and glued the bottom wing, tailfin, tailskid support unit and stabilizer in place. The fit was fairly good, but I still did a lot of puttying, sanding and refilling with Zap-a-Gap to get a smooth finish. I added several external hatches and other hardware from the PE set, and the fuselage and wing assembly were now ready for painting.
From this point on, construction was mainly a matter of painting the remaining subassemblies and then attaching them to their respective locations. Once the fuselage painting was completed, I then proceeded to attach the machine guns, ammo chutes, and extra engine details. Then it was time to attach the top wing. Eduard supplies nicely molded plastic interplane struts, but the cabane struts are flat and relatively flimsy pieces of photo-etch. I attached these cabane struts, and promptly bent them by accident. I was never able to get them back to their original shape and strength so I replaced the vertical portion of the struts with pieces of brass rod. This worked much better, and the next time I’ll just do this on the front end. Prior to attaching the top wing, make sure the radiator vents and actuating handle are attached and painted. This is a really nice feature of this kit, and it’s a shame it’s on the underside of the wing where it is not very visible. I also recommend attaching the interplane struts to the top wing, as well as any rigging that can be attached to the underside of the top wing. Once the struts had set up, I then simply glued the top wing to the cabane struts, making sure to carefully line things up for a “square” fit. After the top wing had set up a bit, I then simply glued the bottom end of the interplane struts to their attachment points on the bottom wing. This way you only have to line up two holes instead of four.
 After the top wing had set up overnight, I then proceeded to complete the wing rigging. I use monofilament thread, and attach it with Zap-a-Gap. I simply threaded the pre-attached rigging through the pre-drilled holes in the bottom wing (lot of “pre” involved here) and secured them with CA. Once dry, I trimmed the excess thread with a single edge razor blade and sanded down any rough spots. One neat thing about the Albatros is that there are access hatches on the underside of the lower wing. By replicating these on the model, you can cover up any minor flaws that develop where the rigging exits the wing. I added the hatches, then touched up the painting, and sealed it with a coat of Future to prepare for the decals.
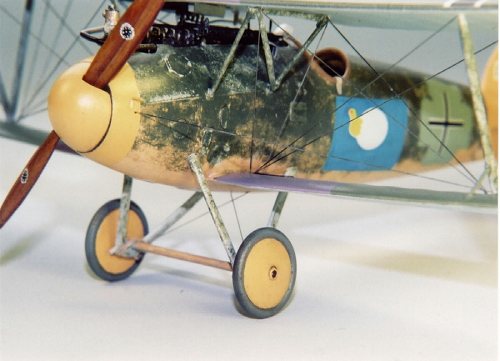
The next items to be installed were the undercarriage and wheels. Eduard does a good job on these parts and this was a relatively simple procedure, although there is some thought that the undercarriage struts are a bit too short. Once dry, rigging was accomplished. I chose to add the bungee cord shock absorbers and made them out of stretched sprue that I wrapped around the undercarriage struts and axles and glued in place. I then added the wheels, tailskid and rudder. Next, the radiator pipes were made from brass rod, glued in place and painted, and the exhaust pipes attached.
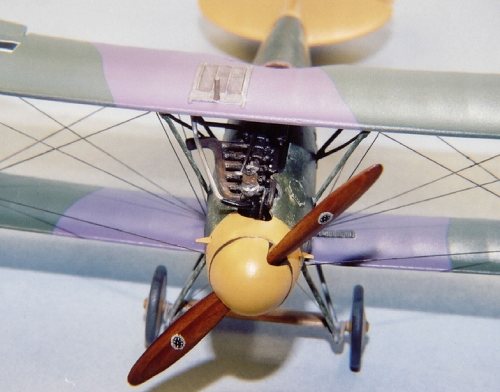
When attaching the spinner, I wanted to be sure and leave a little space between it and the nose of the aircraft. To accomplish this, I glued a piece of styrofoam on the inside of the spinner, and then glued the styrofoam to the propeller shaft protruding from the engine. The propeller is a wooden one produced by Martin Digmayer of the Czech Republic, and supplied by Copper State Models. Finally, the windscreen was trimmed to shape and glued on the fuselage, and rigging was added to the stabilizer control horns.
|
PAINT & DECALS |
PAINTING:
The fuselage interior was painted to represent the wood and metal components used in the Albatros. The interior walls were painted Testor’s Model Master Acrylic Tan, then highlighted with a wash of Testor’s Wood Brown to resemble plywood paneling. The formers and stringers were painted Gunze Wood Brown. Most of the Metal parts were painted Testor’s MM RLM 02 Gray-Green. The seat was painted Dark Gray and given various washes of brown and gray to simulate wear on the leather padding. Seat belts were painted Gunze Sail Color and drybrushed with Tamiya Khaki for wear.
The engine cylinders were painted Testor’s Gunmetal and drybrushed with Gunze Burnt Iron and various shades of Steel and Brown. Ammo boxes were painted Aluminum, and the guns also painted Gunmetal and drybrushed with various metallic shades.
 Once assembled, the fuselage was painted to resemble the varnished plywood paneling. I airbrushed the fuselage with Testor’s MM Acrylic Tan. Once dry, I then used a thinned wash of Testor’s Wood Brown to apply the subtle wood graining. I use a brush that I use for drybrushing, dip it into the paint and then into the thinner and apply it to the fuselage. Since the fuselage was made from separate plywood panels, I brush in different directions to convey the effect of separate panels. Once this is dry, I then go back over the entire fuselage with a thin wash of Testor’s MM Acrylic Wood to give it that honey color representative of varnished plywood. I then sealed the finished product with Future.
I next painted the fuselage panels and struts with MM Lichtblau 76.
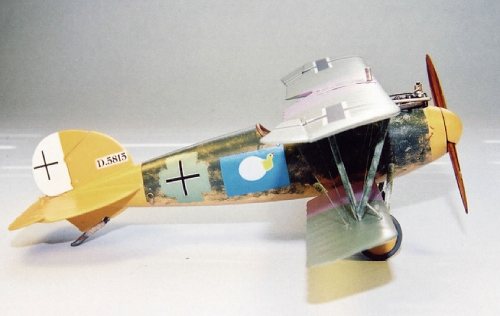
The next step was somewhat painful since it meant covering up most of the plywood effect I worked so hard to achieve. Hubrich’s Albatros had most of its fuselage covered in an olive green mottle that was most likely applied with either rags or sponges. To duplicate the effect, I used a Q-tip to apply Testor’s MM Acrylic OlivGrun to the fuselage surface. I dipped the swab in the paint and then rolled it on in short strokes in different directions, applying it more heavily on the top and lighter on the sides. Once dry, however, I was not entirely pleased with the result as the finish was too heavy and dark in places. To correct this, I lightly sanded the entire surface with a piece of 400 wet-or-dry sandpaper. This removed some of the paint and allowed more of the undercoat to show through. Once I had the finish the way I wanted it, I then masked and painted the yellow unit markings with MM Gelb 04. Next I hand painted the “painted over” crosses on the fuselage sides with Gunze Light Green. Finally I coated the whole thing in Future to prepare for decaling.
 The struts were mottled simply by “dampbrushing” (as opposed to drybrushing) the OlivGrun paint on.
The wings were painted in the familiar green/mauve pattern using MM Grun 62 and MM Napoleonic Violet. The underside of the wings was finished in Polly Scale RLM 64 Light Blue.
The exhaust pipes were painted a combination of MM Jet Exhaust, Copper, and drybrushed with Burnt Iron and Leather. Rigging was painted with Polly Scale Graphite.
The tailskid was painted Wood Brown and Graphite where appropriate. In addition, I wrapped part of the tailskid with thin strips of Tamiya tape and painted it Gunze Sail Color to simulate the cloth used to wrap the tailskids on many aircraft. Wheels are Tamiya Light Gray with some subtle drybrushing added.
DECALS:
The decals used on the fuselage were made for me by two members of the World War One Mailing List, Dale Beamish and Mike Franklin. The decals were printed using an Alps printer. The chicken (“Kuchen”) decal needed some slight touching up to cover minor scratches, but otherwise the results were excellent. Many thanks to Dale and Mike for their help. The wing crosses were from the Aeromaster Albatros set. The Garuda logos on the propeller are from the IPMS Spruce Goose decal set for the NASM “Stropp” Albatros. After applying the decals, I gave the whole thing a light coat of Testor’s MM Acrylic Semi-Gloss finish.
|
CONCLUSIONS |
 This was a most enjoyable model to build, and I thank the members of the World War One List for the inspiration. To me, Hubrich’s aircraft represents a precursor to the camouflage and markings employed by German aircraft during WWII. One can almost see an Me 109G lurking beneath the surface.
With so many different marking possibilities available for the Albatros DV, one could make a career out of building them. The Eduard kit is currently out of production so I recommend that you obtain some as soon as possible. I currently have 10 in inventory and plan to build them all..
|
REFERENCES |
Albatros Aces of World War I, Norman Franks, Osprey Publishing, 2000.
The Jasta Pilots, Franks, Bailey and Duiven, Grub Street, 1996.
Albatros DVa, Famous Aircraft of the National Air and Space Museum No. 4,
Robert Mikesh, Smithsonian Institution Press, 1980.
Albatros Fighters, Windsock Datafile Special, R.L. Rimell, Albatros Productions, Ltd, 1991.
Copyright ModelingMadness.com.
If you would like your product reviewed fairly and fairly quickly, pleasecontact
the editor or see other details in the Note to
Contributors.