Blue Max LVG C.VI
|
KIT # |
BM 204 |
|
PRICE: |
$39.96 |
|
DECALS: |
See review |
|
REVIEWER: |
Otis Goodin |
|
NOTES: |
Tough build but worth it if you're a WWI junkie |
|
HISTORY |
 When
most of us think about WWI aircraft, the name LVG (Luft-Verkehrs-Gesellschaft
mbH) is probably not a name that immediately comes to mind. However, the company
founded in 1910 by Alfred Muller went on to become the second most prolific
German aircraft manufacturer of WWI. The reason for the relative obscurity is
that, for most of the war, the firm manufactured aircraft under license for
companies such as Albatros and Gotha. However, in 1916, LVG managed to design
its own aircraft, the CV, to be used as an artillery observation and
reconnaissance aircraft. LVG delivered 1250 of them to the German Air Service,
and the favorable reviews led the company to develop the CVI, a more streamlined
version of the CV. Appearing in late 1917 and only in active use for the last
six months of the war, the CVI proved to be versatile aircraft with good
maneuverability, speed and rate of climb. Following the war, some 400 remaining
CVIs found use in Latvia, Austria, Hungary, Belgium and Poland.
When
most of us think about WWI aircraft, the name LVG (Luft-Verkehrs-Gesellschaft
mbH) is probably not a name that immediately comes to mind. However, the company
founded in 1910 by Alfred Muller went on to become the second most prolific
German aircraft manufacturer of WWI. The reason for the relative obscurity is
that, for most of the war, the firm manufactured aircraft under license for
companies such as Albatros and Gotha. However, in 1916, LVG managed to design
its own aircraft, the CV, to be used as an artillery observation and
reconnaissance aircraft. LVG delivered 1250 of them to the German Air Service,
and the favorable reviews led the company to develop the CVI, a more streamlined
version of the CV. Appearing in late 1917 and only in active use for the last
six months of the war, the CVI proved to be versatile aircraft with good
maneuverability, speed and rate of climb. Following the war, some 400 remaining
CVIs found use in Latvia, Austria, Hungary, Belgium and Poland.
|
THE KIT |
 The kit
is fairly typical Blue Max, which means that it is a limited run production
(1500 units) with parts made of plastic and white metal. The plastic is a fairly
soft variety, which is helpful considering the amount of sanding and reshaping
required. The white metal parts are of medium quality, requiring some work to
remove flash and enhance detail. The instructions are very basic, with only an
exploded view drawing supplemented with a few out of focus black and white
photos of various locations of a finished model. All in all, not very helpful.
The instructions recommend the use of the Datafile, and I concur. I built
mine without one, but it would have been helpful to have. My main complaint with
Blue Max kits, besides the inadequate instructions and engineering, is the use
of extruded plastic material to serve as wing struts. The material, at least in
the case of the LVG, is too flimsy to support the wings.
The kit
is fairly typical Blue Max, which means that it is a limited run production
(1500 units) with parts made of plastic and white metal. The plastic is a fairly
soft variety, which is helpful considering the amount of sanding and reshaping
required. The white metal parts are of medium quality, requiring some work to
remove flash and enhance detail. The instructions are very basic, with only an
exploded view drawing supplemented with a few out of focus black and white
photos of various locations of a finished model. All in all, not very helpful.
The instructions recommend the use of the Datafile, and I concur. I built
mine without one, but it would have been helpful to have. My main complaint with
Blue Max kits, besides the inadequate instructions and engineering, is the use
of extruded plastic material to serve as wing struts. The material, at least in
the case of the LVG, is too flimsy to support the wings.
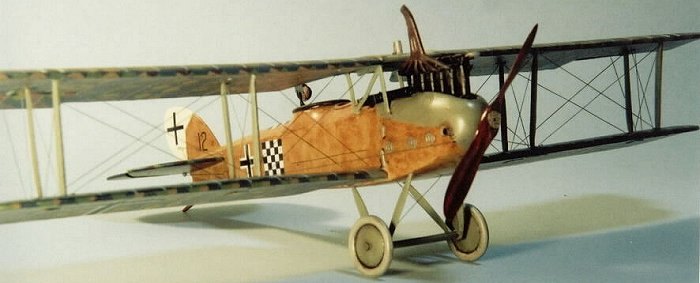
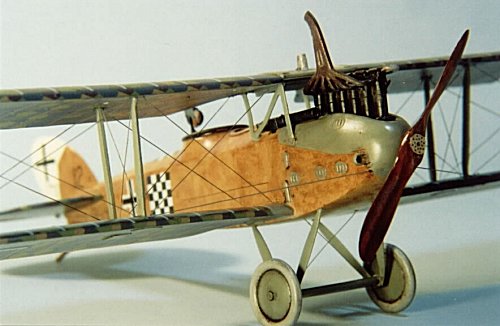
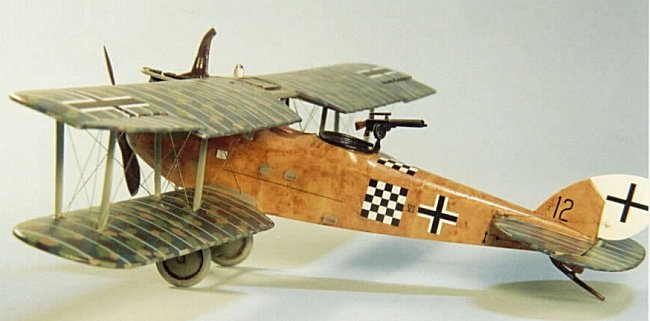
The model features decals for two versions of the LVG CVI, werke number 1510/18, and “Checkerboard 12,” which is the one I chose to build.
|
CONSTRUCTION |
Construction began by separating and cleaning up the plastic and white metal parts. The parts are attached to thick trees, and it is necessary to do a fair amount of sanding and filing to remove the excess material. Once the parts were clean, I then separated the elevator and rudder, and began drilling holes to accept the struts and rigging to be applied later. To Blue Max’s credit, the ailerons are provided as separate parts and do not have to be cut off. This is a nice touch that I wish other model companies would emulate. I then turned my attention to the cockpit and encountered my first problem.
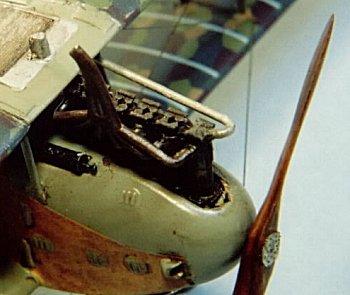
 The
cockpit consists of a floorboard, pilot’s seat, sidewall instruments, joystick,
and observer’s bench made of plastic, along with 3 white metal bulkheads to be
positioned center, fore and aft. Exactly where to position them is not clear
from the instructions, but I made an educated guess. Unfortunately, after
installing them, I noticed that the fuselage halves would not mate with the
bulkheads in place. I tried several locations but nothing would work so I
resolved that I would have to trim down the fuselage sidewalls to create more
room. Using my Dremel, I trimmed and trimmed and trimmed some more and the
fuselage still would not mate with the bulkheads in place. It became apparent
that any more “trimming” would compromise the structural integrity of the
fuselage, so I turned my attention to trimming the bulkheads. Again, using my
Dremel, I ground down the bulkheads as much as I dared and I still could not get
the parts to work. It became apparent that both the size and shape of the
bulkheads were such that they would not fit into the fuselage without some
serious surgery. I proceeded to cut them in half vertically and remove more
material until I could get them to a size and shape that would fit. At this
point I was pretty disgusted at the inept engineering of the kit and considered
junking the whole thing, but at around $40 a pop, I decided I would hang in
there with it. Of course, any thoughts of detailing the cockpit or entering the
kit into competition pretty much vanished at this point. My goal was simply to
build a model that looked like an LVG from the outside so I proceeded to,
uh…..proceed.
The
cockpit consists of a floorboard, pilot’s seat, sidewall instruments, joystick,
and observer’s bench made of plastic, along with 3 white metal bulkheads to be
positioned center, fore and aft. Exactly where to position them is not clear
from the instructions, but I made an educated guess. Unfortunately, after
installing them, I noticed that the fuselage halves would not mate with the
bulkheads in place. I tried several locations but nothing would work so I
resolved that I would have to trim down the fuselage sidewalls to create more
room. Using my Dremel, I trimmed and trimmed and trimmed some more and the
fuselage still would not mate with the bulkheads in place. It became apparent
that any more “trimming” would compromise the structural integrity of the
fuselage, so I turned my attention to trimming the bulkheads. Again, using my
Dremel, I ground down the bulkheads as much as I dared and I still could not get
the parts to work. It became apparent that both the size and shape of the
bulkheads were such that they would not fit into the fuselage without some
serious surgery. I proceeded to cut them in half vertically and remove more
material until I could get them to a size and shape that would fit. At this
point I was pretty disgusted at the inept engineering of the kit and considered
junking the whole thing, but at around $40 a pop, I decided I would hang in
there with it. Of course, any thoughts of detailing the cockpit or entering the
kit into competition pretty much vanished at this point. My goal was simply to
build a model that looked like an LVG from the outside so I proceeded to,
uh…..proceed.
Once I had the bulkhead problem solved, I ran into a problem with the lower half of the engine. Again, with this part in place, the fuselage would not mate, so I started whittling the engine down and also enlarging the fuselage cavity to contain it. By the time I finished, the engine was a shell of its former self, but at least the fuselage would mate. Once the fuselage halves were joined, I used a fair amount of gap filling glue and putty to seal the crevices that remained. After a reasonable amount of sanding I was able to obtain a smooth finish.
 I
attached the stabilizer, tailplane and lower wings to the fuselage. When
attaching the lower wings, I added bits of brass wire to the wings and glued
them into holes I had drilled into the sides of the fuselage. This gives more
support than simply “butt-joining” them to the fuselage. At this point, I turned
my attention to painting and finishing the remaining subassemblies (upper wings,
wheels, engine, machine guns, etc.). This process will be discussed in more
detail in the Painting section below.
I
attached the stabilizer, tailplane and lower wings to the fuselage. When
attaching the lower wings, I added bits of brass wire to the wings and glued
them into holes I had drilled into the sides of the fuselage. This gives more
support than simply “butt-joining” them to the fuselage. At this point, I turned
my attention to painting and finishing the remaining subassemblies (upper wings,
wheels, engine, machine guns, etc.). This process will be discussed in more
detail in the Painting section below.
Once all the subassemblies were finished, I was ready to put the whole thing together. Believe me, I was plenty nervous at this point as I had just invested many hours in getting here. I fully expected the rest of the model to fit together the way the previous parts had, so I was expecting the worst. Maybe that’s a good philosophy to adopt because, though not without problems, the rest of the construction went much better than the earlier stages.
On any biplane, the most critical issue is to get the
wings on straight and level. If the kit is engineered well (a la Eduard) it’s
usually not a problem, but as we have seen with this kit,… well, you get the
picture. I began by installing the cabane struts. They
 are made of white metal and
were generally pretty sturdy although one of them developed a tendency to bend
during installation of the upper wing. As discussed earlier, the interplane
struts were to be formed from the flimsy extruded plastic material provided. I
cut and formed the struts and tried using them, but they simply would not
support the weight of the rather large wing peculiar to the LVG. Looking around
for an alternate plan, I considered using brass rod but decided it was too round
for the LVG struts. I then came across some flat toothpicks and thought these
might work. I cut them close to the recommended size, sanded them to shape and
began trying them on a trial and error basis. I worked from the inside out on
one side, and then did the same on the other side. Without too many failures,
the toothpicks did a credible job, and were far better than the flimsy plastic
originally intended.
are made of white metal and
were generally pretty sturdy although one of them developed a tendency to bend
during installation of the upper wing. As discussed earlier, the interplane
struts were to be formed from the flimsy extruded plastic material provided. I
cut and formed the struts and tried using them, but they simply would not
support the weight of the rather large wing peculiar to the LVG. Looking around
for an alternate plan, I considered using brass rod but decided it was too round
for the LVG struts. I then came across some flat toothpicks and thought these
might work. I cut them close to the recommended size, sanded them to shape and
began trying them on a trial and error basis. I worked from the inside out on
one side, and then did the same on the other side. Without too many failures,
the toothpicks did a credible job, and were far better than the flimsy plastic
originally intended.
Once the wings were in place, I began rigging them
immediately to provide extra strength. I do a lot of my rigging before assembly
because it is easier to reach the rigging points to attach the invisible thread
I use for rigging. In this case, I “pre-rigged” the wings after I finished
applying the lozenge camo, and before attaching the top wing. Once the top wing
was attached, it was simply a matter of sorting out the mass of threads hanging
from the underside of the top wing and guiding each one into its respective
pre-drilled hole in the lower wing. Once the respective
 thread has been “threaded”
into place, I place a small amount of gap filling glue into the hole, grab the
end of the thread with self-clamping tweezers or a hemostat, and allow the
weight of the tweezers to pull the thread taught while the glue sets. Once the
glue has set for a few minutes, I release the tweezers and move on to the next
thread. The concept is simple, it’s just the execution that is a bit tedious,
especially in the beginning when it’s hard to tell which thread is which. I can
usually finish the whole process in about an hour on a simple kit such as a
Pfalz, but this one took 3-4 hours over a couple of nights. Once the wings were
rigged, I trimmed off the excess thread and patched any damaged spots underneath
the wing with more lozenge decals. Once I was satisfied with the result, I added
the rib tapes and underwing crosses.
thread has been “threaded”
into place, I place a small amount of gap filling glue into the hole, grab the
end of the thread with self-clamping tweezers or a hemostat, and allow the
weight of the tweezers to pull the thread taught while the glue sets. Once the
glue has set for a few minutes, I release the tweezers and move on to the next
thread. The concept is simple, it’s just the execution that is a bit tedious,
especially in the beginning when it’s hard to tell which thread is which. I can
usually finish the whole process in about an hour on a simple kit such as a
Pfalz, but this one took 3-4 hours over a couple of nights. Once the wings were
rigged, I trimmed off the excess thread and patched any damaged spots underneath
the wing with more lozenge decals. Once I was satisfied with the result, I added
the rib tapes and underwing crosses.
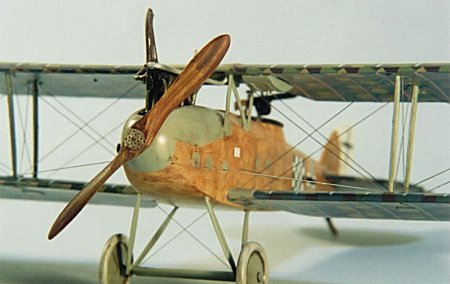
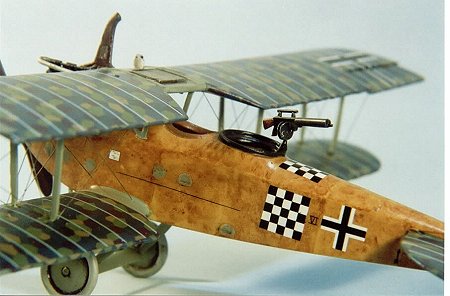
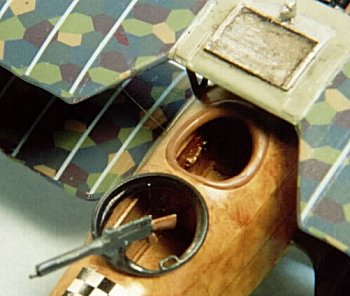
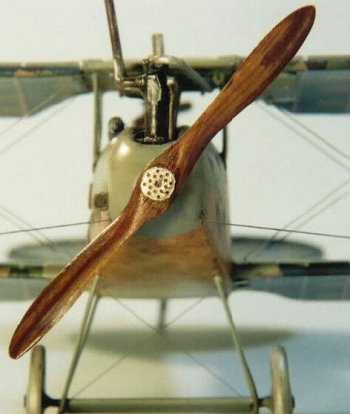
The remaining subassemblies to be added were the rudder, undercarriage struts and wheels, stabilizer flap, control horns, radiator pipes and tailskid. The radiator pipes were made of brass rod and painted Aluminum. All of these parts went on with no problem. The necessary rigging was added, and the observer’s machine gun was installed. I misplaced the white metal support post for the gun so I made one out of brass rod and painted it to match the rest of the assembly. As a final touch, I replaced the kit-supplied prop with one I made myself, using the kit part as a template to get the shape right. This was my first successful attempt at propeller making, and I was more or less pleased with the result. I made it with a piece of basswood board I purchased from Hobbytown. I traced the outline of the kit propeller onto the board and cut it out with a coping saw. I used my Dremel to do most of the heavy duty sanding and then finished it up by hand. Be careful with the Dremel. The basswood is very fragile and the Dremel can snap it in two. I know because I did it. Once the prop was sanded to shape, I stained it with some Minwax Polyshade and added the prop boss from Copper State Models. Overall, not bad.
|
PAINT & DECALS |
The most important painted piece of this model is the
wood-grained fuselage. LVGs, like many German aircraft of WWI, had fuselages
composed of various panels of birch plywood. The panels were attached to a frame
of wood formers and stringers and then stained or finished in a clear varnish.
The result is a beautiful “honey-colored” wood finish that must be replicated
for an accurate model. Almost every modeler who attempts this has his/her own
variation to the theme, but the basic premise is to apply a base coat and then
apply the wood grain effect with various washes of color. Bob Laskodi is one
modeler who I think has the process down pat, but he and I differ slightly in
our approach and result. My method is as follows: I spray a base coat of Testors
Model Master (Acrylic) Wood to the entire fuselage. Once dry, I then spray a
light coat of Future over it to protect it from the next step. Once the Future
coat had dried thoroughly (at least 24 hours) I then apply the wood grain
effect. Some modelers use artist’s oils. I use good old basic Testors gloss
enamels, thinned with 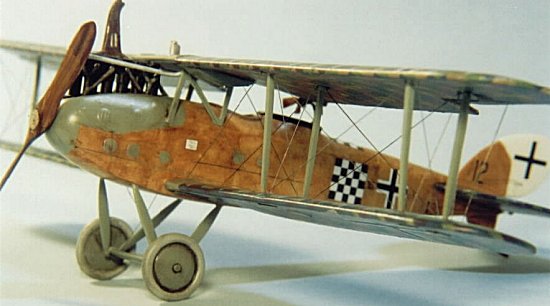 Testor’s
thinner. I take a little black, brown and wood brown color, put it in an old
paint lid, and then add thinner to it until I get it the consistency and color I
like. Somewhere between pretty runny but not too runny is about right. Basically
I want the paint to flow easily but still stick to the surface when I apply it.
Trial and error is the best solution, but it’s hard to mess up. I take a brush I
use for drybrushing, dip it into the paint and then apply it in small sections
at a time. The goal is to make it look like separate panels so I vary the
direction of the grain and intensity of the color with and within each panel.
Occasionally I will make short stabbing strokes to produce what appear to be
“knots” in the wood. Once satisfied with an area, I move on to another one,
usually skipping over a panel rather than doing one adjacent to an area I have
just completed. This gives the previous spot a chance to dry somewhat so that it
maintains its separate identity rather than the paint flowing together into the
adjacent area. Once the entire fuselage has been covered I let it dry overnight.
The next day I coat it again with Future to seal the wood grain and to provide a
glossy surface for decals.
Testor’s
thinner. I take a little black, brown and wood brown color, put it in an old
paint lid, and then add thinner to it until I get it the consistency and color I
like. Somewhere between pretty runny but not too runny is about right. Basically
I want the paint to flow easily but still stick to the surface when I apply it.
Trial and error is the best solution, but it’s hard to mess up. I take a brush I
use for drybrushing, dip it into the paint and then apply it in small sections
at a time. The goal is to make it look like separate panels so I vary the
direction of the grain and intensity of the color with and within each panel.
Occasionally I will make short stabbing strokes to produce what appear to be
“knots” in the wood. Once satisfied with an area, I move on to another one,
usually skipping over a panel rather than doing one adjacent to an area I have
just completed. This gives the previous spot a chance to dry somewhat so that it
maintains its separate identity rather than the paint flowing together into the
adjacent area. Once the entire fuselage has been covered I let it dry overnight.
The next day I coat it again with Future to seal the wood grain and to provide a
glossy surface for decals.
Once the wood grain was complete, I painted the metal panel parts, struts and wheel wells in RLM Grau 02. The engine and machine guns were painted in MM Gun Metal. I really like the Model Master Gun Metal because it has that blue steel color to it, unlike other paint makers whose gunmetal is too gray for my tastes. The exhaust pipe was painted with Gunze Burnt Iron and drybrushed with various metallic shades and pastels. The tires were painted in MM Lichtgrau, then drybrushed with gray pastels to give some variance to the color. The wing-mounted radiator was painted in Aluminum and given a wash of thinned black and brown.
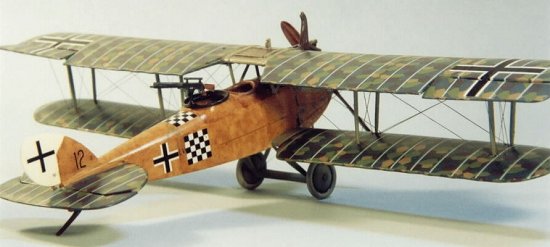
The next major project on this model was to apply the lozenge decals to the wings and stabilizer. Before applying the decals, I first sprayed the surfaces with RLM Grau and then with a heavy coat of Future to create a slick surface. I chose the new Eagle Strike five-color lozenge decals, primarily for two reasons. First, Eagle Strike is none other than the old Aeromaster folks so I knew the quality was good. Secondly, I actually had a hand in the development of these decals so I was confident that the colors were right. There’s a story here so I might as well tell it. A few years ago I contacted Aeromaster to ask them to improve their existing lozenge decals. The quality was good but I felt the colors were a bit off. Aeromaster promptly responded and stated that they had been working on the project for some time but had hit a roadblock because they were not able to get agreement on the colors among their consultants. I offered to assist and to involve members of the WWI Modeling List. Aeromaster agreed and Bob Laskodi, Steve Hustad, others and myself reviewed the Aeromaster samples and offered suggestions. Apparently they took our advice because shortly thereafter the Eagle Strike lozenge appeared. In the instructions, Eagle Strike extends thanks to several folks, including those mentioned, for their help in the development of the decals. I truly do believe that these lozenge decals are the best available on the market today, and I encourage everyone to buy some so they will be a hit and Eagle Strike will make more.
 Applying
lozenge decals is not difficult, but it is tedious and time consuming. Lozenge
fabric was applied in a number of different ways depending on the aircraft and
the manufacturer so it is important to closely review your reference materials
to be sure that you are applying them in the correct manner. On this particular
aircraft, the fabric was applied chordwise, meaning from leading edge to
trailing edge (or vice versa). In addition, it appears that the rolls were
applied in alternating directions so that the pattern on one side of the roll
matched the pattern on the other side of the roll. Think of it this way. The
wing was in the middle with lozenge “installers” on either side. I presume that
rolls of lozenge fabric were positioned so that the fabric could be easily
pulled from the rolls and placed on the wings. One installer pulls from the
leading edge side and another pulls from the trailing edge side. The pieces are
stitched into place and they move onto the next location.
Applying
lozenge decals is not difficult, but it is tedious and time consuming. Lozenge
fabric was applied in a number of different ways depending on the aircraft and
the manufacturer so it is important to closely review your reference materials
to be sure that you are applying them in the correct manner. On this particular
aircraft, the fabric was applied chordwise, meaning from leading edge to
trailing edge (or vice versa). In addition, it appears that the rolls were
applied in alternating directions so that the pattern on one side of the roll
matched the pattern on the other side of the roll. Think of it this way. The
wing was in the middle with lozenge “installers” on either side. I presume that
rolls of lozenge fabric were positioned so that the fabric could be easily
pulled from the rolls and placed on the wings. One installer pulls from the
leading edge side and another pulls from the trailing edge side. The pieces are
stitched into place and they move onto the next location.
In applying the lozenge to this model I attempted to duplicate that effect. I have found it best to apply the lower surface lozenge first, trim it off, and then apply the upper surface so that it slightly overlaps the previous application. I use the Micro Set/Micro Sol method and with these decals it works quite well. Once the base fabric has been applied, it is then time to apply the rib tapes. Talk about fun. Imagine applying about 50 thin strips of decal and making sure they are all straight and line up with each other. In reality you can forget about that actually happening. They won’t all be straight and they won’t all line up perfectly, but if you can get the general effect, you will have done all right. The hardest part is applying rib tapes to the edges of the wings. If you are lucky and have a fairly thick wing like the LVG, it’s not altogether impossible. In this case, I used strips of lozenge fabric rather than the pink or blue rib tapes so I had to make them myself by cutting strips from the lozenge fabric decal. I wish Eagle Strike would go one better and make rib tapes out of lozenge fabric, then they really would boldly go where no decal maker has gone before. But I digress.
Once the lozenge fabric and rib tapes were applied, I sealed them with a light coat of Future. Once dry, I then applied the wing crosses. These decals were supplied with the kit and the quality is very good. If you have ever built a Blue Max kit before, then you know that they take a special pride in their decals and it is usually warranted. They are very thin and no solvent is needed. In fact, if you apply any solvent you will very likely ruin the decals and end up with a curly mess that you will have to remove and discard. Seriously, simply apply the decals to a wet surface, press out the bubbles and that is it. Let them dry and seal them with Future. All the other decals were from the kit, and were applied in the aforementioned manner with no trouble.
Once all the decals were applied, the whole model was given a shot of Future. Later, the lozenge areas were given a light coat of Polly Scale Satin. As a final touch, the wheels were given a black/brown wash, and I highlighted the rigging with Polly Scale graphite.
|
CONCLUSIONS |
Obviously this kit will only appeal to a limited number of modelers. Given the early difficulties I had with the fuselage, I was ultimately pleased with the result. In my opinion, the model certainly looks like an LVG CVI, and Blue Max is to be commended for offering this subject. However, I do wish they had paid more attention to the engineering and fit of the interior parts. I’m sure a modeler with more skill than I possess could do a fabulous job with the kit, but the fact is, most modelers will likely get discouraged running into such problems so early in the construction. Also, Blue Max could really stand to improve their instructions.
|
REFERENCES |
Blue Max kit box, C.J.B. Gannon
Classic Aircraft of WWI, Melvyn Hiscock, Osprey Aerospace, 1994.
Copyright ModelingMadness.com
Review kit courtesy of my kit collection.
If you would like your product reviewed fairly and fairly quickly, please contact the editor or see other details in the Note to Contributors.
Back to Reviews Page 2016