Blue Max 1/48 Sopwith Dolphin
|
KIT # |
BM 112 |
|
PRICE: |
$42.98 |
|
DECALS: |
Two versions |
|
REVIEW : |
|
|
NOTES: |
Limited run injection molded |
|
HISTORY |
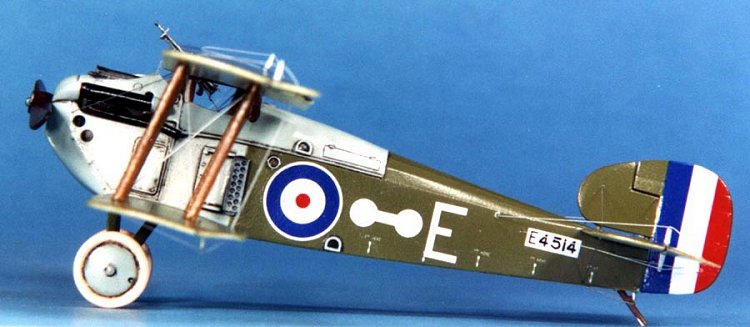
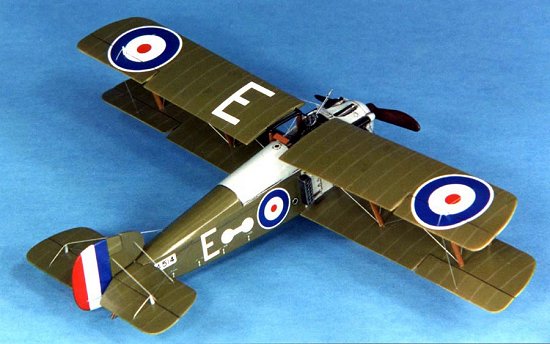
The Sopwith Dolphin was a distinctive looking aircraft (some would say ugly!) that featured several interesting design concepts that differed from Sir Thomas Sopwith usual efforts. Eschewing the usual rotary engine, the Dolphin was the first Sopwith to be fitted with an in-line engine, the Hispano-Suiza V8 that was so effective in the SE5a. In addition, its wing arrangement featured negative stagger, another first for a Sopwith product that gave the plane an unconventional look. The Dolphin was also one of the most heavily armed scouts of the war, featuring the usual two Vickers machine guns and also fitting from one to two Lewis machine guns. First posted to No. 19 Squadron R.F.C. in January 1918, the Dolphin had a superior high altitude performance (due to its long wings) to the Camel.
|
THE KIT |
 The kit is a
multi-media kit consisting of injected molded plastic parts and white metal
parts. It features decal options for two aircraft; generic aircraft flown by No.
19 SQN and the RNAS at Dover. The plastic parts are typical limited run injected
plastic that require substantial clean up of flash, however detail engraving on
the surface is extremely well done. Casting of the wings and horizontal
stabilizer was poor with the dreaded "ripple" present on the leading
and trailing edges. Clean up of the plastic is quite easy, as it is very soft.
The white metal parts are finely cast and very well done requiring only minor
clean up. The instruction sheet is very brief, providing only an expanded
assembly drawing and some basic color and decal notes with pictures of the
completed models. Most modelers will require additional reference material to
build the kit, as there are no rigging diagrams or complete decal placement
instructions.
The kit is a
multi-media kit consisting of injected molded plastic parts and white metal
parts. It features decal options for two aircraft; generic aircraft flown by No.
19 SQN and the RNAS at Dover. The plastic parts are typical limited run injected
plastic that require substantial clean up of flash, however detail engraving on
the surface is extremely well done. Casting of the wings and horizontal
stabilizer was poor with the dreaded "ripple" present on the leading
and trailing edges. Clean up of the plastic is quite easy, as it is very soft.
The white metal parts are finely cast and very well done requiring only minor
clean up. The instruction sheet is very brief, providing only an expanded
assembly drawing and some basic color and decal notes with pictures of the
completed models. Most modelers will require additional reference material to
build the kit, as there are no rigging diagrams or complete decal placement
instructions.
|
CONSTRUCTION |
The first job up was to separate and clean up the plastic and metal parts. Care must be taken when removing the plastic parts, as the pour stubs on the sprue are very thick and pass into the part itself. I used a razor saw to cut off all parts to prevent damage to the adjacent surfaces. This task also included filing off of several molding channels and general flash clean up. It is critical when building a limited run kit, that extensive dry fitting and filing be accomplished prior to assembly so I assembled the major parts with masking tape to judge fit and shaped the parts where needed. Virtually every part needed some minor filing/sanding but in most instances this was no more than a few swipes of a sanding stick. However, major thinning was required of the fuselage sidewalls as they were much too thick and the interior would not fit. After all the major sanding/filing work was done, all parts were given a quick bath in warm soapy water, given a good rinse, and patted dry.
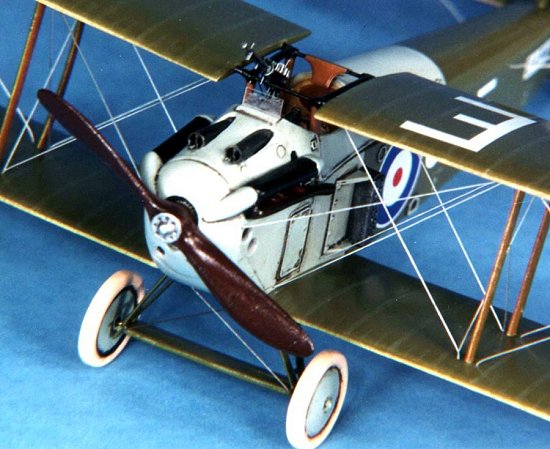
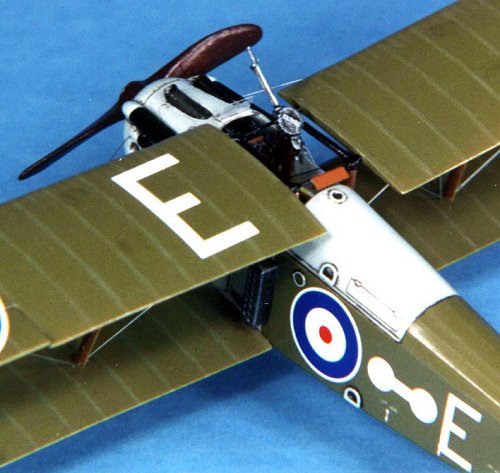
I then pre-painted all the parts as indicated in the instructions. Assembly of the fuselage components was accomplished using super-thin superglue and care must be taken to properly align the white metal stringers, floor, and bulkhead inside the fuselage. Cockpit details are a little on the sparse side, however it is adequate and the addition of the Copper States Model (CSM) detail set really adds a lot of detail (most of which unfortunately can’t even be seen!).
 The top fuselage deck
presented another problem in that it is a hair too wide and short. Some careful
sanding remedied this being careful to preserve the appearance of the fuselage
side, and the center was thinned down to allow it to be force-fit into place at
the correct height. I also sanded off the various detail pieces and replaced
them with the CSM P/E, but this step can be considered unnecessary, as the
molded in detail is fine. I mounted the instrument panel (which also serves as
the base for the guns) to the underside of this piece after carefully sanding
the bottom into the correct profile to allow the guns to lay flat. I then
modified the kit guns with the CSM detail pieces. Generally, I am less than
enthusiastic about P/E parts, but the place where P/E really shines is in
machine guns and the CSM pieces are superb. After drilling out the gun barrels
and assembling all the P/E pieces, the Vickers were painted Metalizer Gun Metal
and dry brushed with Floquil Gun Metal to bring out all the detail. Too bad the
majority of the guns are hidden within the fuselage! I then installed the guns
in place with superglue and used liquid glue to cement the fuselage deck in
place.
The top fuselage deck
presented another problem in that it is a hair too wide and short. Some careful
sanding remedied this being careful to preserve the appearance of the fuselage
side, and the center was thinned down to allow it to be force-fit into place at
the correct height. I also sanded off the various detail pieces and replaced
them with the CSM P/E, but this step can be considered unnecessary, as the
molded in detail is fine. I mounted the instrument panel (which also serves as
the base for the guns) to the underside of this piece after carefully sanding
the bottom into the correct profile to allow the guns to lay flat. I then
modified the kit guns with the CSM detail pieces. Generally, I am less than
enthusiastic about P/E parts, but the place where P/E really shines is in
machine guns and the CSM pieces are superb. After drilling out the gun barrels
and assembling all the P/E pieces, the Vickers were painted Metalizer Gun Metal
and dry brushed with Floquil Gun Metal to bring out all the detail. Too bad the
majority of the guns are hidden within the fuselage! I then installed the guns
in place with superglue and used liquid glue to cement the fuselage deck in
place.
I had a devil of a time with the Hispano-Suiza engine; it absolutely refused to lay flat to the engine mounts. Building up some of the mounts with plastic card, and filing some down remedied this situation, but I still was a little off on the engine.
Unfortunately, the wings and horizontal stabilizer were afflicted with the infamous Blue Max wing ripple and extensive sanding was required to remove most of the ripple. The wings on the Dolphin had a significant dihedral, and to accurately assemble the wings in place I used a sophisticated jig (made of two pencils taped to the desk!). I drilled out the small mounting pegs provided and replaced them with brass pins for extra strength. I then glued the lower wings in place (using my sophisticated pencil jig!). After stuffing the cockpit opening with tissue paper it was off to the paint shop.
|
PAINT & MARKINGS |
 The paint scheme is
simple, consisting of clear-doped linen (CDL) undersurfaces; a light gray
(called Battleship Grey) for the metal/plywood surfaces and PC10 doped finish
for everything else. I airbrushed Polly Scale Doped Linen on the undersides and
after letting dry masked it off and airbrushed Testors Model Master Aircraft
Gray. Letting this paint cure overnight since it is a gloss enamel, I then
masked it off and airbrushed Polly Scale British Brown Drab PC10 which gives a
slightly greener cast for the PC10 dope. After the paint scheme cured for a day,
I shot a light coat of Future to prepare the surface for decaling.
The paint scheme is
simple, consisting of clear-doped linen (CDL) undersurfaces; a light gray
(called Battleship Grey) for the metal/plywood surfaces and PC10 doped finish
for everything else. I airbrushed Polly Scale Doped Linen on the undersides and
after letting dry masked it off and airbrushed Testors Model Master Aircraft
Gray. Letting this paint cure overnight since it is a gloss enamel, I then
masked it off and airbrushed Polly Scale British Brown Drab PC10 which gives a
slightly greener cast for the PC10 dope. After the paint scheme cured for a day,
I shot a light coat of Future to prepare the surface for decaling.
The decals supplied with the kit are fairly good. Nice and thin, but an excess of carrier film requires some delicate trimming. The only problem I had was that the fin stripes were too short and do not correctly cover the rudder. I spliced a spare set of decals from the decal stash in to cover this obvious mistake. I used Micro Sol setting solution thinned 50% with distilled water and the decals responded very well melting into the surface (Blue Max does not recommend setting solutions). After drying overnight, I wiped the decals off with a moist cloth with Pollys Plastic Prep to remove any residue and after drying I shot a light coat of Future over the decals to seal them. For weathering, I chose to accentuate the engraved panel lines and surface detail with a light burnt umber oil wash.
I then sealed everything with a light coat of PS Flat Finish to provide a surface for pastel application. I then used pastel pencils to lightly highlight the engraved detail on the wings/tail surfaces, simulate the wood framing showing through the CDL, and also to highlight the delicate rib tapes. I also randomly applied some ground up burnt umber pastels with a soft brush to simulate dirt staining on the lower surfaces. Lastly, I applied a heavy burnt umber oil wash to the wheels and control surface joins.
|
CONSTRUCTION CONTINUES |
Construction of most Blue Max kits requires that you build your own struts with the strut stock provided. After cutting to the correct size, I dry fit them in place. After all this work I had a set of struts ready for painting and used a base coat of Tamiya Dark Yellow and applied a covering coat of Floquil Brown Mahogany stain. I installed .020-styrene rod as pins and did not taper the struts to provide a larger bonding area. I assembled my Lego jig and installed the struts with liquid cement, and after drying, I placed a bead of superglue around each strut for added strength. This approach provided a very sturdy upper wing mount as when I removed it from the jig I could barely flex the upper wing.
 Assembly of the
landing gear was easy and it was time to put on the tail fin. I installed
.020-styrene rod into the base of the tail fin and drilled corresponding holes
into the stabilizer. After carefully aligning the tail fin to provide a gap at
the aft end I then superglued the rods into place, using the longer rear rod to
double as the kingpost. Lastly, I installed the propeller and tailskid and I was
almost done with only the rigging to be completed.
Assembly of the
landing gear was easy and it was time to put on the tail fin. I installed
.020-styrene rod into the base of the tail fin and drilled corresponding holes
into the stabilizer. After carefully aligning the tail fin to provide a gap at
the aft end I then superglued the rods into place, using the longer rear rod to
double as the kingpost. Lastly, I installed the propeller and tailskid and I was
almost done with only the rigging to be completed.
I use .006-fishing line painted silver and use a "through-hole" rigging method. I basically drill a hole with an #80 bit (the smallest, about .0135) all the way through the wing at each of my rigging exit points. I try to minimize the number of exit points and run as many lines through them when possible. After securing one end to a partially drilled hole (not all the way through) with superglue, I then run the line out through the exit hole. I weight the end of the line with a pair of hemostats to pull tight by letting it hang down and apply a small drop of superglue to secure it. Let cure for about 30 seconds and then unhook the hemostats and proceed to the next wire. Repeat until done! After letting the entire rigging cure for at least an hour, I then take a brand new Exacto blade and trim flush with the wing surface. I then sand the exit holes flush and apply a spot of touch-up paint to cover. That's it, simple, cheap, and fast. In addition, it also provides a small amount of structural integrity. I can rig a whole airplane in under an hour! Can't do that with wire!
Finally, several coats of Polly S Satin Finish was shot to achieve the semi-gloss finish common to most WWI aircraft.
|
CONCLUSIONS |
This is an excellent model of an important WW I aircraft. It was obvious that the scale drawings in the Windsock Datafile were used in the generation of the kit as every detail is exactly reproduced! Due to the limited run nature and its associated fit problems, along with careful work required, I would only recommend this kit to intermediate and advanced level modelers. I also highly recommend the P/E detail sheet produced by CSM (http://www.amug.org/~copperst/main.html) as it provides the seat belts and control horns that are not provided for in the kit and additional items that take the Blue Max kit to a new level of detail, especially with the Vickers machine guns.

|
REFERENCES |
Albatros Productions LTD, Windsock Datafile #54, Sopwith Dolphin
Copyright ModelingMadness.com. All rights reserved. No reproduction in any form without express permission from the editor.
If you would like your product reviewed fairly and fairly quickly, please contact the editor or see other details in the Note to Contributors.
Back to Reviews Page 2017