Shanghai Dragon 1/48 Fokker Dr.I
|
KIT # |
5901 |
|
PRICE: |
$19.98 |
|
DECALS: |
One version |
|
REVIEW : |
|
|
NOTES: |
Aftermarket decals used |
|
HISTORY |
I have already written a history and description of the kit that can be found on this site at reviews/ww1/laskodidr1.htm. I can’t add anything new so I won’t bore the reader with a rehash of those segments of the review.
|
CONSTRUCTION |
 The first order of
business was to correct the few inaccuracies that are present in the kit. Since
I firmly believe that the "A" in AMS should stand for advanced (as
opposed to other words that start with "A"), I only tackled those
errors that significantly impact the "look" of the model. I started by
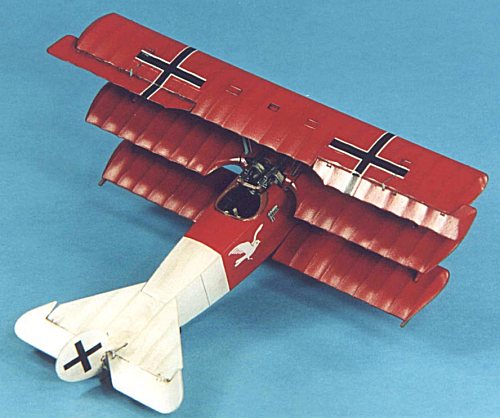
filling with putty the "trenches" on the undersides of the wings, and
after sanding the surface smooth, I replaced the rib detail by masking off with
thin tape and filling with Gunze-Sangyo Mr. Surfacer. The other change was that
the middle wing sits too high on the fuselage causing a distinct step between
the wing and the engine cowl. I fixed this by filing the underside of the wing
where it mounts to the fuselage. After all the major sanding/filing work was
done, all parts were given a quick bath in warm soapy water, given a good rinse,
and patted dry. I then pre-painted all the parts as indicated in the
instructions.
The first order of
business was to correct the few inaccuracies that are present in the kit. Since
I firmly believe that the "A" in AMS should stand for advanced (as
opposed to other words that start with "A"), I only tackled those
errors that significantly impact the "look" of the model. I started by
filling with putty the "trenches" on the undersides of the wings, and
after sanding the surface smooth, I replaced the rib detail by masking off with
thin tape and filling with Gunze-Sangyo Mr. Surfacer. The other change was that
the middle wing sits too high on the fuselage causing a distinct step between
the wing and the engine cowl. I fixed this by filing the underside of the wing
where it mounts to the fuselage. After all the major sanding/filing work was
done, all parts were given a quick bath in warm soapy water, given a good rinse,
and patted dry. I then pre-painted all the parts as indicated in the
instructions.
Assembly of the fuselage components was accomplished using super-thin superglue. Assembly proceeded as described in the instructions, with no major problems. A tip is to anneal (heat in a flame until red-hot) the photo-etch parts that require bending prior to painting. I then closed up the fuselage with liquid cement. Next, I glued with liquid cement the tail fin, the horizontal stabilizer, and lower wing to the fuselage. All joins were then sanded smooth. Fit was very good and no putty was needed. Next stop was the paint shop after stuffing the cockpit opening with tissue paper to prevent overspray.
The model was painted, decaled, and weathered as described in the following subsections and then final assembly took place.
 Now it was time to work
on the machine guns. Assemble the guns as shown in the instructions. I painted
the machine guns in Testors Metalizer Gun Metal and dry brushed with Floquil Gun
Metal. Do not install the gun sight (A19), as Raben’s plane did not carry it.
Check photo references for your particular model; most Dr.I’s did not use it.
Now it was time to work
on the machine guns. Assemble the guns as shown in the instructions. I painted
the machine guns in Testors Metalizer Gun Metal and dry brushed with Floquil Gun
Metal. Do not install the gun sight (A19), as Raben’s plane did not carry it.
Check photo references for your particular model; most Dr.I’s did not use it.
I then glued the interplane struts in place on lower wing into place using super-thin superglue. The middle wing was then installed using the lower wing and interplane struts as a guide. Dry fit the interplane struts before gluing in order to align them correctly between the three wings. I had to file them slightly to place them in the correct positions. The cabane struts were glued to the fuselage body in correct spacing for the upper wing using a caliper to exactly set the distance and the remaining interplane struts were glued to the middle wing.
I placed the upper wing on the workbench and turned the fuselage upside down to mount it. First set the interplane struts into place in their correct holes, then flex the cabane struts into their respective holes and bingo, the wing is in place. I used small rubber bands to help hold both wings in place and then checked alignment of the top to middle wing. When all was to my liking, I superglued the struts to wing. A word of caution let the glue cure fully before moving the model and you will be rewarded with a relatively strong top wing join. I do not use an accelerant for the superglue as it discolors and sometimes pits the surface.
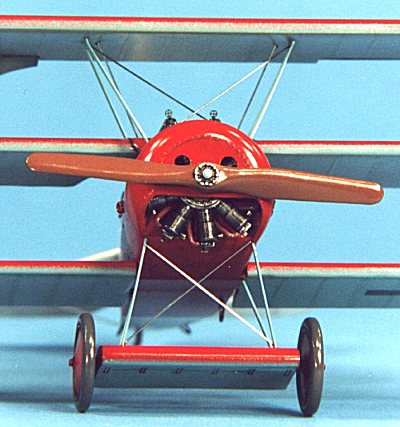
I then installed the landing gear and wheels as indicated and the engine assembly, front cowl and propeller. Install all the remaining fiddly bits and the rigging. I used the kit supplied stainless steel wire for the landing gear and cabane rigging.
|
PAINT & DECALS |
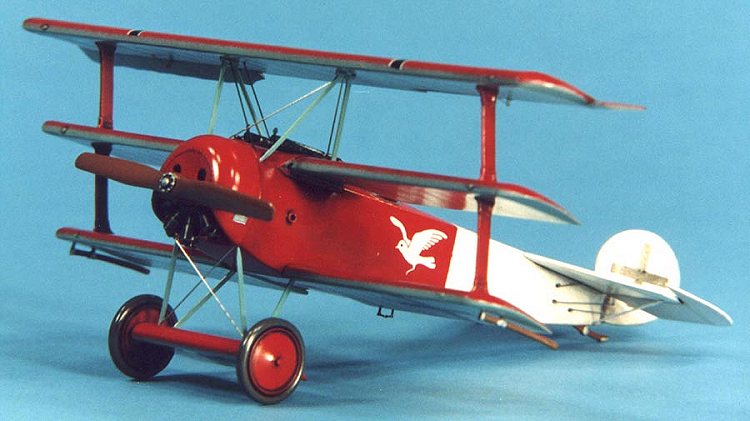
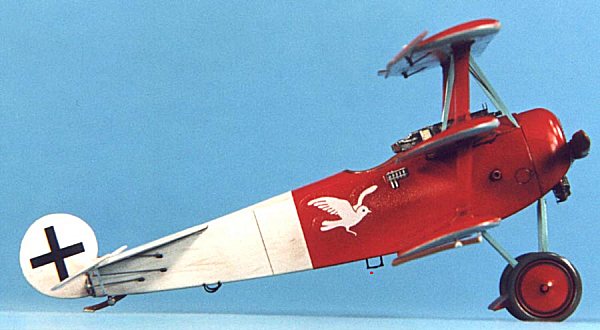
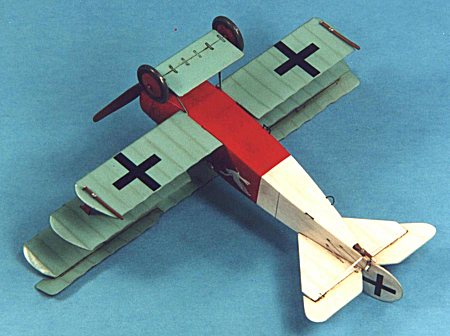
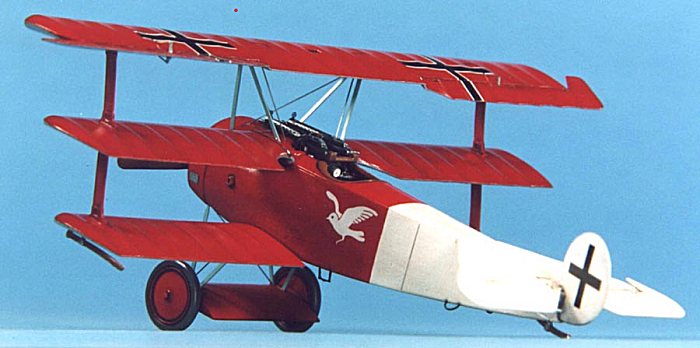
The paint scheme consisted of a red and white fuselage with the undersides of the wings painted a turquoise blue. I used Polly Scale White (RLM21) and RLM23 Red for the fuselage. Undersides were painted with a 50:50 mix of Testors Model Master Aircraft Gray and Boyd Pacific Blue. After the paint scheme cured for a day, I shot a light coat of Future to prepare the surface for decaling.
 Since I had already
modeled Kempf’s aircraft (which is the only decal option provided in the kit),
I substituted Ministry of Small Aircraft Production’s Fokker Dr.I set. I used
the decals for LT August Raben, Jasta 18 Dr.I, flown in early 1918. The decals
are of poor quality, a bit on the thick side and poorly registered. After a
short drying period of about an hour, I applied MicroSol and later Solvaset
setting solution to try to get the decals to melt into the surface. The decals
did not respond to either solution.. After drying overnight, I wiped the decals
off with a moist cloth with a bit of soap to remove any residue and after drying
I shot a light coat of Future over the decals to seal them. For weathering, I
chose to accentuate the engraved panel lines and surface detail with a light
burnt umber oil wash.
Since I had already
modeled Kempf’s aircraft (which is the only decal option provided in the kit),
I substituted Ministry of Small Aircraft Production’s Fokker Dr.I set. I used
the decals for LT August Raben, Jasta 18 Dr.I, flown in early 1918. The decals
are of poor quality, a bit on the thick side and poorly registered. After a
short drying period of about an hour, I applied MicroSol and later Solvaset
setting solution to try to get the decals to melt into the surface. The decals
did not respond to either solution.. After drying overnight, I wiped the decals
off with a moist cloth with a bit of soap to remove any residue and after drying
I shot a light coat of Future over the decals to seal them. For weathering, I
chose to accentuate the engraved panel lines and surface detail with a light
burnt umber oil wash.
I then sealed everything with a light coat of PS Flat Finish to provide a surface for pastel application. I then used pastel pencils to lightly highlight the engraved detail on the wings/tail surfaces, and also to highlight the delicate rib tapes. I also randomly applied some ground up burnt umber pastels with a soft brush to simulate dirt staining on the lower surfaces. Lastly, I applied a heavy burnt umber oil wash to the wheels and control surface joins. I then finished final assembly of the models as described above. Finally, several coats of Polly S Satin Finish was shot to achieve the semi-gloss finish common to most WWI aircraft.
|
CONCLUSIONS |
 I have built many models
of Shanghai Dragon WW II aircraft and have been generally disappointed in their
accuracy and quality of fit. However, the WW I Knights of the Sky Series are in
my opinion, the best-detailed WW I model kits available today without the fit
problems experienced in their WW 2 series. They represent a very good value for
approximately $20 and build up into an impressive model with their highly
detailed engraving and photo-etch parts. A minor drawback is that they are
currently difficult to find; a situation that will hopefully become better with
an announcement by Shanghai Dragon to commit to production of this series during
2000.
I have built many models
of Shanghai Dragon WW II aircraft and have been generally disappointed in their
accuracy and quality of fit. However, the WW I Knights of the Sky Series are in
my opinion, the best-detailed WW I model kits available today without the fit
problems experienced in their WW 2 series. They represent a very good value for
approximately $20 and build up into an impressive model with their highly
detailed engraving and photo-etch parts. A minor drawback is that they are
currently difficult to find; a situation that will hopefully become better with
an announcement by Shanghai Dragon to commit to production of this series during
2000.
This is an excellent model of an important WW I aircraft. The accuracy and level of detail engraved in the kit is outstanding and no after-market sets are really needed for a beautiful build. I highly recommend this kit for all levels of builders including beginners and I enjoyed the building of this model. The kit is easy to build, and in my opinion, is the easiest kit to build of a WWI biplane.
|
REFERENCES |
Squadron/Signal Publications, Fokker Dr. I In Action, SS1098, $8.95
Grub Street, Under The Guns Of The German Aces, $35.00
If you would like your product reviewed fairly and fairly quickly, please contact the editor or see other details in the Note to Contributors.
Back to Reviews Page 2015