|
KIT # |
KLH 89-10 |
|
PRICE: |
$34.98 |
|
DECALS: |
See review |
|
REVIEW : |
|
|
NOTES: |
Short Run |
|
HISTORY |
Almost everyone can tell you who was the highest ranking German ace during World War I, as the famous "Red Baron", AKA Manfred von Richtofen was probably the most widely known warrior from the "Great War". But who was number two will probably elicit shrugs and wrong answers from most individuals. His name was Ernst Udet and he earned 62 victories against the allied forces, second to only Richtofen. Udet was born in Frankfurt on 26 April 1896 and proved at an early age a daredevil streak burned within as he used to enjoy jumping off the roof of his house with only an umbrella to act as his imaginary parachute. Little did he know that that playful act may have helped save his life a few years later when he was forced to parachute from his stricken aircraft. His first taste of the war was not in the air, but on the ground serving as a motorcycle courier through the early stages of the war. Evidently, riding motorcycles was not enough thrills for him, so he transferred into the German Air Service where he started his aerial career flying two-seat observation aircraft.
 His career as a
two-seater pilot came to an abrupt end when he stalled his aircraft in a shallow
turn just after takeoff and crashed on the end of the runway as a complete
wreck. His CO was infuriated at his carelessness and threw him in the base
stockade for a week to think about his actions. Immediately upon his release, he
took an unauthorized trip on a bombing mission to release his frustrations
further irritating his CO. Frustrated by his recklessness and independent
charge, the CO transferred him to a single seat Eindecker unit, where the only
person he could kill while flying was himself. Thus the second highest-ranking
German ace was on his way to becoming an eventual war hero.
His career as a
two-seater pilot came to an abrupt end when he stalled his aircraft in a shallow
turn just after takeoff and crashed on the end of the runway as a complete
wreck. His CO was infuriated at his carelessness and threw him in the base
stockade for a week to think about his actions. Immediately upon his release, he
took an unauthorized trip on a bombing mission to release his frustrations
further irritating his CO. Frustrated by his recklessness and independent
charge, the CO transferred him to a single seat Eindecker unit, where the only
person he could kill while flying was himself. Thus the second highest-ranking
German ace was on his way to becoming an eventual war hero.
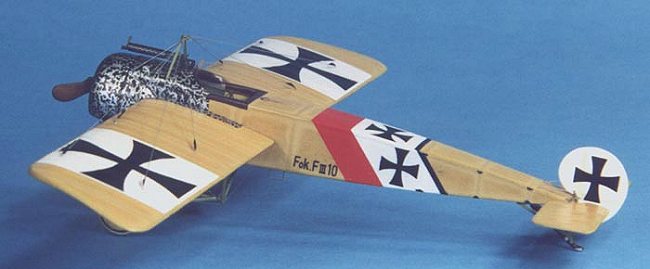
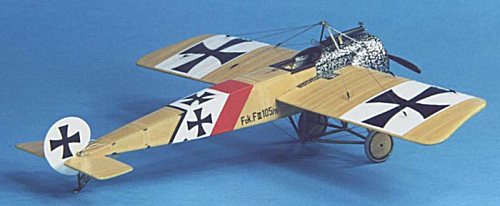
The aircraft modeled is one of the first scout aircraft flown by Udet with his personal marking of a red, white, and black sash painted on the side.
|
THE KIT |
The kit is Flashback’s 1:48 Fokker E.III Eindecker. It is a re-release of the earlier Eduard version, however it replaces most of the interior with resin castings (that are far easier to build than the Eduard photo-etch (P/E)) and a simplified P/E sheet. This is a true multi-media kit featuring injected molded plastic parts (23 parts) that are identical to the Eduard release, finely cast resin parts (6 parts) that include both Schwartzlose and Spandau guns, a P/E sheet (24 items), and decal options for two aircraft, Buddecke’s aircraft flown in Turkey and Bohme’s aircraft flown in Bavaria. The plastic parts are typical limited run injected molded pieces that require substantial clean up. The instruction sheet is an eight-page diagram assembly with marked color painting guidelines.
|
CONSTRUCTION |
 The first job up
was to separate and clean up the plastic and resin parts. Care must be taken
when removing the plastic parts, as the pour stubs on the sprue are very thick
and pass into the part itself. I used a razor saw to cut off all parts to
prevent damage to the adjacent surfaces. This task also included filing off of
several molding channels and general flash clean up. It is critical when
building a limited run kit, that extensive dry fitting and filing be
accomplished prior to assembly so I assembled the major parts with masking tape
to judge fit and shaped the parts where needed. Virtually every part needed some
minor filing/sanding but in most instances this was no more than a few swipes of
a sanding stick. However, major thinning was required of the fuselage as it was
much too thick and the resin interior would not fit. Thank goodness for motor
tools, they take this boring task which would be several hours of
carving/sanding and reduce it to minutes!
The first job up
was to separate and clean up the plastic and resin parts. Care must be taken
when removing the plastic parts, as the pour stubs on the sprue are very thick
and pass into the part itself. I used a razor saw to cut off all parts to
prevent damage to the adjacent surfaces. This task also included filing off of
several molding channels and general flash clean up. It is critical when
building a limited run kit, that extensive dry fitting and filing be
accomplished prior to assembly so I assembled the major parts with masking tape
to judge fit and shaped the parts where needed. Virtually every part needed some
minor filing/sanding but in most instances this was no more than a few swipes of
a sanding stick. However, major thinning was required of the fuselage as it was
much too thick and the resin interior would not fit. Thank goodness for motor
tools, they take this boring task which would be several hours of
carving/sanding and reduce it to minutes!
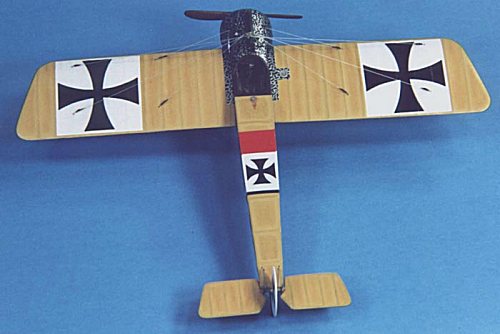
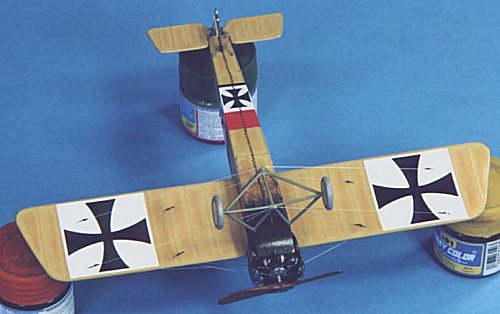
I also thinned down the wings, but this step could be considered unnecessary, as the wings are not all that thick. The main reason was that I wanted to add rib tapes to the surfaces to more accurately represent the real aircraft, so the old rib detail had to go anyway. This was accomplished by masking off the ribs with masking tape and applying Gunze-Sangyo Mr. Surfacer 500 with a paintbrush. After drying completely, I removed the masking tape and gently sanded to take the "edge" off the ribs. Of note, the wings as supplied represent the earlier wing found on the E.II with 11 ribs. The E.III wing had 12 ribs so if you are going to go to all the trouble to sand off and re-do the ribs as I did, don’t forget to add the extra rib. Please don’t count the ribs on my effort, as you will see that I failed basic math!
I then pre-painted all the parts as indicated in the instructions. Assembly of the fuselage components was accomplished using super-thin superglue and presented no major problems. Cockpit details are a little on the sparse side, however it is adequate (the cockpit on the Eindecker was fairly sparse anyway!) and allows super-detailers room to add extras.
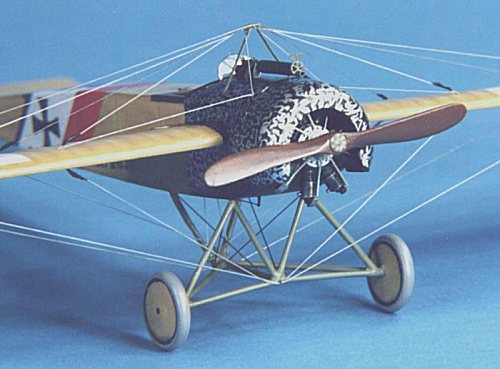
The engine supplied with the kit was poorly molded so I replaced it with a spare Oberursel rotary engine from the DML Dr.I kit. This engine is the same basic engine for both aircraft, but the DML version is far superior and has the pushrod details molded on the cylinder heads. Unfortunately this extra detail meant the cowling would not fit so it was thinned with a Dremel.
 The resin cockpit
tub was superglued to the fuselage half and then the fuselage halves were glued
together with liquid cement. Fit was poor, so putty was used extensively. The
Eindecker had a prominent seam along the fuselage bottom where the fabric was
joined, so don’t go overboard in cleaning up that seam! Next I drilled and
dry-fitted all of the rigging, strut, and landing gear mounting holes to assist
in final assembly as nothing is more frustrating as trying to get these pieces
together with a fragile model. Next stop was the paint shop.
The resin cockpit
tub was superglued to the fuselage half and then the fuselage halves were glued
together with liquid cement. Fit was poor, so putty was used extensively. The
Eindecker had a prominent seam along the fuselage bottom where the fabric was
joined, so don’t go overboard in cleaning up that seam! Next I drilled and
dry-fitted all of the rigging, strut, and landing gear mounting holes to assist
in final assembly as nothing is more frustrating as trying to get these pieces
together with a fragile model. Next stop was the paint shop.
The model was painted, decaled, and weathered as described in the following subsections and then final assembly took place.
Now onto the fun part, putting on the wing! The engineering of this kit leaves much to be desired in that the wing is basically butt joined to the fuselage side, which would create a very fragile model. I decided to use brass pins to strengthen this join, but could only pin the front portion, as the rear would protrude into the cockpit. I used epoxy on the pins and a small portion of the wing to join to the fuselage and then followed this up with superglue to further strengthen the join. The horizontal stabilizer was carefully butt joined to fuselage end with epoxy also.
Assembly of the landing gear was also a problem in that butt joining all the parts together would create a very fragile model. I chose to use .005 stainless wire to pin each joint into a corresponding drilled hole and then apply superglue. This technique worked extremely well and assembly of the landing gear was really easy and relatively strong. The rudder also created a challenge in that butt joining at one point would be fragile and also difficult to correctly mount the rudder. Again, .005 stainless wire and superglue to the rescue!
After installing all the remaining "fiddly bits" I was faced with a substantial challenge in rigging. The kit comes with P/E turnbuckles but I could not find an acceptable way (translated: durable) to mount them with the rigging. So I "chickened out" and went back to my tried and true (and easy!) method of using .006-fishing line painted silver. I then hand painted the turnbuckles on with white glue.
|
PAINT & MARKINGS |
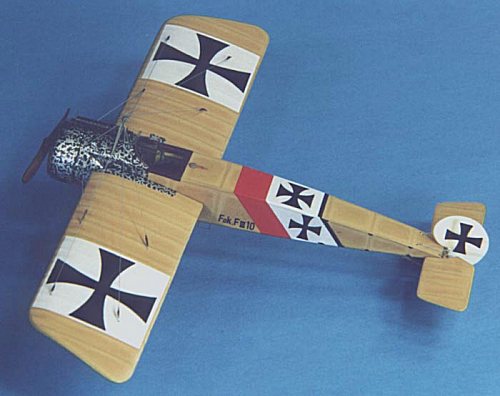 The paint scheme is
very simple; a clear doped linen (CDL) with riffled metal surfaces. I used
Testor Model Master British Gulf Armor Light Stone airbrushed on for the CDL.
After a short drying time, I masked the CDL surfaces and airbrushed Testor
Metalizer Gunmetal for the metal surfaces. After the paint scheme cured for a
day, I shot a light coat of Future to prepare the surface for decaling and the
"riffled metals" finish. A distinctive feature that shows up in most
photographs of Eindecker’s is the riffled metal pattern on the cowl and metal
surfaces. To reproduce this effect I sparingly and finely applied a random
silver pattern using a ZIG Painty Silver Oilbased Paint Marker (available at
most art supply stores) over the gunmetal surfaces. The Painty has a fine petal
shaped tip that allows for very fine drawn lines that closely approximates this
effect which is actually caused by machining aluminum. I am not a talented
enough painter and could never accomplish this effect with a paintbrush (in fact
I tried and it stunk)!
The paint scheme is
very simple; a clear doped linen (CDL) with riffled metal surfaces. I used
Testor Model Master British Gulf Armor Light Stone airbrushed on for the CDL.
After a short drying time, I masked the CDL surfaces and airbrushed Testor
Metalizer Gunmetal for the metal surfaces. After the paint scheme cured for a
day, I shot a light coat of Future to prepare the surface for decaling and the
"riffled metals" finish. A distinctive feature that shows up in most
photographs of Eindecker’s is the riffled metal pattern on the cowl and metal
surfaces. To reproduce this effect I sparingly and finely applied a random
silver pattern using a ZIG Painty Silver Oilbased Paint Marker (available at
most art supply stores) over the gunmetal surfaces. The Painty has a fine petal
shaped tip that allows for very fine drawn lines that closely approximates this
effect which is actually caused by machining aluminum. I am not a talented
enough painter and could never accomplish this effect with a paintbrush (in fact
I tried and it stunk)!
I didn’t like the decals supplied with the kit, they were too boring! Unfortunately, there are not any available after-market decals for the E.III so I issued a call for help to the WWI Modeling List (http://pease1.sr.unh.edu/) hoping to locate and buy the decals that were issued with the Eduard version of the kit that included the famous German ace Ernst Udet’s aircraft. Within a few hours, list member Dale Beamish e-mailed me back, said he had a spare set, and immediately airmailed them to me. I offered to buy them but he refused to even let me pay for the postage! This is an example of the great people that "live" on the WWI List. The set arrived in perfect shape a few days later.
 From previous
experience I knew that old Eduard Propagteam decals had a tendency to be very
brittle and self-destruct into thousands of tiny pieces when wet, so I ran a
test decal with one that I would not be using from the sheet. Immediately upon
hitting the water the decal fragmented into more pieces than I care to count! No
problem, I brushed a light coat of Microscale Liquid Decal Film over the
remaining decals and they went on beautifully. They even responded great to
Microscale MicroSol setting solution. After drying overnight, I wiped the decals
off with a moist cloth with Pollys Plastic Prep to remove any residue and after
drying I shot a very light coat of Future thinned with rubbing alcohol (50-50
mix) over the decals to seal them.
From previous
experience I knew that old Eduard Propagteam decals had a tendency to be very
brittle and self-destruct into thousands of tiny pieces when wet, so I ran a
test decal with one that I would not be using from the sheet. Immediately upon
hitting the water the decal fragmented into more pieces than I care to count! No
problem, I brushed a light coat of Microscale Liquid Decal Film over the
remaining decals and they went on beautifully. They even responded great to
Microscale MicroSol setting solution. After drying overnight, I wiped the decals
off with a moist cloth with Pollys Plastic Prep to remove any residue and after
drying I shot a very light coat of Future thinned with rubbing alcohol (50-50
mix) over the decals to seal them.
Next, a light coat of Polly S Flat Finish was shot to provide a surface for pastels. I then used pastels, pastel pencils, and watercolor pencils to lightly highlight the ribs and detail on the wings/tail surfaces and fuselage. I use Derwent pastels and pencils and they are quite easy to use, just lightly draw on the surface to be highlighted and blend with artists blending stump. A very nice, subtle effect can be achieved with these pencils that is much easier for me than dry brushing. Next I applied a heavy burnt umber oil wash to the wheels and engine undersurfaces. Finally, several coats of Polly S Satin Finish was shot to achieve the semi-gloss finish common to most WWI aircraft.
|
CONCLUSIONS |
Limited run productions bring their own special challenges and rewards to the modeling table. They are not easy to build, but if you are careful and methodical in your building approach excellent results can be achieved. They are not for every one, but an intermediate level (or above) modeler can achieve results that please the eye.
I would like to dedicate this Eindecker to those members of the WWI Modeling List, and Dale Beamish in particular, which have been most helpful to me in my growth as a modeler. If you have an interest in WWI modeling I strongly urge you to look into this wonderful group of very helpful modelers.
|
REFERENCES |
Albatros Productions LTD, Windsock Datafile #15, Fokker E.III, $12.00
Squadron/Signal Publications, Fokker Eindecker in Action, SS1158, $8.95
Copyright ModelingMadness.com. All rights reserved. No reproduction in part or in whole without express permission.
If you would like your product reviewed fairly and fairly quickly , please contact the editor or see other details in the Note to Contributors.
Back to Reviews Page 2015