Eduard 1/48 Pfalz D.IIIa
|
KIT # |
8044 |
|
PRICE: |
$19.95 |
|
DECALS: |
See review |
|
REVIEW : |
|
|
NOTES: |
|
|
HISTORY |
"Always the bridesmaid but never the bride" might be a good proverb to say when discussing the fortunes of the Pfalz Flugzeug Werke GmbH during WWI in that their aircraft always seemed to be less preferred than their competitors. Starting with their version of the famous "Eindekker" in 1915, continuing with the D.III series in 1917, and finishing with the D.XII series in 1918, Pfalz aircraft always seemed to be the bridesmaid to their famous sisters from Fokker and Albatros. However, this is not to say that Pfalz aircraft were indeed the "ugly sister", for the D.III series in particular had a very good war record. However, as beauty is often in the eye of the beholder, several German aces such as Rudolph Berthold actually preferred the Pfalz D.III series over its rival, the Albatros.
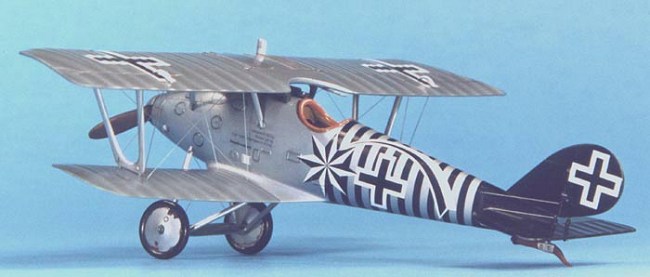
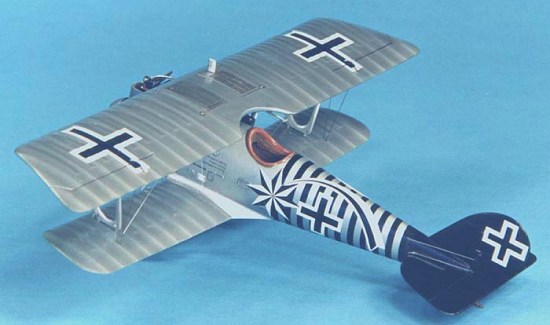
This kit from Eduard represents the last major variant of the D.III series, the D.IIIa. The aircraft modeled is that flown by VZFW Max von Holtzem from Jasta 16.
|
THE KIT |
The kit is Eduard’s Pfalz D.IIIa "Late Version" kit (8044). It consists of only injected molded plastic parts (46 parts) and decal options for two aircraft, Von Holtzem’s and Marwitz’s Jasta 30 aircraft. The plastic parts are high quality injected molded pieces that rivals Tamiya/Hasegawa in quality. A nice touch is the set of "Express Mask" to paint the orange scheme of Jasta 30. The instruction sheet is the usual eight page diagram assembly with marked color painting guidelines, and a cross reference to Tamiya, Humbrol, Revell, Testor, and Aeromaster paints.
|
CONSTRUCTION |
 The first job up was
to pre-paint all the parts as indicated in the instructions. Interior fuselage
walls were covered with Propagteam’s wood grain decal (yuck!) with the
stringer detail on the fuselage sidewalls painted Testor Model Master (TMM)
French Chestnut and given a light wash of burnt umber.
The first job up was
to pre-paint all the parts as indicated in the instructions. Interior fuselage
walls were covered with Propagteam’s wood grain decal (yuck!) with the
stringer detail on the fuselage sidewalls painted Testor Model Master (TMM)
French Chestnut and given a light wash of burnt umber.
Assembly of the fuselage components was accomplished using super-thin superglue. Assembly proceeded as described in the instructions, with no major problems. I especially like the instrument panel decal that even lets a poor painter like myself have a beautiful instrument panel; unfortunately the decal fell off later on! The engine was next as I painted it flat black and then drybrushed Metalizer Aluminum on the cylinder heads and crankcase cover and assembled the components as indicated. I wrapped the engine assembly in Parafilm and then glued it to the engine floor.
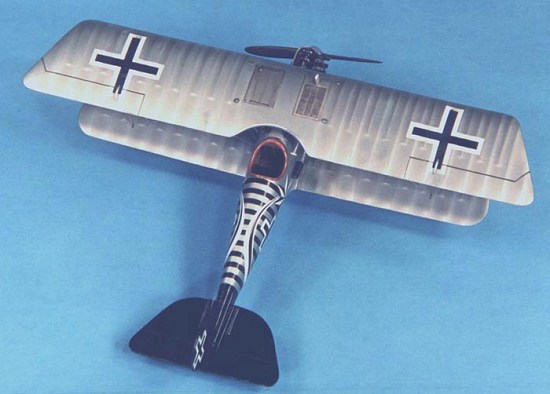
I then closed up the fuselage with liquid cement. Next, I glued with liquid cement the tail fin, horizontal stabilizer, and lower wing to the fuselage. Pictures of the Pfalz show that the wing root/fuselage seam was smoothly faired on the aircraft so a generous amount of putty was sculpted in and then sanded smooth. All joins were then sanded smooth, and no putty was required for gap filling. Then I drilled and dry-fitted all of the rigging, strut, and landing gear mounting holes to assist in final assembly as nothing is more frustrating as trying to get these pieces together with a fragile biplane. Next stop was the paint shop.
The model was painted, decaled, and weathered as described in the following subsections and then final assembly took place.
 Now it was time to
assemble the machine guns as shown in the instructions. I painted the machine
guns in Testor Metalizer Gun Metal and dry brushed with Floquil Gun Metal and
then superglued to the top of the fuselage. An important error in the
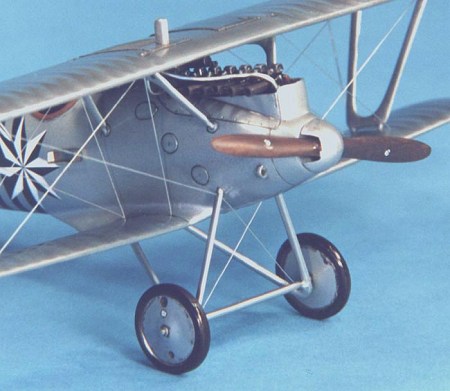
instructions is that Holtzem’s aircraft did not have the standard exhaust
collector, it had individual exhaust pipes. I fabricated some from styrene rod
and drilled out the ends, painted them Testor’s Metalizer Burnt Iron, and
installed them in place.
Now it was time to
assemble the machine guns as shown in the instructions. I painted the machine
guns in Testor Metalizer Gun Metal and dry brushed with Floquil Gun Metal and
then superglued to the top of the fuselage. An important error in the
instructions is that Holtzem’s aircraft did not have the standard exhaust
collector, it had individual exhaust pipes. I fabricated some from styrene rod
and drilled out the ends, painted them Testor’s Metalizer Burnt Iron, and
installed them in place.
I installed the interplane and cabane struts into place with superglue and calipers to set the correct distances and angles using the top wing as a guide. Here I made a critical mistake and mounted the interplane struts backwards! Mount them so that the longer, more sloped strut faces forward. Once I corrected this critical error, the top wing snapped into place with no problem. I used small rubber bands to help hold both wings in place and then checked alignment of the top to bottom wing. When all was to my liking, I superglued the struts to the wing.
Now on to the next challenge, installing the landing gear! Push the pinned legs of the landing gear into the fuselage and set the approximate width of the landing gear axle. Then place the axle into place on the legs and after carefully aligning everything glue it in place Lastly install the painted wheels into place on the axle with superglue, and the tailskid. Carefully install the propeller with superglue I had problems getting a good fit.
Install all the remaining pieces as indicated in the instructions and rig the model as indicated on the instruction sheet. For rigging wire I use fly fishing leader material that is .006 inches in diameter. It is easy to use, just paint it whatever color you like (I finally found a use for those Testors paint markers that I bought! Flat black is best for appearance, silver is the more realistic color but doesn’t show up well on pictures), is easy to pull taut (use a hemostat as that vital third hand to keep the wire taut), is easy to thread around/through stuff, and more importantly, you can trim it flush easily with a new XACTO blade. No more metal wire or stretched sprue for me!
|
PAINT & DECALS |
The paint scheme is very simple, the usual Pfalz "Silbergrau", with a black tail. I used a 50:50 mix of Floquil Old Silver and Gunmetal airbrushed on. After a short drying time, I masked the aft fuselage and airbrushed Testor flat black. The Floquil paints accept masking tape very well, and only small particles pulled off on the tape and did not mar the finish. After the paint scheme cured for a day, I shot a light coat of Future to prepare the surface for decaling.
 The decals supplied
with the kit are not the best. Super thin, super fragile, not very opaque, and
they stick like flypaper to the first thing they touch! I added a few drops of
liquid dishwashing soap to the decal water and that helped a great deal in
placing the decals. Still, bits of the decals tore and can be seen in the photos
as touch-up paint. If I did this again I would definitely get after-market
decals for this kit! After drying overnight, I wiped the decals off with a moist
cloth with Pollys Plastic Prep to remove any residue and after drying I shot a
very light coat of Future thinned with rubbing alcohol (50-50 mix) over the
decals to seal them.
The decals supplied
with the kit are not the best. Super thin, super fragile, not very opaque, and
they stick like flypaper to the first thing they touch! I added a few drops of
liquid dishwashing soap to the decal water and that helped a great deal in
placing the decals. Still, bits of the decals tore and can be seen in the photos
as touch-up paint. If I did this again I would definitely get after-market
decals for this kit! After drying overnight, I wiped the decals off with a moist
cloth with Pollys Plastic Prep to remove any residue and after drying I shot a
very light coat of Future thinned with rubbing alcohol (50-50 mix) over the
decals to seal them.
For weathering, I chose to accentuate the engraved panel lines and surface detail with a light black oil wash. Next, a light coat of Polly S Flat Finish was shot to provide a surface for pastels. I then used pastels, pastel pencils, and watercolor pencils to lightly highlight the ribs and detail on the wings/tail surfaces and fuselage. I use Derwent pastels and pencils and they are quite easy to use, just lightly draw on the surface to be highlighted and blend with artists blending stump. A very nice, subtle effect can be achieved with these pencils that is much easier for me than dry brushing Lastly, I applied a heavy burnt umber oil wash to the wheels and control surface joins.
I then finished final assembly of the models as described above. Lastly, I lightly touched up by hand painting with the appropriate colored paints all flaws and the areas that were covered in superglue including strut/rigging attachment points. Next was a technique I learned that helps hide minor flaws in a model finish caused by superglue and painting successive coats. It is very simple, just spray the entire model with several coats of a mix of equal parts Future, Tamiya Flat Base (X21), and rubbing alcohol. This will hide almost all minor flaws in the finish, but will not cover major flaws so it is not a substitute for poor modeling technique. Finally, several coats of Polly S Satin Finish was shot to achieve the semi-gloss finish common to most WWI aircraft.
|
CONCLUSIONS |
This is an excellent model of an important WW I aircraft. Overall the quality and accuracy are exceptional. The level of detail engraved in the kit is a great improvement over previous generation Eduard models, and no after-market sets are really needed for a beautiful build. I highly recommend this kit for all levels of builders including beginners. For those modelers that have built Eduard kits in the past and swore them off due to the poor fit and construction problems, this model will definitely change your opinion.
|
REFERENCES |
Albatros Productions LTD, Windsock Datafile #21, Pfalz D.IIIa, $15.00
If you would like your product reviewed fairly and quickly, pleasecontact the editor or see other details in the Note to Contributors.
Back to Reviews Page 2024